
Looking for a yarn?


Comments / Questions (44)
![]() Gemma wrote:
Gemma wrote:
I’m up to the end part of the skirt, this step: On next row, inc 14 sts evenly as follows: Work 1 dc in each of the first 12-8-4-14-8-16 dc, * then work 2 dc in next dc, 1 dc in each of the next 11-14-15-16-18-19 dc *, repeat from *-* the entire row = 194-218-242-266-288-310 dc. Doing M. I can’t get it to end at the end of a 14 dc and have the right amount of stitches, I have to add an extra 2dc in next stitch which makes my edge wonky. What could I be doing wrong and how can I fix this?
19.06.2025 - 14:02DROPS Design answered:
Dear Gemma, you are right, increase the last time in the last stitch before the end of the row so that you have increased a total of 14 sts. Happy crocheting!
20.06.2025 - 08:01
![]() Helle Hansen wrote:
Helle Hansen wrote:
Kan ikke finde videoen på kjolen, er der hvor der skal hækles knapkanten, men kan ikke ikke finde ud af hvad det er jeg skal gøre.
21.01.2025 - 15:04
![]() Ingrida wrote:
Ingrida wrote:
Is Round 10 for a XL sized skirt is correct? Why such a different No. of dc? Work 1 dc in each of the first 4-6-6-1-8-8 dc.... Thank fou for the reply.
26.02.2023 - 17:03DROPS Design answered:
Dear Ingrida, the pattern is correct. The number of dc may depend on the initial amount and may vary in order to adjust to the correct amount of dc for that. You should have 38 decreased stitches after the round, and the final number of stitches should match to having worked 1dc before starting with decreases. Happy crocheting!
26.02.2023 - 20:27
![]() Lovisa wrote:
Lovisa wrote:
Hej! Efter att ha virkat rutorna längst ned och sedan första varvet med stolpar ovanför dem, fortsätter man då i en spiral eller vänder man för varje varv så att varannat varv är rätsida och varannat avigsida?
23.05.2022 - 17:35DROPS Design answered:
Hej Lovisa, du virkar runt från mitt bak :)
25.05.2022 - 12:59
![]() Misha wrote:
Misha wrote:
Hello, Can you please clarify if I have to make buttonholes or I just have to sew both sides together with the buttons.
04.04.2022 - 15:17DROPS Design answered:
Dear Misha, you won't make buttonholes, you will sew buttons on one front piece and crochet buttons between 2 stitches through the other front piece. Happy crocheting!
04.04.2022 - 15:37
![]() Lone wrote:
Lone wrote:
Hej - jeg er ved at være oppe ved sidste indtagning (ved 43 cm i størrelse XXL). I flg tegningen skal den måle 55 cm, men min måler 75 cm... Jeg har nøjagtig fulgt hæklefastheden præcis. Blondekanten måler 90 cm, som den skal i følge tegningen... Er der en fejl mht startmålene eller taljemålene?
21.03.2019 - 14:34DROPS Design answered:
Hei Lone. Etter siste felling har du i XXL 260 staver. 6 av disse inngår i stolpene, altså det er 254 staver som utgjør midje-målet. Med en heklefasthet på 23 staver i bredden = 10 cm, blir dette 110 cm rundt hele og 55 cm tvers over. Har du kanskje for mange staver? God fornøyelse
26.03.2019 - 15:16
![]() Loredana wrote:
Loredana wrote:
J’ai réussi a la crocheter alors que c’est mon tout premier ouvrage en crochet,elle est juste magnifique! Merci Drops,vous me rendez heureuse et belle!
23.06.2014 - 12:04
![]() Orsetta wrote:
Orsetta wrote:
Bonjour, Avec la base composée de 22 carrés, j'arrive à une taille beaucoup trop large (13 cm de trop). Je souhaite recommencer sur une base de 14 carrés. Comment puis-je réajuster mes calculs pour dessiner la silhouette de la robe ? Puis-je me baser sur les diminutions indiquées pour la taille S par exemple ? Merci d'avance pour votre aide.
22.06.2014 - 14:23DROPS Design answered:
Bonjour Mme Orsetta, Ce modèle a été écrit sur la base d'un carré = 6x6 cm + 23 B x 13 rangs de B = 10 x 10 cm. Sur la base de votre échantillon et du schéma des mesures en bas de page, vous pouvez tout recalculer pour avoir l'ouvrage qui vous convient. Bon crochet!
23.06.2014 - 09:07
![]() Hluchaniuc Ileana wrote:
Hluchaniuc Ileana wrote:
Elle est ravissante! De 1 à 4 quel niveau de difficulté on peut attribuer à cette robe ? Merci
30.05.2014 - 14:21DROPS Design answered:
Bonjour Mme Hluchaniuc, pour vous aider à réaliser cette robe, vous trouverez différentes vidéos sous l'onglet "Vidéos", si nécessaire, n'hésitez pas à demander de l'aide à votre magasin DROPS ou sur le forum DROPS. Bon crochet!
03.06.2014 - 08:54
![]() Loredana wrote:
Loredana wrote:
Bonjour. Vous dites "crocheter 1 B derrière chacune des 6 premières B crochetées au début du tour (pour que les bordures devant se chevauchent) = 204-230-256-281-306-331 B " mais je ne suis pas sûre de la manière à faire. Comment crocheter derrière les brides? Merci
22.05.2014 - 14:17DROPS Design answered:
Bonjour Loredana, vous crochetez ces 6 brides dans les mêmes mailles du rang précédent où vous avez crocheté les 6 premières brides du début du rang. Bon crochet !
22.05.2014 - 15:58
|
|||||||||||||
Campanula#campanuladress |
|||||||||||||
 |
 |
||||||||||||
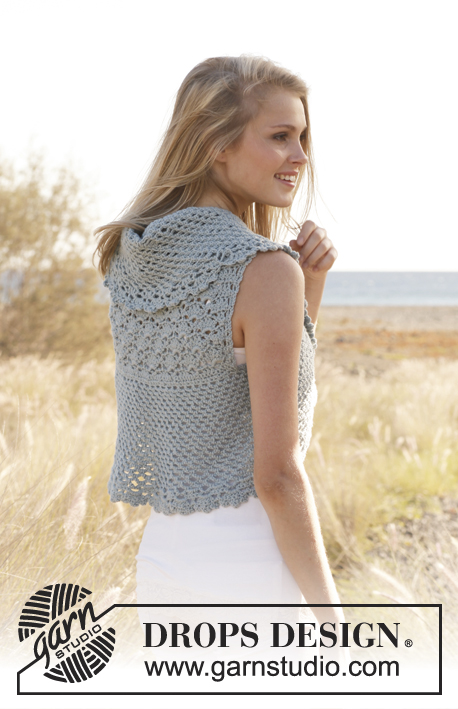
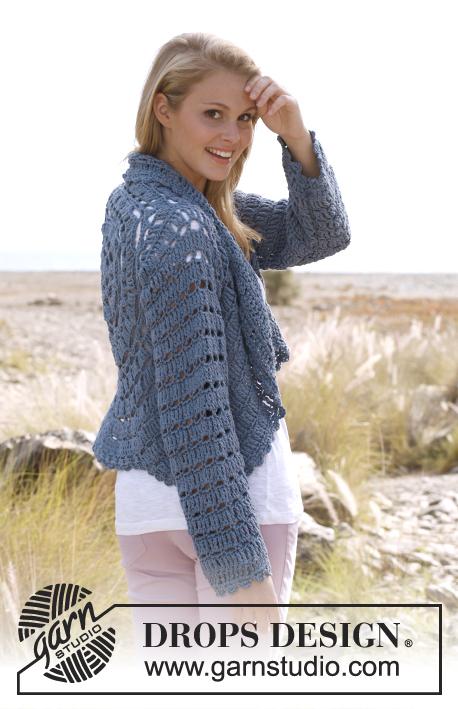
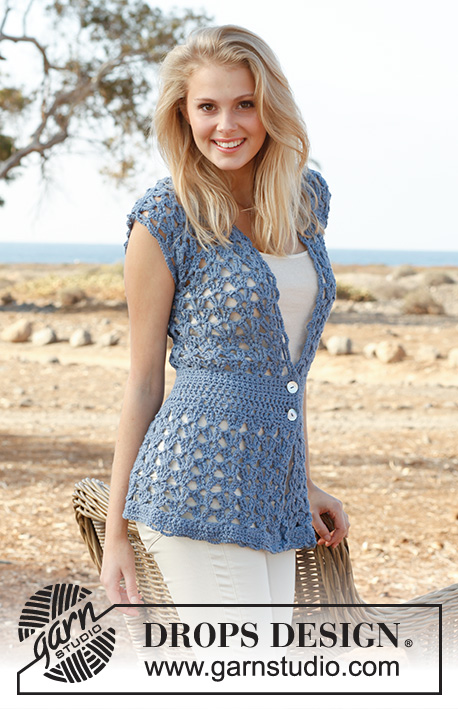
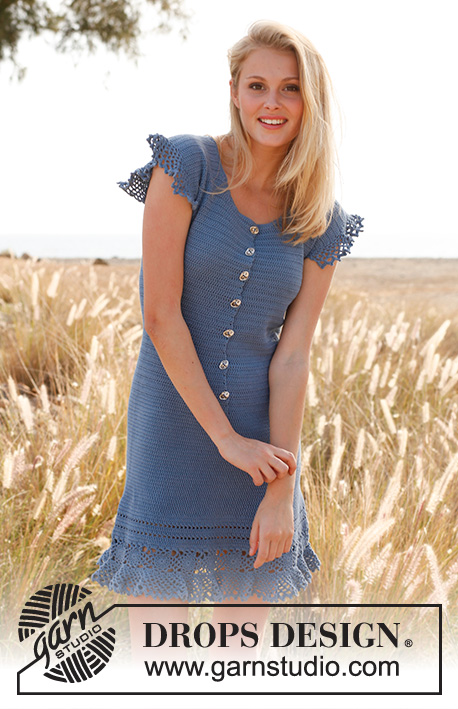
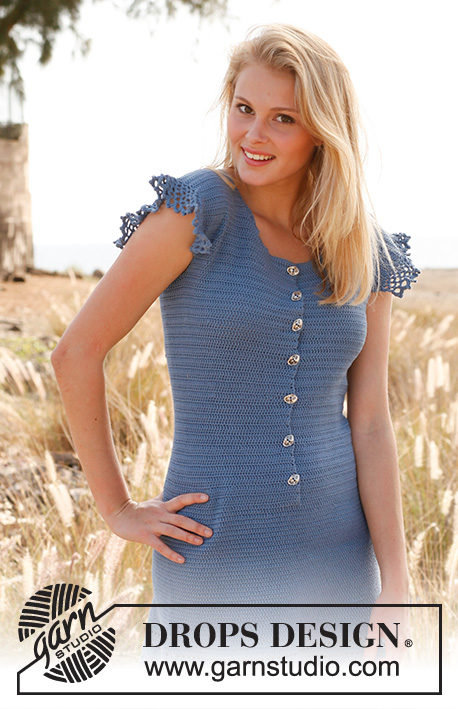
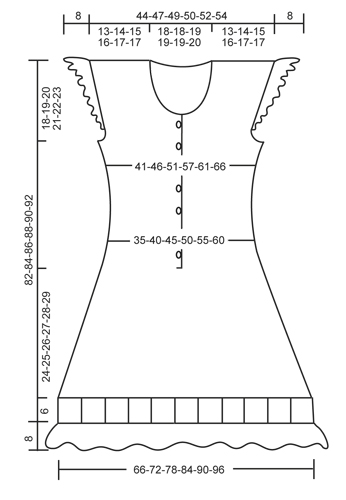
Crochet DROPS dress with buttons at the front and flounce in ”Safran”. Size S-XXXL
DROPS 145-9 |
|||||||||||||
|
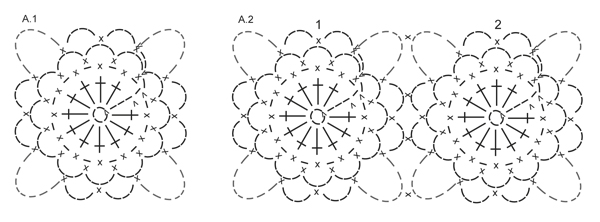
CROCHET INFO: Replace first tr on every round/row with 3 ch and finish every round with 1 sl st in 3rd ch from beg of round. CROCHET 2 TR TOG AS FOLLOWS: Work 1 tr in first tr on round below but wait with last pull through, work 1 tr in next tr on round below but on last pull through, pull thread through all 3 loops on hook. 1 tr has been dec. DECREASE TIP (applies to neck): Dec at beg of row as follows: Work sl sts over no of tr to be dec. Dec at end of row as follows: When no of tr to be dec remains, turn. -------------------------------------------------------- DRESS: First work the squares – they are gradually worked tog. Then work along one side of squares and up the skirt and then the top. Finally work flounce along the other side of squares and down, and ruffles around armholes. SQUARE 1: Also see diagram A.1. Crochet 4 ch on hook size 3 mm with Safran and form a ring with 1 sl st in first ch. ROUND 1: 3 ch (= 1 tr), work 11 tr in ch-ring, finish with 1 sl st in 3rd ch from beg of round. ROUND 2: Work 2 ch, 1 dc in next tr, 1 ch * 1 dc in next tr, 1 ch *, repeat from *-* the entire round and finish with 1 sl st in first ch from beg of round. ROUND 3: 1 ch, 1 dc in 2nd ch from previous round, * 4 ch, 1 dc in next ch from previous round *, repeat from *-*, finish with 1 sl st in first dc from beg of round = 12 ch-loops. ROUND 4: 2 ch, 1 dc in first ch-loop, * 4 ch, 1 dc in next ch-loop, 4 ch, 1 dc in next ch-loop, 8 ch (= corner), 1 dc in next ch-loop *, repeat from *-* the entire round, but finish with 1 sl st in first dc from beg of round (instead of 1 dc in next ch-loop). Cut the thread. SQUARE 2: Work as SQUARE 1 from 1st to 3rd round. ROUND 4: Also see diagram A.1. Work as follows: 2 ch, 1 dc in first ch-loop, 4 ch, 1 dc in next ch-loop, 4 ch, 1 dc in next ch-loop, 4 ch, place the square WS against WS with SQUARE 1, work 1 dc in one of the large ch-loops on SQUARE 1 (= corner), 4 ch, 1 dc in next ch-loop on SQUARE 2, * 2 ch, 1 dc in next small ch-loop on SQUARE 1, 2 ch, 1 dc in next ch-loop on SQUARE 2 *, repeat from *-* 1 more time, 4 ch, 1 dc in next large ch-loop on SQUARE 1 (= corner), 4 ch, 1 dc in next ch-loop on SQUARE 2. Then work around SQUARE 2 as follows: ** 4 ch, 1 dc in next ch-loop, 4 ch, 1 dc in next ch-loop, 8 ch, 1 dc in next ch-loop **, repeat from **-** 1 more time but finish with 1 sl st in first dc from beg of round. Cut the thread. Then work SQUARE 2 until a total of 22-24-26-28-30-32 squares have been worked. The last square is worked tog with both the next to last and the first square so that the squares form a circle. SKIRT: READ CROCHET INFO! Work with Safran on hook size 3 mm along one long side of the squares as follows: ROUND 1: 4 tr in each of the large ch-loops in the corners on the squares and 3 tr in each of the small ch-loops = 14 tr per square and 308-336-364-392-420-448 tr in total. Insert a marker at beg of round = mid back. ROUND 2: Work * 1 tr in each of the first 5 tr, then work 2 tr tog - see explanation above - *, repeat from *-* the entire round = 264-288-312-336-360-384 tr. ROUND 3: Work 1 tr in every tr. REMEMBER THE CROCHET TENSION! ROUND 4: 4 ch, skip first tr, * 1 tr in next tr, 1 ch, skip 1 tr *, repeat from *-* the entire round, finish with 1 sl st in 3rd ch from beg of round. ROUND 5: Work 1 tr in every tr and 1 tr in every ch = 264-288-312-336-360-384 tr. ROUND 6: Work 1 tr in every tr. ROUND 7: Work as 4th round. ROUND 8: Work as 5th round. ROUND 9: Work 1 tr in every tr. ROUND 10: Work 1 tr in each of the first 4-6-6-1-8-8 tr, then work 2 tr tog, * 1 tr in each of the next 4-5-6-7-8-9 tr, then work 2 tr tog *, repeat from *-* the entire round = 220-247-273-298-324-349 tr. Piece now measures approx. 14 cm incl crochet squares. Continue in the round with 1 tr in every tr. When piece measures 29-30-31-32-33-34 cm, work next round as follows: 1 tr in each of the first 8-3-7-10-0-2 tr, then work 2 tr tog, * 1 tr in each of the next 8-9-10-11-12-13 tr, then work 2 tr tog *, repeat from *-* the entire round = 198-224-250-275-300-325 tr. Work 1 more round with 1 tr in every tr, cut the thread. Now beg working back and forth from mid front to make openings for buttons. Count 99-112-125-138-150-163 tr from mid back and insert 1 marker (= mid front). Count 3 tr to the right of marker (when piece is in front of you), beg to work here with 1 sl st and 3 ch, then work 1 tr in every tr around the entire dress until beg of round, do not finish round with 1 sl st but work 1 tr at the back of each of the first 6 tr worked (to make overlap for bands) = 204-230-256-281-306-331 tr. Turn and continue back and forth with 1 tr in every tr. AT THE SAME TIME when piece measures 34-35-36-37-38-39 cm, dec 22-23-23-23-23-24 tr evenly as follows: Work 1 tr in each of the first 6-4-6-7-9-3 tr, then work 2 tr tog, * work 1 tr in each of the next 7-8-9-10-11-12 tr, then work 2 tr tog *, repeat from *-* until 7-4-6-8-9-4 tr remain, work 1 tr in each of these = 182-207-233-258-283-307 tr. Continue with 1 tr in every tr. When piece measures 39-40-41-42-43-44 cm, dec 16-17-19-20-23-25 tr evenly as follows: Work 1 tr in each of the first 7-6-7-14-8-8 tr, then work 2 tr tog, * work 1 tr in each of the next 9-10-10-10-10-10 tr, then work 2 tr tog *, repeat from *-* until 8-7-8-14-9-9 tr remain, work 1 tr in each of these = 166-190-214-238-260-282 tr. Continue to work 1 tr in every tr until piece measures 46-47-48-49-50-51 cm. On next row, inc 14 sts evenly as follows: Work 1 tr in each of the first 12-8-4-14-8-16 tr, * then work 2 tr in next tr, 1 tr in each of the next 10-12-14-15-17-18 tr *, repeat from *-* the entire row = 180-204-228-252-274-296 tr. Continue to work 1 tr in every tr until piece measures 56-57-58-59-60-61 cm. On next row, inc 14 sts evenly as follows: Work 1 tr in each of the first 12-8-4-14-8-16 tr, * then work 2 tr in next tr, 1 tr in each of the next 11-14-15-16-18-19 tr *, repeat from *-* the entire row = 194-218-242-266-288-310 tr. Continue with 1 tr in every tr until piece measures 64-65-66-67-68-69 cm. Armholes beg now and front and back pieces are finished separately. FIRST FRONT PIECE: SIZE S: Work tr back and forth over the first 47 tr. AT THE SAME TIME on 3rd row inc 1 tr towards the armhole by working 2 tr in next to last tr (= broad shoulder). Repeat inc on every row 6 more times. AT THE SAME TIME when piece measures 70 cm, beg neck dec as follows: Work until 14 tr remain towards mid front, turn piece. Then dec on every row as follows: 3 tr 1 time, 2 tr 2 times and 1 tr 3 times – SEE DECREASE TIP! After all inc for shoulder and dec for neck, there are 30 tr on row. Continue to work until piece measures 18 cm from where armhole beg, i.e. piece measures approx. 82 cm in total, cut the thread. SIZE M: Work tr back and forth over the first 52 tr. AT THE SAME TIME on 3rd row inc 1 tr towards the armhole by working 2 tr in next to last tr (= broad shoulder). Repeat inc every other row 4 more times. AT THE SAME TIME when piece measures 71 cm, beg neck dec as follows: Work until 14 tr remain towards mid front, turn piece. Then dec on every row as follows: 3 tr 1 time, 2 tr 2 times and 1 tr 3 times – SEE DECREASE TIP! After all inc for shoulder and dec for neck, there are 33 tr on row. Continue to work until piece measures 19 cm from where armhole beg, i.e. piece measures approx. 84 cm in total, cut the thread. SIZE L: Work tr back and forth over the first 57 tr. AT THE SAME TIME on 4th row inc 1 tr towards the armhole by working 2 tr in next to last tr (= broad shoulder). Repeat inc on 8th row (= 2 inc in total). AT THE SAME TIME when piece measures 72 cm, beg neck dec as follows: Work until 15 tr remain towards mid front, turn piece. Then dec on every row as follows: 3 tr 1 time, 2 tr 2 times and 1 tr 3 times – SEE DECREASE TIP! After all inc for shoulder and dec for neck, there are 34 tr on row. Continue to work until piece measures 20 cm from where armhole beg, i.e. piece measures approx. 86 cm in total, cut the thread. SIZE XL: Work tr back and forth over the first 62 tr. AT THE SAME TIME on 2nd row dec 1 tr towards the armhole by working the last 2 tr tog = 61 tr. When piece measures 73 cm, beg neck dec as follows: Work until 15 tr remain towards mid front, turn piece. Then dec on every row as follows: 3 tr 1 time, 2 tr 2 times and 1 tr 3 times – SEE DECREASE TIP! After all dec there are 36 tr on row. Continue to work until piece measures 21 cm from where armhole beg, i.e. piece measures approx. 88 cm in total, cut the thread. SIZE XXL: Work tr back and forth over the first 67 tr. AT THE SAME TIME on 2nd row dec 1 tr towards the armhole by working the last 2 tr tog, repeat dec on every row 2 more times = 64 tr. When piece measures 74 cm, beg neck dec as follows: Work until 16 tr remain towards mid front, turn piece. Then dec on every row as follows: 3 tr 1 time, 2 tr 2 times and 1 tr 3 times – SEE DECREASE TIP! After all dec there are 38 tr on row. Continue to work until piece measures 22 cm from where armhole beg, i.e. piece measures approx. 90 cm in total, cut the thread. SIZE XXXL: Work tr back and forth over the first 71 tr. AT THE SAME TIME on 2nd row dec 1 tr towards the armhole by working the last 2 tr tog, repeat dec on every row 5 more times. AT THE SAME TIME when piece measures 76 cm, beg neck dec as follows: Work until 16 tr remain towards mid front, turn piece. Then dec on every row as follows: 3 tr 1 time, 2 tr 2 times and 1 tr 3 times – SEE DECREASE TIP! After all dec there are 39 tr on row. Continue to work until piece measures 23 cm from where armhole beg, i.e. piece measures approx. 92 cm in total, cut the thread. OTHER FRONT PIECE: Work as first front piece but reversed. BACK PIECE: Work tr back and forth over the middle 88-98-108-118-126-136 tr (6-8-10-12-14-16 tr in each side = armhole). Inc (in the 3 smallest sizes) / dec (in the 3 largest sizes) in each side at the armholes as on front piece. After all inc/dec are done there are 102-108-112-116-120-124 tr on row. When armhole measures 16-17-18-19-20-21 cm vertically, work for another 2 cm only over 30-33-34-36-38-39 tr in each side (the middle 42-42-44-44-44-46 tr = neck), cut the thread. The whole piece measures approx. 82-84-86-88-90-92 cm. ASSEMBLY: Sew shoulder seams edge to edge to avoid a chunky seam. Work 2 rows with dc around the neck (work first row from WS) – make sure to avoid a tight edge and a wide neckline. FLOUNCE AT THE BOTTOM: Work along the other side of squares at the bottom of skirt as follows - beg mid back: ROUND 1: 4 tr in each of the large ch-loops in the corners on the squares and 3 tr in each of the small ch-loops = 14 tr per square and 308-336-364-392-420-448 tr in total. ROUND 2: 4 ch, skip 1 tr, * 1 dc in next tr, 3 ch, skip 1 tr *, repeat from *-* the entire round, finish with 1 sl st in first ch from beg of round = 154-168-182-196-210-224 ch-loops. ROUND 3: 2 ch, 1 dc at the top of first ch-loop from previous round, * 4 ch, 1 dc in next ch-loop *, repeat from *-* the entire round, finish with 1 sl st in first dc from beg of round. ROUND 4: 2 ch, 1 dc at the top of first ch-loop from previous round, * 5 ch, 1 dc in next ch-loop *, repeat from *-* the entire round, finish with 1 sl st in first dc from beg of round. ROUND 5: Work as 4th round. ROUND 6: * 6 ch, 1 dc in next ch-loop *, repeat from *-* the entire round, finish with 1 sl st in first dc from beg of round. ROUND 7: Work as 6th round. ROUND 8: * 7 ch, 1 dc in next ch-loop *, repeat from *-* the entire round, finish with 1 sl st in first dc from beg of round. ROUND 9: Crochet as follows in every ch-loop: 3 dc, 1 picot (= 3 ch, 1 dc in first ch) and 3 dc. Finish with 1 sl st in first dc from beg of round, cut and fasten the thread. RUFFLE AT THE ARMHOLES: Beg at the end of 4th row, counted from where armhole beg. ROW 1: Work 1 dc in outermost st, * then work 3 ch, skip approx. 1 cm, 1 dc in next st *, repeat from *-* until 4th row on the other side, turn piece. ROW 2: 2 ch, 1 dc at the top of first ch-loop, * 4 ch, 1 dc in next ch-loop *, repeat from *-* the entire row, turn piece. ROW 3: 2 ch, 1 dc at the top of first ch-loop, * 5 ch, 1 dc in next ch-loop *, repeat from *-* the entire row (do not work in the 2 ch from beg of row), turn piece. ROW 4: 3 ch, 1 dc at the top of first ch-loop on previous row, * 6 ch, 1 dc in next ch-loop *, repeat from *-* the entire row (do not work the 2 ch from beg of row), turn piece. ROW 5: 3 ch, 1 dc at the top of first ch-loop on previous row, * 6 ch, 1 dc in next ch-loop *, repeat from *-* the entire row (do not work the 3 ch from beg of row), turn piece. ROW 6: 4 ch, 1 dc at the top of first ch-loop on previous row, * 7 ch, 1 dc in next ch-loop *, repeat from *-* the entire row (do not work the 3 ch from beg of row), turn piece. ROW 7: Work as follows in every ch-loop: 3 dc, 1 picot (= 3 ch, 1 dc in first ch) and 3 dc. Cut and fasten the thread. Work the same way at the bottom of the other sleeve. Sew buttons on left band – top button should be 1 cm from the top, then evenly spaced downwards, button through sts. |
|||||||||||||
Diagram explanations |
|||||||||||||
|
|||||||||||||
 |
|||||||||||||
 |
|||||||||||||
Have you finished this pattern?Tag your pictures with #dropspattern #campanuladress or submit them to the #dropsfan gallery. Do you need help with this pattern?You'll find 7 tutorial videos, a Comments/Questions area and more by visiting the pattern on garnstudio.com. © 1982-2025 DROPS Design A/S. We reserve all rights. This document, including all its sub-sections, has copyrights. Read more about what you can do with our patterns at the bottom of each pattern on our site. |
|||||||||||||


With over 40 years in knitting and crochet design, DROPS Design offers one of the most extensive collections of free patterns on the internet - translated to 17 languages. As of today we count 320 catalogues and 12092 patterns translated into English (UK/cm). 12092
We work hard to bring you the best knitting and crochet have to offer, inspiration and advice as well as great quality yarns at incredible prices! Would you like to use our patterns for other than personal use? You can read what you are allowed to do in the Copyright text at the bottom of all our patterns. Happy crafting!
Post a comment to pattern DROPS 145-9
We would love to hear what you have to say about this pattern!
If you want to leave a question, please make sure you select the correct category in the form below, to speed up the answering process. Required fields are marked *.