
Looking for a yarn?


Comments / Questions (25)
![]() DOMINIQUE AMBROSET wrote:
DOMINIQUE AMBROSET wrote:
Bonjour Quand je fais mon rang en laissant les 16 mailles je tricote mon rang en jersey envers puis ensuite mes 16 mailles dont 2 mailles ensemble à l'endroit et 1 maille à l'endroit
29.04.2025 - 13:57DROPS Design answered:
Bonjour Mme Ambroset, pour le devant gauche, la bordure devant se trouve à gauche, vu sur l'endroit; comme les diminutions de l'encolure se font sur l'endroit, vous allez tricoter le devant gauche ainsi, sur l'endroit; 1 m lis au point mousse, puis à l'endroit jusqu'à ce qu'il reste 16 m (les 13 m de bordure devant + 1 m endroit + les 2 m à diminuer), vous tricotez 2 m ens à l'endroit et les 14 dernières mailles comme avant = vous avez diminué le nombre de mailles jersey. J'espère avoir réussi à vous aider. Bon tricot!
29.04.2025 - 16:31
![]() Dominique AMBROSET wrote:
Dominique AMBROSET wrote:
Bonjour Je suis d accord mais quand je fais le devant gauche je commence a l envers puisque je tricote d abord les mailles du devant afin qu'il me reste les 16 mailles donc je ne peux pas les tricoter a l endroit
29.04.2025 - 08:49DROPS Design answered:
Bonjour Mme Ambroset, pourquoi commencez-vous à l'envers? Les diminutions de l'encolure se font sur l'endroit, donc pour le devant gauche lorsqu'il reste 16 mailles (avant les 14 m de la fin du rang), pour pouvoir diminuer à 14 m du bord, comme pour le devant droit (où vous avez diminué après les 14 premières mailles). Ou bien je ne saisis pas bien ce que vous voulez dire?
29.04.2025 - 13:34
![]() Dominique AMBROSET wrote:
Dominique AMBROSET wrote:
Bonjour Pour le devant gauche est ce normal que l on fasse les diminutions de l encolure 2 mailles endroit et 1 maille endroit alors que l on tricote sur l' envers puisqu il faut qu il me reste 16 mailles
28.04.2025 - 17:43DROPS Design answered:
Bonjour Mme Ambroset, les diminutions de l'encolure se font (sur l'endroit) pour les 2 devants à 14 m du bord: pour le devant droit, après 13 m de bordure devant + 1 m end et pour le devant gauche avant ces 13 m de bordure devant + 1 m end soit lorsqu'il reste 16 m, vous tricotez 2 m ens à l'end, puis vous tricotez les 14 dernières mailles comme avant. Bon tricot!
29.04.2025 - 08:31
![]() Heidi wrote:
Heidi wrote:
Als ik geen knopen en knoopsgaten wil, kan ik dan de biezen gewoon breien zonder de minderingen? Of moet ik minder steken opzetten voor geen overslag te hebben?
16.06.2024 - 00:32DROPS Design answered:
Dag Heidi,
Er zit een overslag in verwerkt voor de knoopsluiting. Je zou minder steken op kunnen zetten, maar je kunt hem ook gewoon zo breien, dus zonder knoopsgaten te maken. Waarschijnlijk merk je bij het dragen nauwelijks verschil met de overslag.
16.06.2024 - 19:10
![]() Gunvor wrote:
Gunvor wrote:
Det skulle vara jättebra om ni kunde ange de färdiga måtten på kläderna. Åtminstone bystmått
24.04.2024 - 13:37
![]() Veerle wrote:
Veerle wrote:
Beste, de panden worden van onder naar boven gebreid en de mouwen van boven naar onder? Dit geeft toch een ander beeld van het stekenpatroon ? Is dit de bedoeling ?Veerle
17.04.2024 - 14:45DROPS Design answered:
Dag Veerle,
Nee hoor, je kunt gewoon tricotsteek van boven naar onder breien, dat ziet er hetzelfde uit als wanneer je tricotsteek van onder naar boven breit.
17.04.2024 - 21:49
![]() Veerle wrote:
Veerle wrote:
Beste, de panden worden van onder naar boven gebreid en de mouwen van boven naar onder? Dit geeft toch een ander beeld van het stekenpatroon ? Is dit de bedoeling ? Veerle
31.03.2024 - 16:50
![]() Kitter wrote:
Kitter wrote:
DROPS Design answered: Hej, Du strikker masker op der fra hvor du lukkede masker af til ærmegab og strikker frem og tilbage de første 1-1-2-4-5-6 cm (alt efter hvilken størrelse du strikker) :) spørgsmål: Vil det så sige at de 6 masker jeg lukkede af til ærmegab skal være med i de masker jeg strikker op❓(undskyld at jeg åbenbart både skal have det skåret ud i pap og ind med skeer)
16.01.2024 - 15:47DROPS Design answered:
Hej Kitter, nej, de 6 masker du lukkede af til ærmegab, skal du ikke strikke op i, dem syr du de første cm af ærmet fast i bagefter :)
17.01.2024 - 13:12
![]() Kitter wrote:
Kitter wrote:
Når jeg tager masker op til ærmer, skal jeg så tage op helt ude fra aflukningen til ærmegab, eller skal det være indenfor❓
15.01.2024 - 14:31DROPS Design answered:
Hej, Du strikker masker op der fra hvor du lukkede masker af til ærmegab og strikker frem og tilbage de første 1-1-2-4-5-6 cm (alt efter hvilken størrelse du strikker) :)
16.01.2024 - 14:27
![]() Marjorie wrote:
Marjorie wrote:
How do i convert patern from circular knitting needles to straight one's
02.09.2023 - 08:43DROPS Design answered:
Dear Marjorie, you can read here how to adapt a pattern for straight needles: https://www.garnstudio.com/lesson.php?id=13&cid=19. Happy knitting!
03.09.2023 - 20:15
|
||||
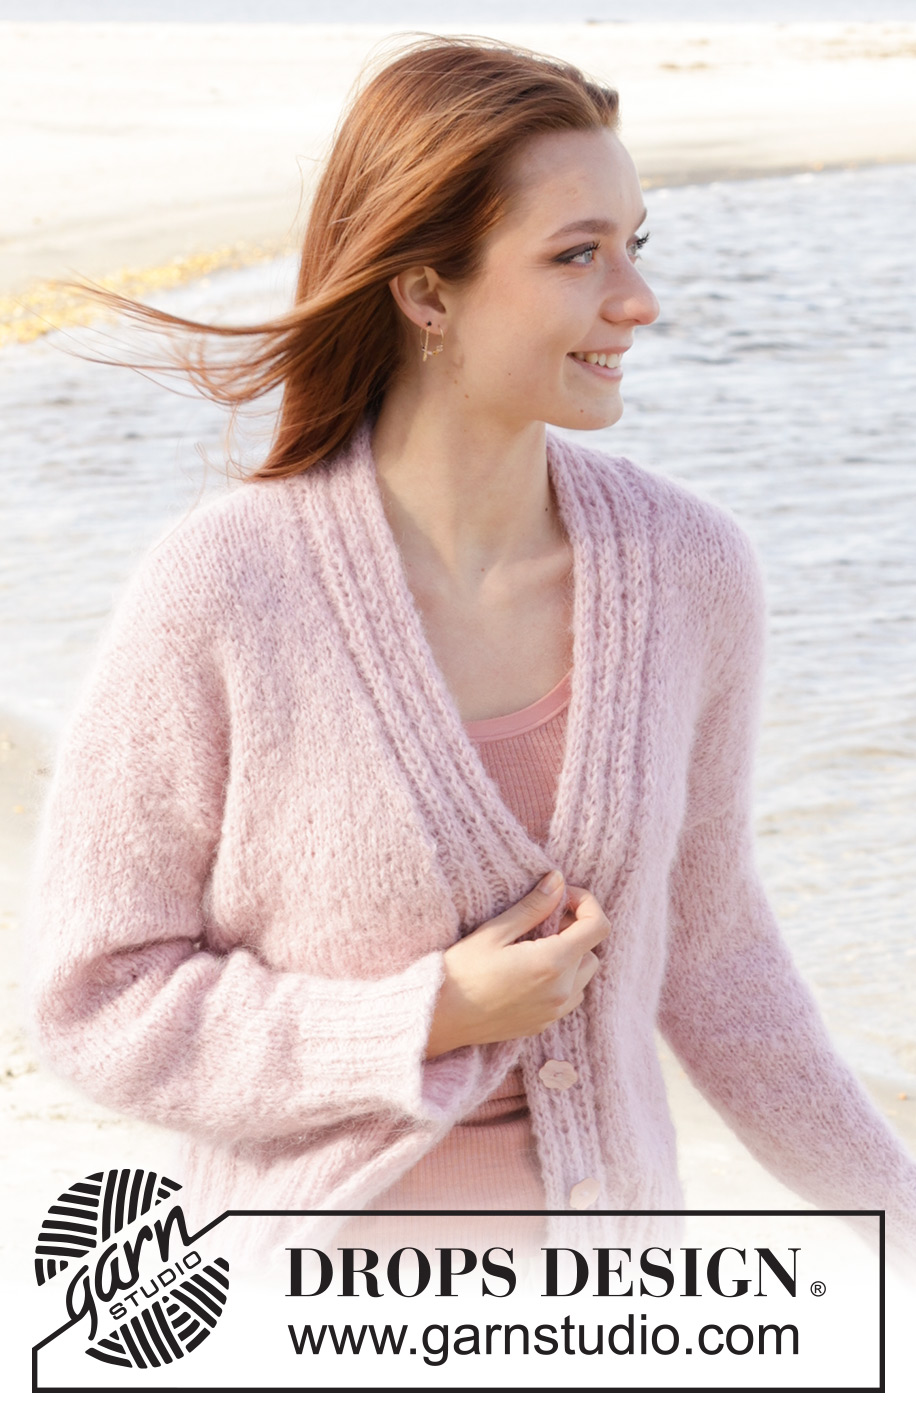
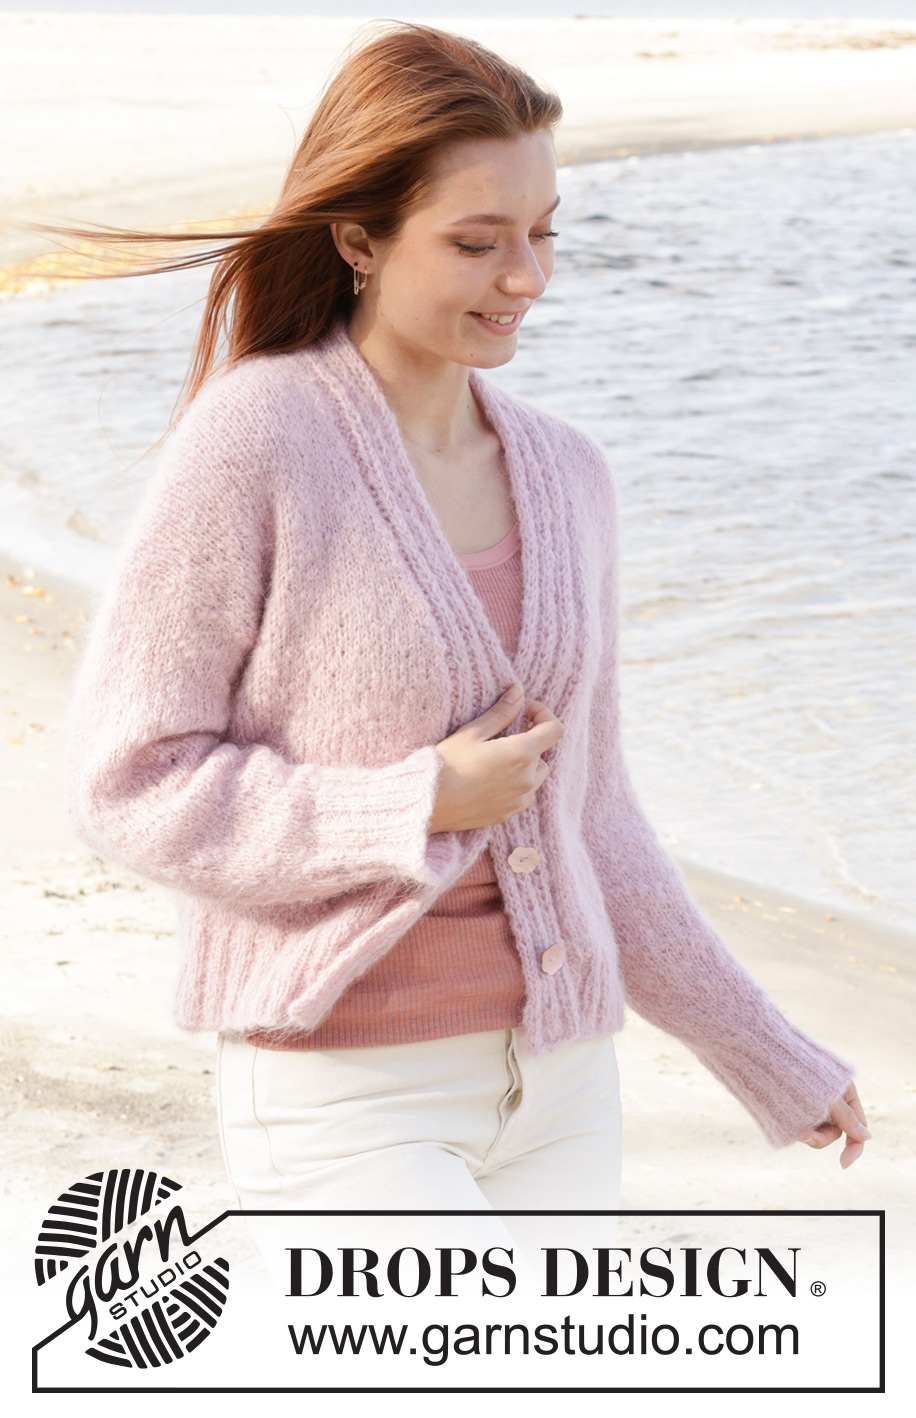
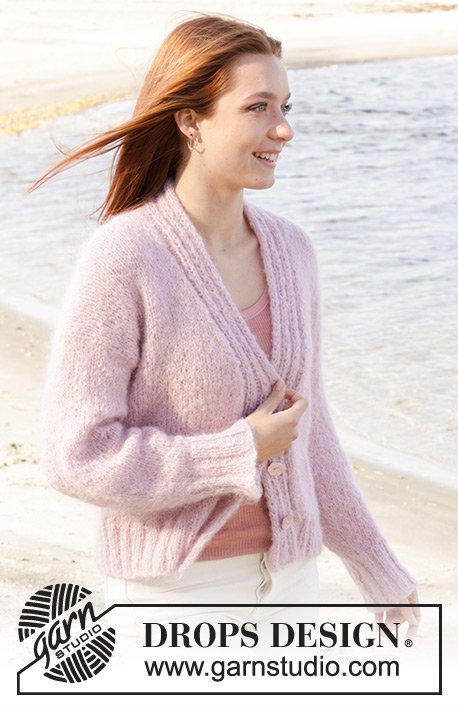
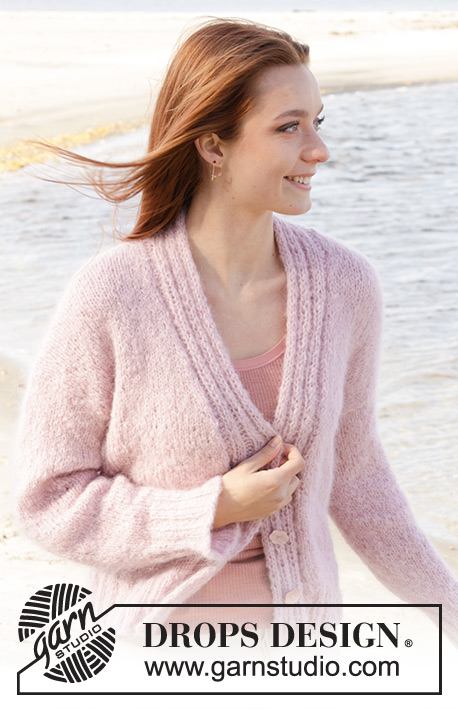
Climbing Rose Cardigan#climbingrosecardigan |
||||
 |
 |
|||
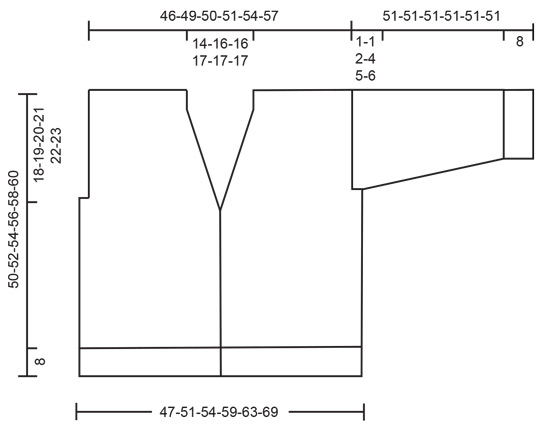
Knitted jacket in DROPS Melody. Piece is knitted bottom up with stocking stitch and V-neck. Size XS – XXL.
DROPS 240-6 |
||||
|
---------------------------------------------------------- EXPLANATION FOR THE PATTERN: ---------------------------------------------------------- GARTER STITCH (back and forth): Knit all rows. 1 ridge vertically = knit 2 rows. BUTTONHOLES (bottom up): Decrease for buttonholes on right band, starting from the right side as follows: Knit sixth and seventh stitch from edge together and make 1 yarn over. On next row from the wrong side, purl yarn over to make hole. Decrease for buttonholes when piece measures: XS: 8, 16 and 24 cm S: 8, 16 and 25 cm M: 8, 17 and 26 cm L: 7, 14, 21 and 28 cm XL: 7, 14, 21 and 28 cm XXL: 7, 15, 23 and 30 cm DECREASE TIP (applies to V-neck): All decreases are done from the right side. RIGHT FRONT PIECE: Work 13 band stitches, knit 1, slip 1 stitch knitwise, knit 1, and pass slipped stitch over stitch worked. LEFT FRONT PIECE: Work until 16 stitches remain, knit 2 together, knit 1 and work 13 band stitches as before. DECREASE TIP-2 (applies to mid under sleeves): Decrease 1 stitch on each side of marker thread as follows: Work until 3 stitches remain before marker thread and knit 2 together, knit 2 (marker thread is between these 2 stitches), slip 1 stitch knitwise, knit 1, pass slipped stitch over stitch worked. ------------------------------------------------------- START THE PIECE HERE: ------------------------------------------------------- JACKET - SHORT OVERVIEW OF THE PIECE: Worked back and forth, bottom up and sewn together when finished. Pick up stitches around each armhole. First work the sleeves back and forth on circular needle and then in the round on double pointed needles / short circular needle. BACK PIECE: Cast on 80-88-92-100-108-120 stitches on circular needle size 5 mm with DROPS Melody. Purl 1 row from wrong side. Then work back and forth in rib as follows: 1 stitch in GARTER STITCH - read explanation above, * purl 2, knit 2 *, repeat from *-* until 3 stitches remain, purl 2 and 1 stitch in garter stitch. Continue like this until rib measures 8 cm. Switch to circular needle size 6 mm. Knit 1 row from right side while decreasing 12-14-14-16-18-22 stitches evenly = 68-74-78-84-90-98 stitches. Then work in stocking stitch with 1 stitch in garter stitch in each side. REMEMBER THE KNITTING TENSION! When piece measures 32-33-34-35-36-37 cm, cast off 2-3-4-6-7-9 stitches for armholes at the beginning of the next 2 rows = 64-68-70-72-76-80 stitches. Continue in stocking stitch. When piece measures 47-49-51-53-55-57 cm, cast off the middle 12-14-14-16-16-16 stitches for neck and finish each shoulder separately. Continue as before and cast off stitches for neck at the beginning of every row from neck as follows: Cast off 2 stitches 1 time and 1 stitch 2 times = 22-23-24-24-26-28 stitches remain on shoulder. Work until piece measures 50-52-54-56-58-60 cm. Cast off knitting from right side. Work the other shoulder the same way. RIGHT FRONT PIECE: Cast on 52-56-60-64-68-72 stitches on circular needle size 5 mm with DROPS Melody. Purl 1 row from wrong side. Then work rib as follows from right side and mid front: 1 stitch in garter stitch, * knit 2, purl 2 *, work from *-* until 3 stitches remain, knit 2 and 1 stitch in garter stitch. Continue like this until rib measures 8 cm, AT THE SAME TIME decrease for BUTTONHOLES - see explanation above. Switch to circular needle size 6 mm. Then work as follows from right side: 1 stitch in garter stitch, (knit 2, purl 2) over the next 12 stitches, knit the next 38-42-46-50-54-58 stitches while AT THE SAME TIME decreasing 5-6-8-9-10-10 stitches evenly over these stitches, 1 stitch in garter stitch = 47-50-52-55-58-62 stitches. Continue with 1 stitch in garter stitch, (knit 2/purl 2) over the 12 band stitches, stocking stitch and 1 stitch in garter stitch in the side - remember BUTTONHOLES. When piece measures 26-27-28-29-30-31 cm begin decrease for V-neck. AT THE SAME TIME as decrease for V-neck, cast off for armholes, read the following section before continuing. V-NECK: Decrease for V-neck every 2 cm 10-11-11-12-12-12 times in total - read DECREASE TIP. ARMHOLES: At the same time when piece measures 32-33-34-35-36-37 cm, cast off 2-3-4-6-7-9 stitches for armhole at the beginning of next row from wrong side. After all decreases for V-neck and armhole, 35-36-37-37-39-41 stitches remain on needle. Continue with band stitches and stocking stitch with 1 stitch in garter stitch towards the side until piece measures 50-52-54-56-58-60 cm. On next row from wrong side cast off the first 22-23-24-24-26-28 stitches for shoulder and work over band as before for approx. 8-9-9-10-10-10 cm. Cast off. LEFT FRONT PIECE: Cast on 52-56-60-64-68-72 stitches on circular needle size 5 mm with DROPS Melody. Purl 1 row from wrong side. Then work rib as follows from right side and the side: 1 stitch in garter stitch, * knit 2, purl 2 *, work from *-* until 3 stitches remain, knit 2 and 1 stitch in garter stitch. Continue like this until rib measures 8 cm. Switch to circular needle size 6 mm. Then work as follows from right side: 1 stitch in garter stitch, knit the next 38-42-46-50-54-58 stitches while AT THE SAME TIME decreasing 5-6-8-9-10-10 stitches evenly over these stitches, work (purl 2/knit 2) over the next 12 stitches, 1 stitch in garter stitch = 47-50-52-55-58-62 stitches. Continue with 1 stitch in garter stitch, stocking stitch and (knit 2/purl 2) over the 12 band stitches, and 1 stitch in garter stitch. When piece measures 26-27-28-29-30-31 cm begin decrease for V-neck. AT THE SAME TIME as decrease for V-neck, cast off for armholes, read the following section before continuing. V-NECK: Decrease for V-neck every 2 cm 10-11-11-12-12-12 times in total - read DECREASE TIP. ARMHOLES: At the same time when piece measures 32-33-34-35-36-37 cm, cast off 2-3-4-6-7-9 stitches for armhole at the beginning of next row from right side. After all decreases for V-neck and armhole, 35-36-37-37-39-41 stitches remain on needle. Continue with band stitches and stocking stitch with 1 stitch in garter stitch towards the side until piece measures 50-52-54-56-58-60 cm. On next row from right side cast off the first 22-23-24-24-26-28 stitches for shoulder and work over band as before for approx. 8-9-9-10-10-10 cm. Cast off. ASSEMBLY: Sew shoulder seams to get a flat and nice seam. SLEEVES: Use circular needle size 6 mm and DROPS Melody. Pick up from right side 50-53-56-59-62-64 stitches - begin from the bottom of armhole. Insert 1 marker in the middle of row – measure sleeve from this marker. Work in stocking stitch back and forth until sleeve measures 1-1-2-4-5-6 cm from marker. Now put piece together on a short circular needle or double pointed needles size 6 mm - work the rest of sleeve in the round. Insert 1 marker thread at the beginning of round (mid under sleeve). Move marker thread upwards when working. Begin round at the marker thread and work in stocking stitch. When sleeve measures 4-3-3-1-1-1 cm, decrease 2 stitches mid under sleeve - read DECREASE TIP. Decrease like this every 5-4½-4½-4-3½-3½ cm 7-8-8-9-10-10 times in total = 36-37-40-41-42-44 stitches. Work until sleeve measures 43 cm from marker. Knit 1 round while increasing 12-11-12-11-14-12 stitches evenly = 48-48-52-52-56-56 stitches. Switch to double pointed needles size 5 mm. Work rib (knit 2/purl 2) for 8 cm. Cast off. Sleeve measures approx. 51 cm from marker. Work the other sleeve the same way. ASSEMBLY: Sew bottom of armholes - see chart. Sew side seams inside 1 edge stitch. Sew band together mid back and sew on to neckline at the back of neck. Sew the buttons onto the left front piece. |
||||
Diagram explanations |
||||
|
||||
 |
||||
 |
||||
Have you finished this pattern?Tag your pictures with #dropspattern #climbingrosecardigan or submit them to the #dropsfan gallery. Do you need help with this pattern?You'll find 29 tutorial videos, a Comments/Questions area and more by visiting the pattern on garnstudio.com. © 1982-2025 DROPS Design A/S. We reserve all rights. This document, including all its sub-sections, has copyrights. Read more about what you can do with our patterns at the bottom of each pattern on our site. |
||||


With over 40 years in knitting and crochet design, DROPS Design offers one of the most extensive collections of free patterns on the internet - translated to 17 languages. As of today we count 320 catalogues and 12089 patterns translated into English (UK/cm). 12089
We work hard to bring you the best knitting and crochet have to offer, inspiration and advice as well as great quality yarns at incredible prices! Would you like to use our patterns for other than personal use? You can read what you are allowed to do in the Copyright text at the bottom of all our patterns. Happy crafting!
Post a comment to pattern DROPS 240-6
We would love to hear what you have to say about this pattern!
If you want to leave a question, please make sure you select the correct category in the form below, to speed up the answering process. Required fields are marked *.