
Popular categories
Looking for a yarn?


Comments / Questions (81)
![]() John Bringetto wrote:
John Bringetto wrote:
Skyscraper Vest: on back piece, after robbing 9 cm, I worked the garter stitch decrease row. It says that the decrease row is knitted from the right side. The bit says to continue in stocking stitch. Well, the. The right side is not correct. The next row should be knit, and if so, the nit will show the wrong side? I’m confused. Please advise how to make it look like the photo.
11.01.2024 - 21:17DROPS Design answered:
Dear Mrs Bringetto, after the rib you will work in stocking stitch with the first and last 6 sts in garter stitch jus as before. Happy knitting!
12.01.2024 - 08:01
![]() Karolin wrote:
Karolin wrote:
Leider passt es gar nicht mit den Maschenproben. Wäre gut wenn beide MaPro bei der Anleitung stehen würden. Die angegebene MaPro erreiche ich mit der 3,5 Nd. Der Hauptteil des Pullunders wird ja aber mit der 4,5 Nd gestrickt. Es passt einfach dann auch mit den Maßen für die Größen nicht wenn ich auf die 4,5er übergehe... :-( Wollte doch einfach nur nen Pullunder stricken... der auch passt
03.01.2024 - 00:07DROPS Design answered:
Liebe Karolin, die Maschenprobe soll mit den grösseren Nadeln gestrickt werden, so wenn Sie 20 Maschen = 10 cm haben, dann sind die 99 Maschen nach Bündchen in S ca 50 cm, genauso wie bei der Maßskizze. Sollte Ihre Maschenprobe stimmen, dann sollten die Maschenprobe mit den Bündchen auch stimmen; man braucht aber dafür mehr Maschen damit das untere Rand nicht zu eng wird wegen Rippenmuster. Viel Spaß beim stricken!
03.01.2024 - 08:35
![]() María Victoria wrote:
María Victoria wrote:
Es posible conseguir el patrón para tejer con agujas simples? Me refiero a no usar agujas circulares. No me acostumbro a usarlas y a veces es complicado ajustar el patrón
07.12.2023 - 17:48DROPS Design answered:
Hola María Victoria, puedes usar agujas rectas para este patrón excepto las cenefas del elástico y del escote, que se tienen que trabajar con agujas circulares. Para ajustar este patrón a agujas rectas, puedes usar la siguiente lección: https://www.garnstudio.com/lesson.php?id=13&cid=23. Nosotros no hacemos patrones personalizados.
11.12.2023 - 00:09
![]() Marta Soto wrote:
Marta Soto wrote:
Cuando pueden enseñar a tejer una chaleca sin mangas sencilla y fácil por favor ...gracias
01.12.2023 - 02:26DROPS Design answered:
Hola Marta, puedes encontrar aquí todos nuestros chalecos slipovers: https://www.garnstudio.com/search.php?action=browse&c=women-slipovers&lang=es. Puedes ver todos los videos relevantes para trabajar cada patrón en su sección de video tutoriales correspondiente.
03.12.2023 - 19:38
![]() Karolin wrote:
Karolin wrote:
Hallo, ich wollte grad loslegen und bleib leider schon bei der Maschenprobe hängen. Ist diese bei Nd 3,5 oder 4,5 gemeint?
18.11.2023 - 12:08DROPS Design answered:
Liebe Karolin, die Maschenprobe wird Glattrechts mit den grösseren Nadeln gestrickt. Viel Spaß beim stricken!
20.11.2023 - 09:56
![]() Nettan wrote:
Nettan wrote:
Jag har använt ca 300g garn i beskrivningen men det står 450g i storlek S Har använt samma stickfastighet som står och stickor Trodde först jag gjort fel i min stickning men har tittat flera gånger och allt ser rätt ut!
09.10.2023 - 11:46
![]() Magali Dubuc wrote:
Magali Dubuc wrote:
Merci beaucoup pour votre réponse.
12.09.2023 - 17:47
![]() Magali Dubuc wrote:
Magali Dubuc wrote:
Bonsoir Je réalise la taille S. Je fais les diminutions du devant (que je commence avant le dos, pour cause de gestion d'un défaut). J'en ai fait 4x2 et j'atteinds les 41cm, je devrais donc commencer la pointe du V. Est-il correct de poursuivre les 4x2 diminutions restantes sur les 1/2 devants, ou devrais je avoir terminé les emmanchures avant de commencer la pointe V ? Merci d'avance pour votre réponse. Cdt Magali
11.09.2023 - 23:09DROPS Design answered:
Bonjour Mme Dubuc, à priori, les diminutions de l'emmanchure ne seront pas terminées avant le début de l'encolure-V, continuez à diminuer pour l'encolure comme indiqué et en même temps, continuez les diminutions de l'emmanchure sur le côté comme avant. Bon tricot!
12.09.2023 - 09:20
![]() Sophie Walker wrote:
Sophie Walker wrote:
Hi, I am about to make this. My gauge swatch matches, but I don’t know what size to knit. How should I know whether to pick S or M.
22.06.2023 - 05:11
![]() Therese wrote:
Therese wrote:
Hej Jag vill sticka denna men med vit som grundfärg och svarta 5cm rutor. Jag undrar hur mycket garn jag behöver? Hela stycket var 450g garn (9x50g ), tror ni att det kommer att räcka med med 6 vita och 3 svarta?
15.04.2023 - 17:37DROPS Design answered:
Hej Therese.... det er svært at regne ud selv... tag hellere et nøgle for meget end et for lidt :)
18.04.2023 - 10:30
|
||||||||||||||||
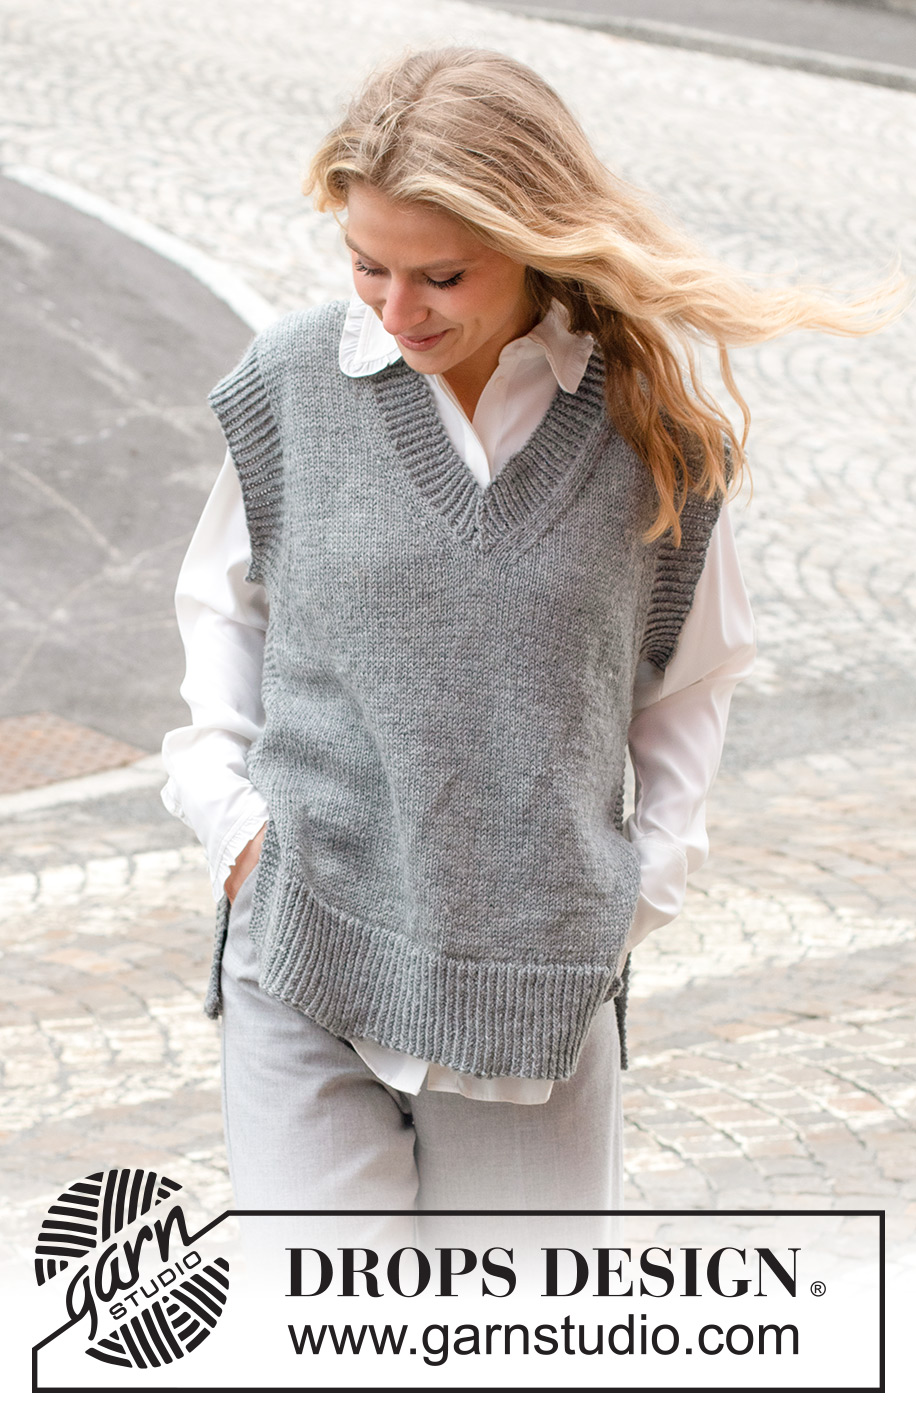
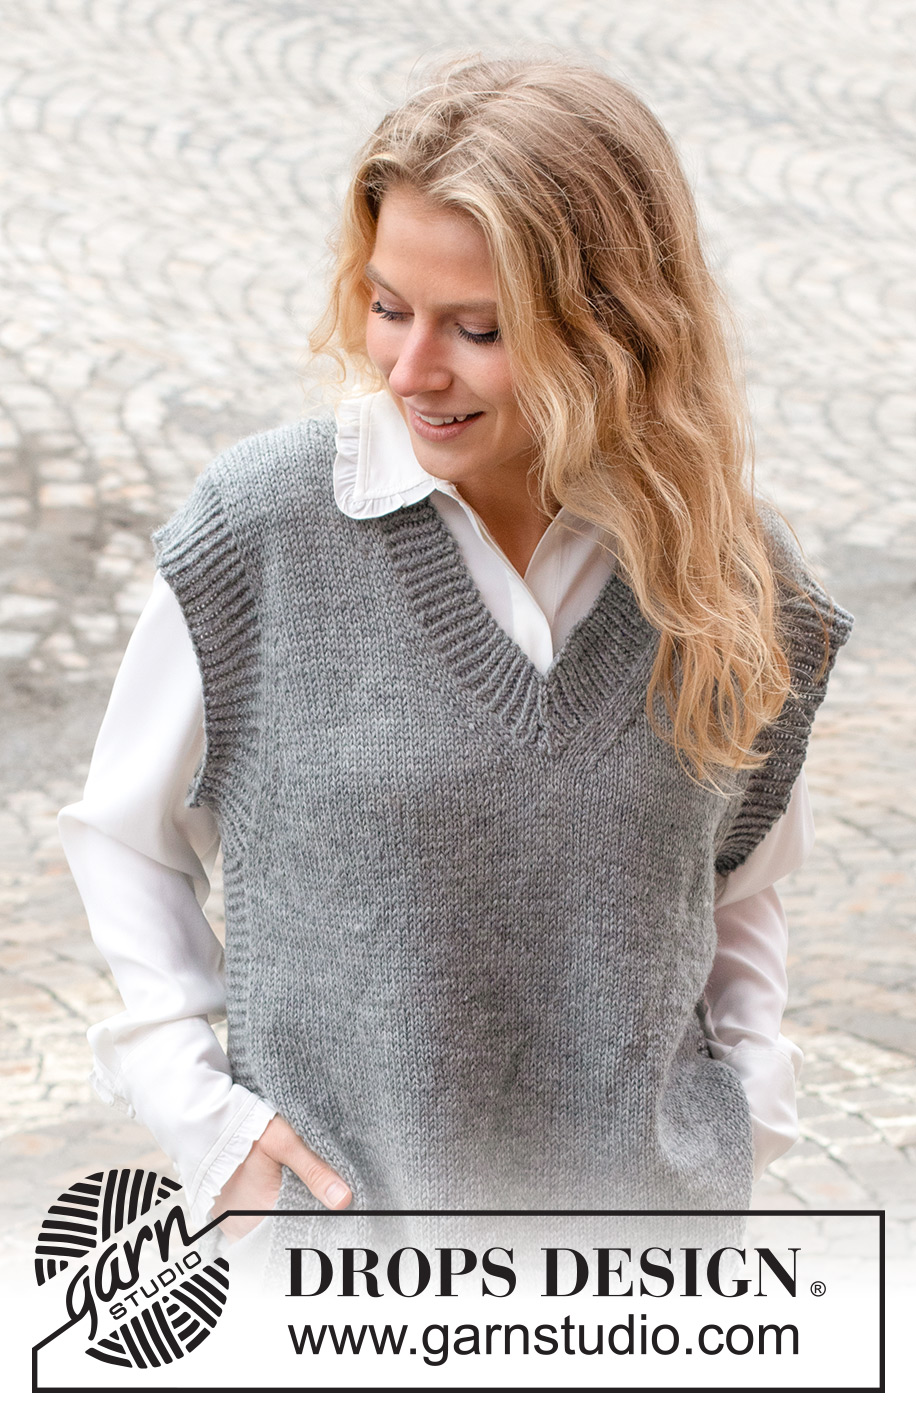
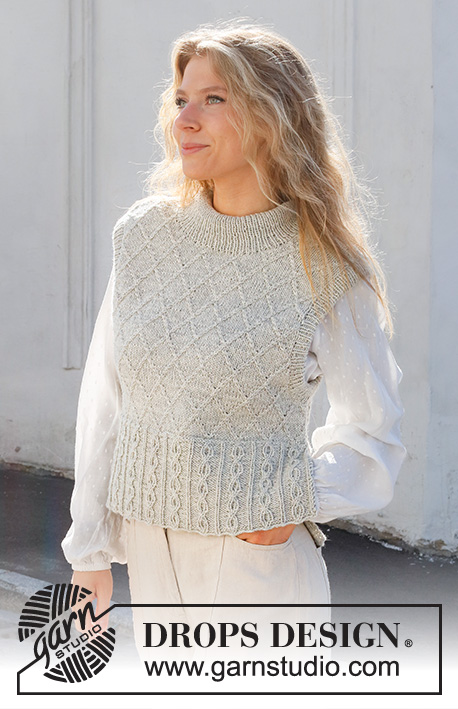
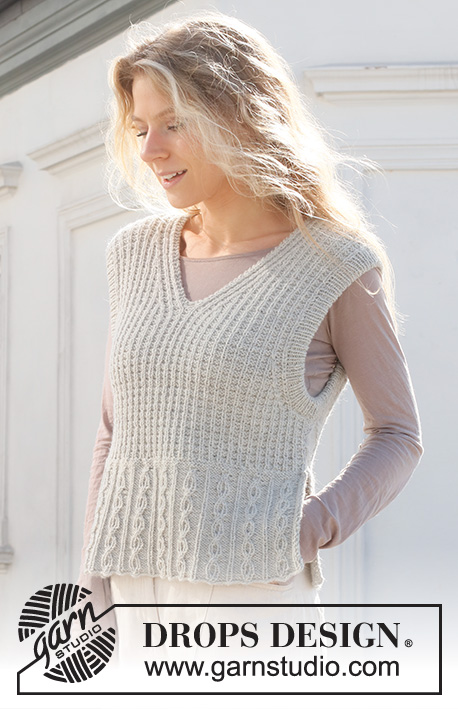
Skyscraper Vest#skyscrapervest |
||||||||||||||||
 |
 |
|||||||||||||||
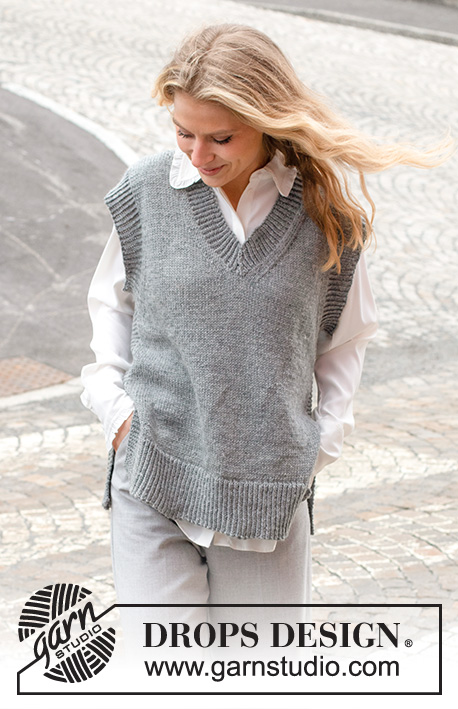
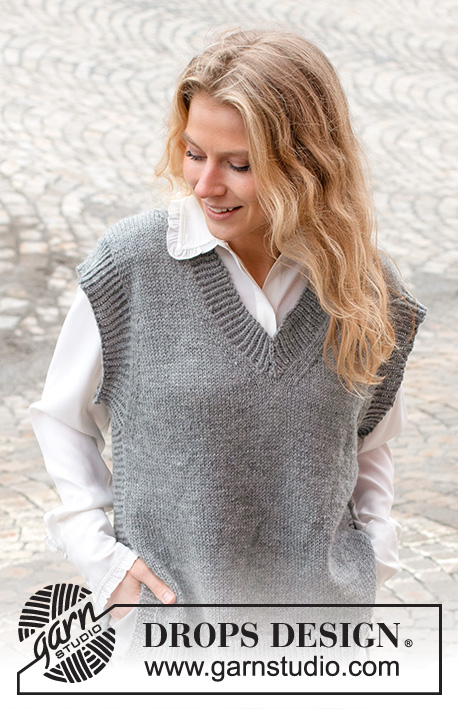
Knitted vest / slipover in DROPS Karisma. Piece is knitted with V-neck, edges in rib and vents in the sides. Size: S - XXXL
DROPS 228-3 |
||||||||||||||||
|
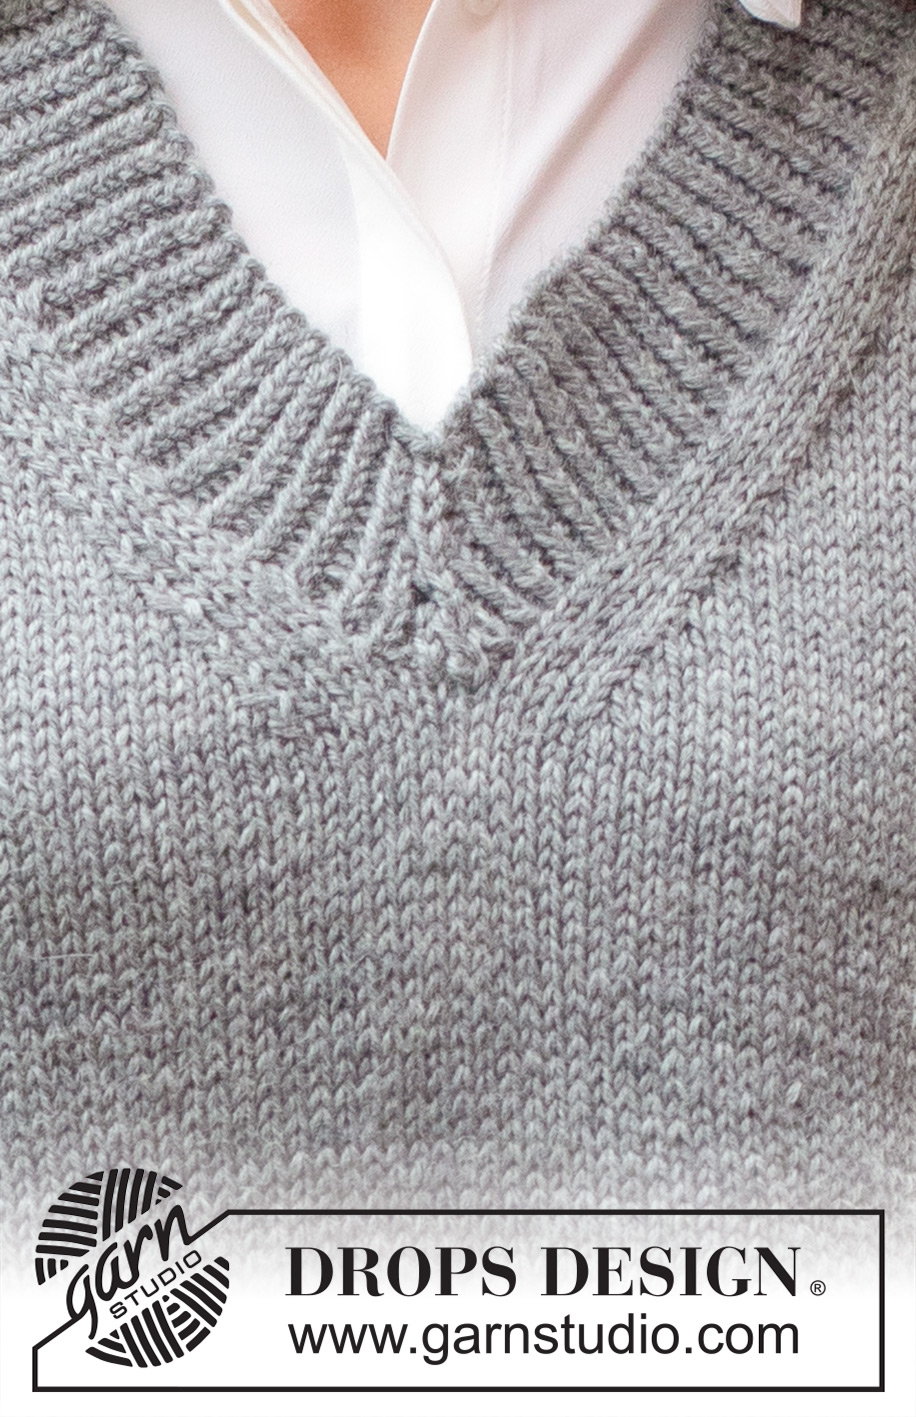
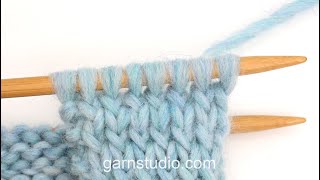
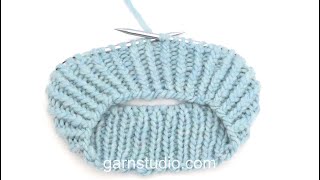
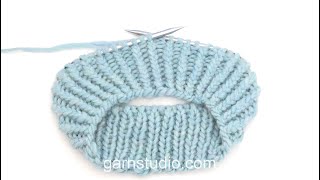
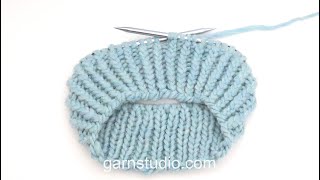
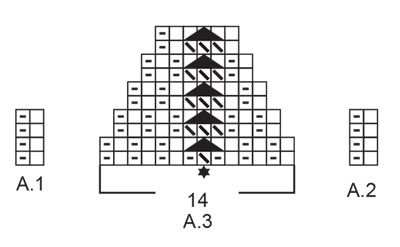
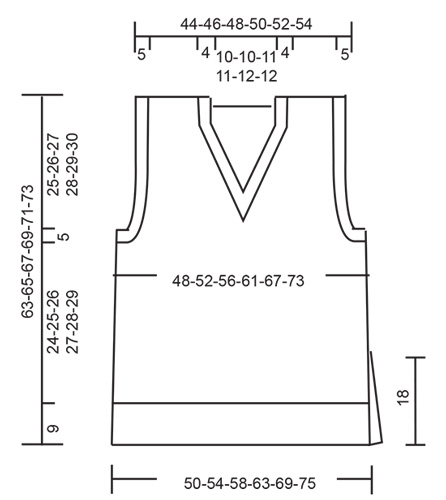
---------------------------------------------------------- EXPLANATION FOR THE PATTERN: ---------------------------------------------------------- GARTER STITCH (worked in the round): 1 ridge vertically = 2 rounds, i.e. knit 1 round and purl 1 round. GARTER STITCH (back and forth): Knit all rows. 1 ridge vertically = knit 2 rows. PATTERN: See diagrams A.1 to A.3. Diagrams show all rows in pattern seen from the right side. DECREASE TIP-1 (evenly): To calculate how to decrease evenly, use the total number of stitches on row (e.g. 119 stitches), minus edge stitches (e.g. 12 stitches) , and divide the remaining 107 stitches by number of increases/decreases to be done (e.g. 20) = 5.3. If decreasing knit in this example approx. every 4th and 5th stitch and every 5th and 6th stitch together. DECREASE TIP-2 (applies to sides of body): Decrease 1 stitch on each side of stitches in garter stitch as follows: Work until 2 stitches remain before stitches in garter stitch, knit 2 together, work 12 stitches in garter stitch, slip 1 stitch knitwise, knit 1, pass slipped stitch over stitch worked. DECREASE TIP-3: All decreases are done from the right side! Decrease at beginning of row as follows: Decrease 1 stitch after 1 edge stitch in garter stitch and 3 knit stitches as follows: Slip 1 stitch knitwise, knit 1, pass slipped stitch over stitch worked (= 1 stitch decreased). Decrease at end of row as follows: Decrease 1 stitch before 3 knit stitches and 1 edge stitch in garter stitch as follows: Work until 6 stitches remain on needle, knit 2 together, knit 3, work 1 edge stitch in garter stitch (= 1 stitch decreased). CAST-OFF TIP: To avoid a tight cast-off edge when casting off, you may use a larger needle. If this still is too tight make 1 yarn over after approx. every 4th stitch while casting off (cast off yarn overs as stitches). ---------------------------------------------------------- START THE PIECE HERE: ---------------------------------------------------------- VEST – SHORT SUMMARY OF PIECE: Work back piece and front piece back and forth on circular needle upwards until vent is done, then slip the 2 part on to same circular needle and work in the round on circular needle up to armhole. Divide piece for front piece and back piece, and finish each part separately back and forth. Work sleeve edges and neck edge in the round on circular needle. BACK PIECE: Cast on 119-129-139-151-165-179 stitches on circular needle size 3.5 mm with DROPS Karisma. Work rib as follows: 6 stitches in GARTER STITCH – read explanation above, A.1 until 7 stitches remain, work first stitch in A.1, 6 stitches in garter stitch. Continue back and forth like this until piece measures 9 cm. Work next row as follows from right side: Work garter stitch as before over the first 6 stitches, knit the next 107-117-127-139-153-167 stitches and decrease at the same time 20-22-24-26-28-30 stitches evenly – read DECREASE TIP-1, work in garter stitch as before over the last 6 stitches = 99-107-115-125-137-149 stitches. Switch to circular needle size 4.5 mm. Now work in stocking stitch with 6 stitches in garter stitch in each side. REMEMBER THE KNITTING TENSION! When piece measures 18 cm – adjust so that next row is worked from right side, put piece aside. Work front piece. FRONT PIECE: Work as on back piece. BODY: Slip stitches on front piece and back front piece on to same circular needle size = 198-214-230-250-274-298 stitches. Begin round before 12 stitches in garter stitch in one side. Continue in stocking stitch and 12 stitches in GARTER STITCH in each side - read explanation above. When piece measures 20 cm, decrease 1 stitch on each side of the 12 stitches in garter stitch - read DECREASE TIP-2. Repeat decrease when piece measures 28-29-30-31-32-33 cm = 190-206-222-242-266-290 stitches. When piece measures 33-34-35-36-37-38 cm, cast off 12-12-14-16-18-20 stitches in each side for armholes (i.e. cast off the 12 stitches in garter stitch and 0-0-1-2-3-4 stitches on each side of garter stitches). Then finish front and back piece separately. BACK PIECE: = 83-91-97-105-115-125 stitches. Continue back and forth in stocking stitch with 1 edge stitch in garter stitch in each side. At the same time on next row from right side begin decrease for armhole - read DECREASE TIP-3. Decrease like this every other row 1-1-3-7-12-18 times, then every 4th row 7-9-8-6-4-1 times (= 8-10-11-13-16-19 stitches decreased for armhole in each side) = 67-71-75-79-83-87 stitches. Continue to work until piece measures 61-63-65-67-69-71 cm. Now cast off the middle 33-33-35-35-37-37 stitches for neck and finish each shoulder separately. Then on next row from the neck, decrease 1 stitch = 16-18-19-21-22-24 stitches remain on shoulder. When piece measures 63-65-67-69-71-73 cm, cast off. Work the other shoulder the same way. FRONT PIECE: = 83-91-97-105-115-125 stitches. Continue back and forth in stocking stitch with 1 edge stitch in garter stitch in each side. At the same time decrease for armholes the same way as on back piece. When piece measures 41-42-43-44-45-46 cm, slip the middle stitch on front piece on a stitch holder (= middle stitch), and slip all stitches after this middle stitch on a stitch holder (= right front piece). Stitches before middle stitch are still on the needle (= left front piece). Left front piece: Continue back and forth with stocking stitch, 1 edge stitch in garter stitch in each side and decrease for armholes as before, at the same time on next row from right side begin decrease for V-neck: Work until 6 stitches remain towards the neck, knit 2 together (= 1 stitch decreased), knit 3, 1 edge stitch in garter stitch. Decrease like this every other row 11-11-11-11-11-11 times, then every 4th row 6-6-7-7-8-8 times (= 17-17-18-18-19-19 stitches decreased for V-neck) = 16-18-19-21-22-24 stitches remain for shoulder. Continue to work until piece measures approx. 63-65-67-69-71-73 cm. Cast off. Right front piece: Continue back and forth with stocking stitch, 1 edge stitch in garter stitch in each side and decrease for armholes as before, at the same time on next row from right side begin decrease for V-neck: Work 1 edge stitch in garter stitch, knit 3, slip 1 stitch knitwise, knit 1, pass slipped stitch over (= 1 stitch decreased), work the rest of row. Decrease like this every other row 11-11-11-11-11-11 times, then every 4th row 6-6-7-7-8-8 times (= 17-17-18-18-19-19 stitches decreased for neck) = 16-18-19-21-22-24 stitches remain for shoulder. Continue to work until piece measures approx. 63-65-67-69-71-73 cm. Cast off. ASSEMBLY: Sew shoulder seams with grafting/kitchener stitches inside cast-off edges. SLEEVE EDGES: Begin from right side where piece was divided for armhole. Use circular needle size 3.5 mm and pick up approx. 132 to 154 stitches around the entire armhole (number of stitches must be divisible by 2). Work rib according to diagram A.1 in the round for 4½-5 cm. Cast off stitches with knit over knit and purl over purl. Repeat around the other armhole. NECK EDGE: Begin mid on top of one shoulder with circular needle size 3.5 mm and DROPS Karisma and pick up 158 to 188 stitches inside 1 edge stitch in garter stitch around the entire neck edge including middle stitch on stitch holder mid front (number of stitches must be divisible by 2). Work rib according to pattern A.2 in the round - adjust so that pattern is worked according to A.3 over the 14 stitches mid front (stitch with star in A.3 should be middle stitch mid front), and so that pattern fits knit 1 twisted / purl 1 in the round on first round worked. Continue in the round and decrease as shown in A.3 until rib measures 4 cm. Cast off with knit over knit and purl over purl, at the same time decrease as before over the middle 3 stitches mid front. |
||||||||||||||||
Diagram explanations |
||||||||||||||||
|
||||||||||||||||
 |
||||||||||||||||
 |
||||||||||||||||
Have you finished this pattern?Tag your pictures with #dropspattern #skyscrapervest or submit them to the #dropsfan gallery. Do you need help with this pattern?You'll find 33 tutorial videos, a Comments/Questions area and more by visiting the pattern on garnstudio.com. © 1982-2026 DROPS Design A/S. We reserve all rights. This document, including all its sub-sections, has copyrights. Read more about what you can do with our patterns at the bottom of each pattern on our site. |
||||||||||||||||


With over 40 years in knitting and crochet design, DROPS Design offers one of the most extensive collections of free patterns on the internet - translated to 17 languages. As of today we count 324 catalogues and 12278 patterns translated into English (UK/cm). 12278
We work hard to bring you the best knitting and crochet have to offer, inspiration and advice as well as great quality yarns at incredible prices! Would you like to use our patterns for other than personal use? You can read what you are allowed to do in the Copyright text at the bottom of all our patterns. Happy crafting!
Post a comment to pattern DROPS 228-3
We would love to hear what you have to say about this pattern!
If you want to leave a question, please make sure you select the correct category in the form below, to speed up the answering process. Required fields are marked *.