DROPS Super Sale - SAVE 30% on 6 yarns all June!

How to work a sweater top down

Several of our sweaters are worked top-down, and this is primarily because it provides more flexibility in terms of adjusting the swweater to personal measurements or preferences. It is easier to adjust the length of sleeves, body and especially the yoke. Working top-down also makes it easier to try the piece on while working.

In this lesson we show you how to work a sweater with a simple raglan increase. Start by picking the pattern you want to knit and use this lesson to guide you. If you want to work on a pattern with a different kind of raglan just follow the instructions for increases in you pattern - you’ll notice that the principle of top-down is the same as in this example. Similarly, this technique can also be used when working a round yoke, just follow the increase instructions for the round yoke instead of the raglan showed here.

Additionally, If you’re working a jacket top-down the technique will be the same, but you’ll work the piece back and forth on needle, starting mid front (a marker at the back will not be necessary).

Let’s get started

1) We have started this example by casting on 48 stitches and working 3 cm = 1 1/8" rib (knit 2, purl 2), before starting the raglan increases.

After the rib edge, continue in stocking stitch and place a marker mid-back. Continue by placing 4 marker threads for raglan in the transition between body and sleeves (from 1. mark to 1. marker thread = half back piece. From 1. to 2. marker thread = 1. sleeve. From 2. to 3. marker thread = front piece. From 3. to 4. marker thread = 2. sleeve. The remaining stitches between 4. marker thread and 1. mark = half back piece).
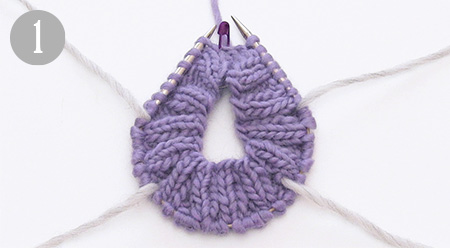
2) Start increasing for raglan on each side of the 4 marker threads.

3) Increase as follows: start 1 stitches before marker thread, make 1 yarn over on right needle.

4) Work 2 stitches (marker thread sits between these stitches), make 1 yarn over on right needle.

5) First increases (yarn overs) before and after 1. marker thread is now complete. Repeat increases at each marker thread (=8 stitches increased on round).

6) On next round, knit the yarn overs twisted (work in the back loop of stitch) to avoid holes.
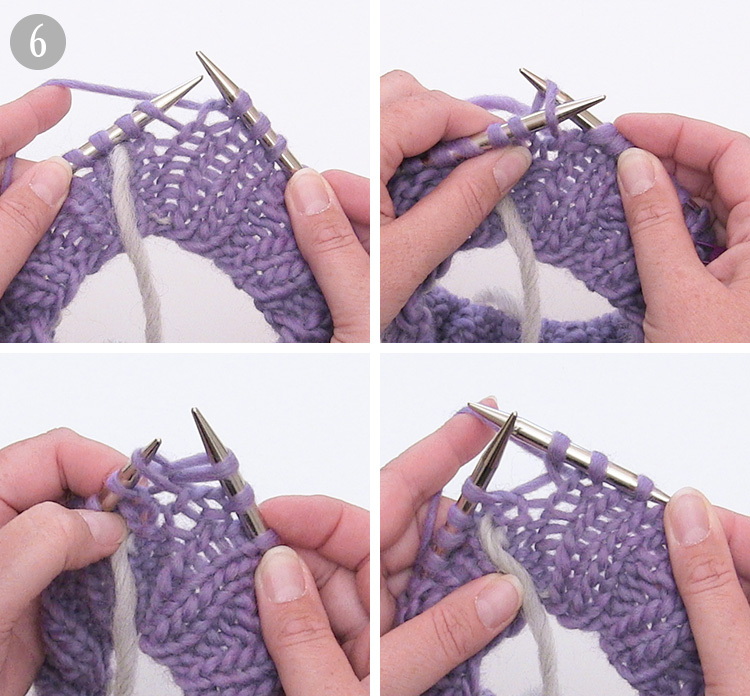
7) Continue with pattern, and increase for raglan as explained.

8) When all increases for raglan are complete, continue working until you reach the measurements for where piece is divided for body and sleeves.

9) Divide piece for sleeves and front/back piece, and finish each part separately. Work until 1. marker thread (=half back piece).

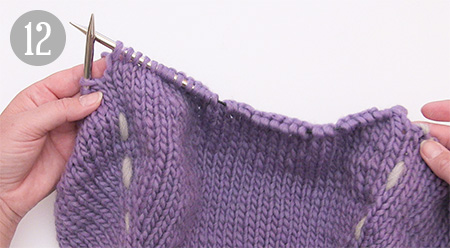
10) Place stitches between 1. and 2. marker thread on a thread/stitch holder (= 1. sleeve).

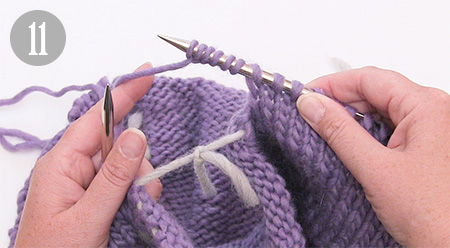
11) Cast on new stitches under sleeve.
12) Work stitches between 2. and 3. marker thread (=front piece).
13) Place stitches between 3. and 4. marker thread on a thread/stitch holder (= 2. sleeve).

14) Cast on new stitches under sleeve (same number of stitches as cast on under 1. sleeve).
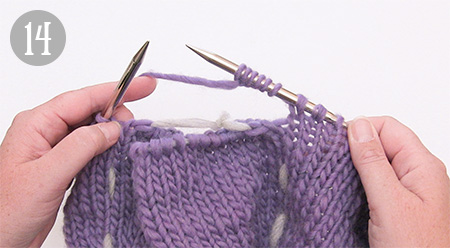
15) Work remaining stitches on back piece (until 1. marker).

16) Work the body in the round, follow instructions for increases, decreases, length and rib edge in your pattern. If you’re unsure about the length of piece, or considering shortening/lengthening it, you can easily try the jumper on while working (TIP: when trying the piece on, distribute stitches over several circular needles to minimise the risk of losing any stitches).

17) Work sleeves: place stitches from one of the threads/stitch holders back on the needle.

18) A: Cast on new stitches under sleeve (see pattern for exact number) and place a marker. The piece is now measured from here. B: Pick up 1 stitch in each of the stitches cast on under the sleeve.

19) Work the length stated in the pattern, place a new marker in the middle of the new stitches cast on. Decrease 1 stitch on each side of the marker.

20) Work until 2 stitches remain before the stitch with marker, slip 1 stitch onto right needle, knit 1, pass the slipped stitch over (= 1 stitch decreased).

21) Work stitch with marker.

22) Knit 2 stitches together (=1 stitch decreased).

You have now decreased 1 stitch before and 1 stitch after marker (= 2 stitches decreased).

23) Follow instructions in pattern regarding the number of decreases and cm/rounds in-between each decrease.

24) When both sleeves have been completed, sew the hole under sleeves.
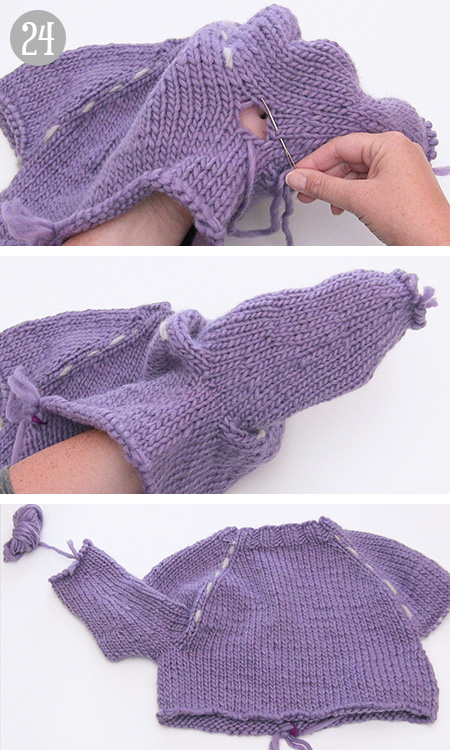
When the body and sleeves are completed according to the pattern, remove all markers and marker threads, and fasten all strands. The jumper is now finished!

Still haven’t chosen a top down pattern? Find some inspiration below:

Comments (159)

Country flag Sif Klein wrote:

Hej Er dette den samme teknik der skal bruges til at samle venstre og højre forstykke i drops  Baby 20-24 boo blue?

16.10.2023 - 11:51

DROPS Design answered:

Hei Sif. Videoen: "Hvordan strikke en genser ovenfra og ned" og hvordan strikke omslagsjakken i Baby DROPS 20-24 strikkes ikke likt. Om du har problemer med omslagsjakken, legg et spørsmål under selve oppskriften (oppgi gjerne hvilken str du strikker) på hva du ønsker hjelp til, så skal vi svare så godt vi kan. mvh DROPS Design

23.10.2023 - 07:35

Country flag Ingeborg wrote:

Kan het van boven naar beneden breien van een vest (heen en weer) ook met gewone breinaalden in plaats van een rondbreinaald?

12.10.2023 - 16:50

DROPS Design answered:

Dag Ingeborg,

Dat zou op zich wel kunnen, maar het hangt een beetje af van de maat en het model en of daarmee alle steken wel op de naald passen.

Om een patroon aan te passen om op rechte naalden te breien hebben we een instructie gemaakt. Deze vind je hier.

05.11.2023 - 19:51

Country flag Tesou BALENT wrote:

BONJOUR Serait il possible d'obtenir une explication pour le modele DROPS 237-39 SPECIFIQUEMENT Je n'aboutis pas au nombre de mailles indiqué sur l'explication après le col faut il augmenter à chaque rang Merci je suis coincée

25.09.2023 - 10:46

DROPS Design answered:

Bonjour Mme Balent, une fois que le col est terminé, on va tricoter une encolure en rangs raccourcis en augmentant 8 mailles tous les rangs sur l'endroit; puis, vous continuez en rond en augmentant 8 mailles tous les 2 tours. Le nombre d'augmentations indiqué correspond à celui fait lors des rangs raccourcis + quand on tricote ensuite en rond. N'hésitez pas à nous indiquer votre taille si besoin. Bon tricot!

25.09.2023 - 16:20

Country flag Mieke wrote:

Bestaat er ook een handleiding voor top down breiwerken waarbij je na de ronde pas (zonder raglan) eerst de mouwen breit daarna het lijf? Hoe gaat dat dan in zijn werk? Speciaal is dat er meerderingen w gemaakt in de mouw door heen en weer te breien waarna verder in het rond w gebreid. Het lijf wordt na de pas ook eerst heen en weer verder gebreid om de gemeerderde steken van de mouwen in op te nemen. Daarna w rug en voorpand verder in het rond gebreid. Ik zoek meer uitleg en/of video. Dank!

10.09.2023 - 15:11

DROPS Design answered:

Dag Mieke,

Het maakt eigenlijk niet uit of je eerst de mouwen of eerst het lijf breit, want het principe is hetzelfde; je breit voor het lijf en ook voor de mouwen als het ware 'tubes' in de rondte. Of je breit heen en weer en naait later de onderarmnaad (als het om de mouw gaat) of de zijnaden (bij het lijf) dicht.

13.09.2023 - 20:54

Country flag Waleska CHolaky wrote:

Gracias por la respuesta. Y para hacer canesú redondo dónde puedo encontrar ayuda?

04.09.2023 - 05:58

DROPS Design answered:

Hola Waleska, en esta página puedes ver cómo se trabaja un jersey de arriba abajo,pero en lugar de aumentar en 4 sitios cada segunda fila para el raglán, para el canesú redondo se trabajan aumentos según el patrón en una sola fila y luego varias filas (según el patrón) son sin aumentos. Puedes buscar en nuestra lista de patrones aquellos que tienen canesú redondo para elegir el modelo que prefieras. Si necesitas ayuda con una parte concreta de un patrón específico puedes escribirnos un comentario indicando que se trata de una pregunta y escribiendo tu duda específica y trataremos de contestarla lo antes posible.

10.09.2023 - 18:47

Country flag Waleska Cholaky wrote:

Cómo hacer un canesú en tejido

03.09.2023 - 04:31

DROPS Design answered:

Hola Waleska, en esta misma lección te permite ver cómo trabajar un canesú básico con aumentos de raglán.

03.09.2023 - 23:50

Country flag Barbara Mahjoub wrote:

Sie geben nirgens eine Maschenprobe oder eine Nadel- oder Wollstärke an. Ihre Beschreibung ist sehr gut verständlich, aber woher soll ich wissen, welche Größe dabei am Ende herauskommt? Ich möchte gerne für meine 3jährige Enkelin eine Jacke stricken, da kann ich sicher nicht mit der von Ihnen angegebenen Maschenzahl beginnen. Wie löse ich das Problem? Danke!

01.09.2023 - 22:46

DROPS Design answered:

Liebe Frau Mahjoub, diese Lektion zeigt nur wie es geht, wenn man einen Pullover von oben nach unten strickt, Hier und auch hier finden Sie Anleitungen für Pullover, die von unten nach oben mit Raglan oder mit einer Rundpasse gestrickt wurden und die dazugehörigene Maschenprobe bzw Garnmenge. Viel Spaß beim stricken!

04.09.2023 - 09:12

Country flag Susan Allen wrote:

Hi, I am making the Tiny Cloud Cardigan, size 5-6 Knitted jacket for children in DROPS Sky. My question is, why are there 69 stitches for the back, but 80 for the front total for the front? Are the 10 stitches for the button bands included within these 80 stitches?

31.08.2023 - 07:28

Country flag Maïté LOISEAU wrote:

Sur le modèle Daisy Delight cardigan children taille 3/4 : pour l'empiècement, que veut dire "répéter 13 fois A.2" ? J'ai augmenté 13 fois 17 mailles seulement sur l'endroit et en tout cela fait 221 mailles + 89 mailles. Donc cela ne fait pas 219 mailles comme annoncé. Merci d'avance de vos explications.

24.06.2023 - 17:19

DROPS Design answered:

Bonjour Mme Loiseau, vous commencez avec 89 m ainsi: 5 m point mousse, A.1 (= 1 m), 13 x A.2 (=13x6=78 m), 5 m point mousse soit 5+1+78+5=89. Quand A.1 et A.2 sont terminés, il y a 16 m dans chaque A.2, soit: 5+1+(13x16=208)+5 = 219 mailles. Bon tricot!

26.06.2023 - 09:43

Country flag Duquenoy wrote:

Bonjour Je tricote le modèle "octobre breeze" . Je ne comprends pas comment tricoter le 2eme rang de l'encolure. Les augmentations de font bien sur l'envers?, près des jetés du rang 1 ? Merci pour votre réponse

13.06.2023 - 11:35

DROPS Design answered:

Bonjour Mme Duquenoy, pour ce modèle, on va augmenter 8 m (dos, devant et manches) au 1er rang de l'encolure (sur l'endroit), on augmente ensuite 4 mailles au 2ème rang (-sur l'envers = on augmente uniquement pour le dos et le devant); au 3ème rang, on augmente 8 mailles (dos, devant et manches) et au 4ème rang (sur l'envers), et on augmente seulement 4 m (dos & devant). Puis on continue en rond en augmentant comme indiqué en fonction de la taille. Tricotez les jetés comme indiqué sous RAGLAN:.. /..puis Sur l’envers, tricoter les jetés ainsi: .../...Sur l’endroit, tricoter les jetés ainsi:. Bon tricot!

13.06.2023 - 16:16

Country flag Anke wrote:

Herzlichen Dank für diese wunderbar ausführliche Beschreibung!!!

17.04.2023 - 11:13

Country flag Gabriele wrote:

Ich habe ene Frage zu dem Sheep Pulli. Ander Stelle wo die Teile getrennt weiter gestrickt werden, Soll unter dem Arm MAschen angeschlagen werden. Wo kommen die hin? Werden sie mitgeschickt beim Rumpf oder werden die auch stillgelegt. Diese Info fehlt leider in der Beschreibung. Sonst hat alles gut geklappt. Das Muster ist zu schön! Vielen Dank und Grüße

17.03.2023 - 22:35

DROPS Design answered:

Liebe Gabrielle, die neuen Maschen unter dem Arm werden wie beim Foto 11 angeschlagen (und die Maschen von dem Ärmel legen Sie still wie beim Foto 12). Viel Spaß beim stricken!

20.03.2023 - 16:05

Country flag Beverly Pagano wrote:

Many of your sweaters are knitted from the top down. Would it be possible to include instructions to raise the back of the neck relative to the front so as to get a better fit?

25.02.2023 - 02:03

DROPS Design answered:

Dear Beverly, some of our patterns include an elevation in the back. You can also apply the technique shown in the following video to work an elevation in your desired model. https://www.garnstudio.com/video.php?id=894&page=2&lang=us Happy knitting!

26.02.2023 - 20:06

Country flag Denise Fontaine wrote:

Patron 40 17 veste enfant. Je ne comprends pas comment distribuer les marqueurs . 1,2,3,4. Je comprends 17 mailles pour le devant droit, puis 12 mailles pour l’épaule droite, 24 mailles pour le dos, 12 mailles pour l’épaule gauche et 17 mailles pour devant gauche = 82 mailles C’est écrit: marqueur 1 en commençant par le dos, compter 17 mailles (=devant), placer le marqueur avant la maille suivante. Pouvez-vous m’éclairer svp? Un grand Merci!

22.02.2023 - 22:44

DROPS Design answered:

Bonjour Mme Fontaine, il y avait une erreur ici, vous commencez à compter à partir du début du rang (et non du milieu dos), correction faite, merci pour votre retour. Bon tricot!

23.02.2023 - 15:20

Country flag Gudrun Öberg wrote:

Hej! Jag önskar få hjälp med att börja med denna fina kofta. Jag har lagt upp, stickat ett avigt varv, men sedan har jag kört fast. Ser att knapphålen ska vara på min högra sida. Jag har kört fast på : Sticka 1 maska RÄTSTICKNING, 1 rätmaska.....( tänker att det 7 första maskorna på var sida är framkanten ).

21.02.2023 - 10:52

DROPS Design answered:

Hei Gudrun Hvilken kofta er det du strikker? Ofte i oppskrifter så skal du strikke 1 kantmaske som skal strikkes rett både fra retten og fra vrangen, og da er det beskrevet i begynnelsen i oppskriften hvordan RÄTSTICKNING skal strikkes. Dette får vi ikke sjekket ettersom vi ikke vet hvilken oppskrift du strikker ettter, så husk å oppgi DROPS nr eller navnet, så skal vi hjelpe deg så godt vi kan. mvh DROPS Design

27.02.2023 - 08:53

Country flag Cristina wrote:

A che taglia corrisponde questo modello?

12.02.2023 - 09:42

DROPS Design answered:

Buonasera Cristina, questo è solo un esempio della lavorazione top down, ma sul nostro sito può trovare tantissimi modelli gratuiti con la stessa costruzione tra cui scegliere. Buon lavoro!

13.02.2023 - 22:34

Country flag Jane wrote:

I’m struggling with the Dream in Blue jumper. When I get to the yoke the numbers don’t add up to 62, and it only says to place one marker. Shouldn’t there be 4 markers? Hope you can help! Thank you.

13.01.2023 - 02:12

DROPS Design answered:

Dear Jane, you are working 3rd size, correct? Then work the first round on yoke as follows: K7, YO, A.1 (= 5 sts), YO, K6, YO, A.1 (= 5 sts), K15, YO, A.1 (= 5 sts), YO, K6, YO, A.1 (= 5 sts), YO, K8 = 7+5+6+5+15+5+6+5+8=62 sts + 8 YO. We don't use markers for the raglan here since raglan is marked with the 5 sts of each A.1 (raglan lines), but feel free to add some if needed . Happy knitting!

13.01.2023 - 09:21

Country flag Laura wrote:

Buongiorno, sto cercando di imparare a seguire il modello 27-31 ma nello sprone quando bisogna eseguire l’alzata mi fa fare a rovescio un ferro, girare e altri ferri a rovescio , girare e sempre a rov ma facendo così non rimane una maglia rasata ma a legaccio…c’è un errore nella spiegazione oppure come devo fare? Grazie

04.12.2022 - 14:42

DROPS Design answered:

Buonasera Laura, nel modello 27-31 l'alzata è lavorata in ferri a diritto e ferri a rovescio. Buon lavoro!

11.12.2022 - 22:18

Country flag Adelaide wrote:

Salve. Lavoro a maglia da quasi 50 anni. Ho imparato il modo sui ferri lineari e mi trovo bene. Anni fa'i vostri modelli erano su lineari,ora è tutto top down. Perché non fate più modelli per noi che non lo usiamo?. Vi seguo comunque ma credo sia giusto anche integrare per noi che non amiamo questa tecnica: è pur sempre lavoro a maglia!!

03.12.2022 - 05:58

DROPS Design answered:

Buonasera Adelaide, sul sito DROPS può trovare modelli gratuiti con tutte le costruzioni, lavorati in piano o in tondo, dal basso verso l'alto o dall'alto in basso. Può essere anche l'occasione per imparare delle tecniche diverse anche grazie all'aiuto dei tantissimi video gratuiti che può trovare sul sito DROPS. Buon lavoro!

03.12.2022 - 16:40

Country flag Adelaide wrote:

Salve. Lavoro a maglia da quasi 50 anni. Ho imparato il modo sui ferri lineari e mi trovo bene. Anni fa'i vostri modelli erano su lineari,ora è tutto top down. Perché non fate più modelli per noi che non lo usiamo?. Vi seguo comunque ma credo sia giusto anche integrare per noi che non amiamo questa tecnica: è pur sempre lavoro a maglia!!

03.12.2022 - 05:55

DROPS Design answered:

Buonasera Adelaide, sul sito DROPS può trovare modelli gratuiti con tutte le costruzioni, lavorati in piano o in tondo, dal basso verso l'alto o dall'alto in basso. Può essere anche l'occasione per imparare delle tecniche diverse anche grazie all'aiuto dei tantissimi video gratuiti che può trovare sul sito DROPS. Buon lavoro!

03.12.2022 - 16:40

Leave a comment or question to this lesson

Your email address will not be published. Required fields are marked *.