How to work a sweater top down

Several of our sweaters are worked top-down, and this is primarily because it provides more flexibility in terms of adjusting the swweater to personal measurements or preferences. It is easier to adjust the length of sleeves, body and especially the yoke. Working top-down also makes it easier to try the piece on while working.

In this lesson we show you how to work a sweater with a simple raglan increase. Start by picking the pattern you want to knit and use this lesson to guide you. If you want to work on a pattern with a different kind of raglan just follow the instructions for increases in you pattern - you’ll notice that the principle of top-down is the same as in this example. Similarly, this technique can also be used when working a round yoke, just follow the increase instructions for the round yoke instead of the raglan showed here.

Additionally, If you’re working a jacket top-down the technique will be the same, but you’ll work the piece back and forth on needle, starting mid front (a marker at the back will not be necessary).

Let’s get started

1) We have started this example by casting on 48 stitches and working 3 cm = 1 1/8" rib (knit 2, purl 2), before starting the raglan increases.

After the rib edge, continue in stocking stitch and place a marker mid-back. Continue by placing 4 marker threads for raglan in the transition between body and sleeves (from 1. mark to 1. marker thread = half back piece. From 1. to 2. marker thread = 1. sleeve. From 2. to 3. marker thread = front piece. From 3. to 4. marker thread = 2. sleeve. The remaining stitches between 4. marker thread and 1. mark = half back piece).
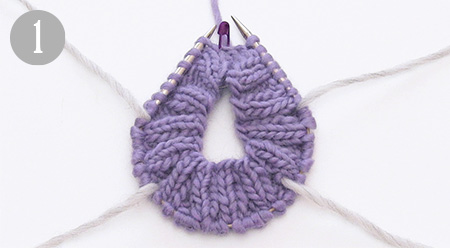
2) Start increasing for raglan on each side of the 4 marker threads.

3) Increase as follows: start 1 stitches before marker thread, make 1 yarn over on right needle.

4) Work 2 stitches (marker thread sits between these stitches), make 1 yarn over on right needle.

5) First increases (yarn overs) before and after 1. marker thread is now complete. Repeat increases at each marker thread (=8 stitches increased on round).

6) On next round, knit the yarn overs twisted (work in the back loop of stitch) to avoid holes.
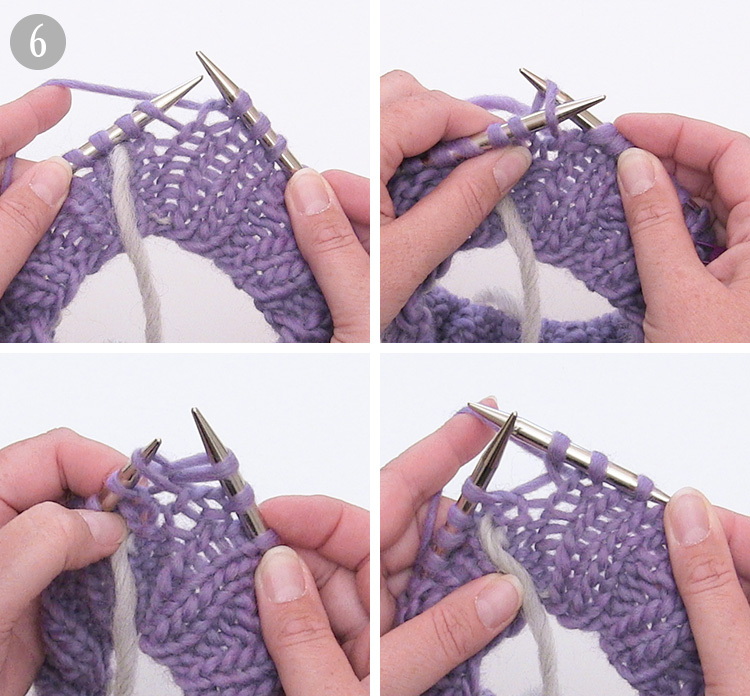
7) Continue with pattern, and increase for raglan as explained.

8) When all increases for raglan are complete, continue working until you reach the measurements for where piece is divided for body and sleeves.

9) Divide piece for sleeves and front/back piece, and finish each part separately. Work until 1. marker thread (=half back piece).

10) Place stitches between 1. and 2. marker thread on a thread/stitch holder (= 1. sleeve).

11) Cast on new stitches under sleeve.
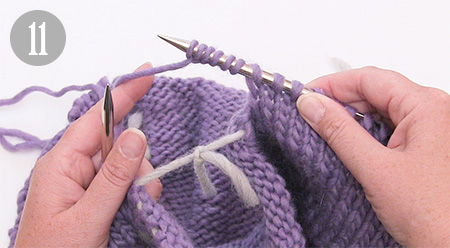
12) Work stitches between 2. and 3. marker thread (=front piece).
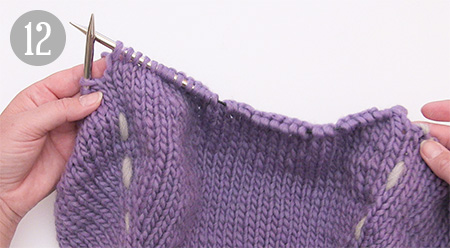
13) Place stitches between 3. and 4. marker thread on a thread/stitch holder (= 2. sleeve).

14) Cast on new stitches under sleeve (same number of stitches as cast on under 1. sleeve).
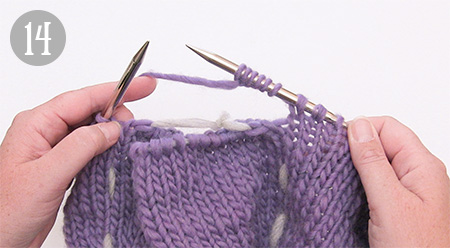
15) Work remaining stitches on back piece (until 1. marker).

16) Work the body in the round, follow instructions for increases, decreases, length and rib edge in your pattern. If you’re unsure about the length of piece, or considering shortening/lengthening it, you can easily try the jumper on while working (TIP: when trying the piece on, distribute stitches over several circular needles to minimise the risk of losing any stitches).

17) Work sleeves: place stitches from one of the threads/stitch holders back on the needle.

18) A: Cast on new stitches under sleeve (see pattern for exact number) and place a marker. The piece is now measured from here. B: Pick up 1 stitch in each of the stitches cast on under the sleeve.

19) Work the length stated in the pattern, place a new marker in the middle of the new stitches cast on. Decrease 1 stitch on each side of the marker.

20) Work until 2 stitches remain before the stitch with marker, slip 1 stitch onto right needle, knit 1, pass the slipped stitch over (= 1 stitch decreased).

21) Work stitch with marker.

22) Knit 2 stitches together (=1 stitch decreased).

You have now decreased 1 stitch before and 1 stitch after marker (= 2 stitches decreased).

23) Follow instructions in pattern regarding the number of decreases and cm/rounds in-between each decrease.

24) When both sleeves have been completed, sew the hole under sleeves.
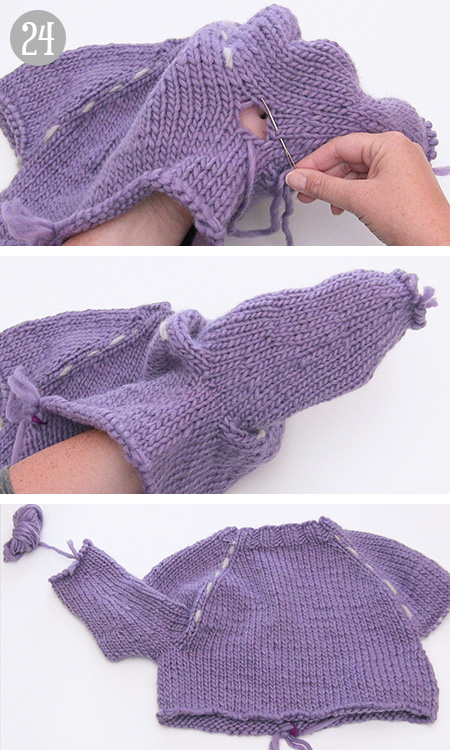
When the body and sleeves are completed according to the pattern, remove all markers and marker threads, and fasten all strands. The jumper is now finished!

Still haven’t chosen a top down pattern? Find some inspiration below:

Comments (151)

Melanie wrote:

Hallo, ich verstehe leider nicht, was bei Schritt 1 heißen soll, dass man in der hinteren Mitte einen Markierer setzen soll. Was bedeutet hintere Mitte? Danke!

22.11.2021 - 21:27:

DROPS Design answered:

Liebe Melanie, es bedeutet, daß der Anfang von dem gestrickten Modell in der Mitte von Rückenteil ist. Siehe auch Antwort bei der Anleitung, die Sie gerade stricken. Viel Spaß beim stricken!

23.11.2021 - 08:41:

Margrit Barro wrote:

Hallo, mir fehlt bei der Anleitung die Angabe wie die Maschen für Vorder-Rückenteil und Ärmel aufgeteilt werden, also in welchem Verhältnis. Bei deinem Beispiel kann man zum Glück die Maschen abzählen, aber sind die Maschen für die Ärmel immer die halbe Anzahl von Rücken- und Vorderteil? Über eine Antwort würde ich mich freuen. Danke im Voraus.

03.11.2021 - 11:51:

DROPS Design answered:

Liebe Frau Barro, das finden Sie in die Anleitung von dem Modell, das Sie stricken, die Maschenanzahl von der benötigen Maschen beim Rücken- und Vorderteil + die Maschen, die man unter den Ärmel anschlagen muss + die Maschen die für Ärmel stillgelegt werden. Dieses Video zeigt auch das Technik - beide sind keine richtigen Anleitungen, nur Modellen um die Technik zu zeigen. Viel Spaß beim stricken!

04.11.2021 - 07:15:

Corinna wrote:

Liebes Drops-Team, vielen Dank für die tolle Kurzanleitung!! Ich hab nur eine Frage zu Bild 24: gibt es auch eine Anleitung, wie das Loch unter dem Arm geschlossen wird - ohne, dass das im fertigen Pulli dann stört oder auffällt ? liebe Grüße, Corinna

02.11.2021 - 14:20:

DROPS Design answered:

Liebe Corinna, ja sicher, dieses Video zeigt zwei verschiedene Arten dieses Loch zusammenzunähen. Viel Spaß beim stricken!

03.11.2021 - 09:18:

Ana Graciela Perez wrote:

Se puede tejer de abajo hacia arriba en un patrón de saco tejido de arriba hacia abajo. Gracias

20.10.2021 - 17:28:

DROPS Design answered:

Hola Ana, sí, se puede trabajar de abajo arriba, pero tienes que ajustar el patrón, empezando desde el final de la prenda/ las instrucciones. En el caso de un raglán o canesú redondo, vas a tener que disminuir en vez de aumentar.

20.10.2021 - 22:43:

Clara Nergårdh wrote:

Vilken storlek på stickorna använder ni i den här beskrivningen?

20.10.2021 - 10:08:

DROPS Design answered:

Hej Clara, det kan være pind nr 7 eller 8 i den her lektion. Men sørg for at få den strikkefasthed som står i den opskrift du følger, ellers får du ikke de rigtige mål.

22.10.2021 - 12:14:

Madeleine wrote:

Om man skulle vilja sticka en polotröja med ett liknande mönster till denna, hur skulle man göra då?

05.10.2021 - 19:32:

DROPS Design answered:

Hej Madeleine. Då får du sticka en högre halskant (ev sticka på den senare). Du hittar flera mönster på polotröjor som stickas uppifrån och ner här. Mvh DROPS Design

07.10.2021 - 13:17:

Elisabeth Solhaug wrote:

På oppskrift 221-3, når jeg øker i mønstret med kast, blir det for mange masker.. skal kastet strikkes sammen med masken i neste runde slik at ant masker blir lik? Mener ikke på økningen i raglan.

01.09.2021 - 19:02:

DROPS Design answered:

Hei Elisabeth. Du skal ikke strikke kastene sammene med maskene . Når du strikker 1.rad av A.1 skal det økes med 4 masker og på neste omgang strikkes kastet vridd rett, det skal ikke blir hull. Når du strikker 3. rad av A.1 strikkes det 5 masker sammen 2 ganger = 8 masker felt, på samme rad øker du med 8 masker/kast, slik at maskeantallet blir det samme. Har du felt riktig maskeantall før og etter kastene? mvh DROPS design

06.09.2021 - 07:33:

Kiki wrote:

Hallo, ich stricke sei fast 40 Jahren Norweger Pullis von oben.auch mit Zopfmuster eine einfache schöne Sache.

26.08.2021 - 08:53:

Brenda Koopman wrote:

Ik heb ‘Listen to nature’ (nr 213-1) gemaakt. Goed gelukt, alleen stap 18 is niet goed gegaan. Ik heb zoals in 18B beschreven steken opgenomen voor de mouw, maar dat leverde gaten op en slordig breiwerk. Heb dit achteraf dicht moeten maken, wat niet mooi is geworden. Ik ga een volgende keer denk ik methode 18A maar volgen en hoop dat het grotere gat dat dan ontstaat mooi dicht te maken is.\\r\\nZou echter het liefst methode 18B doen. Tips ervoor?

18.08.2021 - 07:40:

Mimisasa wrote:

Modèle de pull heim Quelle est l’astuce pour éviter l’effet de spirale( lors d’un changement de rang) qd on tricote avec une aiguille circulaire / empiècement rond . J’ai peur que cela décale le motif du jacquard

18.07.2021 - 18:04:

DROPS Design answered:

Bonjour Mimisasa, cette vidéo montre comment éviter un décalage lorsque l'on tricote des rayures en rond; lorsque l'on tricote un jacquard, cette méthode est parfois plus compliquée à adapter, vous pouvez jouer avec les couleurs au début des tours en serrant un peu plus, un peu moins pour tenter de rétablir une "ligne droite". Bon tricot!

19.07.2021 - 09:42:

Marlene Collette wrote:

J'ai commandé la laine pour modèle Tavik z - 831 , mais je ne voie pas dans les explications quand démarrer le jacquart .

17.07.2021 - 19:50:

DROPS Design answered:

Bonjour Mme Collette, dans ce modèle, le jacquard se tricote en suivant les diagrammes A.1 et A.2 (A.3 pour le bonnet). Pour le pull, vous tricoterez A.1 lorsque vous commencerez l'empiècement. Bon tricot!

19.07.2021 - 09:44:

Elsa Lourdes wrote:

Con vueltas cortas para que la parte de la espalda sea mas alta que la delantera seria interesante un video.

06.07.2021 - 01:32:

Ximena wrote:

Hola! cual es la distribución de puntos en el ejemplo de la lección, para colocar los marcadores correspondientes entre espalda ,mangas y delantero? gracias

05.07.2021 - 04:19:

DROPS Design answered:

Hola Ximena, este es sólo un ejemplo sobre cómo se trabaja, de forma teórica. El número de puntos a distribuir se encuentra especificado en cada patrón en el que se use esta técnica.

14.07.2021 - 23:46:

TORILL Waarum Johansen wrote:

Jeg har begynt på mønster til topp ,211/5 Cash the Wind. Jeg har 4 merketråder,rygg,arm,forstykke,arm.Da jeg skal begynne 2dre omgang å artikkel den økte maskene som skal inni A1,A2,A3,for jeg ikke maskeantalle til å stemme.Hvordan skal jeg gjøre dette,Jeg står helt fast.

04.07.2021 - 03:47:

DROPS Design answered:

Hei Torill. Husk det skal økes før 1. og 3. merke og etter 2. og 4. merke (raglan økningene på for og bakstykket), i tillegg økes det i diagram A.1 og A.3 x 2. Hvilken str. strikker du? I f,eks str. S, har man 106 maskere, så setter man 4 merker. 1. merke i 17. maske, 2. merke i 37. maske, 3. merke i 70. maske og 4. merke i 90. maske. I 1. omgang med raglanøkning og økning i diagrammene skal du da ha + 4 masker i raglanøkning og + 4 i diagrammene (A.1 og A.3) = 8 økte masker, 106 + 8 = 114 masker. mvh DROPS design

05.07.2021 - 08:46:

Farida wrote:

Hola, soy principiante, en el punto 6, cada cuántas corridas debo aumentar puntos? Hablan de un patrón que no aparece en este artículo, ayuuuuda, muchas gracias

06.06.2021 - 02:46:

DROPS Design answered:

Hola Farida, este es solo un ejemplo sobre cómo se trabaja este tipo de disminuciones. No es ningún patrón en concreto. En cada patrón indican cada cuántas vueltas se tiene que aumentar y el número de puntos a aumentar.

13.06.2021 - 19:05:

Marie wrote:

Ich verstehe leider nicht, wie man den Pullover zwischendurch anprobieren soll. Selbst mit einer 80 cm Rundstricknadel passt das strickteil nicht über den Kopf ....gibt es einen Trick dabei? Vielen Dank

31.05.2021 - 23:12:

DROPS Design answered:

Liebe Marie, Sie können z.B. alle Maschen auf einen Faden stilllegen - siehe Video. Viel Spaß beim stricken!

01.06.2021 - 08:43:

Maria Luisa Lagos wrote:

Hola. Una vez hecha la muestra. Que medida debo tomar para hacer el cálculo de los puntos que tengo que montar? Contorno de cuello? Contorno de cabeza? Quiero hacer un cárdigan abierto adelante Gracias!!!!

23.05.2021 - 14:06:

DROPS Design answered:

Hola María Luisa, el número de puntos dependerá del modelo y la talla. Para realizar nuestros modelos, necesitarías la medida del contorno del pecho y de las caderas, para elegir la talla adecuada. Puedes consultar nuestra colección de chaquetas para más información.

30.05.2021 - 20:17:

VIALAR wrote:

Bonjour, comment comptez-vous les mailles après un premier rang de l'empiècement , vous dites 94 moi je n'en compte que 90 - 86 mailles + 4 jetés

17.05.2021 - 15:19:

DROPS Design answered:

Bonjour Mme Vialar, pourriez-vous poser votre question sur le modèle que vous tricotez? Il sera ainsi plus facile pour nous de vérifier et de vous expliquer, merci pour votre compréhension.

18.05.2021 - 09:23:

VIALAR wrote:

Comment comptez-vous les mailles 94 après le 1er rang , moi j'arrive à 90 - 86 mailles + 4 jetés

17.05.2021 - 15:16:

Shanthi wrote:

Hi. In the pattern BLUE NOVEMBER, can you give me proper instructions on how to decrease 29 stitches from 67 stitches to get 38 stitches ? I received you mail, thank you but could not get the answer I wanted. I have reached the end of the puffed sleeve but cannot go further since I am finding it hard to understand. Awaiting you reply. Thank you.

17.05.2021 - 12:37:

DROPS Design answered:

See Answer below :)

18.05.2021 - 09:23:

Leave a comment or question to this lesson

Your email address will not be published. Required fields are marked *.