DROPS Sky
DROPS Sky
74% Alpaca, 18% Polyamide, 8% Wool
from 5.10 £ /50g
Get the yarn to make this pattern from 15.30£.

The yarn cost is calculated from the pattern’s smallest size and the yarn’s cheapest product type. Looking for an even better price? You might find it on the DROPS Deals!

DROPS Super Sale

Chill of Dawn

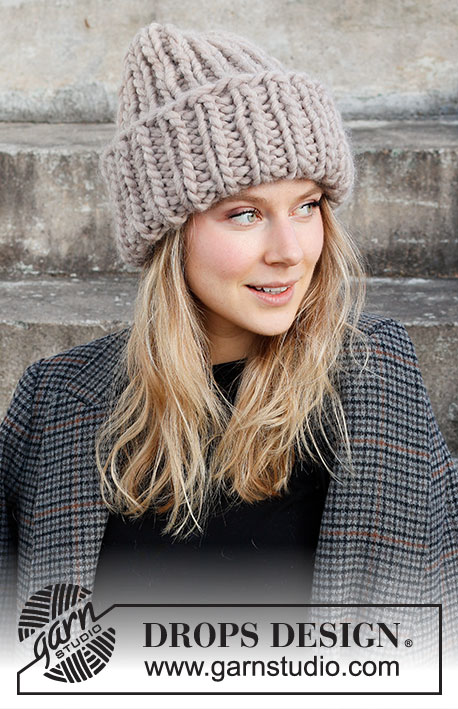
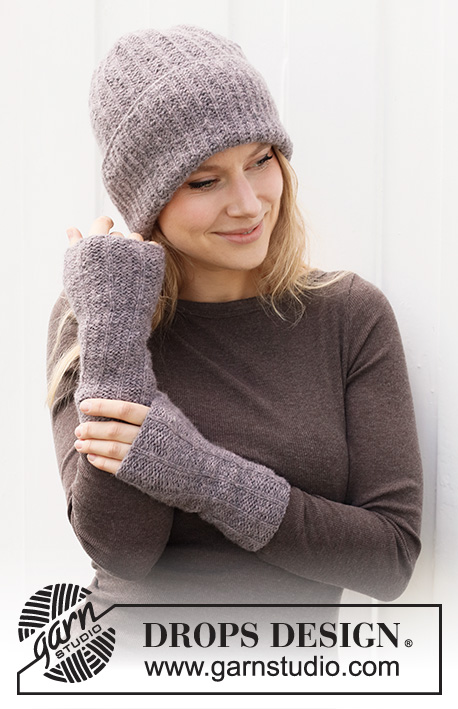
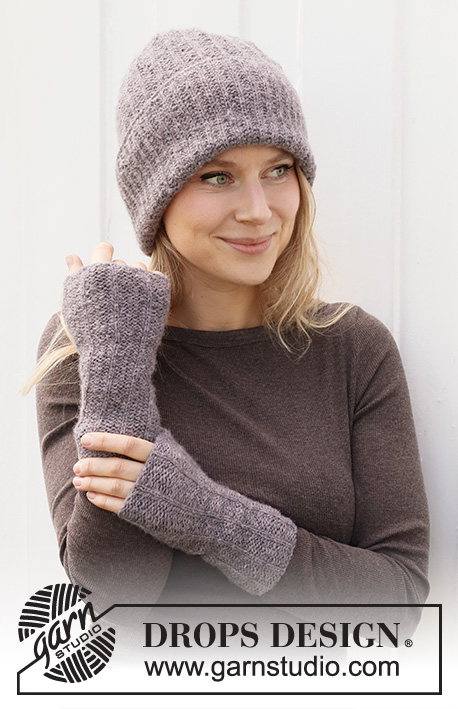
Knitted beanie / hipster hat and wrist warmers in DROPS Sky with garter stitch and English rib stitch.

DROPS 214-15
DROPS design: Pattern sk-113
Yarn group B
-------------------------------------------------------

FOR THE ENTIRE SET:

SIZE:
S/M - L/XL

MATERIALS:
DROPS SKY from Garnstudio (belongs to yarn group B)
150-150 g colour 08, lavender

HAT:

SIZE:
S/M - L/XL
Head circumference: approx. 54/56 - 58/60 cm

MATERIALS:
DROPS SKY from Garnstudio (belongs to yarn group B)
100-100 g colour 08, lavender

KNITTING TENSION:
21 stitches in width and 42 rows vertically in garter stitch = 10 x 10 cm.

NEEDLES:
DROPS CIRCULAR NEEDLE SIZE 3.5 mm : Length 40 cm.
DROPS DOUBLE POINTED NEEDLES SIZE 3.5 mm
Needle size is only a suggestion! If you have too many stitches on 10 cm switch to a larger needle size. If you have too few stitches on 10 cm switch to a smaller needle size.

WRIST WARMERS:

SIZE:
S/M - L/XL
Measurements: Length: 22 cm Circumference: Approx. 18-19 cm.

MATERIALS:
DROPS SKY from Garnstudio (belongs to yarn group B)
50-50 g colour 08, lavender

KNITTING TENSION:
21 stitches in width and 42 rows vertically in garter stitch = 10 x 10 cm.

NEEDLES:
DROPS CIRCULAR NEEDLE SIZE 3.5 mm : Length 40 cm.
Needle size is only a suggestion! If you have too many stitches on 10 cm switch to a larger needle size. If you have too few stitches on 10 cm switch to a smaller needle size.

-------------------------------------------------------

Alternative Yarn – See how to change yarns here
Yarn Groups A to F – Use the same pattern and change the yarn here
Yarn usage using an alternative yarn – Use our yarn converter here

-------------------------------------------------------

DROPS Sky
DROPS Sky
74% Alpaca, 18% Polyamide, 8% Wool
from 5.10 £ /50g
Get the yarn to make this pattern from 15.30£.

The yarn cost is calculated from the pattern’s smallest size and the yarn’s cheapest product type. Looking for an even better price? You might find it on the DROPS Deals!

DROPS Super Sale

SAVE 30% on 6 cotton favourites!
Valid until 12.04.2024

Pattern instructions

NOTE: This pattern is written in British English. All measurements in charts are in cm. For conversion from cm to inches - click here. There are different terms for crocheting in British and American English. If this pattern includes crochet, click for "crochet terms" here. For this pattern in American English, please click here.
-------------------------------------------------------

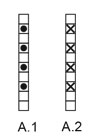
EXPLANATION FOR THE PATTERN:

-------------------------------------------------------

GARTER STITCH (worked in the round):
1 ridge vertically = 2 rounds, i.e. knit 1 round and purl 1 round.

GARTER STITCH (back and forth):
Knit all rows.
1 ridge vertically = knit 2 rows.

PATTERN:
Hat: See diagram A.1.
Wrist warmers: See diagram A.2.
Diagrams show all rows in pattern seen from the right side.

DECREASE TIP-1 (applies to hat):
Decrease on rounds that are last round in A.1 as follows:
Decrease as follows after marker:
Work stitch with marker and the next 7 stitches as before, slip 1 stitch knitwise, knit 1, pass slipped stitch over (= 1 stitch decreased).
Decrease as follows before marker:
Work until 9 stitches remain before marker, knit the next 2 stitches together (= 1 stitch decreased)

DECREASE TIP-2 (applies to wrist warmers): 
Decrease 1 stitch by knitting 2 together from right side.

INCREASE TIP (applies to wrist warmers):
Increase 1 stitch by making 1 yarn over. On next row, knit yarn over twisted to avoid hole.

CAST-OFF TIP:
To avoid a tight cast-off edge you may use a larger needle size. If this also is too tight, work a 1 yarn over after approx. every 4th stitch while casting off (cast off yarn overs as regular stitches).

-------------------------------------------------------

START THE PIECE HERE:

-------------------------------------------------------

HAT - SHORT OVERVIEW OF THE PIECE:
Work in the round on a short circular needle. Switch to double pointed needles when needed.

HAT:
Cast on 104-112 stitches on a circular needle size 3.5 mm with Sky. Knit 1 round. Then work pattern as follows: * A.1 (= 1 stitch), 1 stitch in GARTER STITCH - read explanation above *, work from *-* the entire round. REMEMBER THE KNITTING TENSION! When A.1 has been worked vertically, repeat the last 2 rounds in A.1.
When piece measures 14 cm, turn piece so that wrong side is outwards (this is done so that right side of folding edge is turned outwards at the end when hat is finished). Insert a marker here. NOW MEASURE PIECE FROM HERE!
Then work pattern in the in opposite direction as follows: * 3 stitches in garter stitch, A.1 (= 1 stitch) *, repeat from *-* the entire round. When piece measures 14-15 cm from marker, insert 2 new markers in piece as follows: Insert first marker in the first English rib stitch on round, skip the next 51-55 stitches and insert next marker in the next stitch (= 51-55 stitches between stitches with marker). On next round begin decrease - read DECREASE TIP-1 (= 4 stitches decreased). Decrease like this every other round 16-18 times = 40-40 stitches.
Then work in stocking stitch and decrease as follows:
ROUND 1: * Knit 2, knit 2 together (= 1 stitch decreased) *, work from *-* the entire round (= 10 stitches decreased) = 30-30 stitches.
ROUND 2: Knit 1 round.
ROUND 3: Knit stitches together 2 by 2 = 15-15 stitches.
Cut the yarn and pull it through the remaining stitches, tighten together and fasten.
Hat measures approx. 24-26 cm with 12 cm fold at the bottom.

-------------------------------------------------------

WRIST WARMERS - SHORT OVERVIEW OF THE PIECE:
Work back and forth on circular needle, and sew together.

WRIST WARMERS:
Cast on 43-47 stitches on a circular needle size 3.5 mm with Sky. Work pattern as follows (1st row = right side): Work 11-13 stitches in GARTER STITCH – read explanation above, * A.2 (= 1 stitch), 4 stitches in garter stitch *, work from *-* 4 times in total, A.2 over next stitch, 11-13 stitches in garter stitch. Continue back and forth like this. REMEMBER THE KNITTING TENSION!
When A.2 has been worked vertically, repeat the last 2 rows in diagram until finished measurements, and when piece measures 4 cm decrease 2 stitches on row as follows: Work 3 stitches in garter stitch as before, decrease 1 stitch – read DECREASE TIP-2, work as before until there is 5 stitches left on row, decrease 1 stitch, work 3 stitches garter stitch as before. Repeat decrease when piece measures 6 cm = 39-43 stitches. When piece measures 8 cm, decrease 1 stitch in garter stitch in every section with 4 stitches in garter stitch = 35-39 stitches.
Work until piece measures 14 cm. Now increase 2 stitches on row as follows: Work 3 stitches in garter stitch as before, increase 1 stitch – read INCREASE TIP, work as before until there are 3 stitches left on row, increase 1 stitch, work 3 stitches in garter stitch as before. Repeat increase when piece measures 18 cm = 39-43 stitches. Continue like this until piece measures 22 cm. Cast off by knitting from wrong side - read CAST-OFF TIP. Cut the yarn but leave some yarn for assembly. Sew seam inside 1 edge stitch in garter stitch. Work the other wrist warmer the same way.

Diagram

symbols = knit from the right side, purl from the wrong side
symbols = English rib stitch (applies to hat): insert right needle through stitch on round before previous round, knit 1 and slip stitches off the left needle
symbols = English rib stitch (applies to wrist warmers): insert right needle through stitch on needle before previous row, knit 1 and slip stitches off the left needle
diagram

Each of our patterns has specific tutorial videos to help you.

Do you have a question? See a list of frequently asked questions (FAQ)

Knitting tension is what determines the final measurements of your work, and is usually measured per 10 x 10 cm. It is provided like so: number of stitches in width x number of rows in height - eg: 19 stitches x 26 rows = 10 x 10 cm.

The knitting tension is very individual; some people knit/crochet loosely while others work tightly. You adjust the knitting tension with the needle size, which is why the suggested needle size is only meant as a guide! You need to adjust this (up or down) to ensure that YOUR knitting tension matches the knitting tension provided in the pattern. If you work with a different knitting tension than provided you will have a different yarn consumption, and your work will have different measurements than what the pattern suggests.

The knitting tension also determines which yarns can replace each other. As long as you achieve the same knitting tension you can replace one yarn with another.

See DROPS lesson: How to measure your tension/gauge

See DROPS video: How to make a gauge tension swatch

The required amount of yarn is provided in grams, eg: 450 g. To calculate how many balls you’ll need you first need to know how many grams are in 1 ball (25g, 50g or 100g). This information is available if you click on the individual yarn quality on our pages. Divide the amount required with the amount of each ball. For example, if each ball is 50g (the most common amount), the calculation will be as follows: 450 / 50 = 9 balls.

The important thing when changing from one yarn to another is that the knitting/crochet tension remains the same. This is so that the measurements of the finished piece will be the same as on the sketch provided. It is easier to achieve the same knitting tension using yarns from the same yarn group. It is also possible to work with multiple strands of a thinner yarn to achieve the knitting tension of a thicker one. Please try our yarn converter. We recommend you to always work a test swatch.

Please NOTE: when changing yarn the garment might have a different look and feel to the garment in the photo, due to individual properties and qualities of each yarn.

See DROPS lesson: Can I use a different yarn than the one mentioned in the pattern?

All our yarns are categorised into yarn groups (from A to F) according to thickness and knitting tension – group A contains the thinnest yarns and group F the thickest. This makes it easier for you to find alternative yarns to our patterns, should you wish to switch yarn. All yarns within the same group have a similar knitting tension and can easily replace each other. However, different yarn qualities have different structures and properties which will give the finished work a unique look and feel.

Click here for an overview of the yarns in each yarn group

At the top of all our patterns you’ll find a link to our yarn calculator, which is a helpful tool should you wish to use a different yarn than suggested. By filling in the yarn quality you wish to replace, the amount (in your size) and number of strands, the calculator will present good alternative yarns with the same knitting tension. Additionally it will tell you how much you’ll require in the new qualities and whether you’ll need to work with multiple strands. Most skeins are 50g (some are 25g or 100g).

If the pattern is worked with multiple colours, every colour will have to be calculated separately. Similarly, if the pattern is worked with several strands of different yarns (for example 1 strand Alpaca and 1 strand Kid-Silk) you will have to find alternatives for each, individually.

Click here to see our yarn calculator

Since different yarns have different qualities and textures we have chosen to keep the original yarn in our patterns. However, you can easily find options among our available qualities by using our yarn calculator, or simply pick a yarn from the same yarn group.

It is possible that some retailers still have discontinued yarns in stock, or that someone has a few skeins at home that they would like to find patterns for.

The yarn calculator will provide both alternative yarn as well as required amount in the new quality.

If you think it's hard to decide what size to make, it can be a good idea to measure a garment you own already and like the size of. Then you can pick the size by comparing those measures with the ones available in the pattern's size chart.

You'll find the size chart at the bottom of the pattern.

See DROPS lesson: How to read size chart

The needle size provided in the pattern serves only as a guide, the important thing is to follow the knitting tension. And since knitting tension is very individual, you will have to adjust the needle size to ensure that YOUR tension is the same as in the pattern – maybe you’ll have to adjust 1, or even 2 needle sizes, up or down to achieve the correct tension. For this, we recommend that you work test swatches.

Should you work with a different knitting tension than the one provided, the measurements of the finished garment might deviate from the measurement sketch.

See DROPS lesson: How to measure your tension/gauge

See DROPS video: How to make a tension/gauge swatch

Working a garment top-down provides more flexibility and room for personal adjustment. For example it is easier to try the garment on while working, as well as making adjustments to length of yoke and shoulder caps.

The instructions are carefully explaining every step, in the correct order. Diagrams are adjusted to the knitting direction and are worked as usual.

The diagram depicts all rows/rounds, and every stitch seen from the right side. It is read from bottom to top, from right to left. 1 square = 1 stitch.

When working back and forth, every other row is worked from the right side and every other row is worked from the wrong side. When working from the wrong side, the diagram will have to be worked reversed: from left to right, knit stitches are purled, purl stitches are knit etc.

When working in the round every round is worked from the right side and the diagram are worked from right to left on all rounds.

See DROPS lesson: How to read knitting diagrams

The diagram depicts all rows/rounds, and every stitch seen from the right side. It is worked from bottom to top, from right to left.

When working back and forth every other row is worked from the right side: from right to left and every other row is worked from the wrong side: from left to right.

When working in the round, every row in the diagram are worked from the right side, from right to left.

When working a circular diagram you start in the middle and work your way outwards, counter clockwise, row by row.

The rows usually start with a given number of chain stitches (equivalent to the height of the following stitch), this will either be depicted in the diagram or explained in the pattern.

See DROPS lesson: How to read crochet diagrams

Instructions for working several diagrams after each other on the same row/round, will often be written like so: “work A.1, A.2, A.3 a total of 0-0-2-3-4 times". This means you work A.1 once, then A.2 is worked once, and A.3 is repeated (in width) the number of times provided for your size – in this case like so: S = 0 times, M = 0 times, L=2 times, XL= 3 times and XXL = 4 times.

The diagrams are worked as usual: begin with the first row in A.1, then work the first row in A.2 etc.

See DROPS lesson: How to read knitting diagrams

See DROPS lesson: How to read crochet diagrams

The total width of the garment (from wrist-to-wrist) will be larger in the larger sizes, despite the actual sleeves being shorter. The larger sizes have longer sleeve caps and wider shoulders, so there will be a good fit in all sizes.

The measurement sketch/schematic drawing provides information regarding the full length of the garment. If it’s a jumper or a jacket the length is measured from the highest point on the shoulder closest to the neckline, and straight down to the bottom of the garment. It is NOT measured from the tip of shoulder. Similarly, the length of yoke is measured from the highest point on the shoulder and down to where yoke is split into body and sleeves.

On a jacket measures are never taken along bands, unless specifically stated. Always measure inside band stitches when measuring the length.

See DROPS lesson: How to read a schematic drawing

Diagrams are often repeated on the round or in height. 1 repeat is the diagram the way it appears in the pattern. If it says to work 5 repeats of A.1 in the round, then you work A.1 a total of 5 times after/next to each other in the round. If it says to work 2 repeats of A.1 vertically/in height you work the entire diagram once, then begin again at the start and work the entire diagram one more time.

Chain stitches are slightly narrower than other stitches and to avoid working the cast-on edge too tight, we simply chain more stitches to begin with. The stitch count will be adjusted on the following row to fit the pattern and measurement sketch.

The rib edge is more elastic and will contract slightly compared to, for example, stocking stitch. By increasing before the rib edge, you avoid a visible difference in width between the rib edge and the rest of the body.

It’s very easy to cast off too tightly, and by making yarn overs while casting off (and simultaneously casting these off) you avoid a too tight cast off edge.

See DROPS video: How to bind off with yarn overs (yo)

To achieve an even increase (or decrease) you can increase on, for example: every 3rd and 4th row alternately, like so: work 2 rows and increase on the 3rd row, work 3 rows and increase on the 4th. Repeat this until the increase is complete.

See DROPS lesson: Increase or decrease 1 st on every 3rd and 4th row alternately

Should you prefer to work in the round instead of back and forth, you may of course adjust the pattern. You’ll need to add steeks mid-front (usually 5 stitches), and follow the instructions. When you would normally turn and work from the wrong side, simply work across the steek and continue in the round. At the end you’ll cut the piece open, pick up stitches to work bands, and cover the cut edges.

See DROPS video: How to knit steeks and cut open

Should you prefer to work back and forth instead of in the round, you may of course adjust the pattern so you work the pieces separately and then assemble them at the end. Divide the stitches for the body in 2, add 1 edge stitch in each side (for sewing) and work the front and back pieces separately.

See DROPS lesson: Can I adapt a pattern for circular needles into straight needles?

Pattern repeats can vary slightly in the different sizes, in order to get the correct proportions. If you’re not working the exact same size as the garment in the photo, yours might deviate slightly. This has been carefully developed and adjusted so that the complete impression of the garment is the same in all sizes.

Make sure to follow instructions and diagrams for your size!

If you have found a pattern you like which is available in women’s size it’s not very difficult to convert it to men’s size. The biggest difference will be the length of sleeves and body. Start working on the women size that you think would fit across the chest. The additional length will be worked right before you cast off for the armhole/sleeve cap. If the pattern is worked top-down you can add the length right after the armhole or before the first decrease on sleeve.

Regarding additional yarn amount, this will depend on how much length you add, but it is better with a skein too many than too few.

All yarns will have excess fibres (from production) that might come off as lint or shedding. Brushed yarns (ie hairier yarns) have more of these loose, excess fibres, causing more shedding.

Shedding also depends on what is worn under or over the garment, and whether this pulls at the yarn fibres. It’s therefore not possible to guarantee that there will be no shedding

Below are some tips on how to get the best result when working with hairier yarns:

1. When the garment is finished (before you wash it) shake it vigorously so the looser hairs come off. NOTE: do NOT use a lint roller, brush or any method that pulls at the yarn.

2. Place the garment in a plastic bag and put it in your freezer - the temperature will cause the fibres to become less attached to each other, and excess fibres will come off easier.

3. Leave in the freezer for a few hours before taking it out and shaking it again.

4. Wash the garment according to the instructions on the yarn label.

Pilling is a natural process that happens to even the most exclusive of fibers. It's a natural sign of wear and tear that is hard to avoid, and that is most visible in high friction areas of your garment like a sweater's arms and cuffs.

You can make your garment look as new by removing the pilling, using a fabric comb or a pill/lint remover.

Still can't find the answer you need? Then scroll down and leave your question so one of our experts can try to help you. This will be done normally within 5 to 10 working days.
In the meantime, you can read the questions and answers that others have left to this pattern or join the DROPS Workshop on Facebook to get help from fellow knitters/crocheters!

You might also like...

Post a comment to pattern DROPS 214-15

We would love to hear what you have to say about this pattern!

If you want to leave a question, please make sure you select the correct category in the form below, to speed up the answering process. Required fields are marked *.

Comments / Questions (13)

country flag Lourdes wrote:

Hola Llegue a la parte de las disminuciones del gorro, cuando leo los tips de disminución resultan 2 puntos disminuidos en cada vuelta, pero en las indicaciones dice que se disminuyen 4. No lo comprendo. Que estoy haciendo mal? Gracias

28.05.2023 - 07:51

DROPS Design answered:

Hola Lourdes, se disminuye 1 punto antes y 1 punto después de cada marcapuntos, tal y como se indica en el TIP-1 PARA LAS DISMINUCIONES. Como tienes dos marcapuntos en la vuelta, entonces trabajas las disminuciones 2 veces en la vuelta = 4 disminuciones en total.

28.05.2023 - 19:02

country flag Jacqui wrote:

I’m having a problem with decreasing on the hat. I decrease on the k/p row as instructed but in the next row, knitting the English/fisherman stitch into the row below (where that stitch is one of the reduced ones), causes me to have a dropped/loose stitch. Can you please explain what I need to do to avoid this? Thanks!

26.02.2023 - 15:51

DROPS Design answered:

Dear Jacqui, on next round make sure you are inserting the needle into all stitches from previous round to avoid loosing one of the decreased stitches. Happy knitting!

27.02.2023 - 10:54

country flag Elin wrote:

Kan ni skriva hur man ska sticka varven från varv 2. Är det så här varv2 1 rät, 1 rät upprepa Varv 3 1 rät 1 avig upprepa Varv4 1 patent 1 rät upprepa

21.05.2022 - 19:18

DROPS Design answered:

Hei Elin. Tenker du på luen eller pulsvantene? Luen strikkes rundt og pulsvantene strikkes frem og tilbake, og når du strikker etter diagram, husk å lese diagramikon forklaringen til hvordan maskene skal strikkes (patentmasken strikkes ulikt på luen og pulsvantene). Når det strikkes RÄTSTICKNING er det også forskjellige forklaringer på om det strikkes luen eller pulsvarmere. Forklaringen står øverst i oppskriften. mvh DROPS Design

23.05.2022 - 08:59

country flag Ellie wrote:

What does it mean from the first Garter Stitch? Sorry I still don't get it. A chart is read from right to left and left to right on the next row (purl row). Why your pattern is written vertically? Instead of repeating the same exact thing it is written in the pattern, can you explicitly express, like Knit All, Knit 1, Purl all row in the third, etc. Can't understand. I've read some patterns and your pattern is impossible to understand, especially this one.

20.01.2022 - 18:57

DROPS Design answered:

Dear Ellie, correct, you have to repeat the stitches between * and * all around the round, and repeat these rounds as shown in the chart - maybe this lesson could help you better?

21.01.2022 - 09:07

country flag Ellie Wakamatsu wrote:

Hat question: "When A.1 has been worked vertically, repeat the last 2 rounds in A.1.", what does it mean? Is it that I almost measure 14 cm for the rim portion before flipping it to inside out, the last 2 rounds in A1, so according to the pattern, K, K1B four times, then K2, and I keep doing that an entire row, then do the purl version. I do that 2 times (Garter Stitch, meaning 2 rows of knit and purl of a ridge?) for 4 rows (knit, purl x 2 Garter stitch/ridge rows)?

20.01.2022 - 13:53

DROPS Design answered:

Dear Mrs Wakamatsu, this means you will repeat the round 3 and 4 described in the previous answer; and yes, work until piece measures 14 cm before flipping inside out and work : 3 sts in garter st (alternately K or P in height) and A.1 as previously. Hope this will help. Hpapy knitting!

20.01.2022 - 17:16

country flag Ellie wrote:

Hi, can you please confirm if I understand this part of this hat pattern correctly? * A.1 (= 1 stitch), 1 stitch in GARTER STITCH - read explanation above * This above line means, A1, first so I do Knit, Knit one below four times, knit 2. Is this correct? What does it mean 1 stitch in Garter stitch? You mean knit in pattern (K, K1B x 4, K2), then on the next is purl row, since it is Garter stitch, so the pattern would look (P, P1B x4, P2)?

20.01.2022 - 13:44

DROPS Design answered:

Dear Ellie, on first round repeat: *A.1 (= K1), 1 st in garter st (= K1)*; on 2nd round, repeat *A.1 (= K1), 1 st in garter st (= P1)*, on 3rd round repeat *A.1 (= Knit 1 below), 1 st in garter st (= K1)*, on 4rd round repeat *A.1 (= K1), 1 st in garter st (= P1)*. Repeat then round 3 and 4. Happy knitting!

20.01.2022 - 17:13

country flag Ruta wrote:

Już widzę, że robiłam źle robiąc na około, proszę skasować mój poprzedni komentarz

25.12.2021 - 21:35

country flag Ruta wrote:

Widzę, że na zdjęciu są 2 oczka lewe i 1 oczko ściegiem angielskim, w opisie jest błąd, to niemożliwe, żeby powstał wzór że zdjęcia robiąc 1 oczko prawe, 1 oczko ściegiem angielskim, a kolejny rząd wszystkie prawe. Właśnie robię według opisu i wychodzi zupełnie co innego,vdo tego brzeg się podwija. Czy nie powinno być 2 oczka lewe, 1 ściegiem angielskim, a w kolejnym rzędzie wszystko na prawo?

25.12.2021 - 19:29

DROPS Design answered:

Witaj Ruto, tylko zakładka na dole czapki jest przerabiana jako 1 oczko ściegiem francuskim, A.1, itd. Dalsza część czapki jest przerabiana następująco: ‘Dalej przerabiać w przeciwnym kierunku następująco: *3 oczka ściegiem francuskim, schemat A.1 (= 1 oczko) *,… Pozdrawiamy!

27.12.2021 - 13:53

country flag Katu wrote:

Die deutsche Anleitung hat Fehler wie zum Beispiel dass auf einmal häken auftaucht anstatt stricken. Es ist ein einziges Chaos und ich musste auf die englische Anleitung zurück greifen um zu begreifen, was gemeint ist. Schrecklich und wirklich schade, das versaut die Lust die Mütze zu stricken.

13.11.2021 - 20:31

DROPS Design answered:

Guten Morgen, die Stellen mit "häkeln" statt "stricken" wurden korrigiert. Ansonsten wären wir Ihnen dankbar für weitere konkrete Hinweise, an welchen Stellen genau Sie Probleme mit der Anleitung haben und wo Sie die Anleitung als "Chaos" empfinden und auf die englische Version zurückgreifen mussten - an sich entspricht die Anleitung nämlich unseren üblichen Formulierungen, aber wir möchten uns natürlich bemühen, so verständlich wie möglich zu sein. Gutes Gelingen mit Ihrer Mütze!

15.11.2021 - 09:09

country flag Gun-Britt Pohtola wrote:

Någon råddigare beskrivning av mönstret, dvs ytmönstret har jag inte sett på länge. Av bilden framgår att det också finns aviga maskor på utsidan men om man stickar runt så vet jag inte var de finns, om man stickar enligt mönsterbilden. Bättre kan ni ! GB Pohtola

25.01.2021 - 13:11