
Popular categories
Looking for a yarn?


Comments / Questions (17)
![]() Kovács Jánosné wrote:
Kovács Jánosné wrote:
Nem értem a leirásban 2 fonalról /két szál/ irnak, kivéve az ujjaknál, de ott sem világos , hogy elhagyjuk az egyik szálat. Nekem ez nem világos
07.01.2025 - 15:49DROPS Design answered:
Kedves Kovács Jánosné, a darabot végig a háromféle fonalból 1-1 szálat összefogva (három szállal) kell kötni. A mintaleírást javítottuk. Sikeres kézimunkázást.
14.01.2025 - 16:20
![]() Liz Blaine wrote:
Liz Blaine wrote:
Please ignore my last question - I have just watched the video for short rows and think I understand it
24.01.2023 - 04:14
![]() Liz Blaine wrote:
Liz Blaine wrote:
Hi - I'm loving this pattern and how it is knitting up - but I'm not sure I understand correctly the following instructions for the collar. * Work 1 ridge back and forth over all stitches, 1 ridge back and forth over the first 9-9-9-10-10-10 stitches towards mid front * Could you please explain that for me in really really simple terms - maybe a diagram too? Thank you
24.01.2023 - 04:10DROPS Design answered:
Dear Mrs Blaine, to make the collar being larger on the outer edge as on the inner edge (shawl collar), you will work short rows, starting from RS (right collar) / from WS (left collar) and work more rows over the first outer stitches: 2 rows/ 1 ridge over all stitches and 2 rows/1 ridge over the first 9-10 sts only. Happy knitting!
24.01.2023 - 12:11
![]() Annette Toftager wrote:
Annette Toftager wrote:
Hvordan finder man ud af hvad størrelse man skal strikke, er der et skema med mål?
13.03.2022 - 17:20DROPS Design answered:
Hej Annette, ja, du finder cardiganens mål i måleskitsen nederst i opskriften. Du får de korrekte mål når du holder den strikkefasthed som står i opskriften. God fornøjelse!
14.03.2022 - 08:45
![]() Anouk Dekker wrote:
Anouk Dekker wrote:
Ik ben dit vest aan het breien met de bijbehorende wol van Drops, maar ik loop vast bij de kraag. Hoewel het patroon goed te volgens is snap ik dit stuk niet helemaal. Ik ben nu bij de "rechter kraag" en heb dus 13 steken op de naald. Dan moet ik 2 toeren/naalden recht breien voor de eerste ribbel. Maar dan ..... Ga ik dan meteen al terug naar 9 steken of gaat dat geleidelijker. Als ik op de tekening kijk lijkt het of ik elke ribbel een steek zou moeten minderen??? En dat ca 6 ribbels??
09.03.2021 - 12:59DROPS Design answered:
Dag Anouk,
Je breit als het ware verkorte toeren. Dus je breit eerst 13 steken (dus over alle steken van de kraag heen en weer). Dan brei je 9 steken, keer je het werk en brei je 9 steken terug. Zo brei je steeds afwisselend alle steken en alleen de 9 steken , dus je herhaalt steeds wat tussen de sterretjes staat.
09.03.2021 - 21:13
![]() Barbara wrote:
Barbara wrote:
Buongiorno, avrei bisogno di alcune informazioni: - quantità di filato per una taglia 54-56 (XXXL - XXXXL)? - quantità di maglie per la suddetta taglia? - se ho solo dei ferri non circolari, i cambiamenti nella lavorazione quali sono? - se ho già la lana, ma non è Drop? Ringrazio anticipatamente, cordialmente saluto.
31.12.2020 - 19:32DROPS Design answered:
Buonasera Barbara, purtroppo in questa sede non possiamo fornirle un'assistenza così personalizzata, ma può rivolgersi al suo rivenditore DROPS di fiducia. Buon lavoro!
01.01.2021 - 22:02
![]() Bjarney Halldórsdóttir wrote:
Bjarney Halldórsdóttir wrote:
Það er prentvilla í prjónfestunni í íslensku útgáfunni. Stendur að 8 lykkjur og 1 umferð!!! séu 10x10 cm
06.12.2020 - 10:52
![]() Catherine wrote:
Catherine wrote:
Bonjour, J'ai déjà Drops Melody et je voudrais combiner un autre fil pour tricoter ce modèle avec des grosses aiguilles 12. Quel fil me conseillez-vous d'ajouter? Merci d'avance
06.10.2020 - 09:18DROPS Design answered:
Bonjour Catherine, 1 fil D (Melody) peut remplacer 1 fil C + 1 fil A (cf alternatives), vous pouvez ainsi conserver au choix Brushed ou Alpaca Bouclé ou bien remplacer une de ces 2 là par 2 fils du groupe A (pour remplacer 1 fil du groupe C). Consultez également notre convertisseur pour voir des alternatives, votre magasin saura également vous conseiller si besoin, même par mail ou téléphone. Bon tricot!
06.10.2020 - 11:28
![]() JAULIN Nadia wrote:
JAULIN Nadia wrote:
Bonjour, Serait-il possible de me préciser les augmentations de la manche en taille S. Je ne comprends pas combien de rangs je dois faire. Merci de votre retour.
26.08.2020 - 16:57DROPS Design answered:
Bonjour Mme Jaulin, la phrase a été reformulée correctement, merci pour votre retour. En taille S, vous augmentez 1 maille au début du rang à 15 cm et 1 maille en fin de rang à 30 cm = vous augmentez 2 mailles au total, une fois à droite et une fois à gauche (vu sur l'endroit). Bon tricot!
27.08.2020 - 09:18
![]() Liliana wrote:
Liliana wrote:
Las medidas de los diagramas son centímetros o puntos a montar en la aguja? The measurements in the diagrams are centimeters or points to mount on the needle? Thank you very much!
06.06.2020 - 23:39DROPS Design answered:
Hola Liliana. Los números en el diagrama bajo el patrón son cm.
07.06.2020 - 21:35
|
|
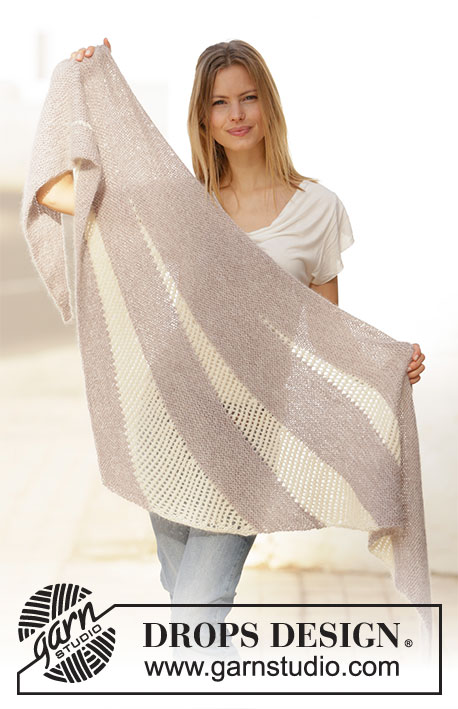
Transitions Jacket#transitionsjacket |
|
 |
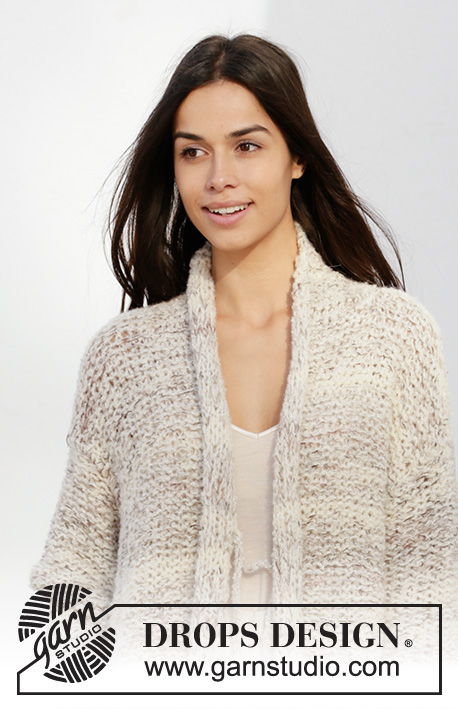 |
Knitted jacket in DROPS Fabel, DROPS Brushed Alpaca Silk and DROPS Alpaca Bouclé. The piece is worked with a shawl collar and splits in the sides. Sizes XS - XXL.
DROPS 210-23 |
|
|
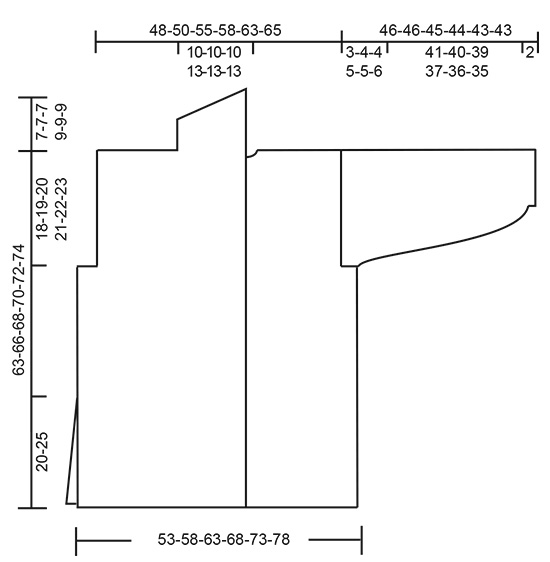
------------------------------------------------------- EXPLANATIONS FOR THE PATTERN: ------------------------------------------------------- RIDGE/GARTER STITCH (worked back and forth): Knit all rows. 1 ridge in height = Knit 2 rows. REVERSE STOCKING STITCH: Purl from the right side and knit from the wrong side. MEASURING TIP: All width measurements are taken with the pieces lying flat and without stretching. All length measurements are taken holding the pieces up or the jacket will be too long when worn. INCREASE TIP (for sides of sleeves): Increase 1 stitch on the inside of the 1 edge stitch by making 1 yarn over. On the next row work the yarn over twisted to avoid a hole. ------------------------------------------------------- START THE PIECE HERE: ------------------------------------------------------- JACKET – SHORT OVERVIEW OF THE PIECE: The whole garment is worked with 1 strand of each quality (= 3 strands). The back and front pieces and the sleeves are worked back and forth separately with circular needle, bottom up. The garment is sewn together to finish as described in the text. BACK PIECE: Cast on 42-46-50-54-58-62 stitches with circular needle size 12 mm and 1 strand of each quality. Purl 1 row (= wrong side). Continue with REVERSE STOCKING STITCH and 1 edge stitch in GARTER STITCH on each side – read description above. REMEMBER THE KNITTING TENSION! When the piece measures 45-47-48-49-50-51 cm – read MEASURING TIP, cast off 2-3-3-4-4-5 stitches for the armholes at the beginning of the next 2 rows = 38-40-44-46-50-52 stitches. Continue as before with 1 edge stitch in garter stitch on each side. When the piece measures 60-63-65-67-69-71 cm, cast off the middle 6-6-6-8-8-8 stitches for the neck and each shoulder is finished separately. Continue working and cast off 1 stitch for the neck at the beginning of next row from the neck = 15-16-18-18-20-21 stitches left on the shoulder. Continue working until the back piece measures 63-66-68-70-72-74 cm. Loosely cast off with knit from the right side. Work the other shoulder in the same way. RIGHT FRONT PIECE: Cast on 30-32-34-36-38-40 stitches with circular needle size 12 mm and 1 strand of each quality. Purl 1 row (= wrong side). Continue with reverse stocking stitch and 1 edge stitch in garter stitch on each side. When the piece measures 45-47-48-49-50-51 cm, cast off 2-3-3-4-4-5 stitches for the armhole at the beginning of the next row from the wrong side = 28-29-31-32-34-35 stitches. Continue as before with 1 edge stitch in garter stitch on each side until the piece measures 63-66-68-70-72-74 cm. The next row is worked as follows from the wrong side: Cast off 15-16-18-18-20-21 stitches for the shoulder and knit the remaining 13-13-13-14-14-14 stitches on the row for the collar. Continue the collar as described below. RIGHT COLLAR: = 13-13-13-14-14-14 stitches. Keep the stitches on circular needle size 12 mm. Start from the right side and work garter stitch back and forth using 1 strand of each quality as follows: * Work 1 ridge back and forth over all stitches, 1 ridge back and forth over the first 9-9-9-10-10-10 stitches towards mid front *, work from *-* a total of 6-6-6-8-8-8 times (the collar should measure approx. 8-8-8-9-9-9 cm on the inside at the narrowest). Loosely cast off with knit from the right side. LEFT FRONT PIECE: Cast on 30-32-34-36-38-40 stitches with circular needle size 12 mm and 1 strand of each quality. Purl 1 row (= wrong side). Continue with reverse stocking stitch and 1 edge stitch in garter stitch on each side. When the piece measures 45-47-48-49-50-51 cm, cast off 2-3-3-4-4-5 stitches for the armhole at the beginning of the next row from the right side = 28-29-31-32-34-35 stitches. Continue as before with 1 edge stitch in garter stitch on each side until the piece measures 63-66-68-70-72-74 cm. The next row is worked as follows from the right side: Cast off 15-16-18-18-20-21 stitches for the shoulder and knit the remaining 13-13-13-14-14-14 stitches on the row for the collar. Continue the collar as described below. LEFT COLLAR: = 13-13-13-14-14-14 stitches. Keep the stitches on circular needle size 12 mm. Start from the wrong side and work garter stitch back and forth using 1 strand of each quality as follows: * Work 1 ridge back and forth over all stitches, 1 ridge back and forth over the first 9-9-9-10-10-10 stitches towards mid front *, work from *-* a total of 6-6-6-8-8-8 times (the collar should measure approx. 8-8-8-9-9-9 cm on the inside at the narrowest). Knit 1 row from the wrong side. Loosely cast off with knit from the right side. SLEEVE: Cast on 16-18-18-20-20-20 stitches with circular needle size 9 mm and 1 strand Fabel, 1 strand Brushed Alpaca Silk and 2 strands Alpaca Bouclé (= 4 strands). Remove the one strand of Alpaca Bouclé and work the rest of the sleeve with 1 strand of each quality. Purl 1 row (= wrong side). Knit 1 row. Change to circular needle size 12 mm and work the next row as follows from the wrong side: 1 edge stitch in garter stitch, * make 1 yarn over, knit 2 *, work from *-* until there is 1 stitch left on the row, make 1 yarn over and work the last stitch in garter stitch = 24-27-27-30-30-30 stitches on the row. Continue with reverse stocking stitch and 1 edge stitch in garter stitch on each side (yarn overs from the previous row are purled twisted to avoid holes). When the sleeve measures 15-15-15-15-14-10 cm, increase as described below – read INCREASE TIP: SIZES XS, M, XL and XXL: Increase 1 stitch on each side. Increase like this every 15-15-14-10 cm a total of 2-2-2-3 times on each side = 28-31-34-36 stitches. SIZES S and L: Increase 1 stitch at the beginning of the row (not each side). Repeat the increase at the end of the row when the piece measures 30-30 cm = 29-32 stitches. After all the increases there are 28-29-31-32-34-36 stitches on the needle. Work until the sleeve measures 43-42-41-39-38-37 cm. Insert 1 marker on each side – these mark the bottom of the armhole. Continue working until the piece measures 0-1-1-2-2-3 cm from the markers. Now cast off 5 stitches for the sleeve cap at the beginning of the next 4 rows = 8-9-11-12-14-16 stitches left. Cast off the remaining stitches. The sleeve measures approx. 46-46-45-44-43-43 cm. Work the other sleeve in the same way. ASSEMBLY: Sew the shoulder seams inside the cast-off edge. Sew in the sleeves inside the 1 edge stitch in garter stitch and sew the bottom of the armhole – the markers on the sleeve should match the sides of the body. Sew the sleeve and side seams in one go – sew in the outermost loop of the outermost stitch so the seam is flat and finish the seam when there are 20 to 25 cm left on each side (= splits). Sew the collar together mid back with grafting stitches making sure the seam turns in when the collar is folded down. Sew the collar to the neck at the back. |
|
|
|
Have you finished this pattern?Tag your pictures with #dropspattern #transitionsjacket or submit them to the #dropsfan gallery. Do you need help with this pattern?You'll find 20 tutorial videos, a Comments/Questions area and more by visiting the pattern on garnstudio.com. © 1982-2025 DROPS Design A/S. We reserve all rights. This document, including all its sub-sections, has copyrights. Read more about what you can do with our patterns at the bottom of each pattern on our site. |
|


With over 40 years in knitting and crochet design, DROPS Design offers one of the most extensive collections of free patterns on the internet - translated to 17 languages. As of today we count 314 catalogues and 11822 patterns translated into English (UK/cm).
We work hard to bring you the best knitting and crochet have to offer, inspiration and advice as well as great quality yarns at incredible prices! Would you like to use our patterns for other than personal use? You can read what you are allowed to do in the Copyright text at the bottom of all our patterns. Happy crafting!
Post a comment to pattern DROPS 210-23
We would love to hear what you have to say about this pattern!
If you want to leave a question, please make sure you select the correct category in the form below, to speed up the answering process. Required fields are marked *.