
Popular categories
Looking for a yarn?


Comments / Questions (68)
![]() Marie-Louise wrote:
Marie-Louise wrote:
Stickfasthet för detta mönster 210-22 Är det 23 maskor på stickor 2,5 eller 3
06.06.2025 - 14:03DROPS Design answered:
Hej Marie-Louise. Stickfastheten är med den sticka som du stickar slätstickning med, dvs den större av de två. Men får du inte riktig stickfasthet med sticka 3,5 så får du testa en annan och använda den som du får rätt stickfasthet med. Mvh DROPS Design
09.06.2025 - 12:28
![]() Tove Hanssen wrote:
Tove Hanssen wrote:
Er det feil i mønster nr 210-22 ? prøvd å legge opp halskant 108 m i str M men halskanten blir ikke på noen måte likt det som vises på bilde , den blir trang og liten med str til et barn . Virker som altfor lite masker å starte med . Så hva er feil ?
02.02.2025 - 16:55DROPS Design answered:
Hei Tove. Oppskriften er oversendt til design avd slik at de kan ta en dobbeltsjekk. Du kan evnt legge opp flere masker og så når du skal øke etter halskanten, ikke øke flere maske enn hva du skal ha i str. M på begynneklsen av bærestykket. mvh DROPS Design
10.02.2025 - 13:30
![]() Gudrun wrote:
Gudrun wrote:
Hallo liebes Dropsteam. Trotz passender Maschenprobe \r\nwerde ich bei der Passe nur auf ca 23 cm bei Größe XXXL kommen. Kann ich den Rest dann ohne Zunahmen stricken?\r\n\r\nLiebe Grüße \r\nTrudi
23.01.2025 - 22:12DROPS Design answered:
Liebe Gudrun, ja ganz genau, stricken Sie jetzt wie zuvor aber ohne Zunahmen bis die Arbeit 27 cm misst. Viel Spaß beim Stricken!
24.01.2025 - 10:07
![]() Betty Osmont wrote:
Betty Osmont wrote:
Je ne comprends pas pour l'empiècement on dit de placer un marqueur tout les 4 mailles ( donc dans la 5e) mais cela ne fait pas tout le tour. Les augmentations ne seront donc pas repartis. Merci de m'éclairer
23.01.2025 - 17:17DROPS Design answered:
Bonjour Mme Osmont, vous devez tricoter ainsi (tailles M, L, XL, XXL): (3 m end, 1 m avec un marqueur, 4 m end), répétez de (à) soit 8 mailes au total 16-17-18-18 fois tout le tour = 128-136-144-144 mailles, autrement dit, entre le 1er marqueur et le 2ème marqueur vous aurez 7 mailles (4 m après le marqueur, 3 m avant le marqueur suivant). Bon tricot!
24.01.2025 - 09:03
![]() Hanne wrote:
Hanne wrote:
Jeg havde utroligt svært ved at få strikkefastheden til at passe i denne opskrift. Er det mon meningen at det er en næsten gennemsigtig sag? Det er jo ret tyndt , fabelgarnet, så hvis jeg skal ramme 23 masker på 10 cm, skal jeg bruge pinde nr 4 eller 4 1/2?? Fabel-garnet ser pænest ud på pinde 3??
25.12.2024 - 17:17DROPS Design answered:
Hei Hanne. Vi har brukt pinne 3,5 for å få den oppgitte strikkefastheten (23 masker i bredden og 30 pinner i høyden med glattstrikk = 10 x 10 cm) på denne genseren. Pinne str. 4,5 høres for tykt ut. Har du prøvd ulike kvaliteter på pinnene (tre/aluminium) ? Noen kan få ulike strikkefasthet med like str. på pinnene. mvh DROPS Design
03.01.2025 - 10:11
![]() Liz wrote:
Liz wrote:
Further to my last question, 116 in 4ply seems about 60 stitches short. However loosely I cast in, there’s no way that is big enough. The other drops pattern with drops Fabel is 160 stitches for a fitted round neck. Can you explain please? Thanks very much.
23.08.2024 - 09:36DROPS Design answered:
Dear Liz, please make sure you get correct tension, ie 23 sts = 10 cm in stocking stitch with the larger needles (adjust needle size if necessary) then tension with smaller needles should work; make also sure your cast on edge is not that tight to make sure you can pass head through. Note that number of stitches around neck depends on the tension, size and shape of piece. Happy knitting!
23.08.2024 - 15:49
![]() Liz wrote:
Liz wrote:
Is the stitch count right for the casting on of the neck? There’s no way an adult would get their head through the neck hole.
22.08.2024 - 19:06DROPS Design answered:
Dear Liz, make sure you get the correct tension (adjust needle size if necessary) with larger needles, then you should get the correct circumference, make sure the cast on edge is not too tight casting on stitches on a larger needle or with 2 needles - find different videos for casting on here. Happy knitting!
23.08.2024 - 07:57
![]() Bente Wendelbo Hansen wrote:
Bente Wendelbo Hansen wrote:
Jeg vil strikke Model Fenne, dvs uden ribkant i halsen, hvordan gør jeg det? Mvh Bente
29.06.2024 - 09:26DROPS Design answered:
Hej Bente, du følger opskriften men strikker det du vil i stedet for ribkant i halsen :)
02.07.2024 - 11:47
![]() Pernilla wrote:
Pernilla wrote:
Hur vet man när man ska byta rand i mönstret? Det står bara i början, att man ska använda choklad (och beige), men inte resterande ränder
03.06.2024 - 11:52DROPS Design answered:
Hej Pernilla. Det står i början av mönstret: RÄNDER: Det stickas 4 ränder så här: Anpassa så att varje rand avslutas med natur och börjar med färgen. RAND 1: Sticka * 1 varv med choklad, 1 varv med natur *, sticka *-* i 18-18-19-19-20-20 cm totalt (dvs mätt från uppläggningskanten). RAND 2: Sticka * 1 varv med havsbrus, 1 varv med natur *, sticka *-* i 13-13-13-14-14-14 cm. RAND 3: Sticka * 1 varv med lavendel, 1 varv med natur *, sticka *-* i 13-13-13-14-14-14 cm. RAND 4: Sticka * 1 varv med rosa dröm, 1 varv med natur *, sticka *-* till färdigt mått. Mvh DROPS Design
04.06.2024 - 07:21
![]() Frédérique wrote:
Frédérique wrote:
Hey, wie toll ist das denn: Die Anleitung für meine Größe beim Ausdrucken markiert!!! Der Marker kann in Rente gehen. Die beste Idee ever. Ich bin begeistert. Seit wann gibt es diese Möglichkeit denn schon, habe ich da etwas nicht mitbekommen? Etwas mehr Werbung bitte!
07.05.2024 - 10:04
|
|
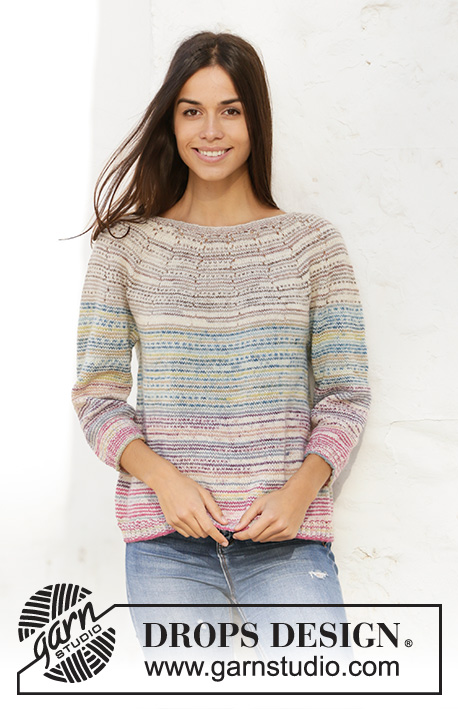
Watercolour Sky#watercolourskysweater |
|
 |
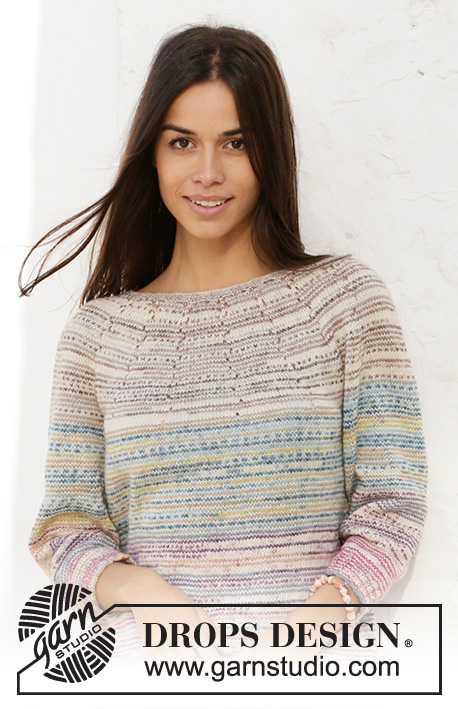 |
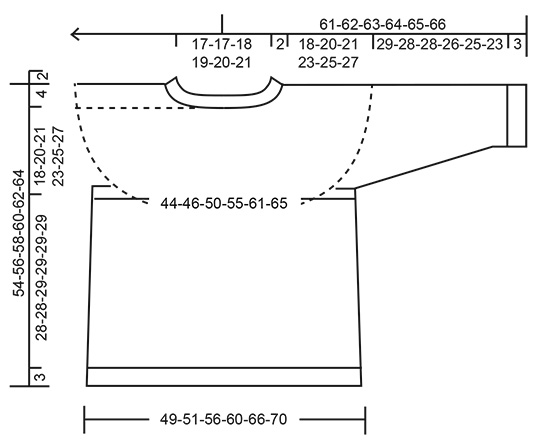
Knitted jumper with round yoke in DROPS Fabel. The piece is worked top down with stripes and ¾-length sleeves. Sizes S - XXXL.
DROPS 210-22 |
|
|
------------------------------------------------------- EXPLANATIONS FOR THE PATTERN: ------------------------------------------------------- STRIPES: Work 4 stripes as follows (adjust so each stripe ends with off-white and begins with the colour): STRIPE 1: Work * 1 round with soft chocolate, 1 round with off white *, work from *-* for a total of 18-18-19-19-20-20 cm (i.e. measured from the cast-on edge). STRIPE 2: Work * 1 round with sea mist, 1 round with off white *, work from *-* for 13-13-13-14-14-14 cm. STRIPE 3: Work * 1 round with lavender, 1 round with off white *, work from *-* for 13-13-13-14-14-14 cm. STRIPE 4: Work * 1 round with pink dream, 1 round with off white *, work from *-* to finished length. INCREASE TIP-1 (evenly spaced): To work out how to increase evenly, count the total number of stitches on the needle (e.g. 108 stitches) and divide by the number of increases to be made (e.g. 20) = 5.4. In this example, increase by making 1 yarn over after alternately each 5th and 6th stitch. On the next round work the yarn overs twisted to avoid holes. INCREASE TIP-2 (for round yoke): All increases are worked on a round with off-white. Increase by making 1 yarn over between 2 stitches. The yarn over is not worked twisted on the next round. INCREASE TIP-3 (for sides of body): Work until there are 2 stitches left before the marker thread, make 1 yarn over, knit 4 (marker thread sits between these 4 stitches) make 1 yarn over (= 2 stitches increased at each marker thread; 4 stitches increased on round). On the next round work the yarn overs twisted to avoid holes. DECREASE TIP (for sleeves): Decrease 1 stitch on each side of the marker thread as follows: Work until there are 3 stitches left before the marker thread, knit 2 together, knit 2 (marker thread sits between these 2 stitches), slip 1 stitch as if to knit, knit 1 and pass the slipped stitch over the knitted stitch. CASTING-OFF TIP: To avoid the cast-off edge being tight you can cast off with a larger size needle. If the edge is still tight, make 1 yarn over after approx. each 4th stitch at the same time as casting off and the yarn overs are cast off as normal stitches. ------------------------------------------------------- START THE PIECE HERE: ------------------------------------------------------- JUMPER – SHORT OVERVIEW OF THE PIECE: The neck and yoke are worked in the round with circular needle, from mid back and top down. The yoke is divided for body and sleeves. The body is continued in the round with circular needle. The sleeves are worked in the round with double pointed needles, top down. NECK: Cast on 104-108-112-116-120-124 stitches with circular needle size 2.5 mm and off-white. Work the piece in STRIPES – read description above (i.e. the first round is worked with soft chocolate). Knit 1 round. Work rib (= knit 2 / purl 2) over all stitches. When the rib measures 2 cm, adjust so the next round is worked with off-white, change to circular needle size 3.5 mm. Insert 1 marker thread on the beginning of the round; the yoke will be measured from this marker thread! YOKE: Knit 1 round and increase 15-20-24-28-24-16 stitches evenly spaced – read INCREASE TIP-1 = 119-128-136-144-144-140 stitches. Work 2 rounds. REMEMBER THE KNITTING TENSION! Then insert markers on the next round with soft chocolate as follows: * Knit 3, insert 1 marker in the next stitch and knit the stitch, knit 3-4-4-4-4-3 *, work from *-* (= 17-16-17-18-18-20 times in width). Stiches will be increased on each side of these stitches with a markers. On the next round with off-white increase 1 stitch before each stitch with a marker (= 17-16-17-18-18-20 stitches increased) – read INCREASE TIP-2. Increase like this every 4th round a total of 12-13-14-15-17-17 times but increase alternately before and after the stitches with markers = 323-336-374-414-450-480 stitches. When the piece measures 18-20-21-23-25-27 cm from the marker thread, divide the piece for body and sleeves as follows: Work 47-49-54-59-66-71 stitches (= half back piece), place the next 68-70-79-89-93-98 stitches on a thread for the sleeve and cast on 8 stitches under the sleeve, work 93-98-108-118-132-142 stitches (= front piece), place the next 68-70-79-89-93-98 stitches on a thread for the sleeve and cast on 8 stitches under the sleeve, finish by working the last 47-49-54-59-66-71 stitches (= half back piece). BODY: = 203-212-232-252-280-300 stitches. Insert 1 marker thread in the middle of the 8 new stitches under each sleeve (= in sides of body). There are 102-106-116-126-140-150 stitches on the back piece and 101-106-116-126-140-150 stitches on the front piece. Allow the threads to follow your work onwards; they will be used when increasing in the sides. Continue in the round with stripes and stocking stitch. When the piece measures 3 cm from the division increase 1 stitch on each side of both marker threads – read INCREASE TIP-3 (= 4 stitches increased). Increase like this every 4 cm a total of 6 times = 227-236-256-276-304-324 stitches. When the piece measures 28-28-29-29-29-29 cm from where the body and sleeves were divided increase 1-0-0-0-0-0 stitch = 228-236-256-276-304-324 stitches. Change to circular needle size 2.5 mm and work rib (= knit 2 / purl 2) for 3 cm; adjust so the last round is worked with off-white. Cast off with knit using pink dream – read CASTING-OFF TIP. SLEEVES: Place the 68-70-79-89-93-98 stitches from the thread on the one side of the piece on double pointed needles size 3.5 mm and knit up 1 stitch in each of the 8 stitches cast on under the sleeve = 76-78-87-97-101-106 stitches. Insert 1 marker thread in the middle of the 8 stitches under the sleeve. Allow the thread to follow your work onwards; it will be used when decreasing under the sleeve. Continue with stocking stitch and stripes. When the sleeve measures 3-3-1-1-4-2 cm from the division decrease 1 stitch on each side of the marker thread – read DECREASE TIP (= 2 stitches decreased). Decrease like this every 2½-2½-2-1½-1-1 cm a total of 9-9-12-16-17-19 times = 58-60-63-65-67-68 stitches. When the sleeve measures 29-28-28-26-25-23 cm from the division, change to double pointed needles size 2.5 mm and increase 2-0-1-3-1-0 stitches = 60-60-64-68-68-68 stitches. Work rib in the round (= knit 2 / purl 2) for 3 cm; adjust so the last round is worked with off-white. Cast off with knit using pink dream. Work the other sleeve in the same way. |
|
|
|
Have you finished this pattern?Tag your pictures with #dropspattern #watercolourskysweater or submit them to the #dropsfan gallery. Do you need help with this pattern?You'll find 25 tutorial videos, a Comments/Questions area and more by visiting the pattern on garnstudio.com. © 1982-2025 DROPS Design A/S. We reserve all rights. This document, including all its sub-sections, has copyrights. Read more about what you can do with our patterns at the bottom of each pattern on our site. |
|


With over 40 years in knitting and crochet design, DROPS Design offers one of the most extensive collections of free patterns on the internet - translated to 17 languages. As of today we count 314 catalogues and 11822 patterns translated into English (UK/cm).
We work hard to bring you the best knitting and crochet have to offer, inspiration and advice as well as great quality yarns at incredible prices! Would you like to use our patterns for other than personal use? You can read what you are allowed to do in the Copyright text at the bottom of all our patterns. Happy crafting!
Post a comment to pattern DROPS 210-22
We would love to hear what you have to say about this pattern!
If you want to leave a question, please make sure you select the correct category in the form below, to speed up the answering process. Required fields are marked *.