DROPS Melody
DROPS Melody
71% Alpaca, 25% Wool, 4% Polyamide
from 4.25 £ /50g
Get the yarn to make this pattern from 8.50£.

The yarn cost is calculated from the pattern’s smallest size and the yarn’s cheapest product type. Looking for an even better price? You might find it on the DROPS Deals!

DROPS SS24

Golden Treasure

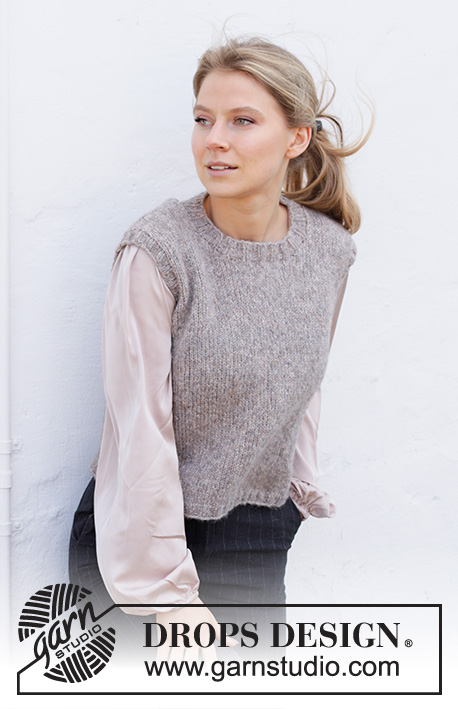
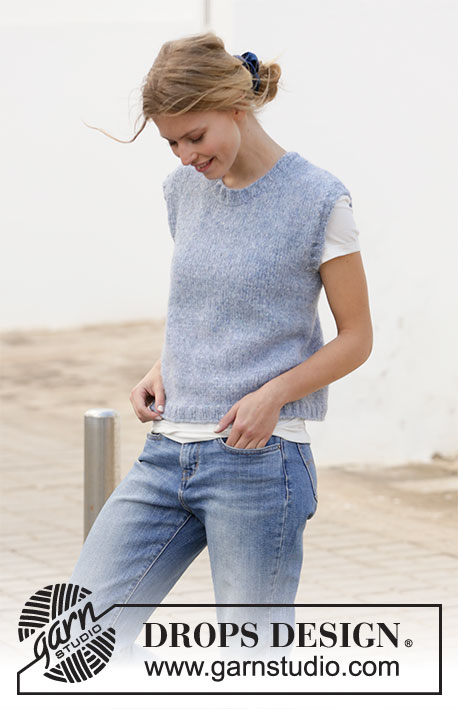
Knitted vest / slipover with round neck in DROPS Melody. Size: S - XXXL

DROPS 212-17
DROPS design: Pattern ml-046
Yarn group D
----------------------------------------------------------

SIZE:
S - M - L - XL - XXL - XXXL

MATERIALS:
DROPS MELODY from Garnstudio (belongs to yarn group D)
100-150-150-150-150-200 g colour 18, mustard

KNITTING TENSION:
13 stitches in width and 15 rows vertically in stocking stitch = 10 x 10 cm.

NEEDLES:
DROPS CIRCULAR NEEDLE SIZE 7 mm : Length 40 and 60 or 80 cm for stocking stitch.
DROPS CIRCULAR NEEDLE SIZE 5.5 mm : Length 40 and 60 or 80 cm for rib.
Needle size is only a suggestion! If you have too many stitches on 10 cm switch to a larger needle size. If you have too few stitches on 10 cm switch to a smaller needle size.

-------------------------------------------------------

Alternative Yarn – See how to change yarns here
Yarn Groups A to F – Use the same pattern and change the yarn here
Yarn usage using an alternative yarn – Use our yarn converter here

-------------------------------------------------------

DROPS Melody
DROPS Melody
71% Alpaca, 25% Wool, 4% Polyamide
from 4.25 £ /50g
Get the yarn to make this pattern from 8.50£.

The yarn cost is calculated from the pattern’s smallest size and the yarn’s cheapest product type. Looking for an even better price? You might find it on the DROPS Deals!

Pattern instructions

NOTE: This pattern is written in British English. All measurements in charts are in cm. For conversion from cm to inches - click here. There are different terms for crocheting in British and American English. If this pattern includes crochet, click for "crochet terms" here. For this pattern in American English, please click here.
----------------------------------------------------------

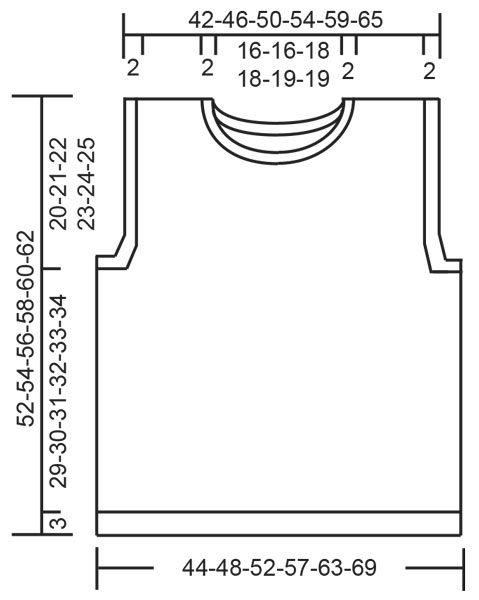
EXPLANATION FOR THE PATTERN:

----------------------------------------------------------

DECREASE TIP (evenly):
To calculate how to decrease evenly, use the total number of stitches on row (e.g. 132 stitches) and divide stitches by number of decreases to be done (e.g. 16) = 8.25. In this example knit approx. every 7th and 8th stitch together.

GARTER STITCH (back and forth):
Knit all rows.

----------------------------------------------------------

START THE PIECE HERE:

----------------------------------------------------------

VEST - SHORT OVERVIEW OF THE PIECE:
Work piece in the round on circular needle up to armhole, then divide the piece, and work front and back piece back and forth separately. Work neck edge and sleeve edges in the round on a short circular needle.

BODY:
Cast on 132-140-156-172-188-208 stitches on circular needle size 5.5 mm with Melody. Knit 1 round. Then work rib knit 2 and purl 2 until piece measures 3 cm.
Switch to circular needle size 7 mm, and work 1 round in stocking stitch while decreasing 16-16-20-24-24-28 stitches evenly– read DECREASE TIP in explanation above = 116-124-136-148-164-180 stitches.
Insert one marker at beginning of round and one marker after 58-62-68-74-82-90 stitches, move the markers upwards when working.
REMEMBER THE KNITTING TENSION!
Then work in stocking stitch until piece measures 32-33-34-35-36-37 cm from cast-on edge. On next round cast off 4-4-4-6-6-6 stitches for armholes in each side, cast off 2-2-2-3-3-3 stitches on each side of each marker.
Then work front and back piece separately with 1 edge stitch in garter stitch in each side.

BACK PIECE:
= 54-58-64-68-76-84 stitches. Work as before and decrease 1 stitch inside 1 edge stitch in garter stitch in each side 2 times = 50-54-60-64-72-80 stitches.
Work until piece measures approx. 50-52-54-56-58-60 cm from cast-on edge.
On next row from right side divide the piece and decrease for neck edge as follows: Work the first 13-15-17-19-22-26 stitches, cast off the next 24-24-26-26-28-28 stitches and work the rest of row.
Now work shoulders separately but do not cut the yarn. Work left shoulder from here.

LEFT SHOULDER (back piece):
= 13-15-17-19-22-26 stitches. Begin from wrong side and work as before the rest of row. Cast off 1 stitch at the beginning of next row from right side and work the rest of row = 12-14-16-18-21-25 stitches. Work 1 row from wrong side and cast off by knitting from right side. Piece measures 52-54-56-58-60-62 cm in total from cast-on edge.

RIGHT SHOULDER (back piece):
= 13-15-17-19-22-26 stitches. Begin from right side and work as before the rest of row. Cast off 1 stitch at the beginning of next row from wrong side and work the rest of row = 12-14-16-18-21-25 stitches. Work 1 row from right side and cast off by purling from wrong side. Piece measures 52-54-56-58-60-62 cm in total from cast-on edge.

FRONT PIECE:
= 54-58-64-68-76-84 stitches. Work as before and decrease 1 stitch inside 1 edge stitch in garter stitch in each side 2 times = 50-54-60-64-72-80 stitches. Work until piece measures 40-42-44-46-48-50 cm from cast-on edge.
On next row from right side divide the piece and decrease for neck edge as follows: Work as before over the first 18-20-22-24-27-31 stitches, cast off the next 14-14-16-16-18-18 stitches by knitting, work as before over the last 18-20-22-24-27-31 stitches.
Now work shoulders separately but do not cut the yarn. Work right shoulder from here.

RIGHT SHOULDER (front piece):
= 18-20-22-24-27-31 stitches. Work as before, begin from wrong side, and cast off for neck at beginning of every row from right side 3 stitches 1 time, 2 stitches 1 time and 1 stitch 1 time = 12-14-16-18-21-25 stitches. Continue until piece measures 52-54-56-58-60-62 cm in total, and cast off by knitting from right side or purling from wrong side.

LEFT SHOULDER (front piece):
= 18-20-22-24-27-31 stitches. Work as before, begin from right side, and cast off for neck at beginning of every row from wrong side 3 stitches 1 time, 2 stitches 1 time and 1 stitch 1 time = 12-14-16-18-21-25 stitches. Continue until piece measures 52-54-56-58-60-62 cm in total, and cast off by knitting from right side or purling from wrong side.

ASSEMBLY:
Sew the shoulder seams together.

NECK EDGE:
Pick up stitches inside 1 stitch along neck edge with circular needle size 5.5 mm. Begin from right side at the shoulder seam. Pick up approx. 68-68-72-72-76-76 stitches (must be divisible by 4). Work rib with knit 2/ purl 2 for approx. 2½ cm.
Loosely cast off stitches with knit over knit and purl over purl.

SLEEVE EDGE:
Pick up stitches inside 1 stitch along armholes with a short circular needle size 5.5 mm. Begin from right side at the armhole. Pick up approx. 64-80 stitches (must be divisible by 4). Work rib with knit 2/ purl 2 until rib measures approx. 2½ cm. Loosely cast off stitches with knit over knit and purl over purl.
Work the other sleeve edge the same way.

Diagram

diagram measurements

Each of our patterns has specific tutorial videos to help you.

Do you have a question? See a list of frequently asked questions (FAQ)

Knitting tension is what determines the final measurements of your work, and is usually measured per 10 x 10 cm. It is provided like so: number of stitches in width x number of rows in height - eg: 19 stitches x 26 rows = 10 x 10 cm.

The knitting tension is very individual; some people knit/crochet loosely while others work tightly. You adjust the knitting tension with the needle size, which is why the suggested needle size is only meant as a guide! You need to adjust this (up or down) to ensure that YOUR knitting tension matches the knitting tension provided in the pattern. If you work with a different knitting tension than provided you will have a different yarn consumption, and your work will have different measurements than what the pattern suggests.

The knitting tension also determines which yarns can replace each other. As long as you achieve the same knitting tension you can replace one yarn with another.

See DROPS lesson: How to measure your tension/gauge

See DROPS video: How to make a gauge tension swatch

The required amount of yarn is provided in grams, eg: 450 g. To calculate how many balls you’ll need you first need to know how many grams are in 1 ball (25g, 50g or 100g). This information is available if you click on the individual yarn quality on our pages. Divide the amount required with the amount of each ball. For example, if each ball is 50g (the most common amount), the calculation will be as follows: 450 / 50 = 9 balls.

The important thing when changing from one yarn to another is that the knitting/crochet tension remains the same. This is so that the measurements of the finished piece will be the same as on the sketch provided. It is easier to achieve the same knitting tension using yarns from the same yarn group. It is also possible to work with multiple strands of a thinner yarn to achieve the knitting tension of a thicker one. Please try our yarn converter. We recommend you to always work a test swatch.

Please NOTE: when changing yarn the garment might have a different look and feel to the garment in the photo, due to individual properties and qualities of each yarn.

See DROPS lesson: Can I use a different yarn than the one mentioned in the pattern?

All our yarns are categorised into yarn groups (from A to F) according to thickness and knitting tension – group A contains the thinnest yarns and group F the thickest. This makes it easier for you to find alternative yarns to our patterns, should you wish to switch yarn. All yarns within the same group have a similar knitting tension and can easily replace each other. However, different yarn qualities have different structures and properties which will give the finished work a unique look and feel.

Click here for an overview of the yarns in each yarn group

At the top of all our patterns you’ll find a link to our yarn calculator, which is a helpful tool should you wish to use a different yarn than suggested. By filling in the yarn quality you wish to replace, the amount (in your size) and number of strands, the calculator will present good alternative yarns with the same knitting tension. Additionally it will tell you how much you’ll require in the new qualities and whether you’ll need to work with multiple strands. Most skeins are 50g (some are 25g or 100g).

If the pattern is worked with multiple colours, every colour will have to be calculated separately. Similarly, if the pattern is worked with several strands of different yarns (for example 1 strand Alpaca and 1 strand Kid-Silk) you will have to find alternatives for each, individually.

Click here to see our yarn calculator

Since different yarns have different qualities and textures we have chosen to keep the original yarn in our patterns. However, you can easily find options among our available qualities by using our yarn calculator, or simply pick a yarn from the same yarn group.

It is possible that some retailers still have discontinued yarns in stock, or that someone has a few skeins at home that they would like to find patterns for.

The yarn calculator will provide both alternative yarn as well as required amount in the new quality.

If you think it's hard to decide what size to make, it can be a good idea to measure a garment you own already and like the size of. Then you can pick the size by comparing those measures with the ones available in the pattern's size chart.

You'll find the size chart at the bottom of the pattern.

See DROPS lesson: How to read size chart

The needle size provided in the pattern serves only as a guide, the important thing is to follow the knitting tension. And since knitting tension is very individual, you will have to adjust the needle size to ensure that YOUR tension is the same as in the pattern – maybe you’ll have to adjust 1, or even 2 needle sizes, up or down to achieve the correct tension. For this, we recommend that you work test swatches.

Should you work with a different knitting tension than the one provided, the measurements of the finished garment might deviate from the measurement sketch.

See DROPS lesson: How to measure your tension/gauge

See DROPS video: How to make a tension/gauge swatch

Working a garment top-down provides more flexibility and room for personal adjustment. For example it is easier to try the garment on while working, as well as making adjustments to length of yoke and shoulder caps.

The instructions are carefully explaining every step, in the correct order. Diagrams are adjusted to the knitting direction and are worked as usual.

The diagram depicts all rows/rounds, and every stitch seen from the right side. It is read from bottom to top, from right to left. 1 square = 1 stitch.

When working back and forth, every other row is worked from the right side and every other row is worked from the wrong side. When working from the wrong side, the diagram will have to be worked reversed: from left to right, knit stitches are purled, purl stitches are knit etc.

When working in the round every round is worked from the right side and the diagram are worked from right to left on all rounds.

See DROPS lesson: How to read knitting diagrams

The diagram depicts all rows/rounds, and every stitch seen from the right side. It is worked from bottom to top, from right to left.

When working back and forth every other row is worked from the right side: from right to left and every other row is worked from the wrong side: from left to right.

When working in the round, every row in the diagram are worked from the right side, from right to left.

When working a circular diagram you start in the middle and work your way outwards, counter clockwise, row by row.

The rows usually start with a given number of chain stitches (equivalent to the height of the following stitch), this will either be depicted in the diagram or explained in the pattern.

See DROPS lesson: How to read crochet diagrams

Instructions for working several diagrams after each other on the same row/round, will often be written like so: “work A.1, A.2, A.3 a total of 0-0-2-3-4 times". This means you work A.1 once, then A.2 is worked once, and A.3 is repeated (in width) the number of times provided for your size – in this case like so: S = 0 times, M = 0 times, L=2 times, XL= 3 times and XXL = 4 times.

The diagrams are worked as usual: begin with the first row in A.1, then work the first row in A.2 etc.

See DROPS lesson: How to read knitting diagrams

See DROPS lesson: How to read crochet diagrams

The total width of the garment (from wrist-to-wrist) will be larger in the larger sizes, despite the actual sleeves being shorter. The larger sizes have longer sleeve caps and wider shoulders, so there will be a good fit in all sizes.

The measurement sketch/schematic drawing provides information regarding the full length of the garment. If it’s a jumper or a jacket the length is measured from the highest point on the shoulder closest to the neckline, and straight down to the bottom of the garment. It is NOT measured from the tip of shoulder. Similarly, the length of yoke is measured from the highest point on the shoulder and down to where yoke is split into body and sleeves.

On a jacket measures are never taken along bands, unless specifically stated. Always measure inside band stitches when measuring the length.

See DROPS lesson: How to read a schematic drawing

Diagrams are often repeated on the round or in height. 1 repeat is the diagram the way it appears in the pattern. If it says to work 5 repeats of A.1 in the round, then you work A.1 a total of 5 times after/next to each other in the round. If it says to work 2 repeats of A.1 vertically/in height you work the entire diagram once, then begin again at the start and work the entire diagram one more time.

Chain stitches are slightly narrower than other stitches and to avoid working the cast-on edge too tight, we simply chain more stitches to begin with. The stitch count will be adjusted on the following row to fit the pattern and measurement sketch.

The rib edge is more elastic and will contract slightly compared to, for example, stocking stitch. By increasing before the rib edge, you avoid a visible difference in width between the rib edge and the rest of the body.

It’s very easy to cast off too tightly, and by making yarn overs while casting off (and simultaneously casting these off) you avoid a too tight cast off edge.

See DROPS video: How to bind off with yarn overs (yo)

To achieve an even increase (or decrease) you can increase on, for example: every 3rd and 4th row alternately, like so: work 2 rows and increase on the 3rd row, work 3 rows and increase on the 4th. Repeat this until the increase is complete.

See DROPS lesson: Increase or decrease 1 st on every 3rd and 4th row alternately

Should you prefer to work in the round instead of back and forth, you may of course adjust the pattern. You’ll need to add steeks mid-front (usually 5 stitches), and follow the instructions. When you would normally turn and work from the wrong side, simply work across the steek and continue in the round. At the end you’ll cut the piece open, pick up stitches to work bands, and cover the cut edges.

See DROPS video: How to knit steeks and cut open

Should you prefer to work back and forth instead of in the round, you may of course adjust the pattern so you work the pieces separately and then assemble them at the end. Divide the stitches for the body in 2, add 1 edge stitch in each side (for sewing) and work the front and back pieces separately.

See DROPS lesson: Can I adapt a pattern for circular needles into straight needles?

Pattern repeats can vary slightly in the different sizes, in order to get the correct proportions. If you’re not working the exact same size as the garment in the photo, yours might deviate slightly. This has been carefully developed and adjusted so that the complete impression of the garment is the same in all sizes.

Make sure to follow instructions and diagrams for your size!

If you have found a pattern you like which is available in women’s size it’s not very difficult to convert it to men’s size. The biggest difference will be the length of sleeves and body. Start working on the women size that you think would fit across the chest. The additional length will be worked right before you cast off for the armhole/sleeve cap. If the pattern is worked top-down you can add the length right after the armhole or before the first decrease on sleeve.

Regarding additional yarn amount, this will depend on how much length you add, but it is better with a skein too many than too few.

All yarns will have excess fibres (from production) that might come off as lint or shedding. Brushed yarns (ie hairier yarns) have more of these loose, excess fibres, causing more shedding.

Shedding also depends on what is worn under or over the garment, and whether this pulls at the yarn fibres. It’s therefore not possible to guarantee that there will be no shedding

Below are some tips on how to get the best result when working with hairier yarns:

1. When the garment is finished (before you wash it) shake it vigorously so the looser hairs come off. NOTE: do NOT use a lint roller, brush or any method that pulls at the yarn.

2. Place the garment in a plastic bag and put it in your freezer - the temperature will cause the fibres to become less attached to each other, and excess fibres will come off easier.

3. Leave in the freezer for a few hours before taking it out and shaking it again.

4. Wash the garment according to the instructions on the yarn label.

Pilling is a natural process that happens to even the most exclusive of fibers. It's a natural sign of wear and tear that is hard to avoid, and that is most visible in high friction areas of your garment like a sweater's arms and cuffs.

You can make your garment look as new by removing the pilling, using a fabric comb or a pill/lint remover.

Still can't find the answer you need? Then scroll down and leave your question so one of our experts can try to help you. This will be done normally within 5 to 10 working days.
In the meantime, you can read the questions and answers that others have left to this pattern or join the DROPS Workshop on Facebook to get help from fellow knitters/crocheters!

You might also like...

Post a comment to pattern DROPS 212-17

We would love to hear what you have to say about this pattern!

If you want to leave a question, please make sure you select the correct category in the form below, to speed up the answering process. Required fields are marked *.

Comments / Questions (25)

country flag Anne wrote:

Bonjour, Auriez-vous une vidéo à m'indiquer pour rabattre souplement le col en côtes 2/2 Merci pour votre réponse.

15.02.2024 - 01:39

DROPS Design answered:

Bonjour Anne, vous trouverez différentes façons de rabattre les mailles ici, dans notre vidéothèque, notamment la technique à l'italienne. Bonnes finitions!

15.02.2024 - 07:44

country flag Elli wrote:

Danke für die Antwort, aber ich soll ja laut Anleitung nur 72 Maschen für Größe L aufnehmen, keine 100. Wie mache ich das?

03.07.2023 - 15:55

DROPS Design answered:

Liebe Elli, sorry, ich habe die falschen Maschenanzahl geschrieben, Sie haben dann 28 M hinten + 28 M vorne, es sind dann 16 Maschen beidseitig um 72 Maschen zu haben; an den Seiten nehmen Sie nicht 1 Masche in jeder Reihe auf, aber diese 16 M beidseitig von der Schulternaht regelmäßig verteilt. Sollten Sie immer zuviele Maschen auffassen, dann können Sie auch bei der 1. Runde regelmäßig verteilt abnehmen. Viel Spaß beim stricken!

03.07.2023 - 16:06

country flag Elli wrote:

Hallo, wie kann ich denn aus dem Halsausschnitt für Größe L nur 72 Maschen aufnehmen? Wenn ich aus jeder Masche eine aufnehme, komme ich auf weit über 100 Maschen.

01.07.2023 - 14:58

DROPS Design answered:

Dear Elli, nehmen Sie 28 Maschen am Halsausschnitt beim Rückenteil (die 26 abgekettene Maschen + 1 M beidseitig) und 28 Maschen am Halsausschnitt beim Vorderteil (die 16 abgekettene Maschen + 6 Maschen beidseitig) + 22 Maschen beidseitig zwischen Hals vorne und hinten, so haben Sie 100 Maschen. Viel Spaß beim stricken!

03.07.2023 - 10:09

country flag Addi wrote:

Hallo, wie ist das genau gemeint, was muss ich tun, das „innerhalb“ verstehe ich hier nicht: „je 1 Masche innerhalb 1 kraus rechten Rand-Masche abnehmen,“. Danke!

28.06.2023 - 20:59

DROPS Design answered:

Liebe Addi, nehmen Sie 1 Masche am Anfang der Hin-Reihe nach der Randmaschen (die krausrechts gestrickt wird) ab und nehmen Sie 1 Masche am Ende der Hin-Reihen vor der Randmasche (die krausrechts gestrickt wird) ab. Viel Spaß beim stricken!

29.06.2023 - 12:47

country flag Audrey wrote:

Bonjour, quand j'arrive au col et que je relève les mailles j'ai 120 mailles en faisant tout le tour ... 😳 Et dans l'explication il est mentionné 68 mailles... Je ne vois pas comment un tel écart est possible. Auriez-vous une suggestion ? Merci bien

20.04.2023 - 13:32

DROPS Design answered:

Bonjour Audrey, relevez peut-être moins de mailles sur les côtés le long des épaules - cf vidéo (entre les mailles rabattues pour l'encolure et celles rabattues pour l'épaule); vous pouvez ajuster le nombre de mailles au 1er tour à un nombre divisible par 4 - vous pouvez ensuite ajuster le nombre en fonction de comment vous souhaitez l'encolure (plus ou moins échancrée). Bon tricot!

20.04.2023 - 16:25

country flag Anne wrote:

After the piece is worked to 32cm, do I cast off 4 stitches on each side of marker that is on cast on, and then cast off two stitches on each side of the center marker that is after 58 stitches?

04.03.2023 - 02:20

DROPS Design answered:

Dear Anne, you need to cast off 4 stitches in total on each side (under the arm), which means that you cast off 2 stitches on each side of the markers (which are marking the sides). So you cast off 4 stitches on each side, not 4 +2 stitches. Happy knitting!

05.03.2023 - 20:33

country flag Eva Sjoelund wrote:

Hej kan det verkligen bara vara 68 maskor man ska sticka upp på halskanten i storlek s. Till ärmkanten ska man sticka upp 64 vilket låter rimligare. Jag frågade detta även den 9:e juli. Hoppas på svar snart

20.07.2022 - 18:17

DROPS Design answered:

Hej Eva, Der er mange som har strikket vesten og har ikke hørt noget om at det ikke passer.... Vil du have halsen større så er det naturligvis bare at strikke flere masker op :)

03.08.2022 - 15:28

country flag Eva Sjoelund wrote:

Hej kan det verkligen bara vara 68 maskor man ska sticka upp på halskanten i storlek s. Till ärmkanten ska man sticka upp 64 vilket låter rimligare.

09.07.2022 - 20:31

country flag Helle wrote:

Når man skal strikke bagstykket skal man så benytte almindelige strikkepinde istedet for den rundpind man ellers har strikket med?

01.01.2022 - 15:40

DROPS Design answered:

Hej Helle, nej du kan fortsætte med at strikke frem og tilbage på rundpind :)

05.01.2022 - 08:31

country flag Matty Peene wrote:

Ik brei maat L. 2x 68 steken. Na het minderen voor de armsgaten ( 2x4 en 2x2) kom ik op 54 steken aan 1 kant. Dan ga ik verder met het achterpand volgens het patroon heb je dan voor maat L 64 steken. Wat doe ik verkeerd?

24.12.2021 - 12:48

DROPS Design answered:

Dag Matty,

De omschrijving was wat verwarrend; het is nu aangepast in: Kant op de volgende naald 4-4-4-6-6-6 steken af voor de armsgaten aan elke kant, door 2-2-2-3-3-3 steken aan elke kant van elke markeerdraad af te kanten.

13.02.2022 - 09:41