
Popular categories
Looking for a yarn?


Comments / Questions (37)
![]() Ana Ramirez wrote:
Ana Ramirez wrote:
Jeg strikker største størrelse. Etter jeg strikker de tre fargene blir det 41. Det betyr at jeg starter ikke med den lyserosa til vrangbord. Har jeg gjørt feil?
11.05.2025 - 15:26DROPS Design answered:
Hei Ana, Du har strikket stripene riktig. Da fortsetter du med glattstrikk og lys rosa til bolen måler 25 cm fra delingen, og deretter begynner vrangbord. Et annet alternativ er at du fortsetter med sjøgrønn til bolen måler 25 cm og bare har vrangbord i lys rosa. God fornøyelse!
12.05.2025 - 06:04
![]() Ana Cecilia wrote:
Ana Cecilia wrote:
Estoy trabajando el cuerpo. Talla 9/10. Pregunta es que se teje hasta 25 cm. Las ratas amarillas y azules suman 26 menos los cms antes de la divisjon. El rosa claro es solo para el resorte?
09.05.2025 - 14:22DROPS Design answered:
Hola Ana, tienes 18 cm en el canesú (más los 3 pliegues iniciales, que también se trabajan con las rayas). Por lo que deberías haber trabajado rosa entero en el canesú y aprox. 3cm de amarillo. Después trabajas los aprox. 10cm restantes de amarillo en el cuerpo y 13 cm de azul (eso serían 23 cm desde la división). Así que deberías haber empezado el rosa claro antes de empezar con el resorte.
11.05.2025 - 00:07
![]() Ana Ramirez wrote:
Ana Ramirez wrote:
Jeg strikker st. 9/10. jeg er på bolen. Men får ikke til å stemme at det Blir 25 cm fra deling av arbeid, det er 13 cm på stripene gul og blå. Betyr at jeg starter med rosa?. Er vrangbord strikket i lyserosa?
09.05.2025 - 13:04DROPS Design answered:
Hei Ana. Jakken strikkes ovenfra og ned og du starter med fargen 20 rose og strikker nesten hele bærestykket med den fargen, ca 13 cm + 3 riller. Så strikkes det ca 13 cm med gul, deretter ca 13 cm med sjøgrønn og avslutt med en vrangbord på ca 2 cm. mvh DROPS Design
12.05.2025 - 14:18
![]() Hej Se Nedenstående Kommentar wrote:
Hej Se Nedenstående Kommentar wrote:
Jeg har købt Drops Air garn hos jer og har strikket en trøje til mit barnebarn pige 9 år. Jeg har meget garn i overskud, har I en opskrift på en hue og luffer (vanter) i dette garn , pinde 5?. Med venlig hilsen Rise Skovsgaard 20627499
14.02.2025 - 18:05
![]() Marjolein Roosen wrote:
Marjolein Roosen wrote:
My next step is dividing the work. Now i have to make 32 stitches (left front piece), and then put the next 47 stitches on a thread. So do the first 32 stitches stay on the needle? And do i stitch the next 47 stitches (sleeve) before i put them on a thread? How and where should i start these six new stitches? And where will i leave them afterwards?
09.09.2024 - 13:08DROPS Design answered:
Dear Mrs Roosen, yes work the first 32 sts and keep them on needle, slip the next 47 sts on a thread and cast on 6 sts, then work the 55 sts for back piece, slip the next 47 sts on a thread for 2nd sleeve and cast on 6 sts then work the last 32 sts on needle for front piece. Find also these steps in this lesson, from picture 9) - applies to a jumper but the technique will be the same for a jacket. Happy knitting!
10.09.2024 - 08:50
![]() Martina wrote:
Martina wrote:
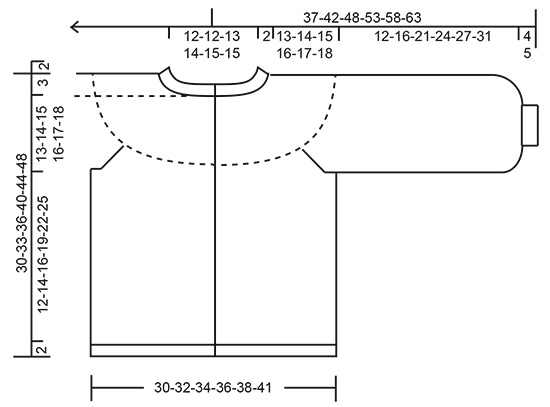
Hallo, ich habe eine Frage zum Anschlag der Passe: Zu Beginn sollen 61 Maschen angeschlagen werden. Im Originalgarn mit einer Maschenprobe von 17M pro 10cm entspricht dies einer Breite von ca. 36 cm (35,88 cm). Im Schaubild sind aber für die Hälfte 15 cm angegeben - wird der Anschlag mit 61 M dann nicht zu weit? Oder ist hier die Mehrweite für die Knopfleiste berücksichtigt, die (weil überlappend) im Schaubild nicht sichtbar ist? Danke vorab!
19.07.2024 - 14:48DROPS Design answered:
Liebe Martina, ja, zum einen überlappt die Knopfleiste, zum anderen wird der Beginn der Passe mit der dünneren Nadel gestrickt, dadurch wird der Halsausschnitt auch noch ein wenig enger im Vergleich zu dem, was Sie mit der genannten Maschenprobe errechnet haben. Erst nach 3 Krausrippen wird dann ja zur dickeren Nadel gewechselt. Viel Spaß beim Stricken!
23.07.2024 - 01:01
![]() Marjolein Roosen wrote:
Marjolein Roosen wrote:
Hello, I would love to create this for my daughter. A visual aide helps me often to better understand the pattern. Sometimes you have video lessons of a whole sweater, socks or cardigans. Is there a video lesson of a similar vest?
08.07.2024 - 11:51DROPS Design answered:
Hi Marjolein, there is not a video for this whole pattern. In each pattern you will find the list of video and lessons to help you. If you have any questions when making the cardigan, please feel free to leave a question in the comment section at the bottom of the page, we will answer you as soon as possible. Happy knitting!
13.07.2024 - 14:28
![]() Marie-Claude FARGEON wrote:
Marie-Claude FARGEON wrote:
Bonjour, Je ne comprends pas bien ce qu'il faut faire au moment où l'on divise l'empiècement entre devant, dos et manches. Les 6 nouvelles mailles montées avant ou après les manches ( leur emplacement ne me semble par ailleurs pas symétrique par rapport au dos dans vos explications... ) se tricotent ensuite avec quelle partie? Merci pour les précisions que vous pourrez m'apporter! Marie-Claude
13.02.2024 - 20:42DROPS Design answered:
Bonjour Mme Fargeon, si votre nombre de mailles est juste à la fin de l'empiècement, les 6 mailles doivent être symétriques, sous chaque manche. Retrouvez dans cette leçon comment on procède à partir de la division: à partir de la photo 9). Bon tricot!
14.02.2024 - 08:07
![]() Patty Walk wrote:
Patty Walk wrote:
On the yoke section of this sweater, in size 9-10 the directions say to increase to 241 stitches using raglan increase. Then it says to continue working until the piece measures 7 inches from the marker. What marker? And where do you measure the 7 inches from? Thank you for your time.
23.01.2024 - 08:32DROPS Design answered:
Hi Patty, You should have inserted a marker after the 3 ridges at the top of the yoke (as you change to needle size 5 mm). This is where you measure from and it should be 7 cm not 7 inches. You then increase again and work until the piece measures (11)-11-12-12-13-13 cm, before inserting 4 new markers. Hope this helps and happy knitting!
24.01.2024 - 07:03
![]() Cathie Calagna wrote:
Cathie Calagna wrote:
Greetings! Could you tell me how wide the pink stripe above the sleeve ribbing should be for size 9/10? Thank you!
21.01.2024 - 07:25DROPS Design answered:
Dear Mrs Calagna, you should have approx. 25 cm light pink over rib (neck edge 2 cm + yoke 13 cm pink + 5 cm yellow on yoke then 8 cm yellow on sleeve (13 cm yellow in total) + 13 cm green + 25 cm light pink = 31 cm before ribbing). Happy knitting!
22.01.2024 - 09:17
|
|
Candy Bar Jacket#candybarjacket |
|
 |
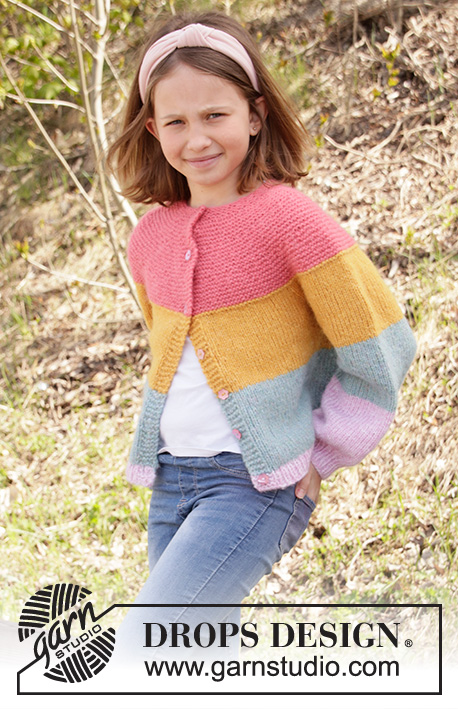 |
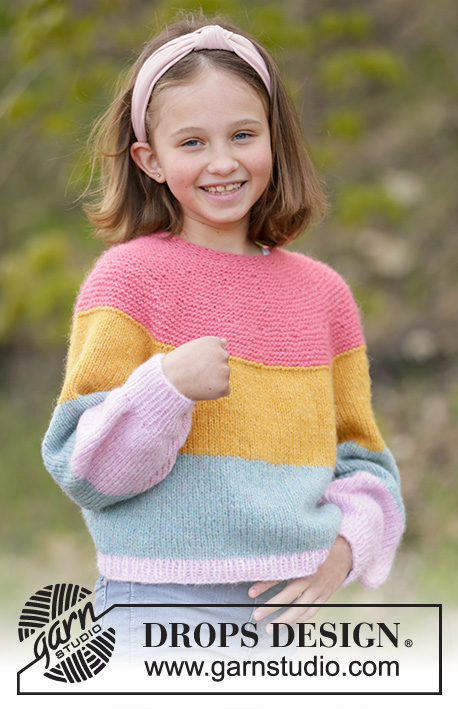
Knitted jacket for children with stripes in DROPS Air, Nepal or Paris. The piece is worked top down with round yoke and raglan. Sizes 1-10 years.
DROPS Children 34-24 |
|
|
------------------------------------------------------- EXPLANATIONS FOR THE PATTERN: ------------------------------------------------------- STRIPES: Stripes are worked on the whole garment as follows: Work (10½)-11-12-13-14-15 cm with rose, (8½)-9-10-11-12-13 cm yellow and (8½)- 9-10-11-12-13 cm sea green. Then complete the garment with light pink. RIDGE/GARTER STITCH (worked back and forth): 1 ridge in height = Knit 2 rows. BUTTONHOLES: Work buttonholes on the right band (when garment is worn). Work from the right side when there are 3 stitches left on the row as follows: Make 1 yarn over, knit 2 together and knit the last stitch. On the next row knit the yarn over to leave a hole. The first buttonhole is worked when the piece measures approx. 1 cm. Then work the next (5)-5-5-6-6-6 buttonholes with approx. (5)-5½-6-6½-7 cm between each one. INCREASE TIP (evenly spaced): To work out how to increase evenly, count the total number of stitches on the needle (e.g. 47 stitches) and divide by the number of increases to be made (e.g. 40) = 1.1. In this example, increase by making 1 yarn over after each stitch. Do not increase on bands. On the next row knit the yarn overs twisted to avoid holes. RAGLAN: Increase to raglan in each transition between body and sleeves. All increases are worked from the right side! Start 1 stitch before the marker, make 1 yarn over, knit 2 (the marker sits between these 2 stitches) and make 1 yarn over. On the next row purl the yarn overs twisted to avoid holes. ------------------------------------------------------- START THE PIECE HERE: ------------------------------------------------------- JACKET – SHORT OVERVIEW OF THE PIECE: The yoke is worked back and forth with circular needle, top down. The yoke is divided for body and sleeves and the body continued back and forth with circular needle. The sleeves are worked in the round with double pointed needles. YOKE: Cast on (47)-53-55-57-61-61 stitches with circular needle size 4 mm and Air - the whole piece is worked in STRIPES – read description above. Work 3 ridges; the first buttonhole is worked after approx. 1 cm - see description above. Change to circular needle size 5 mm and insert 1 marker; THE PIECE IS NOW MEASURED FROM HERE. On the next row increase (40)-42-42-44-48-50 stitches evenly spaced – READ INCREASE TIP in explanations above = (87)-95-97-101-109-111 stitches. Work garter stitch until the piece measures (3)-3-3-3-3-3 cm. REMEMBER THE KNITTING TENSION! On the next row increase (36)-38-38-40-46-48 stitches evenly spaced = (123)-133-135-141-155-159 stitches. Work garter stitch until the piece measures (7)-7-7-7-7-7 cm. On the next row increase 30-32-38-40-42-42 stitches evenly spaced = (153)-165-173-181-197-201 stitches. Work garter stitch until the piece measures (11)-11-12-12-13-13 cm. Now insert 4 markers in the piece without working the stitches as follows: Insert 1 marker after (25)-26-27-28-30-31 stitches (= front piece), the next marker after (31)-35-37-39-43-43 stitches (= sleeve), the next marker after (41)-43-45-47-51-53 stitches (= back piece) and the last marker after (31)-35-37-39-43-43 stitches (= sleeve). There are 25-26-27-28-30-31 stitches left after the last marker (= front piece). Continue with stocking stitch (the outermost 5 stitches in each side are continued in garter stitch to finished length) and on the first row from the right side increase stitches to RAGLAN – read description above (8 stitches increased on row). Increase on each row from the right side a total of (2)-3-3-4-4-5 times = (169)-189-197-213-229-241 stitches on needle. Continue working until the piece measures (13)-14-15-16-17-18 cm from the marker. The yoke is now divided for body and sleeves as follows: Work (27)-29-30-32-34-36 stitches (= left front piece), place the next (35)-41-43-47-51-53 stitches on a thread for sleeve, cast on 6 new stitches on the needle (= side under sleeve), work (45)-49-51-55-59-63 stitches (= back piece), place the next (35)-41-43-47-51-53 stitches on a thread for sleeve, cast on 6 new stitches on the needle (= side under sleeve) and work the remaining (27)-29-30-32-34-36 stitches (= right front piece). Body and sleeves are finished separately. THE PIECE IS NOW MEASURED FROM HERE! BODY: = (111)-119-123-131-139-147 stitches. Continue with stocking stitch (bands in garter stitch) and stripes as before until the piece measures (12)-14-16-19-22-25 cm from the division (or to desired length; there is approx. 2 cm left to finished length). Change to circular needle size 4 mm. Work the bands in garter stitch and the rest of the stitches in rib (knit 1/ purl 1) for 2 cm. Loosely cast off with knit over knit and purl over purl. The jacket measures approx. (30)-33-36-40-44-48 cm from the shoulder down. SLEEVE: Place the (35)-41-43-47-51-53 stitches from the thread on the one side of the piece on double pointed needles size 5 mm and knit up 1 stitch in each of the 6 stitches cast on under the sleeve = (41)-47-49-53-57-59 stitches. Insert a marker thread in the middle of the 6 stitches under the sleeve; beginning of round. Work in the round with stocking stitch and stripes until the piece measures (12)-16-21-24-27-31 cm (or to desired length; there is approx. (4)-4-4-4-5-5 cm left to finished length). On the next round decrease (13)-17-17-21-23-25 stitches evenly spaced = (28)-30-32-32-34-34 stitches. Change to double pointed needles size 4 mm and work rib (knit 1/ purl 1) in the round for approx. (4)-4-4-4-5-5 cm. Loosely cast off with knit over knit and purl over purl. Work the other sleeve in the same way. ASSEMBLY: Sew buttons onto left band. |
|
|
|
Have you finished this pattern?Tag your pictures with #dropspattern #candybarjacket or submit them to the #dropsfan gallery. Do you need help with this pattern?You'll find 27 tutorial videos, a Comments/Questions area and more by visiting the pattern on garnstudio.com. © 1982-2025 DROPS Design A/S. We reserve all rights. This document, including all its sub-sections, has copyrights. Read more about what you can do with our patterns at the bottom of each pattern on our site. |
|


With over 40 years in knitting and crochet design, DROPS Design offers one of the most extensive collections of free patterns on the internet - translated to 17 languages. As of today we count 314 catalogues and 11822 patterns translated into English (UK/cm).
We work hard to bring you the best knitting and crochet have to offer, inspiration and advice as well as great quality yarns at incredible prices! Would you like to use our patterns for other than personal use? You can read what you are allowed to do in the Copyright text at the bottom of all our patterns. Happy crafting!
Post a comment to pattern DROPS Children 34-24
We would love to hear what you have to say about this pattern!
If you want to leave a question, please make sure you select the correct category in the form below, to speed up the answering process. Required fields are marked *.