
Popular categories
Looking for a yarn?


Comments / Questions (23)
![]() Guylaine wrote:
Guylaine wrote:
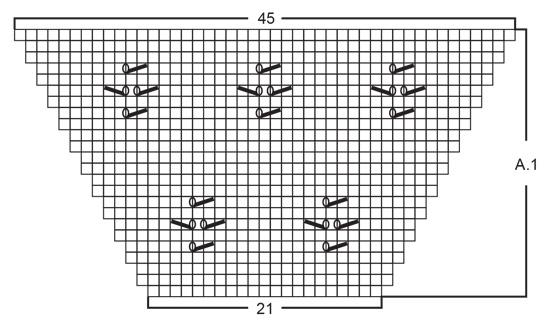
Je ne comprends pas le diagramme A1, les augmentations se font sur l'endroit, mais il y a deux rangs de 25 mailles, et il faut que je puisse faire mes points ajourés, est-ce possible d'avoir plus d'explications car je suis perdue? merci
30.09.2023 - 20:19DROPS Design answered:
Bonjour Guylaine, vous augmentez sur l'endroit, par ex au 1er rang = vous avez donc: 1 jeté, les 21 m de A.1, 1 jeté, au rang suivant sur l'envers, vous avez donc 23 mailles (comme dans le diagramme), puis au rang suivant sur l'endroit, vous augmentez de nouveau, mais cette fois de part et d'autre des 23 mailles, soit: 1 jeté, 23 m, 1 jeté. Est-ce bien cette partie que vous n'aviez pas comprise? Bon tricot!
02.10.2023 - 10:08
![]() Marion Ruge wrote:
Marion Ruge wrote:
Vielen Dank für Ihre schnelle Antwort. Leider verstehe ich es noch immer nicht richtig. Laut der Anleitung wird die Passe mit der letzten Reihe von A5 - A7 abgeschlossen. Das bedeutet, ich beginne die Ärmel jeweils mit der ersten Reihe von A8 und A3. A8 geht über 5 Maschen und beginnt in Reihe 5 mit dem Lochmuster, A3 geht über 12 Maschen und beginnt ebenfalls in Reihe 5 mit dem Lochmuster. Was mache ich falsch?
04.09.2023 - 10:53DROPS Design answered:
Liebe Frau Ruge, - Ihren Hinweis senden wir unser Design Team, beachten Sie nur, daß das Lochmuster von der Passe weitergestrickt wird so, daß es wie zuvor forsetzt. Die Maschen unter die Ärmel werden glatt rechts gestrickt, wenn sie nicht im Lochmuster wegen den Abnahmen gestrickt werden können. Viel Spaß beim stricken!
04.09.2023 - 15:14
![]() Marion Ruge wrote:
Marion Ruge wrote:
Ich stricke die Jacke in Größe M. Für die Ärmel habe ich die erforderliche Maschenanzahl von 79 erreicht. Wenn ich nun im Muster stricke wie angegeben (7 M gl. re, A8, A3 (5×), 7 M gl. re) habe ich zwischen den Löchern aus A8 und dem ersten Mustersatz A3 keine Zwischenmaschen. Was mache ich falsch? Vielen Dank im Voraus für Ihre Hilfe
01.09.2023 - 16:14DROPS Design answered:
Liebe Frau Ruge, beginnen Sie A.8 mit der gleichen Reihe wie Sie A.3 weiterstricken sollen, so wird das Muster immer wie zuvor forsetzen. Viel Spaß beim stricken!
04.09.2023 - 09:27
![]() Hanne Meldgaard wrote:
Hanne Meldgaard wrote:
Er de 5 kantmasker i hver side med i de 160 maker str large
15.03.2022 - 14:06DROPS Design answered:
Hej Hanne. Ja det stämmer. Mvh DROPS Design
16.03.2022 - 09:23
![]() Lene wrote:
Lene wrote:
Hej, jeg synes at diagram A8 er ude af fase med det øvrige ærmemønster? Det lille hulmønster på pinde 5-9 i A8 kommer blot een maske fra tilsvarende hulmønster på A3. Burde det ikke være forskudt opad?
13.02.2021 - 19:42DROPS Design answered:
Hej Lene, når du udgår fra mønsteret på ærmet som du allerede har strikket, kan det så stemme at du skal strikker A.3 i den anden side ærmet, for at det skal blive forskudt?
18.02.2021 - 09:37
![]() Nena wrote:
Nena wrote:
C’è un errore nella traduzione italiana e precisamente prima di incominciare i polsini delle maniche: ”Lavorare 1 giro diritto in cui diminuire 17-15-17-19-17-19 maglie in modo uniforme = 68-68-72-76-76-80 maglie.” La parola corretta è “aumentare” e non diminuire ;-)
29.07.2020 - 06:10DROPS Design answered:
Buongiorno Nena. Abbiamo corretto il testo. La ringraziamo per la segnalazione. Buon lavoro!
03.08.2020 - 12:35
![]() Loredana wrote:
Loredana wrote:
Buongiorno, se guardo il diagramma A3 dall'alto verso il basso la sequenza per la manica viene corretta
21.07.2020 - 10:24
![]() Loredana wrote:
Loredana wrote:
Per la manica dice di lavorare 7 maglie, poi A8 ( 5 maglie) e poi A3 x 5 ripetizioni e finire con 7 maglie a maglia rasata. Ma il diagramma A8 alla quinta riga ha il motivo traforato e A3 alla quinta riga ha 2 diritti e poi il motivo traforato. Così facendo il disegno non viene troppo ravvicinato?
20.07.2020 - 21:41DROPS Design answered:
Buongiorno Loredana. Trasmetteremo la sua segnalazione alla casa madre. Può lavorare la manica avendo attenzione ad incolonnare correttamente il motivo traforato e a mantenere le giuste distanze tra un motivo e l’altro. Buon lavoro!
21.07.2020 - 08:56
![]() Nicki wrote:
Nicki wrote:
Hi again. Hope you are keeping safe and well. On the sleeves now. Size L. First row: Knit 6, A8, (A3 x 6), Knit 6. This means that the first hole is 8 st from (in front of) the marker, but 14 st from (behind) the marker. Is that right? I was expecting the holes to be in equivalent position on both sides of the marker. Thank you :-)
27.04.2020 - 16:50DROPS Design answered:
Dear Nicky, the marker is in the middle of the new 8 sts picked up from armhole on body, the knit 6 at the beg of the row are the 4 sts on the left side of the marker (in knitting direction) + the next 2 sts and the last knit 6 at the end of the round are 2 sts + 4 of the 8 new stitches, this means you have K12 mid under arm, K6 on each side of the marker. Happy knitting!
28.04.2020 - 10:02
![]() Nicki wrote:
Nicki wrote:
Thank you for your earlier reply. It will be very helpful when I reach the division for sleeve/body. My query refers to the bit after finishing the raglan increases and before completing the 3rd set of lace (size L A5, 4xA3, A7) on the sleeves in the yoke. In line 17 of 3rd set of lace (or line 65 from cuff), 31 raglan increases have made 85 stitches in the sleeve. The lace pattern diagram is only for 83 stitches and so I have 2 extra stitches. Have I done something wrong?
04.12.2019 - 23:23DROPS Design answered:
Dear Nicky, sorry for late answer, when working the "lace pattern sleeve", you will always work K1 before/after the lace pattern, increasing first after this K1 at the beg of sleeve and before this K1 at the end of sleeve, then when all increases are done, just work: K1, A.5, A.3, A.7, K1 = 85 sts in size L. Happy knitting!
11.12.2019 - 15:57
|
|||||||||||||
Rivage Jacket#rivagejacket |
|||||||||||||
 |
 |
||||||||||||
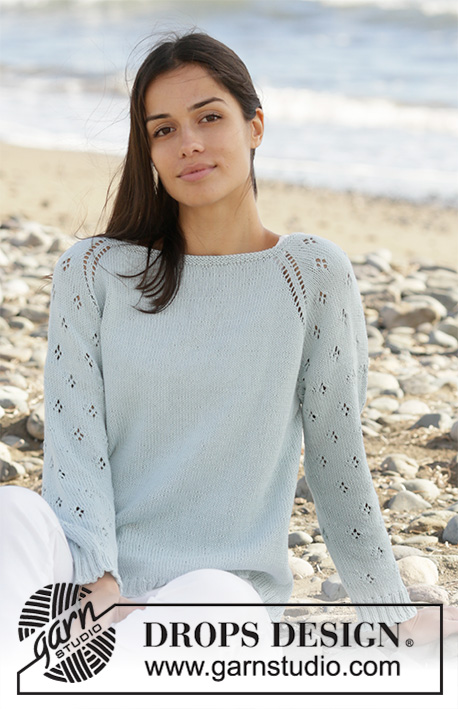
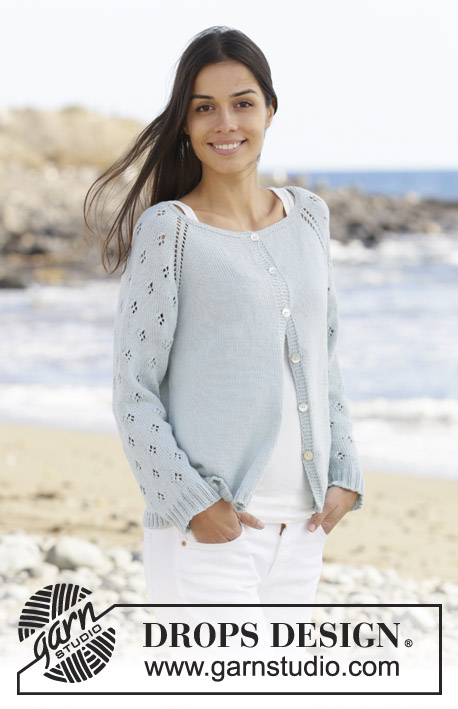
Knitted jacket with raglan in DROPS Alpaca. Piece is knitted top down with lace pattern on sleeves. Size: S - XXXL
DROPS 199-21 |
|||||||||||||
|
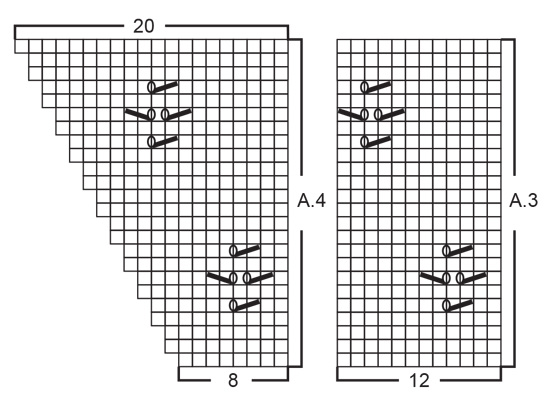
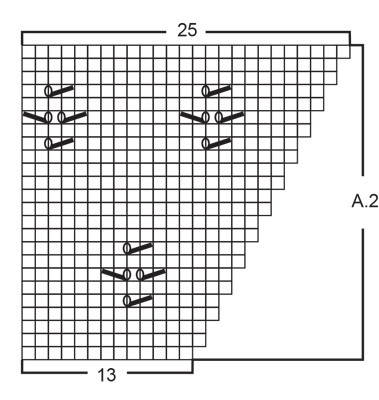
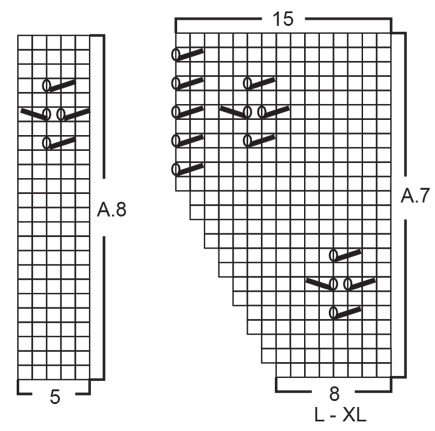
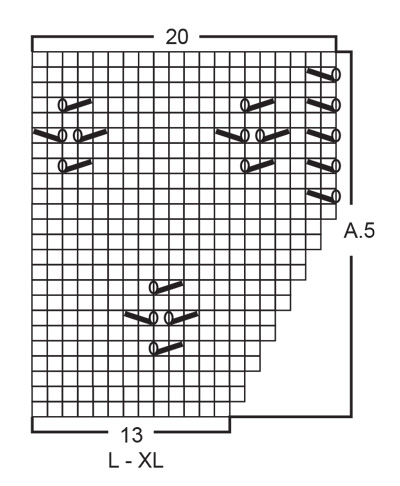
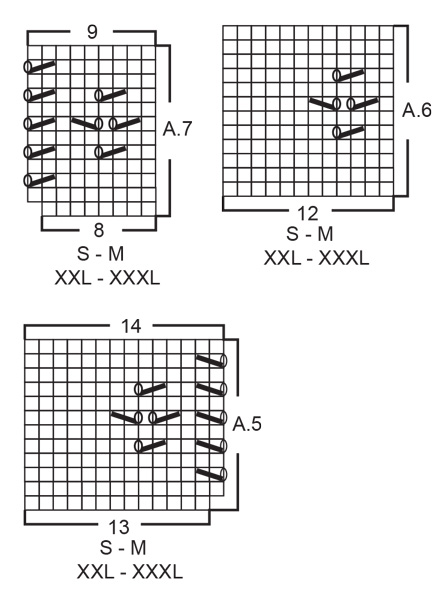
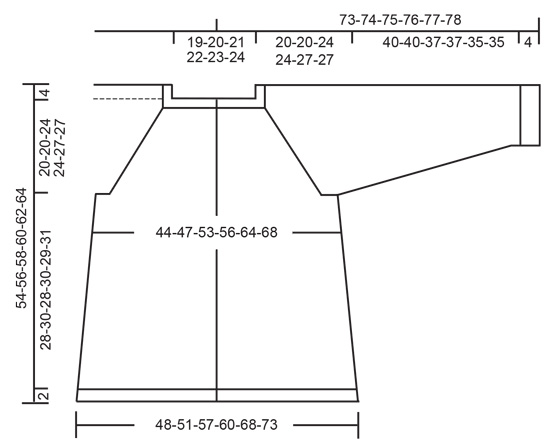
---------------------------------------------------------- EXPLANATION FOR THE PATTERN: ---------------------------------------------------------- GARTER STITCH (back and forth): Knit all rows. 1 ridge vertically = knit 2 rows. PATTERN: See diagrams A.1 to A.8. Choose diagram for your size (applies to A.5, A.6 and A.7). Diagrams show all rows in pattern seen from the right side. INCREASE TIP-1 (evenly): All increases are done from the right side. To calculate how to increase evenly, use the total number of stitches on row (e.g. 134 stitches), minus bands (e.g. 10 stitches) and divide the remaining 124 stitches by number of increases to be done (e.g. 26) = 4.7. In this example increase by making 1 yarn over after alternately approx. every 4th and 5th stitch. Do not increase over bands. On next row (wrong side) purl yarn overs twisted to avoid holes. RAGLAN: All increases are done from the right side. Increase for raglan in every transition between front/back piece and sleeves as follows: Begin 1 stitch before marker thread, make 1 yarn over, knit 2 (marker thread is between these 2 stitches), make 1 yarn over (= 2 stitches increased at the marker thread and 8 stitches increased in total on row) On next row (wrong side) purl the yarn over to make a hole. Then work the new stitch in stocking stitch on body and in lace pattern on sleeves. INCREASE TIP-2 (applies to sides of body): All increases are done from the right side. Work until 3 stitches remain before marker thread, make 1 yarn over, knit 6 (marker thread is in the middle of these 6 stitches), make 1 yarn over (= 2 stitches increased at the marker thread and 4 stitches increased in total on row). On next row (wrong side) purl yarn overs twisted to avoid holes. Then work the new stitches in stocking stitch. DECREASE TIP (applies to mid under sleeves): Decrease 1 stitch on each side of marker thread as follows: Work until 3 stitches remain before marker thread, knit 2 together, knit 2 stitches (marker thread is between these 2 stitches), slip 1 stitch knitwise, knit 1, pass slipped stitch over stitch worked (= 2 stitches decreased). BUTTONHOLES: Decrease for buttonholes on right band (when garment is worn). Decrease for first buttonhole on first row from right side when edge in garter stitch in the neck has been worked. Then decrease the next 5-5-5-5-6-6 buttonholes, approx. 8-8-8½-9-8-8 cm apart. 1 BUTTONHOLE = decrease from right side when 3 stitches remain on row, make 1 yarn over, knit the next 2 stitches together and knit last stitch. On next row (wrong side) knit the yarn over to make a hole. ---------------------------------------------------------- START THE PIECE HERE: ---------------------------------------------------------- JACKET - SHORT OVERVIEW OF THE PIECE: Work neck edge and yoke back and forth on circular needle from mid front, work top down. Now divide yoke for body and sleeves. Work body back and forth from mid front, work top down. Work sleeves in the round on double pointed needles/short circular needle, top down. NECK EDGE: Cast on 130-134-138-142-148-156 stitches (including 5 band stitches in each side towards mid front) on circular needle size 2.5 mm with Alpaca. Work 3 ridges in GARTER STITCH - read explanation above. Knit 1 row from right side while increasing 6-26-22-38-32-44 stitches evenly - read INCREASE TIP-1 and remember BUTTONHOLES on right band = 136-160-160-180-180-200 stitches. Purl 1 row (work bands in garter stitch and purl yarn overs twisted). Then work yoke as explained below. YOKE: Switch to circular needle size 3 mm. Insert 4 marker threads in piece as explained below (without working the stitches). Use marker threads when increasing for raglan. Count 25-31-31-36-36-41 stitches (= front piece), insert 1 marker thread before next stitch, count 23 stitches (= sleeve), insert 1 marker thread before next stitch, count 40-52-52-62-62-72 stitches (= back piece), insert 1 marker thread before next stitch, count 23 stitches (= sleeve), insert 1 marker thread before next stitch. There are 25-31-31-36-36-41 stitches after last marker thread on front piece. Work first row as follows from right side: 5 band stitches in garter stitch, work in stocking stitch until 1 stitch remains before marker thread, increase for RAGLAN on each side of marker thread – read explanation above, work A.1 over the next 21 stitches (= sleeve), increase for raglan on each side of marker thread, work in stocking stitch until 1 stitch remains before next marker thread (= back piece), increase for raglan on each side of marker thread, work A.1 over the 21 stitches (= sleeve), increase for raglan on each side of marker thread, work in stocking stitch until 5 stitches remain on row and finish with 5 band stitches in garter stitch (= front piece). Continue pattern like this with 5 band stitches in garter stitch in each side towards mid front, stocking stitch on front and back piece and A.1 on sleeves. REMEMBER THE KNITTING TENSION! AT THE SAME TIME continue increase for raglan on every other row (i.e. on every row from right side) until increase has been done 25-25-31-31-37-37 times in total at every marker thread (including increase explained on first row). Work the new stitch in stocking stitch on front and back piece and in lace pattern the way diagrams show on sleeves. When A.1 has been worked 1 time vertically, continue lace pattern on sleeves as explained below: LACE PATTERN SLEEVE: SIZE S and M: When A.1 has been worked 1 time vertically, work next row as follows over stitches on sleeves: Work A.2 (= 13 stitches), work A.3 over the next 24 stitches (= 2 repetition of 12 stitches), and finish with A.4 (= 8 stitches). When A.2 to A.4 have been worked 1 time vertically, work next row as follows over stitches on sleeves: Work A.5 (= 13 stitches), work A.6 over the next 48 stitches (= 4 repetition of 12 stitches), and finish with A.7 (= 8 stitches). When last row in A.5 to A.7 remain, divide yoke for body and sleeves as explained below ALL SIZES. SIZE L and XL: When A.1 has been worked 1 time vertically, work next row as follows over stitches on sleeves: Work A.2 (= 13 stitches), work A.3 over the next 24 stitches (= 2 repetition of 12 stitches), and finish with A.4 (= 8 stitches). When A.2 to A.4 have been worked 1 time vertically, work next row as follows over stitches on sleeves: Work A.5 (= 13 stitches), work A.3 over the next 48 stitches (= 4 repetition of 12 stitches), and finish with A.7 (= 8 stitches). When last row in A.5 to A.7 remain, divide yoke for body and sleeves as explained below ALL SIZES. SIZE XXL and XXXL: When A.1 has been worked 1 time vertically, work next row as follows over stitches on sleeves: Work A.2 (= 13 stitches), work A.3 over the next 24 stitches (= 2 repetition of 12 stitches), and finish with A.4 (= 8 stitches). When A.2 to A.4 have been worked 1 time vertically, work next row as follows over stitches on sleeves: Work A.2 (= 13 stitches), work A.3 over the next 48 stitches (= 4 repetition of 12 stitches), and finish with A.4 (= 8 stitches). When A.2 to A.4 have been worked, work next row as follows over stitches on sleeves: Work A.5 (= 13 stitches), work A.6 over the next 72 stitches (= 6 repetition of 12 stitches), and finish with A.7 (= 8 stitches). When last row in A.5 to A.7 remain, divide yoke for body and sleeves as explained below ALL SIZES. ALL SIZES: When increases for raglan are done, there are 336-360-408-428-476-496 stitches on round. Continue lace pattern as explained above until last row in A.5 and A.7 remains. Now divide yoke for body and sleeves and work last row as follows from wrong side: Work the first 54-57-64-67-77-81 stitches as before (= front piece), slip the next 65-71-81-85-89-91 stitches on 1 stitch holder for sleeve, cast on 8-8-8-10-10-12 new stitches on row (= in the side under sleeve), work 98-104-118-124-144-152 stitches as before (= back piece), slip the next 65-71-81-85-89-91 stitches on 1 stitch holder for sleeve, cast on 8-8-8-10-10-12 new stitches on row (= in the side under sleeve) and work the 54-57-64-67-77-81 stitches as before (= front piece). Yoke measures now approx. 20-20-24-24-27-27 cm from cast-on edge mid front. Remove the marker threads in piece. Now finish body and sleeves separately. NOW MEASURE THE PIECE FROM HERE! BODY: = 222-234-262-278-318-338 stitches. Insert 1 marker thread in each side on body, in the middle of the 8-8-8-10-10-12 stitches that were cast on under sleeves. Move the marker threads upwards when working; they should be used for increase later in the sides. Continue back and forth in stocking stitch with 5 band stitches in garter stitch in each side towards mid front. When piece measures 4 cm from division in all sizes, increase 1 stitch on each side of both markers - READ INCREASE TIP-2 (= 4 stitches increased). Increase like this every 5 cm 5 times in total in all sizes = 242-254-282-298-338-358 stitches. Work until piece measures approx. 28-30-28-30-29-31 cm from division (or desired length, approx. 2 cm remain until finished measurements). Knit 1 row from right side while increasing 58-62-70-74-82-86 stitches evenly = 300-316-352-372-420-444 stitches. This is done to avoid the rib to be worked, from contracting. Switch to circular needle size 2.5 mm. Work next row as follows from wrong side: 5 band stitches in garter stitch, * purl 2, knit 2 *, repeat from *-* until 7 stitches remain on needle, purl 2 and finish with 5 band stitches in garter stitch. Continue rib like this for 2 cm. Cast off stitches with knit over knit and purl over purl. Jacket measures approx. 54-56-58-60-62-64 cm from shoulder and down. SLEEVE: Slip the 65-71-81-85-89-91 stitches from stitch holder in one side of piece on double pointed needles or a short circular needle size 3 mm and pick in addition up 1 stitch in each of the 8-8-8-10-10-12 new stitches cast on under sleeve = 73-79-89-95-99-103 stitches. Insert 1 marker thread in the middle of the 8-8-8-10-10-12 stitches under sleeve. Move the marker thread upwards when working; it should be used for decrease under sleeve. Begin round at the marker thread and work as follows: Work 4-7-6-9-5-7 stitches in stocking stitch, work A.8 (= 5 stitches), work A.3 over the next 60-60-72-72-84-84 stitches (= 5-5-6-6-7-7 repetitions of 12 stitches) and finish with 4-7-6-9-5-7 stitches in stocking stitch. Continue pattern like this (the lace pattern continues nicely over sleeve). AT THE SAME TIME when piece measures 3-3-3-2-2-2 cm from division, decrease 2 stitches mid under sleeve - read DECREASE TIP. Decrease like this every 3½-3-2-2-1½-1½ cm 11-13-17-19-20-21 times in total = 51-53-55-57-59-61 stitches - NOTE: Work stitches that do not fit the lace pattern when decreasing under sleeve, in stocking stitch. Work until piece measures approx. 40-40-37-37-35-35 cm from division (or desired length, approx. 4 cm remain until finished measurements). NOTE: Shorter measurements in the larger sizes because of wider neck and longer yoke. Knit 1 round while increasing 17-15-17-19-17-19 stitches evenly = 68-68-72-76-76-80 stitches. This is done to avoid the rib to be worked, from contracting. Switch to double pointed needles size 2.5 mm. Work rib in the round = knit 2/purl 2 for 4 cm. Loosely cast off stitches with knit over knit and purl over purl. Sleeve measures approx. 44-44-41-41-39-39 cm from division. Work the other sleeve the same way. ASSEMBLY: Sew the buttons on to the left band. |
|||||||||||||
Diagram explanations |
|||||||||||||
|
|||||||||||||
|
|||||||||||||
|
|||||||||||||
|
|||||||||||||
|
|||||||||||||
|
|||||||||||||
|
|||||||||||||
|
|||||||||||||
Have you finished this pattern?Tag your pictures with #dropspattern #rivagejacket or submit them to the #dropsfan gallery. Do you need help with this pattern?You'll find 25 tutorial videos, a Comments/Questions area and more by visiting the pattern on garnstudio.com. © 1982-2025 DROPS Design A/S. We reserve all rights. This document, including all its sub-sections, has copyrights. Read more about what you can do with our patterns at the bottom of each pattern on our site. |
|||||||||||||


With over 40 years in knitting and crochet design, DROPS Design offers one of the most extensive collections of free patterns on the internet - translated to 17 languages. As of today we count 314 catalogues and 11822 patterns translated into English (UK/cm).
We work hard to bring you the best knitting and crochet have to offer, inspiration and advice as well as great quality yarns at incredible prices! Would you like to use our patterns for other than personal use? You can read what you are allowed to do in the Copyright text at the bottom of all our patterns. Happy crafting!
Post a comment to pattern DROPS 199-21
We would love to hear what you have to say about this pattern!
If you want to leave a question, please make sure you select the correct category in the form below, to speed up the answering process. Required fields are marked *.