
Popular categories
Looking for a yarn?


|
|||||||||||||
Rivage Jacket |
|||||||||||||
 |
 |
||||||||||||
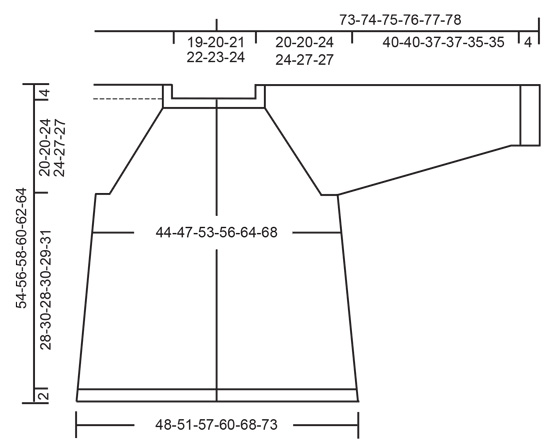
Knitted jacket with raglan in DROPS Alpaca. Piece is knitted top down with lace pattern on sleeves. Size: S - XXXL
DROPS 199-21 |
|||||||||||||
|
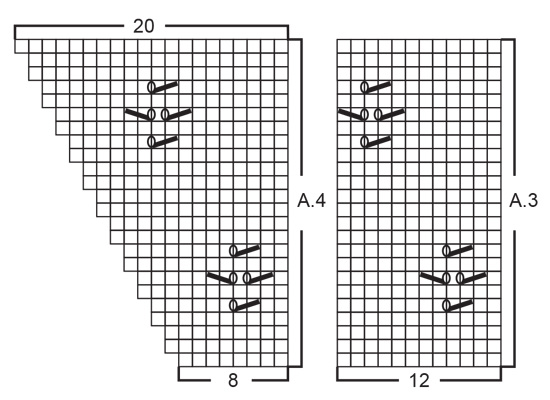
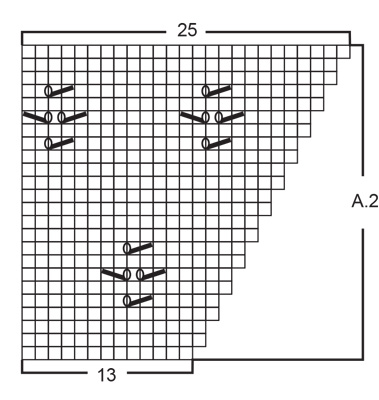
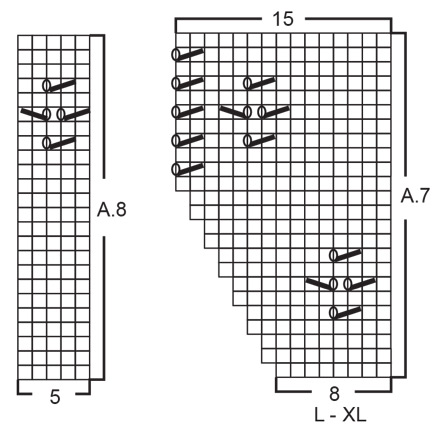
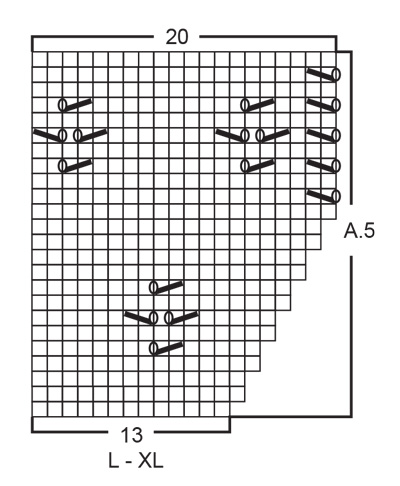
---------------------------------------------------------- EXPLANATION FOR THE PATTERN: ---------------------------------------------------------- GARTER STITCH (back and forth): Knit all rows. 1 ridge vertically = knit 2 rows. PATTERN: See diagrams A.1 to A.8. Choose diagram for your size (applies to A.5, A.6 and A.7). Diagrams show all rows in pattern seen from the right side. INCREASE TIP-1 (evenly): All increases are done from the right side. To calculate how to increase evenly, use the total number of stitches on row (e.g. 134 stitches), minus bands (e.g. 10 stitches) and divide the remaining 124 stitches by number of increases to be done (e.g. 26) = 4.7. In this example increase by making 1 yarn over after alternately approx. every 4th and 5th stitch. Do not increase over bands. On next row (wrong side) purl yarn overs twisted to avoid holes. RAGLAN: All increases are done from the right side. Increase for raglan in every transition between front/back piece and sleeves as follows: Begin 1 stitch before marker thread, make 1 yarn over, knit 2 (marker thread is between these 2 stitches), make 1 yarn over (= 2 stitches increased at the marker thread and 8 stitches increased in total on row) On next row (wrong side) purl the yarn over to make a hole. Then work the new stitch in stocking stitch on body and in lace pattern on sleeves. INCREASE TIP-2 (applies to sides of body): All increases are done from the right side. Work until 3 stitches remain before marker thread, make 1 yarn over, knit 6 (marker thread is in the middle of these 6 stitches), make 1 yarn over (= 2 stitches increased at the marker thread and 4 stitches increased in total on row). On next row (wrong side) purl yarn overs twisted to avoid holes. Then work the new stitches in stocking stitch. DECREASE TIP (applies to mid under sleeves): Decrease 1 stitch on each side of marker thread as follows: Work until 3 stitches remain before marker thread, knit 2 together, knit 2 stitches (marker thread is between these 2 stitches), slip 1 stitch knitwise, knit 1, pass slipped stitch over stitch worked (= 2 stitches decreased). BUTTONHOLES: Decrease for buttonholes on right band (when garment is worn). Decrease for first buttonhole on first row from right side when edge in garter stitch in the neck has been worked. Then decrease the next 5-5-5-5-6-6 buttonholes, approx. 8-8-8½-9-8-8 cm apart. 1 BUTTONHOLE = decrease from right side when 3 stitches remain on row, make 1 yarn over, knit the next 2 stitches together and knit last stitch. On next row (wrong side) knit the yarn over to make a hole. ---------------------------------------------------------- START THE PIECE HERE: ---------------------------------------------------------- JACKET - SHORT OVERVIEW OF THE PIECE: Work neck edge and yoke back and forth on circular needle from mid front, work top down. Now divide yoke for body and sleeves. Work body back and forth from mid front, work top down. Work sleeves in the round on double pointed needles/short circular needle, top down. NECK EDGE: Cast on 130-134-138-142-148-156 stitches (including 5 band stitches in each side towards mid front) on circular needle size 2.5 mm with Alpaca. Work 3 ridges in GARTER STITCH - read explanation above. Knit 1 row from right side while increasing 6-26-22-38-32-44 stitches evenly - read INCREASE TIP-1 and remember BUTTONHOLES on right band = 136-160-160-180-180-200 stitches. Purl 1 row (work bands in garter stitch and purl yarn overs twisted). Then work yoke as explained below. YOKE: Switch to circular needle size 3 mm. Insert 4 marker threads in piece as explained below (without working the stitches). Use marker threads when increasing for raglan. Count 25-31-31-36-36-41 stitches (= front piece), insert 1 marker thread before next stitch, count 23 stitches (= sleeve), insert 1 marker thread before next stitch, count 40-52-52-62-62-72 stitches (= back piece), insert 1 marker thread before next stitch, count 23 stitches (= sleeve), insert 1 marker thread before next stitch. There are 25-31-31-36-36-41 stitches after last marker thread on front piece. Work first row as follows from right side: 5 band stitches in garter stitch, work in stocking stitch until 1 stitch remains before marker thread, increase for RAGLAN on each side of marker thread – read explanation above, work A.1 over the next 21 stitches (= sleeve), increase for raglan on each side of marker thread, work in stocking stitch until 1 stitch remains before next marker thread (= back piece), increase for raglan on each side of marker thread, work A.1 over the 21 stitches (= sleeve), increase for raglan on each side of marker thread, work in stocking stitch until 5 stitches remain on row and finish with 5 band stitches in garter stitch (= front piece). Continue pattern like this with 5 band stitches in garter stitch in each side towards mid front, stocking stitch on front and back piece and A.1 on sleeves. REMEMBER THE KNITTING TENSION! AT THE SAME TIME continue increase for raglan on every other row (i.e. on every row from right side) until increase has been done 25-25-31-31-37-37 times in total at every marker thread (including increase explained on first row). Work the new stitch in stocking stitch on front and back piece and in lace pattern the way diagrams show on sleeves. When A.1 has been worked 1 time vertically, continue lace pattern on sleeves as explained below: LACE PATTERN SLEEVE: SIZE S and M: When A.1 has been worked 1 time vertically, work next row as follows over stitches on sleeves: Work A.2 (= 13 stitches), work A.3 over the next 24 stitches (= 2 repetition of 12 stitches), and finish with A.4 (= 8 stitches). When A.2 to A.4 have been worked 1 time vertically, work next row as follows over stitches on sleeves: Work A.5 (= 13 stitches), work A.6 over the next 48 stitches (= 4 repetition of 12 stitches), and finish with A.7 (= 8 stitches). When last row in A.5 to A.7 remain, divide yoke for body and sleeves as explained below ALL SIZES. SIZE L and XL: When A.1 has been worked 1 time vertically, work next row as follows over stitches on sleeves: Work A.2 (= 13 stitches), work A.3 over the next 24 stitches (= 2 repetition of 12 stitches), and finish with A.4 (= 8 stitches). When A.2 to A.4 have been worked 1 time vertically, work next row as follows over stitches on sleeves: Work A.5 (= 13 stitches), work A.3 over the next 48 stitches (= 4 repetition of 12 stitches), and finish with A.7 (= 8 stitches). When last row in A.5 to A.7 remain, divide yoke for body and sleeves as explained below ALL SIZES. SIZE XXL and XXXL: When A.1 has been worked 1 time vertically, work next row as follows over stitches on sleeves: Work A.2 (= 13 stitches), work A.3 over the next 24 stitches (= 2 repetition of 12 stitches), and finish with A.4 (= 8 stitches). When A.2 to A.4 have been worked 1 time vertically, work next row as follows over stitches on sleeves: Work A.2 (= 13 stitches), work A.3 over the next 48 stitches (= 4 repetition of 12 stitches), and finish with A.4 (= 8 stitches). When A.2 to A.4 have been worked, work next row as follows over stitches on sleeves: Work A.5 (= 13 stitches), work A.6 over the next 72 stitches (= 6 repetition of 12 stitches), and finish with A.7 (= 8 stitches). When last row in A.5 to A.7 remain, divide yoke for body and sleeves as explained below ALL SIZES. ALL SIZES: When increases for raglan are done, there are 336-360-408-428-476-496 stitches on round. Continue lace pattern as explained above until last row in A.5 and A.7 remains. Now divide yoke for body and sleeves and work last row as follows from wrong side: Work the first 54-57-64-67-77-81 stitches as before (= front piece), slip the next 65-71-81-85-89-91 stitches on 1 stitch holder for sleeve, cast on 8-8-8-10-10-12 new stitches on row (= in the side under sleeve), work 98-104-118-124-144-152 stitches as before (= back piece), slip the next 65-71-81-85-89-91 stitches on 1 stitch holder for sleeve, cast on 8-8-8-10-10-12 new stitches on row (= in the side under sleeve) and work the 54-57-64-67-77-81 stitches as before (= front piece). Yoke measures now approx. 20-20-24-24-27-27 cm from cast-on edge mid front. Remove the marker threads in piece. Now finish body and sleeves separately. NOW MEASURE THE PIECE FROM HERE! BODY: = 222-234-262-278-318-338 stitches. Insert 1 marker thread in each side on body, in the middle of the 8-8-8-10-10-12 stitches that were cast on under sleeves. Move the marker threads upwards when working; they should be used for increase later in the sides. Continue back and forth in stocking stitch with 5 band stitches in garter stitch in each side towards mid front. When piece measures 4 cm from division in all sizes, increase 1 stitch on each side of both markers - READ INCREASE TIP-2 (= 4 stitches increased). Increase like this every 5 cm 5 times in total in all sizes = 242-254-282-298-338-358 stitches. Work until piece measures approx. 28-30-28-30-29-31 cm from division (or desired length, approx. 2 cm remain until finished measurements). Knit 1 row from right side while increasing 58-62-70-74-82-86 stitches evenly = 300-316-352-372-420-444 stitches. This is done to avoid the rib to be worked, from contracting. Switch to circular needle size 2.5 mm. Work next row as follows from wrong side: 5 band stitches in garter stitch, * purl 2, knit 2 *, repeat from *-* until 7 stitches remain on needle, purl 2 and finish with 5 band stitches in garter stitch. Continue rib like this for 2 cm. Cast off stitches with knit over knit and purl over purl. Jacket measures approx. 54-56-58-60-62-64 cm from shoulder and down. SLEEVE: Slip the 65-71-81-85-89-91 stitches from stitch holder in one side of piece on double pointed needles or a short circular needle size 3 mm and pick in addition up 1 stitch in each of the 8-8-8-10-10-12 new stitches cast on under sleeve = 73-79-89-95-99-103 stitches. Insert 1 marker thread in the middle of the 8-8-8-10-10-12 stitches under sleeve. Move the marker thread upwards when working; it should be used for decrease under sleeve. Begin round at the marker thread and work as follows: Work 4-7-6-9-5-7 stitches in stocking stitch, work A.8 (= 5 stitches), work A.3 over the next 60-60-72-72-84-84 stitches (= 5-5-6-6-7-7 repetitions of 12 stitches) and finish with 4-7-6-9-5-7 stitches in stocking stitch. Continue pattern like this (the lace pattern continues nicely over sleeve). AT THE SAME TIME when piece measures 3-3-3-2-2-2 cm from division, decrease 2 stitches mid under sleeve - read DECREASE TIP. Decrease like this every 3½-3-2-2-1½-1½ cm 11-13-17-19-20-21 times in total = 51-53-55-57-59-61 stitches - NOTE: Work stitches that do not fit the lace pattern when decreasing under sleeve, in stocking stitch. Work until piece measures approx. 40-40-37-37-35-35 cm from division (or desired length, approx. 4 cm remain until finished measurements). NOTE: Shorter measurements in the larger sizes because of wider neck and longer yoke. Knit 1 round while increasing 17-15-17-19-17-19 stitches evenly = 68-68-72-76-76-80 stitches. This is done to avoid the rib to be worked, from contracting. Switch to double pointed needles size 2.5 mm. Work rib in the round = knit 2/purl 2 for 4 cm. Loosely cast off stitches with knit over knit and purl over purl. Sleeve measures approx. 44-44-41-41-39-39 cm from division. Work the other sleeve the same way. ASSEMBLY: Sew the buttons on to the left band. |
|||||||||||||
Diagram explanations |
|||||||||||||
|
|||||||||||||

|
|||||||||||||
|
|||||||||||||
|
|||||||||||||
|
|||||||||||||
|
|||||||||||||

|
|||||||||||||
|
|||||||||||||
|
Have you made this or any other of our designs? Tag your pictures in social media with #dropsdesign so we can see them! Do you need help with this pattern?You'll find tutorial videos, a Comments/Questions area and more by visiting the pattern on garnstudio.com. © 1982-2024 DROPS Design A/S. We reserve all rights. This document, including all its sub-sections, has copyrights. Read more about what you can do with our patterns at the bottom of each pattern on our site. |
|||||||||||||


With over 40 years in knitting and crochet design, DROPS Design offers one of the most extensive collections of free patterns on the internet - translated to 17 languages. As of today we count 304 catalogues and 11422 patterns - 11422 of which are translated into English (UK/cm).
We work hard to bring you the best knitting and crochet have to offer, inspiration and advice as well as great quality yarns at incredible prices! Would you like to use our patterns for other than personal use? You can read what you are allowed to do in the Copyright text at the bottom of all our patterns. Happy crafting!
Comments / Questions (23)
Hi. Not sure if I've done something wrong. On completion of the raglan section for size L the diagrams show: 83 (A5(20) +A3x4(48)+A7(15) stitches for each sleeve. However, I have 85 stitches for each sleeve so the continuing lace pattern doesn't work for me. After 31 raglan increases my maths makes it: Front sides 62 (31+31) x 2; Sleeves 85 (23+31+31) x 2; Back 114 (52+31+31) = 408. Can you help me out please?
03.12.2019 - 19:36DROPS Design answered:
Dear Nicky, when dividing piece for body/sleeves, you will take 2 sts from the sleeve on each side for front piece/back piece, ie: front piece = 31+31+2 (from the 31 sts inc on sleeve) = 64 sts; sleeves = 29 (remaining from the 31 sts inc on sleeve) +23+29 (from the 31 sts inc on sleeve)=81 sts; back piece = 2 (from the 31 sts inc on sleeve) +31+52+31+2 (from the 31 sts inc on sleeve)=118 sts. Happy knitting!
04.12.2019 - 08:30Vielen Dank für Ihre Antworten. Jacke fertig. Sieht toll aus :)
02.10.2019 - 18:24Bonjour, Je suis en train de tricoter ce gilet en taille S. Il est indiqué de démarrer avec 23 mailles pour la manche et d'ajouter 25 fois une augmentation de chaque côté, ce qui fait obtenir 23 + 50= 73 mailles. Si l'on met en attente 65 m. pour la manche, que faire des 8 autres? Merci de votre réponse, Cordialement, Blanche.
17.09.2019 - 18:42DROPS Design answered:
Bonjour Blanche, les 4 premières mailles de la manche seront tricotées pour le devant/le dos et les 4 dernières mailles de la manche seront tricotées pour le dos/le devant, on aura ainsi: 50 m devant + 4 m manche = 54 m pour chaque devant et 90 m dos + les 4 dernières m de la 1ère manche + les 4 premières m de la 2ème manche = 98 m. Bon tricot!
18.09.2019 - 07:57Den Ärmel stricke ich in Runden RECHTS? D. h. Nun stricke ich das Lochmuster in rechts, statt wie zu Beginn in den linken Rückreihen?
10.09.2019 - 21:20DROPS Design answered:
Liebe Frau Bien Foutu, die Ärmel werden in Runden glatt rechts und im Muster gestrickt, Glatt rechts in der Runde strickt man mit nur rechten Maschen und die leeren Kästchen in den Diagrammen werden dann immer rechts gestrickt. Viel Spaß beim stricken!
11.09.2019 - 07:59Schon gefunden. Brille zurechtgerückt😊
05.09.2019 - 22:07Hallo. Wenn ich die Ärmelmaschen wieder aufnehme, wie stricke ich das Muster weiter. Ich finde die Anleitung für das Muster in den Ärmeln nicht. Danke für Ihre Antwort.
05.09.2019 - 22:05DROPS Design answered:
Liebe Frau Bien, die Ärmel stricken Sie mit Diagram A.8, es befindet sich unter A.2 . Viel Spaß beim stricken!
06.09.2019 - 07:56Hallo. Ich verstehe das Musterdiagramm offensichtlich nicht. Ich stricke das Muster in den linken Rückreihen? Aber wenn ich bei L - XL A2 - A4 stricke, dann stricke ich es ja umgekehrt - also A4 - A2.
25.08.2019 - 11:53DROPS Design answered:
Liebe Frau Bien, ja genau, hier unten Mehrere verschiedene Diagramme nacheinander: lesen Sie mehr. Viel Spaß beim stricken!
26.08.2019 - 09:09Buonasera mi piacerebbe fare questo cardigan. e' possibile farlo coi ferri normali? Come devo trasformare le istruzioni? Grazie. Roberta
05.04.2019 - 17:57DROPS Design answered:
Buonasera Roberta! Se preferite lavorare in piano, invece che in tondo, dovrete naturalmente fare delle modifiche al modello in modo da lavorare le parti separatamente e poi assemblarle alla fine. Dividere le maglie del corpo in 2, aggiungere 1 maglia di vivagno a ogni lato (per la cucitura) e lavorare il davanti e il dietro in modo separato. Vedere la lezione DROPS: Posso adattare un modello disegnato per i ferri circolari ai ferri dritti?. Buon lavoro!
05.04.2019 - 18:47Buonasera, ho fatto i 25 aumenti per il raglan, ma sul ferro ho 336 maglie invece delle 326 indicate nel modello. C'è un errore nelle spiegazioni oppure ho sbagliato io? Grazie
18.03.2019 - 18:55DROPS Design answered:
Buongiorno Tiziana. Abbiamo corretto il numero delle maglie nel testo. Le maglie sono, per la taglia S, 336. La ringraziamo per la segnalazione. Buon lavoro!
19.03.2019 - 00:18Bonjour, comment faire pour commander la laine pour réaliser ce gilet? Pour une taille XXXL Bien à vous
09.03.2019 - 15:23DROPS Design answered:
Bonjour Mme Libbrecht, vous trouverez ici la liste des magasins DROPS, si vous n'avez pas la chance d'avoir une boutique près de chez vous, vous pouvez vous commander dans une des boutiques en ligne, au choix. Bon tricot!
11.03.2019 - 10:37