
Popular categories
Looking for a yarn?


Comments / Questions (20)
![]() Lynda wrote:
Lynda wrote:
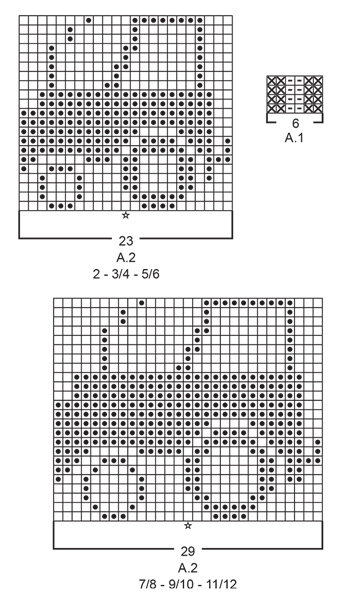
Vers la fin de l’empiècement, après la diminution de 18 mailles, il reste 80 mailles ( 5/6) mais après il est mentionné: on a maintenant 6 mailles pour chaque manche et 22 mailles pour le devant et le dos ce qui fait un total de 56 mailles. On a fait quoi avec les 24 mailles ( entre le 80 et 56).
01.06.2025 - 18:52DROPS Design answered:
Bonjour Lynda, ces 24 mailles correspondent aux 4 motifs de 6 mailles du diagramme A.1 des raglans: 6 m pour chaque manche + 22 m pour le devant et le dos + 4x 6 mailles pour le raglan =80 mailles. Bon tricot!
02.06.2025 - 08:28
![]() Laurence wrote:
Laurence wrote:
Concernant ce pull, je ne vois pas où mettre les marqueurs pour différencier le dos et le devant sans oublier les augmentations sont fait à qu’elle moment ? Svp si quelqu’un peut m’aider
28.11.2024 - 11:48DROPS Design answered:
Bonjour Laurence, le pull se tricote de bas en haut; lorsque vous tricotez l'empiècement, vous allez commencer à l'un des marqueurs (début du dos ou début manche gauche, au choix), et tricoter les 3 dernières mailles de A.1 (1 m end, 2 m envers), puis vous tricotez ainsi à chaque transition/chaque marqueur: 2 m env, 1 m end, marqueur, 1 m end, 2 m env. Vous terminez le tour par les 3 premières mailles de A.1 soit 2 m env, 1 m end. Vous diminuez ensuite pour le raglan avant/après chaque A.1 comme indiqué sous RAGLAN. Bon tricot!
29.11.2024 - 16:38
![]() Cissou wrote:
Cissou wrote:
Est-il possible de remplacer ce fil avec du baby merinos ? Le rendu sera t’il similaire?
19.11.2024 - 22:49DROPS Design answered:
Bonjour Mme Cissou, Baby Merino n'est pas une alternative à Sky car elles appartiennent à deux groupes de fils différents et vous aurez donc un échantillon différent; retrouvez iciles pulls que vous pouvez tricoter en Baby Merino = groupe de fils A (seul ou avec une autre laine). Bon tricot!
20.11.2024 - 08:05
![]() Suzan wrote:
Suzan wrote:
Bonjour,peut-on faire du jacquard au lieu de broder le modèle?
26.10.2024 - 23:09DROPS Design answered:
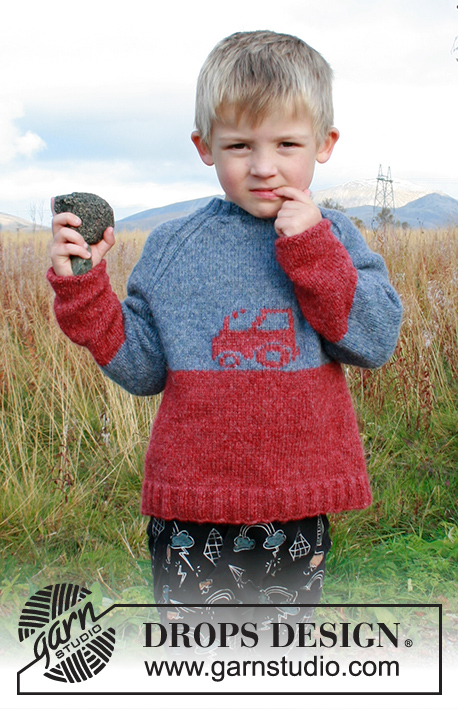
Bonjour Suzan, on brode ici le tracteur car le pull est tricoté en rond; si vous voulez le tricoter en jacquard, il faudra alors tricoter cette partie en allers et retours. Bon tricot!
28.10.2024 - 09:15
![]() Jutta Und Dietmar Reisch wrote:
Jutta Und Dietmar Reisch wrote:
Hallo, wo finde ich bitte die Anleitung zum Maschenstich, mit dem der Traktor gearbeitet wird? Vielen Dank für Ihre Hilfe. Herzliche Grüße Jutta Reisch
17.10.2024 - 08:38DROPS Design answered:
Liebe Frau Reisch, in diesem Video zeigen wir, wie man den Traktor im Maschenstich aufstickt. Viel Spaß beim Stricken!
17.10.2024 - 10:12
![]() Christine wrote:
Christine wrote:
I would like to knit this sweater for a big 4 year old. Which size should I make?
07.06.2024 - 03:20DROPS Design answered:
Hi Christine, please take a look at the lesson HERE. Happy knitting!
07.06.2024 - 07:57
![]() Gitte wrote:
Gitte wrote:
Hej. Jeg vil høre om man ikke kan strikke traktoren på. På samme måde, som man vil strikke mønster strik. I stedet for at sy den på med maske sting. Hilsen Gitte.
24.09.2022 - 08:55DROPS Design answered:
Hei Gitte. Du kan strikke den, men da må den røde tråden følge hele veien rundt der det kun strikkes med grått (da må den røde tråden snurres rundt den grå tråden). Men da er det lett for en barnehånd å sette seg fast i disse trådene når man tar på seg genseren. Du kan også klippe tråden hver gang du har strikket en rad av diagrammet, men du vil få mange tråder å feste og det kan bli litt ujevnt /hull ved overgangene. mvh DROPS Design
26.09.2022 - 10:13
![]() Talvikki wrote:
Talvikki wrote:
Vastaus äskeiseen kysymykseen löytyikin työn edetessä raglavaiheeseen. Kiva ohje😊
02.04.2022 - 15:39
![]() Talvikki wrote:
Talvikki wrote:
Mitä ohjeessa traktorin kuvan vieressä oleva kuuden silmukan A1 ohje tarkoittaa? Nurja silmukka farkunsinisellä langalla ja Oikea silmukka farkunsinisellä langalla. Mihin??
28.03.2022 - 22:30
![]() Karen Norris wrote:
Karen Norris wrote:
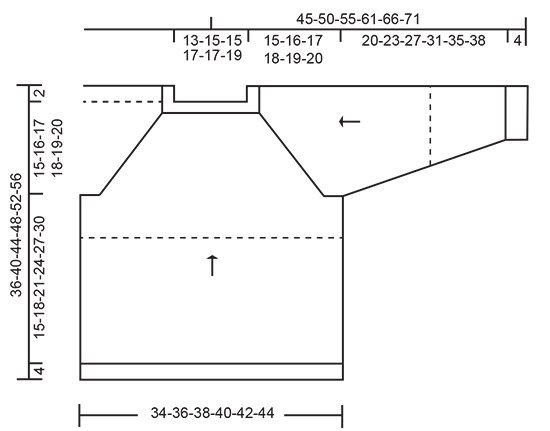
On the 11-12 years size you have said the arm will measure 42cm at the end of the increasing at the time you join onto the body to start the yoke, on the diagram and measurements showing it says 38 for biggest size, 42 cm seems very long for a child size, is this right?
13.08.2021 - 20:38DROPS Design answered:
Dear Karen, yes, the 42 cm is right, however, if you feel unsure we would suggets that you take a similarly shaped sweater, that fits, and measure and compare the sizes, and modify if necessary. Happy Stitching!
15.08.2021 - 23:32
|
|||||||||||||||||||
Tiny Trucker#tinytruckersweater |
|||||||||||||||||||
 |
 |
||||||||||||||||||
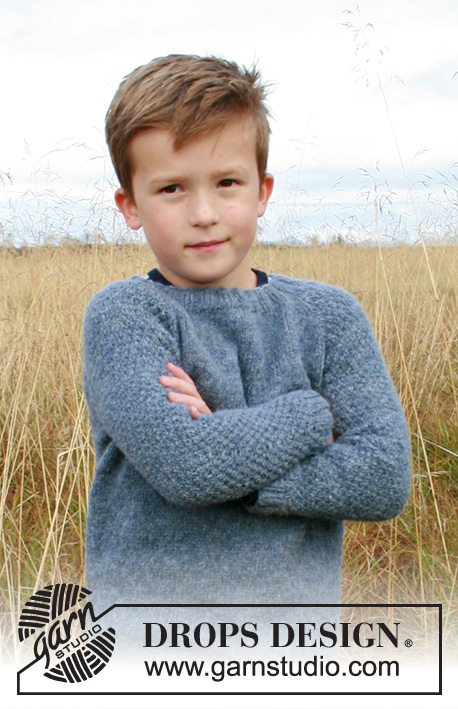
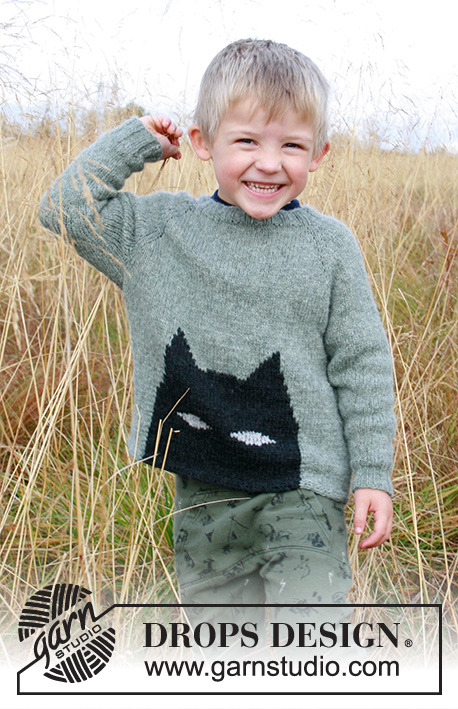
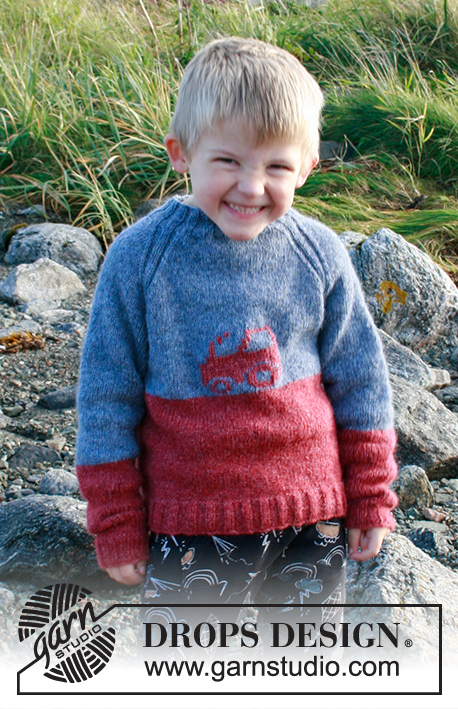
Knitted jumper with raglan and embroidered tractor for children in DROPS Sky. Sizes 2-12 years.
DROPS Children 34-15 |
|||||||||||||||||||
|
------------------------------------------------------- EXPLANATIONS FOR THE PATTERN: ------------------------------------------------------- DECREASE/INCREASE TIP: To work out how to decrease/increase evenly, count the total number of stitches on needle (e.g. 170 stitches), and divide by the number of decreases/increases to be made (e.g. 28) = 6.1. In this example, decrease by knitting together each 5th and 6th stitch. When increasing make 1 yarn over after each 6th stitch. On the next row work the yarn overs twisted to avoid holes. PATTERN: See diagrams A.1 and A.2. Choose diagram for your size (applies to A.2). A.1 is worked in transition between body and sleeves on yoke. A.2 (tractor) is embroidered on front piece with duplicate stitches. RAGLAN: Decrease to raglan in each transition between front/back piece and sleeves; i.e. decrease on each side of the 4 markers as follows: Start 5 stitches before the marker, knit 2 together, work A.1 (marker sits in the middle of these 6 stitches), slip 1 stitch as if to knit, knit 1 and pass the slipped stitch over (= 2 stitches decreased at marker and a total of 8 stitches decreased on decrease-round). INCREASE TIP (for mid under sleeves): Increase 1 stitch on each side of the marker thread as follows: Work until there is 1 stitch left before the marker thread, 1 yarn over, knit 2 (marker sits between these 2 stitches), 1 yarn over (= 2 stitches increased). On the next round knit the yarn overs twisted to avoid holes. Then work the new stitches in stocking stitch. ------------------------------------------------------- START THE PIECE HERE: ------------------------------------------------------- JUMPER - SHORT OVERVIEW OF THE PIECE: The body is worked in the round, bottom up, with circular needle as far as the armholes. The sleeves are worked in the round with double pointed needles, bottom up. Body and sleeves are placed on same circular needle and the yoke is worked in the round to finished length. A tractor is embroidered on the front piece with duplicate stitches. BODY: Cast on 170-180-190-205-215-225 stitches with circular needle size 3 mm and brick red. Knit 1 round then work rib in the round (= knit 2/ purl 3) for 4 cm. Knit 1 round where you decrease 28-30-32-35-37-39 stitches evenly spaced – read DECREASE/INCREASE TIP = 142-150-158-170-178-186 stitches. Change to circular needle size 4 mm and work stocking stitch in the round. When the piece measures 17-19-21-23-25-27 cm, change to jeans blue. Continue in the round with stocking stitch. When the piece measures 19-22-25-28-31-34 cm, on the next round, cast off stitches for the armholes on each side as follows: Cast off 3 stitches, work 65-69-73-79-83-87 stitches in stocking stitch (= front piece), cast off 6 stitches, work 65-69-73-79-83-87 stitches in stocking stitch (= back piece) and cast off the remaining 3 stitches = 130-138-146-158-166-174 stitches left on needle. Lay the piece to one side and work sleeves as described below. SLEEVE: Cast on 35-35-40-40-45-45 stitches with double pointed needles size 3 mm and brick red. Knit 1 round then work rib in the round (= knit 2/ purl 3) for 4 cm. Knit 1 round where you increase 5-7-4-6-3-5 stitches evenly spaced = 40-42-44-46-48-50 stitches. Insert 1 marker thread at the beginning of the round = mid under sleeve. Allow the marker thread to follow your work onwards; it will be used when increasing mid under sleeve. Change to double pointed needles size 4 mm and work stocking stitch in the round. When the piece measures 6 cm in all sizes increase 2 stitches mid under sleeve – read INCREASE TIP. Increase like this every 4-4½-5½-6½-7½-8½ cm a total of 5 times in all sizes = 50-52-54-56-58-60 masker. AT THE SAME TIME when the piece measures 12-14-16-18-20-21 cm, change to jeans blue. Continue in the round with stocking stitch. When the sleeve measures 24-27-31-35-39-42 cm, cast off stitches for armhole mid under sleeve on the next round as follows: Cast off 3 stitches, work 44-46-48-50-52-54 stitches in stocking stitch and cast off the remaining 3 stitches. Cut the strand. Work the other sleeve in the same way. YOKE: Place the sleeves on the same circular needle as the body, where you cast off stitches for armholes (without working the stitches) = 218-230-242-258-270-282 stitches on needle. Insert 1 marker in each transition between body and sleeves (= 4 markers). The whole of the yoke is worked with jeans blue. The first round is worked as follows: Start the round by the one marker and knit 1, purl 2 (= ½ A.1), * work stocking stitch until there are 3 stitches left before the next marker, work A.1 (= 6 stitches – marker sits in middle of A.1) *, work from *-* a total of 3 times, work stocking stitch until there are 3 stitches left before the first marker and finish with purl2, knit 1 (= ½ A.1). Continue in the round with stocking stitch and A.1 in each transition between body and sleeves. When you have worked 1-1-1-2-2-2 cm from where body and sleeves were combined, decrease to RAGLAN on each side of the 4 markers – read description above. Decrease to raglan every 2nd round a total of 16-17-18-19-20-21 times on each side of all 4 markers. After the last decrease-round there are 90-94-98-106-110-114 stitches left on the needle and the piece measures approx. 12-13-14-15-16-17 cm from where body and sleeves were combined. On the next round decrease 18-14-18-18-22-18 stitches, but work the decreases so that you decrease 9-7-9-9-11-9 stitches evenly over the 27-29-31-35-37-39 stitches in stocking stitch on the front piece and 9-7-9-9-11-9 stitches evenly over the 27-29-31-35-37-39 stitches in stocking stitch on the back piece = 72-80-80-88-88-96 stitches left on needle. There are now 6 stitches between A.1 on each sleeve and 18-22-22-26-26-30 stitches between A.1 on front and back pieces. Now work neck as described below. NECK: Change to short circular needle size 3 mm and work rib in the round (= knit 2/ purl 2), but adjust so the rib matches A.1 on the round. Work rib for approx. 3 cm. Change to short circular needle size 4 mm and cast off with knit over knit and purl over purl (cast off with a larger needle size to avoid a tight cast-off edge). The jumper measures approx. 36-40-44-48-52-56 cm from the shoulder down. Cut and fasten the strands. ASSEMBLY: Embroider the tractor on the front piece with duplicate stitches in brick red – see A.2. Start on round 2 of jeans blue on the front piece and adjust so the middle stitch on the front piece matches the stitch marked with a star in A.2. Sew openings under sleeves. |
|||||||||||||||||||
Diagram explanations |
|||||||||||||||||||
|
|||||||||||||||||||
|
|||||||||||||||||||
|
|||||||||||||||||||
Have you finished this pattern?Tag your pictures with #dropspattern #tinytruckersweater or submit them to the #dropsfan gallery. Do you need help with this pattern?You'll find 24 tutorial videos, a Comments/Questions area and more by visiting the pattern on garnstudio.com. © 1982-2025 DROPS Design A/S. We reserve all rights. This document, including all its sub-sections, has copyrights. Read more about what you can do with our patterns at the bottom of each pattern on our site. |
|||||||||||||||||||


With over 40 years in knitting and crochet design, DROPS Design offers one of the most extensive collections of free patterns on the internet - translated to 17 languages. As of today we count 314 catalogues and 11822 patterns translated into English (UK/cm).
We work hard to bring you the best knitting and crochet have to offer, inspiration and advice as well as great quality yarns at incredible prices! Would you like to use our patterns for other than personal use? You can read what you are allowed to do in the Copyright text at the bottom of all our patterns. Happy crafting!
Post a comment to pattern DROPS Children 34-15
We would love to hear what you have to say about this pattern!
If you want to leave a question, please make sure you select the correct category in the form below, to speed up the answering process. Required fields are marked *.