


Komentáře / Otázky (20)
![]() Lynda napsala:
Lynda napsala:
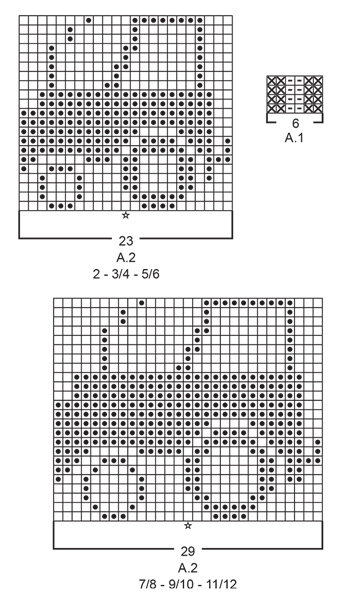
Vers la fin de l’empiècement, après la diminution de 18 mailles, il reste 80 mailles ( 5/6) mais après il est mentionné: on a maintenant 6 mailles pour chaque manche et 22 mailles pour le devant et le dos ce qui fait un total de 56 mailles. On a fait quoi avec les 24 mailles ( entre le 80 et 56).
01.06.2025 - 18:52Odpověď DROPS Design :
Bonjour Lynda, ces 24 mailles correspondent aux 4 motifs de 6 mailles du diagramme A.1 des raglans: 6 m pour chaque manche + 22 m pour le devant et le dos + 4x 6 mailles pour le raglan =80 mailles. Bon tricot!
02.06.2025 - 08:28
![]() Laurence napsala:
Laurence napsala:
Concernant ce pull, je ne vois pas où mettre les marqueurs pour différencier le dos et le devant sans oublier les augmentations sont fait à qu’elle moment ? Svp si quelqu’un peut m’aider
28.11.2024 - 11:48Odpověď DROPS Design :
Bonjour Laurence, le pull se tricote de bas en haut; lorsque vous tricotez l'empiècement, vous allez commencer à l'un des marqueurs (début du dos ou début manche gauche, au choix), et tricoter les 3 dernières mailles de A.1 (1 m end, 2 m envers), puis vous tricotez ainsi à chaque transition/chaque marqueur: 2 m env, 1 m end, marqueur, 1 m end, 2 m env. Vous terminez le tour par les 3 premières mailles de A.1 soit 2 m env, 1 m end. Vous diminuez ensuite pour le raglan avant/après chaque A.1 comme indiqué sous RAGLAN. Bon tricot!
29.11.2024 - 16:38
![]() Cissou napsala:
Cissou napsala:
Est-il possible de remplacer ce fil avec du baby merinos ? Le rendu sera t’il similaire?
19.11.2024 - 22:49Odpověď DROPS Design :
Bonjour Mme Cissou, Baby Merino n'est pas une alternative à Sky car elles appartiennent à deux groupes de fils différents et vous aurez donc un échantillon différent; retrouvez iciles pulls que vous pouvez tricoter en Baby Merino = groupe de fils A (seul ou avec une autre laine). Bon tricot!
20.11.2024 - 08:05
![]() Suzan napsala:
Suzan napsala:
Bonjour,peut-on faire du jacquard au lieu de broder le modèle?
26.10.2024 - 23:09Odpověď DROPS Design :
Bonjour Suzan, on brode ici le tracteur car le pull est tricoté en rond; si vous voulez le tricoter en jacquard, il faudra alors tricoter cette partie en allers et retours. Bon tricot!
28.10.2024 - 09:15
![]() Jutta Und Dietmar Reisch napsala:
Jutta Und Dietmar Reisch napsala:
Hallo, wo finde ich bitte die Anleitung zum Maschenstich, mit dem der Traktor gearbeitet wird? Vielen Dank für Ihre Hilfe. Herzliche Grüße Jutta Reisch
17.10.2024 - 08:38Odpověď DROPS Design :
Liebe Frau Reisch, in diesem Video zeigen wir, wie man den Traktor im Maschenstich aufstickt. Viel Spaß beim Stricken!
17.10.2024 - 10:12
![]() Christine napsala:
Christine napsala:
I would like to knit this sweater for a big 4 year old. Which size should I make?
07.06.2024 - 03:20Odpověď DROPS Design :
Hi Christine, please take a look at the lesson HERE. Happy knitting!
07.06.2024 - 07:57
![]() Gitte napsala:
Gitte napsala:
Hej. Jeg vil høre om man ikke kan strikke traktoren på. På samme måde, som man vil strikke mønster strik. I stedet for at sy den på med maske sting. Hilsen Gitte.
24.09.2022 - 08:55Odpověď DROPS Design :
Hei Gitte. Du kan strikke den, men da må den røde tråden følge hele veien rundt der det kun strikkes med grått (da må den røde tråden snurres rundt den grå tråden). Men da er det lett for en barnehånd å sette seg fast i disse trådene når man tar på seg genseren. Du kan også klippe tråden hver gang du har strikket en rad av diagrammet, men du vil få mange tråder å feste og det kan bli litt ujevnt /hull ved overgangene. mvh DROPS Design
26.09.2022 - 10:13
![]() Talvikki napsala:
Talvikki napsala:
Vastaus äskeiseen kysymykseen löytyikin työn edetessä raglavaiheeseen. Kiva ohje😊
02.04.2022 - 15:39
![]() Talvikki napsala:
Talvikki napsala:
Mitä ohjeessa traktorin kuvan vieressä oleva kuuden silmukan A1 ohje tarkoittaa? Nurja silmukka farkunsinisellä langalla ja Oikea silmukka farkunsinisellä langalla. Mihin??
28.03.2022 - 22:30
![]() Karen Norris napsala:
Karen Norris napsala:
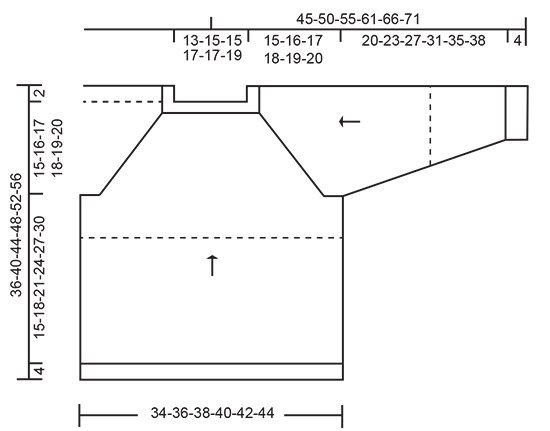
On the 11-12 years size you have said the arm will measure 42cm at the end of the increasing at the time you join onto the body to start the yoke, on the diagram and measurements showing it says 38 for biggest size, 42 cm seems very long for a child size, is this right?
13.08.2021 - 20:38Odpověď DROPS Design :
Dear Karen, yes, the 42 cm is right, however, if you feel unsure we would suggets that you take a similarly shaped sweater, that fits, and measure and compare the sizes, and modify if necessary. Happy Stitching!
15.08.2021 - 23:32
|
|||||||||||||||||||
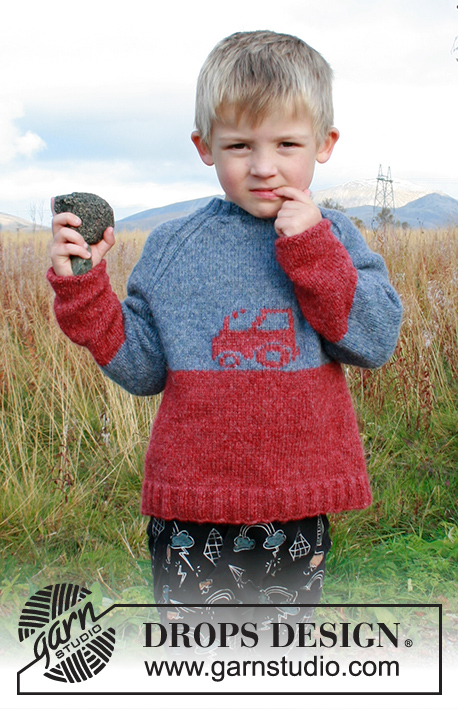
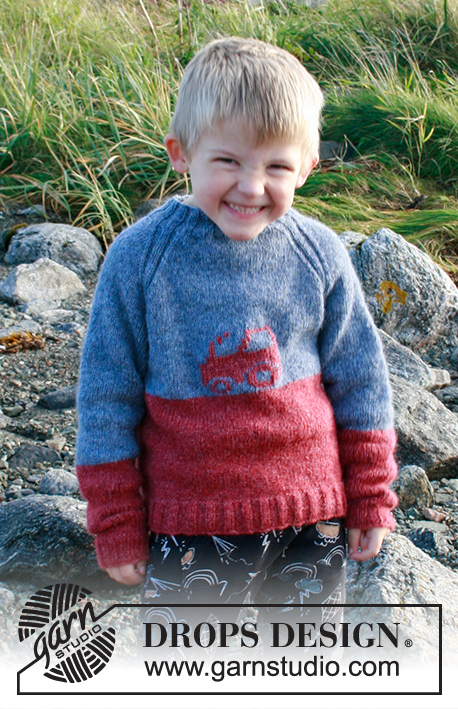
Tiny Trucker#tinytruckersweater |
|||||||||||||||||||
 |
 |
||||||||||||||||||
Dětský raglánový pulovr s vyšitým traktorem pletený v kruhových řadách zdola nahoru z příze DROPS Sky. Velikost 2-12 let.
DROPS Children 34-15 |
|||||||||||||||||||
|
------------------------------------------------------- VYSVĚTLIVKY: ------------------------------------------------------ TIP – UJÍMÁNÍ/PŘIDÁVÁNÍ: Abychom vypočítali, v jakých rozestupech máme ujímat/přidávat, vydělíme celkový počet ok na jehlici (např. 170 ok) počtem ok, která potřebujeme ujmout/přidat (tj. 28), takže 170 : 28 = 6,1. V tomto případě tedy spleteme hladce dohromady každé 5. a 6. oko. Pokud přidáváme, pak 1x nahodíme za každým 6. okem. V následující řadě pleteme nahození za zadní nit, aby se v pletenině netvořily dírky. VZOR: Viz schémata A.1 a A.2. Zvolte si schéma pro požadovanou velikost (platí pro schéma A.2). Vzor A.1 pleteme na sedle, v místě, kde se stýkají rukávy a trup. Vzor A.2 (traktor) vyšijeme na přední díl pletacím stehem. RAGLÁNOVÉ ZKOSENÍ: Ujímáme na obou stranách každého raglánového “švu”, tj. ve všech místech, kde se stýkají rukávy s trupem (= na obou stranách každé ze 4 značek). Začínáme 5 ok před značkou a postupujeme takto: 2 oka spleteme hladce, upleteme vzor A.1 (značka leží uprostřed těchto 6 ok), 1 oko sejmeme hladce, 1 upleteme hladce a sejmuté přes ně přetáhneme (= ujmuli jsme 2 oka u jedné značky, celkem takto ujmeme 8 ok v kruhové řadě). TIP - PŘIDÁVÁNÍ (rukávy, podpaží): Přidáváme 1 oko na každé straně značky, takto – začínáme 1 oko před značkou: 1x nahodíme, 2 oka upleteme hladce (značka leží mezi nimi), 1x nahodíme (= přidali jsme 2 oka). V následující kruhové řadě pleteme nahození za zadní nit, aby se v pletenině netvořily dírky. Nová oka pak pleteme lícovým žerzejem. ------------------------------------------------------- POPIS PRÁCE: ---------------------------------------------------------- PULOVR - JAK BUDEME POSTUPOVAT: Pleteme v kruhových řadách zdola nahoru na kruhové jehlici. U průramků pleteninu rozdělíme. Rukávy upleteme samostatně v kruhových řadách od dolního lemu až k průramkům. Pak je převedeme na stejnou kruhovou jehlici jako trup a sedlo pak upleteme v kruhových řadách nad všemi díly společně. Nakonec vyšijeme pletacím stehem na přední stranu svetru traktor. TRUP: Na kruhovou jehlici č.3 nahodíme cihlově červenou přízí 170-180-190-205-215-225 ok a upleteme 1 kruhovou řadu hladce. Pokračujeme v kruhových řadách pružným vzorem 2/3, tj. střídáme 2 oka hladce, 3 obrace. Ve výši 4 cm pleteme 1 kruhovou řadu hladce a SOUČASNĚ ujmeme rovnoměrně 28-30-32-35-37-39 ok – viz TIP – UJÍMÁNÍ/PŘIDÁVÁNÍ = 142-150-158-170-178-186 ok. Pleteninu převedeme na kruhovou jehlici č.4 a pleteme v kruhových řadách lícovým žerzejem. Ve výši 17-19-21-23-25-27 cm změníme přízi na džínově modrou. Pokračujeme dál lícovým žerzejem. Ve výši 19-22-25-28-31-34 cm uzavřeme v následující kruhové řadě na obou bocích oka pro průramky, takto: 3 oka uzavřeme, 65-69-73-79-83-87 ok upleteme lícovým žerzejem (= přední díl), 6 ok uzavřeme, 65-69-73-79-83-87 ok upleteme lícovým žerzejem (= zadní díl) a poslední 3 oka uzavřeme = na jehlici zbývá 130-138-146-158-166-174 ok. Díl odložíme a upleteme rukávy. RUKÁV: Na ponožkové jehlice č.3 nahodíme cihlově červenou přízí 35-35-40-40-45-45 ok a upleteme 1 kruhovou řadu hladce. Pokračujeme v kruhových řadách pružným vzorem 2/3, tj. střídáme 2 oka hladce, 3 obrace. Ve výši 4 cm pleteme 1 kruhovou řadu hladce a SOUČASNĚ přidáme rovnoměrně 5-7-4-6-3-5 ok = 40-42-44-46-48-50 ok. Označíme si začátek kruhové řady = střed vnitřní strany rukávu, podpaží. Značku během pletení snímáme vždy do aktuálně pletené kruhové řady. Pleteninu převedeme na ponožkové jehlice č.4 a pleteme lícovým žerzejem v kruhových řadách. Ve výši 6 cm (platí pro všechny velikosti) přidáme na každé straně značky 1 oko – viz TIP - PŘIDÁVÁNÍ. Toto přidávání opakujeme vždy po 4-4,5-5,5-6,5-7,5-8,5 cm výšky, celkem 5x (platí pro všechny velikosti) = 50-52-54-56-58-60 ok. SOUČASNĚ ve výši 12-14-16-18-20-21 cm změníme přízi na džínově modrou. Pokračujeme dál lícovým žerzejem. Ve výši 24-27-31-35-39-42 cm uzavřeme oka pro průramek, takto: v následující kruhové řadě uzavřeme 3 oka, 44-46-48-50-52-54 ok upleteme lícovým žerzejem a uzavřeme zbylá 3 oka. Přízi odstřihneme. Stejným způsobem upleteme i druhý rukáv. SEDLO: Rukávy a trup převedeme na stejnou kruhovou jehlici – rukávy sesadíme s trupem v místech uzavřených pro průramky (oka nepleteme, pouze přesuneme) = na kruhové jehlici máme 218-230-242-258-270-282 ok. Označíme si všechna místa, kde se stýkají rukávy s trupem (= do pleteniny vložíme 4 značky). Celé sedlo pleteme džínově modrou přízí. První kruhovou řadu pleteme takto – začínáme u jedné značky: 1 oko upleteme hladce, 2 obrace (= ½ vzoru A.1), pak *pleteme lícovým žerzejem až po poslední 3 oka před následující značkou, vzor A.1 (= 6 ok – značka leží uprostřed vzoru A.1)*, *-* opakujeme celkem 3x, potom pleteme lícovým žerzejem až po poslední 3 oka před 1. značkou a končíme 2 oky obrace a 1 okem hladce (= ½ vzoru A.1). Takto pokračujeme v kruhových řadách lícovým žerzejem a vzorem A.1 v každém raglánovém „švu“. Ve výši 1-1-1-2-2-2 cm od místa, kde jsme spojili rukávy s trupem, začneme ujímat pro RAGLÁNOVÉ ZKOSENÍ – viz výše. Ujímáme na obou stranách všech 4 značek, a to v každé 2. kruhové řadě, celkem 16-17-18-19-20-21x. Po dokončení poslední kruhové řady s ujímáním zbývá na jehlici 90-94-98-106-110-114 ok a sedlo měří asi 12-13-14-15-16-17 cm (od místa, kde jsme spojili rukávy s trupem). V následující kruhové řadě ujmeme 18-14-18-18-22-18 ok, ale tak, že ujmeme 9-7-9-9-11-9 ok rovnoměrně nad 27-29-31-35-37-39 oky lícovým žerzejem předního dílu a dalších 9-7-9-9-11-9 ok ujmeme rovnoměrně nad 27-29-31-35-37-39 oky lícovým žerzejem zadního dílu (tj. nad rukávy ujímat nebudeme) = na jehlici zbývá 72-80-80-88-88-96 ok. Nyní máme 6 ok mezi vzory A.1 na každém rukávu a 18-22-22-26-26-30 ok mezi vzory A.1 na předním a na zadním dílu. LEM PRŮKRČNÍKU: Pleteninu převedeme na krátkou kruhovou jehlici č.3 a pleteme v kruhových řadách pružným vzorem 2/2 (= střídáme 2 oka hladce, 2 obrace); vzor ale přizpůsobíme tak, aby do něj zapadal vzor A.1. Když je lem vysoký asi 3 cm, převedeme pleteninu na krátkou kruhovou jehlici č.4 a všechna oka dle vzoru volně uzavřeme. Pulovr měří asi 36-40-44-48-52-56 cm (od ramene). Přízi odstřihneme a zapošijeme. DOKONČENÍ: Na přední díl vyšijeme pletacím stehem traktor cihlově červenou přízí – viz schéma A.2. Začneme ve 2. kruhové řadě pletené džínově modrou přízí a vzor umístíme tak, aby středové oko předního dílu odpovídalo oku označenému ve schématu A.2 hvězdičkou. Sešijeme otvory v podpaží. |
|||||||||||||||||||
Vysvětlivky ke schématu |
|||||||||||||||||||
|
|||||||||||||||||||
|
|||||||||||||||||||
|
|||||||||||||||||||
Dokončili jste tento model?Pak označte své fotky tagem #dropspattern #tinytruckersweater nebo je pošlete do galerie #dropsfan. Potřebujete s tímto návodem poradit?Otevřete-li si návod na stránce garnstudio.com, najdete tam 22 výukových video-ukázek, Komentáře/Dotazy a další užitečné informace. © 1982-2025 DROPS Design A/S. Vyhrazujeme si veškerá práva. Tento dokument, včetně všech jeho dílčích částí, podléhá autorským právům. Podrobnější komentář k možnostem užití našich návodů najdete dole pod každým návodem na našich stránkách. |
|||||||||||||||||||


V oblasti pletené a háčkované módy působí DROPS Design více než 40 let. Díky tomu vám můžeme nabídnout jednu z nejrozsáhlejších kolekcí modelů s bezplatnými návody dostupnými na internetu - navíc v 17 jazycích. K dnešnímu dni máme na 314 katalogů a 11821 návodů celkem - z nich je už 7047 dostupných v [češtině].
Přidejte komentář k návodu DROPS Children 34-15
Rádi bychom věděli, co si o tomto modelu myslíte!
Pokud se chcete na něco zeptat, dbejte prosím na to, abyste ve formuláři níže vybrali správnou kategorii - díky tomu se dříve dozvíte, co potřebujete vědět. Povinná pole jsou označena *.