
Categorías populares
¿Buscas un hilo?


Comentarios / Preguntas (13)
![]() Maria White escribió:
Maria White escribió:
I plan on making fruity feet socks and the frosted top socks. My question is how many skines of each color do I purchase? Foot lenght 9 1/2.
18.09.2024 - 18:28DROPS Design respondió:
Dear Mrs White, you will find the total weight required in each yarn and each size in the header, in 2nd size you need 100 g DROPS Flora color 19 + 50 g DROPS Flora color 01, 1 ball Flora = 50 g (see shadecard), so that you will need 2 balls color 19 and 1 ball color 01. Happy knitting!
19.09.2024 - 09:20
![]() Amanda Hubbard escribió:
Amanda Hubbard escribió:
Thank you for your link to How to knit a folded edge in a skirt. I can't get any volume from any of the links for these socks. Do you have any suggestions on how to get volume to work. I've tried it on numerous devices Thanks you for your assistance.
01.10.2021 - 04:19DROPS Design respondió:
Dear Mrs Hubbard, Our videos do not have sound. We are a worldwide company and our videos are watched by people around the world, speaking different languages, many of whom do not understand English. We have therefore written instructions to accompany this video (ie here the written pattern and the diagram), and there is no sound to disturb while watching. Enjoy!
01.10.2021 - 07:48
![]() Amanda Hubbard escribió:
Amanda Hubbard escribió:
I don't understand what I should be doing here at the *=this round is worked as follows: Fold row of holes (= 4th round in diagram) so that the wrong side lies towards the wrong side. Place the first stitch on the cast-on edge outermost on the left needle, knit the first 2 stitches on the needle together (i.e. the first stitch from the cast-on edge + first stitch on the round are knitted together). Place the next stitch on the cast-on edge outermost on the left needle, knit the first 2 stitches
06.09.2021 - 02:44DROPS Design respondió:
Dear Mrs Hubbard, maybe this video could help you understanding this row, the folded edge is somewhat different but the way of working this row (from approx. 1:08 in the video) is the same. Happy knitting!
06.09.2021 - 08:16
![]() Brugere escribió:
Brugere escribió:
Bonjour Je viens de finir ce modèle qui est très joli. Une question quand sortez vous les explications du modèle no- 046 de printemps 2021 .. Je suis impatiente de le faire ... merci cordialement
19.03.2021 - 14:37DROPS Design respondió:
Bonjour Mme Brugere et merci, saviez-vous que vous pouvez partager vos photos sur notre site? Vous retrouverez toutes les infos ici - tous les modèles retenus seront publiés d'ici mai, le modèle no-046 ne devrait plus tarder :)
19.03.2021 - 15:28
![]() Carolina Björkman escribió:
Carolina Björkman escribió:
Glöm min fråga för jag kom på vad jag gjorde för fel.
21.12.2020 - 12:51
![]() Carolina Björkman escribió:
Carolina Björkman escribió:
Hej! När man gjort rad 10 i mönstret o stickat ihop fem maskor så att man har minskat maskor. Hur och var ökar man så att man på rad 11 sickar en avig o 17 räta maskor?
20.12.2020 - 21:22DROPS Design respondió:
Hej Carolina: På varv 10 har du även 8 omslag (markerade som ringar i diagrammet) så du minskar 8 maskor och ökar 8 så att maskantalet förblir detsamma. Mvh DROPS Design
21.12.2020 - 13:55
![]() Randu escribió:
Randu escribió:
Hello! Could you make a video on how to knit the part marked with the star ?! It would help a lot! Thank you!
22.11.2020 - 20:03DROPS Design respondió:
Dear Randu, this video shows how to work a similar row for a skirt - follow the pattern for the first rounds, then you can make the row with the star as shown from time code 1:15 approx. Hope this will help. Happy knitting!
23.11.2020 - 10:45
![]() Claudia Carolina escribió:
Claudia Carolina escribió:
Buongiorno spett.le Drops, Nel Bordino superiore (inizio lavoro) si vedono delle piccole crestine o picot, come posso ottenerle se il diagramma A1 inizia coi primi tre giri tutto a diritto? Grazie mille per tanti meravigliosi schemi, Claudia
23.10.2019 - 13:30DROPS Design respondió:
Buongiorno Claudia Carolina. Quando lavora la riga con la stella nel diagramma , piega il lavoro all'altezza della riga traforata (quarta riga), formando così il bordino a picot che vede in fotagrafia. Buon lavoro!
23.10.2019 - 14:14
![]() Ann Weihe escribió:
Ann Weihe escribió:
Hvad betyder stjærnen i opskriften som er ude i siden Hilsen Ann
03.06.2019 - 15:52DROPS Design respondió:
Hei Ann. Dette er det nest nederste symbolet i symbolforklaringen: "denne omgangen strikkes slik: Brett hullraden (= 4.omgang i diagrammet) slik at vrangen ligger mot vrangen. Sett første maske på oppleggskanten ytterst på venstre pinne, strikk de 2 første maskene på pinnen rett sammen (dvs første maske fra oppleggskanten + første maske på omgangen strikkes rett sammen)... osv" God fornøyelse
04.06.2019 - 07:26
![]() Dina escribió:
Dina escribió:
Buongiorno! Dove posso trovare un video per capire come lavorare la riga indicata con una stella nel diagramma? Non l'ho notato fra quelli correlati al modello però forse mi è sfuggito... Grazie!
25.04.2018 - 15:24DROPS Design respondió:
Buongiorno Dina. Un video che spieghi come lavorare la riga con la stella non è ancora disponibile. Di fatto è un metodo che sostituisce la cucitura con un ago, dove invece di passare l'ago tra il filo delle due maglie, riprende una maglia dal ferro di avvio delle maglie e la lavora insieme con la maglia sul ferro. Buon lavoro!
26.04.2018 - 11:45
|
|||||||||||||||||||||||||
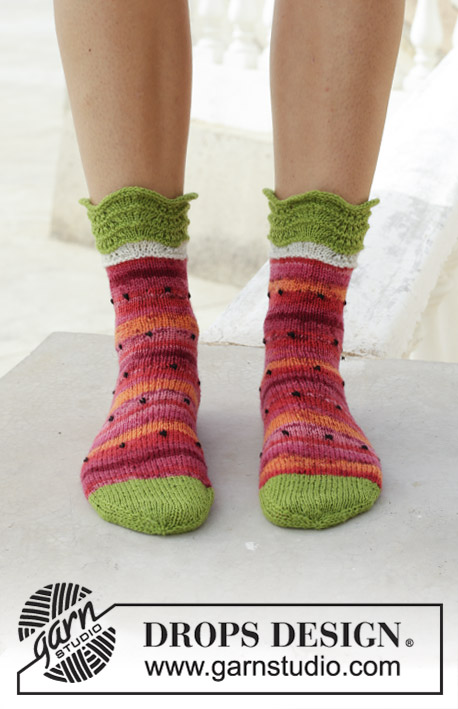
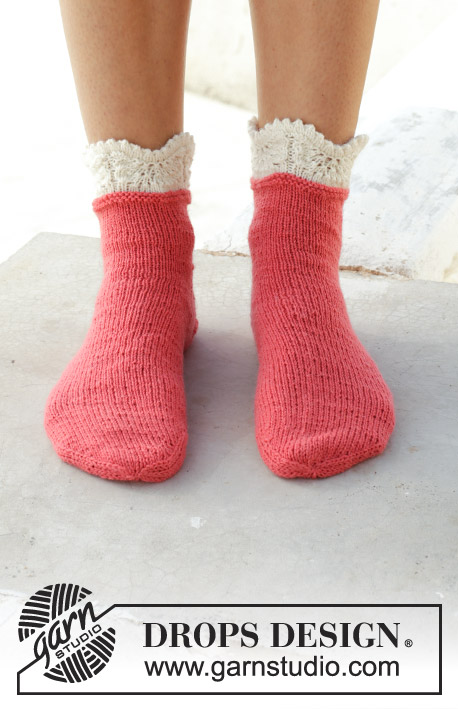
Frosted Top Socks#frostedtopsocks |
|||||||||||||||||||||||||
 |
 |
||||||||||||||||||||||||
Calcetines de punto con cenefa en patrón de ondas. Tallas 35/37-41/43. Realizados en DROPS Flora.
DROPS 189-27 |
|||||||||||||||||||||||||
|
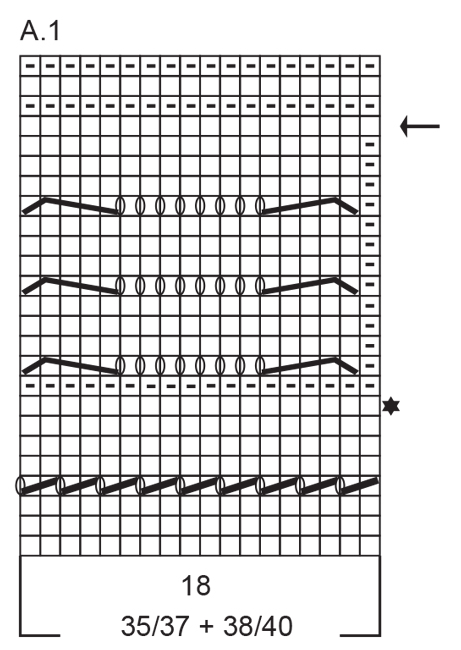
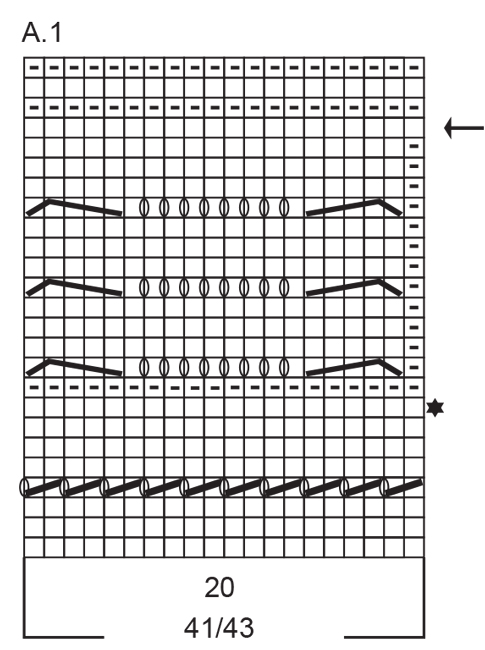
INFORMACIÓN PARA REALIZAR EL PATRÓN: PLIEGUE/ PUNTO MUSGO (en redondo): 1 pliegue= 2 vueltas. Trabajar 1 vuelta de derecho y 1 vuelta de revés. PATRÓN: Ver el diagrama A.1. Elegir el diagrama correspondiente a su talla. DISMINUCIONES PARA EL TALÓN: FILA 1 (= lado derecho): Trabajar de derecho hasta que queden 6-7-7 puntos, deslizar el siguiente punto como de derecho, 1 derecho, pasar el punto deslizado sobre el punto trabajado, girar la labor FILA 2 (= lado revés): Trabajar de revés hasta que queden 6-7-7 puntos, deslizar el siguiente punto como de revés, 1 revés, pasar el punto deslizado sobre el punto trabajado, girar la labor. FILA 3 (= lado derecho): Trabajar de derecho hasta que queden 5-6-6 puntos, deslizar el siguiente punto como de derecho, 1 derecho, pasar el punto deslizado sobre el punto trabajado, girar la labor. FILA 4 (= lado revés): Trabajar de revés hasta que queden 5-6-6 puntos, deslizar el siguiente punto como de revés, 1 revés, pasar el punto deslizado sobre el punto trabajado, girar la labor. Continuar disminuyendo de esta manera trabajando hasta que haya 1 punto menos antes de deslizar un punto y hasta que queden 14-14-16 puntos en las agujas. -- -- -- -- -- -- -- -- -- -- -- -- -- -- -- -- -- -- -- -- -- -- -- -- -- -- -- -- CALCETÍN: La labor se trabaja en redondo con agujas de doble punta, desde la pierna hasta la punta del pie. Montar 72-72- 80 puntos con agujas de doble punta de 2.5 mm y blanco hueso. Trabajar el PATRÓN A.1 (= 18-18- 20 puntos – elegir el diagrama correspondiente a tu talla) 4 veces en redondo. En la vuelta con una flecha en el diagrama, cambiar a coral. Cuando se haya completado A.1, la labor mide aprox. 5 cm desde el borde superior hasta abajo. Trabajar 1 vuelta en punto jersey en la que se disminuyan 6-4-8 puntos repartidos en la vuelta = 66-68-72 puntos. Insertar 1 marcapuntos al inicio de la vuelta (= mitad de la espalda). Continuar con punto jersey. AL MISMO TIEMPO en la vuelta 1 disminuir 1 punto a cada lado del marcapuntos como sigue: Trabajar juntos de derecho los primeros 2 puntos después del marcapuntos y trabajar los últimos 2 puntos antes del marcapuntos juntos de derecho retorcido. Disminuir de esta manera cada 3ª-4ª- 5ª vuelta un total de 6-5-5 veces = 54-58-62 puntos. Continuar trabajando hasta que la labor mida 6-7-8 cm después del diagrama A.1. Ahora mantener los primeros 12-13-14 puntos en la aguja, pasar los siguientes 30-32-34 puntos a un gancho auxiliar (= mitad del empeine) y mantener los últimos 12-13-14 puntos en la aguja = 24-26-28 puntos para el talón. Trabajar en punto jersey de ida y vuelta sobre estos puntos del talón 5-5½- 6 cm. Insertar 1 nuevo marcapuntos. LA LABOR SE MIDE AHORA DESDE AQUÍ! Después de las disminuciones para el talón, recoger 13-14- 16 puntos a cada lado del talón y pasar los 30-32- 34 puntos del gancho auxiliar de vuelta en las agujas = 70-74-82 puntos. Insertar 1 marcapuntos a cada lado de los 30-32-34 puntos del empeine. Continuar trabajando en punto jersey AL MISMO TIEMPO disminuir a cada lado como sigue: Trabajar juntos de derecho retorcido los 2 últimos puntos antes de los 30-32- 34 puntos del empeine y juntos de derecho los primeros 2 puntos después de los 30-32- 34 puntos del empeine. Disminuir de esta manera cada 2ª vuelta un total de 9-9-11 veces = 52-56-60 puntos. Continuar trabajando hasta que la labor mida 18-19- 21 cm medidos desde el marcapuntos en el talón (= quedan 4-5- 6 cm hasta alcanzar las medidas finales). Insertar 1 marcapuntos a cada lado para que queden 26-28-30 puntos tanto en la parte superior como en la planta del pie. Continuar con punto jersey sobre todos los puntos AL MISMO TIEMPO disminuir para la punta a ambos lados de cada marcapuntos. Disminuir como sigue: Trabajar hasta que queden 3 puntos antes del marcapuntos, 2 puntos juntos de derecho (= 1 punto disminuido), 2 derechos (el marcapuntos se encuentra entre estos 2 puntos) y trabajar 2 puntos juntos de derecho retorcido (= 1 punto disminuido). Repetir en el otro marcapuntos. Disminuir de esta manera a cada lado cada 2ª vuelta un total de 4-7-9 veces y después cada vuelta un total de 6-3-2 veces = 12-16- 16 puntos restantes en la aguja. En la siguiente vuelta trabajar todos los puntos juntos de derecho de 2 en 2 = 6-8- 8 puntos. Cortar el hilo y pasarlo por los puntos restantes, estirar y asegurar bien. Trabajar 1 calcetín más de la misma manera. |
|||||||||||||||||||||||||
Explicaciones del diagrama |
|||||||||||||||||||||||||
|
|||||||||||||||||||||||||
|
|||||||||||||||||||||||||
|
|||||||||||||||||||||||||
¿Terminaste este patrón?Entonces, etiqueta tus fotos con #dropspattern #frostedtopsocks o envíalas a la galería #dropsfan. ¿Necesitas ayuda con este patrón?Encontrarás 25 videos tutoriales, un espacio para comentarios/preguntas y más visitando la página del patrón en garnstudio.com © 1982-2025 DROPS Design A/S. Todos los derechos reservados. Este documento, incluyendo todas sus sub-secciones, está protegido por los derechos de autor (copyright). Lee más acerca de lo que puedes hacer con nuestros patrones en la parte de abajo de cada patrón de nuestro sitio. |
|||||||||||||||||||||||||


Con más de 40 años en el diseño de modelos de punto y de ganchillo, DROPS Design ofrece una de las más vastas colecciones de patrones gratuitos en el internet - traducidos en 17 idiomas. Al día de hoy, contamos con 314 catálogos y 11822 patrones - de los cuales 11158 están traducidos en español.
Nosotros trabajamos con mucho esmero para brindarte lo mejor que las labores de punto y ganchillo tienen para ofrecer,inspiración y consejos, así como hilos de magnífica calidad a precios increíbles! Te gustaría usar nuestros patrones para otro fin además del uso personal? Puedes leer acerca de lo que estás permitida a hacer en el texto de Copyright en la parte de abajo de todos nuestros patrones. Felices labores!
Escribe un comentario sobre DROPS 189-27
¡Nos encantaría saber qué piensas acerca de este patrón!
Si quieres escribir una pregunta referente al patrón, por favor asegúrate de elegir la categoría correcta en el formulario debajo, para acelerar el proceso de respuesta. Los campos obligatorios están marcados con un *.