
Popular categories
Looking for a yarn?


|
|||||||||||||||||||||||||
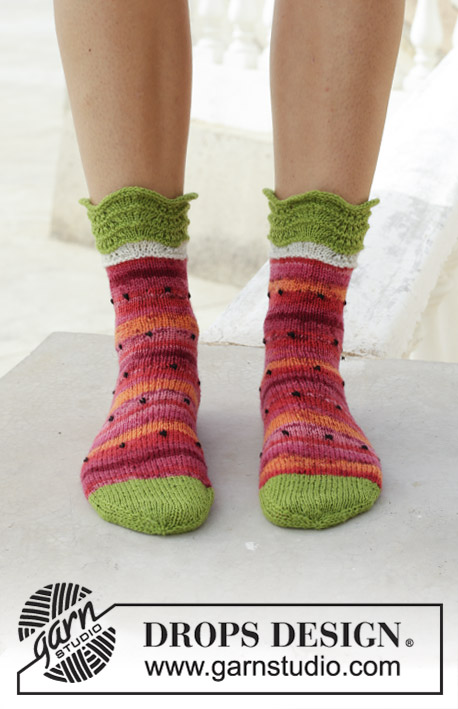
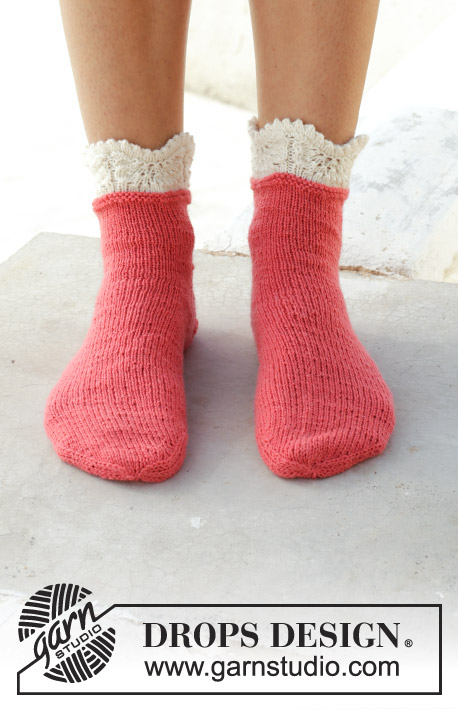
Frosted Top Socks |
|||||||||||||||||||||||||
 |
 |
||||||||||||||||||||||||
Knitted socks with edge in wave pattern. Sizes 35/37 - 41/43. The piece is worked in DROPS Flora.
DROPS 189-27 |
|||||||||||||||||||||||||
|
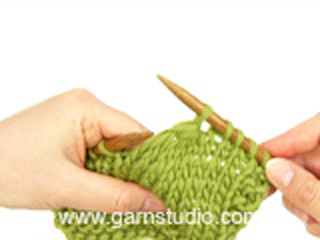
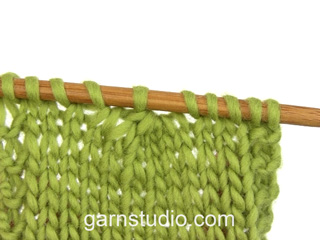
INFORMATION FOR THE PATTERN: RIDGE/GARTER STITCH (worked in the round): 1 ridge = 2 rounds. Knit 1 round and purl 1 round. PATTERN: See diagram A.1. Choose diagram for your size. HEEL DECREASE: ROW 1 (= right side): Knit until there are 6-7-7 stitches left, slip the next stitch as if to knit, knit 1, pass the slipped stitch over, turn the piece. ROW 2 (= wrong side): Purl until there are 6-7-7 stitches left, slip the next stitch as if to purl, purl 1, pass the slipped stitch over, turn the piece. ROW 3 (= right side): Knit until there are 5-6-6 stitches left, slip the next stitch as if to knit, knit 1, pass the slipped stitch over, turn the piece. ROW 4 (= wrong side): Purl until there are 5-6-6 stitches left, slip the next stitch as if to purl, purl 1, pass the slipped stitch over, turn the piece. Continue to decrease like this by working until there is 1 less stitch before slipping a stitch and until you have 14-14-16 stitches left on the needles. -------------------------------------------------------- SOCK: The piece is worked in the round with double pointed needles, from the leg down to the toe. Cast on 72-72-80 stitches with double pointed needles size 2.5 mm and off white. Work PATTERN A.1 (= 18-18-20 stitches – choose the diagram for your size) 4 times on the round. On the round with an arrow in the diagram, change to coral. When A.1 has been completed, the piece measures approx. 5 cm from the top edge down. Work 1 round stocking stitch where you decrease 6-4-8 stitches evenly on round = 66-68-72 stitches. Insert 1 marker at the beginning of the round (= mid back). Continue with stocking stitch. AT THE SAME TIME on round 1 decrease 1 stitch on each side of the marker as follows: Knit the first 2 stitches after the marker together and knit the last 2 stitches before the marker twisted together. Decrease like this every 3rd-4th-5th round a total of 6-5-5 times = 54-58-62 stitches. Continue working until the piece measures 6-7-8 cm after diagram A.1. Now keep the first 12-13-14 stitches on the needle, place the next 30-32-34 stitches on a thread (= mid top of foot) and keep the last 12-13-14 stitches on the needle = 24-26-28 stitches for heel. Work stocking stitch back and forth over these heel stitches for 5-5½-6 cm. Insert 1 new marker. THE PIECE IS NOW MEASURED FROM HERE. Now decrease for heel - read HEEL DECREASE! After the heel decrease, knit up 13-14-16 stitches on each side of the heel and the 30-32-34 stitches from the thread are placed back on the needles = 70-74-82 stitches. Insert 1 marker on each side of the 30-32-34 stitches on top of foot. Continue working stocking stitch AT THE SAME TIME as you decrease in each side as follows: Knit twisted together the last 2 stitches before the 30-32-34 stitches on top of foot and knit together the first 2 stitches after the 30-32-34 stitches on top of foot. Decrease like this every 2nd round a total of 9-9-11 times = 52-56-60 stitches. Continue working until piece measures 18-19-21 cm measured from the heel marker (= 4-5-6 cm left to finished length). Insert 1 marker in each side so that there are 26-28-30 stitches both on top and underneath the foot. Continue with stocking stitch over all stitches AT THE SAME TIME as you decrease for toe on each side of both markers. Decrease as follows: Work as far as 3 stitches before the marker, knit 2 stitches together (= 1 stitch decreased), knit 2 stitches (marker is in the middle of these 2 stitches) and knit 2 stitches twisted together (= 1 stitch decreased). Repeat at the other marker. Decrease like this in each side every 2nd round a total of 4-7-9 times and then every round a total of 6-3-2 times = 12-16-16 stitches left on needle. On the next round knit all stitches together 2 and 2 = 6-8-8 stitches. Cut the strand and pull it through the remaining stitches, pull tight and fasten the strand well. Work 1 more sock in the same way. |
|||||||||||||||||||||||||
Diagram explanations |
|||||||||||||||||||||||||
|
|||||||||||||||||||||||||

|
|||||||||||||||||||||||||

|
|||||||||||||||||||||||||
|
Have you made this or any other of our designs? Tag your pictures in social media with #dropsdesign so we can see them! Do you need help with this pattern?You'll find tutorial videos, a Comments/Questions area and more by visiting the pattern on garnstudio.com. © 1982-2024 DROPS Design A/S. We reserve all rights. This document, including all its sub-sections, has copyrights. Read more about what you can do with our patterns at the bottom of each pattern on our site. |
|||||||||||||||||||||||||


With over 40 years in knitting and crochet design, DROPS Design offers one of the most extensive collections of free patterns on the internet - translated to 17 languages. As of today we count 304 catalogues and 11422 patterns - 11422 of which are translated into English (UK/cm).
We work hard to bring you the best knitting and crochet have to offer, inspiration and advice as well as great quality yarns at incredible prices! Would you like to use our patterns for other than personal use? You can read what you are allowed to do in the Copyright text at the bottom of all our patterns. Happy crafting!
Comments / Questions (12)
Thank you for your link to How to knit a folded edge in a skirt. I can't get any volume from any of the links for these socks. Do you have any suggestions on how to get volume to work. I've tried it on numerous devices Thanks you for your assistance.
01.10.2021 - 04:19DROPS Design answered:
Dear Mrs Hubbard, Our videos do not have sound. We are a worldwide company and our videos are watched by people around the world, speaking different languages, many of whom do not understand English. We have therefore written instructions to accompany this video (ie here the written pattern and the diagram), and there is no sound to disturb while watching. Enjoy!
01.10.2021 - 07:48I don't understand what I should be doing here at the *=this round is worked as follows: Fold row of holes (= 4th round in diagram) so that the wrong side lies towards the wrong side. Place the first stitch on the cast-on edge outermost on the left needle, knit the first 2 stitches on the needle together (i.e. the first stitch from the cast-on edge + first stitch on the round are knitted together). Place the next stitch on the cast-on edge outermost on the left needle, knit the first 2 stitches
06.09.2021 - 02:44DROPS Design answered:
Dear Mrs Hubbard, maybe this video could help you understanding this row, the folded edge is somewhat different but the way of working this row (from approx. 1:08 in the video) is the same. Happy knitting!
06.09.2021 - 08:16Bonjour Je viens de finir ce modèle qui est très joli. Une question quand sortez vous les explications du modèle no- 046 de printemps 2021 .. Je suis impatiente de le faire ... merci cordialement
19.03.2021 - 14:37DROPS Design answered:
Bonjour Mme Brugere et merci, saviez-vous que vous pouvez partager vos photos sur notre site? Vous retrouverez toutes les infos ici - tous les modèles retenus seront publiés d'ici mai, le modèle no-046 ne devrait plus tarder :)
19.03.2021 - 15:28Glöm min fråga för jag kom på vad jag gjorde för fel.
21.12.2020 - 12:51Hej! När man gjort rad 10 i mönstret o stickat ihop fem maskor så att man har minskat maskor. Hur och var ökar man så att man på rad 11 sickar en avig o 17 räta maskor?
20.12.2020 - 21:22DROPS Design answered:
Hej Carolina: På varv 10 har du även 8 omslag (markerade som ringar i diagrammet) så du minskar 8 maskor och ökar 8 så att maskantalet förblir detsamma. Mvh DROPS Design
21.12.2020 - 13:55Hello! Could you make a video on how to knit the part marked with the star ?! It would help a lot! Thank you!
22.11.2020 - 20:03DROPS Design answered:
Dear Randu, this video shows how to work a similar row for a skirt - follow the pattern for the first rounds, then you can make the row with the star as shown from time code 1:15 approx. Hope this will help. Happy knitting!
23.11.2020 - 10:45Buongiorno spett.le Drops, Nel Bordino superiore (inizio lavoro) si vedono delle piccole crestine o picot, come posso ottenerle se il diagramma A1 inizia coi primi tre giri tutto a diritto? Grazie mille per tanti meravigliosi schemi, Claudia
23.10.2019 - 13:30DROPS Design answered:
Buongiorno Claudia Carolina. Quando lavora la riga con la stella nel diagramma , piega il lavoro all'altezza della riga traforata (quarta riga), formando così il bordino a picot che vede in fotagrafia. Buon lavoro!
23.10.2019 - 14:14Hvad betyder stjærnen i opskriften som er ude i siden Hilsen Ann
03.06.2019 - 15:52DROPS Design answered:
Hei Ann. Dette er det nest nederste symbolet i symbolforklaringen: "denne omgangen strikkes slik: Brett hullraden (= 4.omgang i diagrammet) slik at vrangen ligger mot vrangen. Sett første maske på oppleggskanten ytterst på venstre pinne, strikk de 2 første maskene på pinnen rett sammen (dvs første maske fra oppleggskanten + første maske på omgangen strikkes rett sammen)... osv" God fornøyelse
04.06.2019 - 07:26Buongiorno! Dove posso trovare un video per capire come lavorare la riga indicata con una stella nel diagramma? Non l'ho notato fra quelli correlati al modello però forse mi è sfuggito... Grazie!
25.04.2018 - 15:24DROPS Design answered:
Buongiorno Dina. Un video che spieghi come lavorare la riga con la stella non è ancora disponibile. Di fatto è un metodo che sostituisce la cucitura con un ago, dove invece di passare l'ago tra il filo delle due maglie, riprende una maglia dal ferro di avvio delle maglie e la lavora insieme con la maglia sul ferro. Buon lavoro!
26.04.2018 - 11:45Hallo, helaas zijn de plaatjes van de telpatroontjes niet zichtbaar.. daar staat nu een vraagteken. zowel op de pc als op de iPad niet te zien. kunnen jullie dit herstellen? dan ga ik enthousiast aan de slag! :)
24.04.2018 - 13:47DROPS Design answered:
Hallo Mary, Vaak heeft dit te maken met een (tijdelijke) internetstoring of verbindingsproblemen. De plaatjes zijn wel aanwezig op de site. De pagina herladen of later weren even proberen is de oplossing.
28.04.2018 - 18:17