
Popular categories
Looking for a yarn?


|
||||||||||||||||||||||||||||||||||||||||||||||
Advent Calendar Doors |
||||||||||||||||||||||||||||||||||||||||||||||
 |
 |
|||||||||||||||||||||||||||||||||||||||||||||
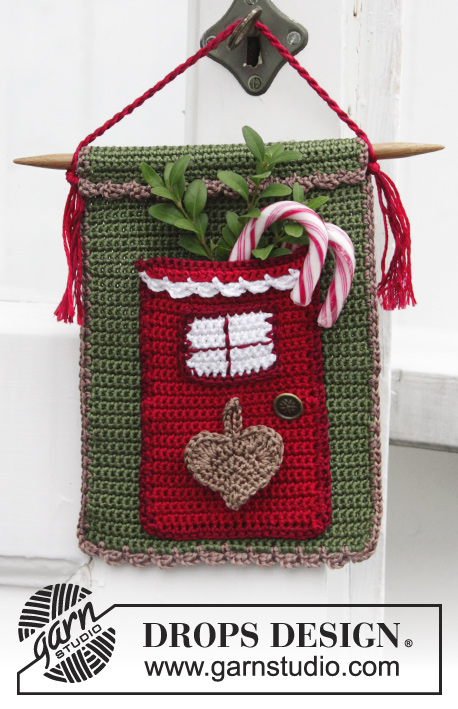
Crocheted separate Advent calendar doors with decorations. The pieces are worked in DROPS Safran.
DROPS Extra 0-1392 |
||||||||||||||||||||||||||||||||||||||||||||||
|
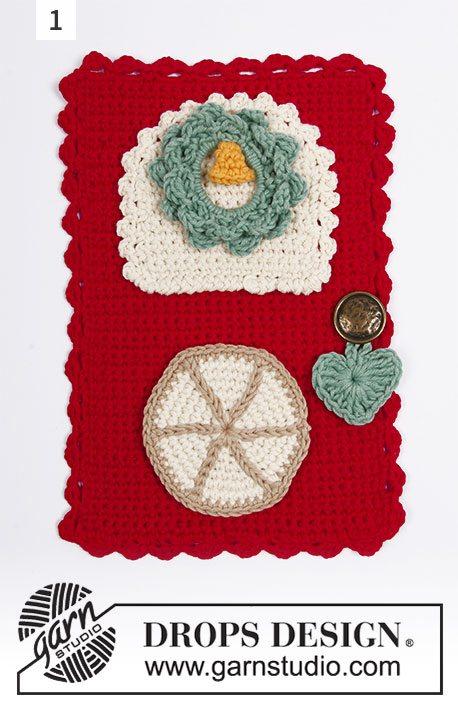
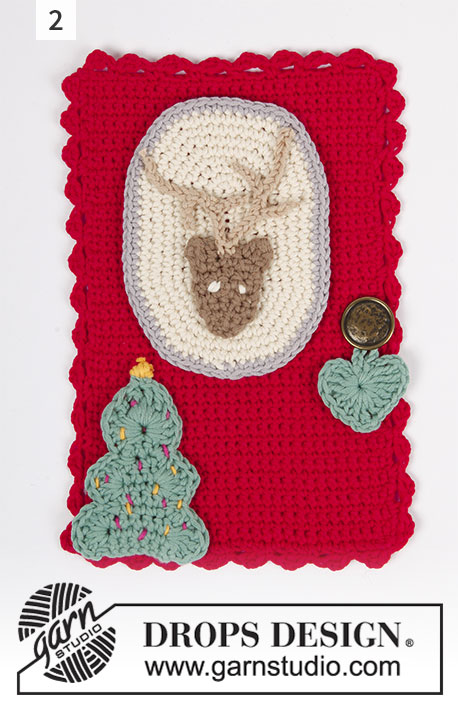
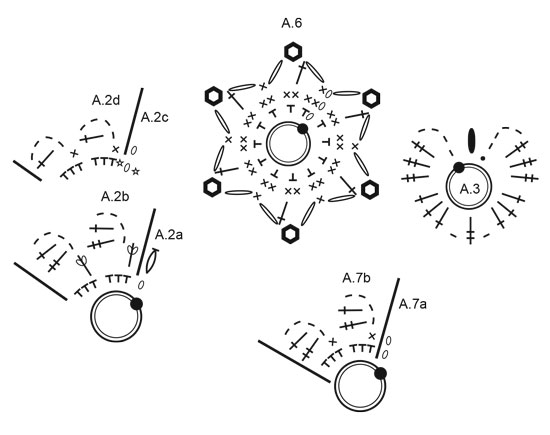
INFORMATION FOR THE PATTERN: PATTERN: Hexagonal window: See diagram A.1. Wreath with bell: See diagram A.2. Heart: See diagram A.3. Straight-sided oval window: See diagram A.4. Oval window: See diagram A.5. Star: See diagram A.6. Wreath: See diagram A.7. LOBSTER STITCH (for arched window): Work double crochets, but backwards. In other words, work double crochets from left to right. CROCHET INFO (for arched window, Christmas tree and reindeer): First double crochet is replaced by 1 chain stitch. WORK 2 DOUBLE CROCHETS TOGETHER: * Insert hook into next stitch, pick up strand *, repeat from *-* one more time, make a yarn over and pull yarn over through all 3 loops on hook (= 1 double crochet decreased). ---------------------------------------------------------- DOOR TO ADVENT CALENDAR: This pattern consists of 1 door and 16 different pieces of decoration that can be combined in different ways - see photos. Photo 1-4 shows combinations explained in DOOR 1-4 below. The doors are made separately, they measure 13 x 20 cm each. When all the 24 doors are worked they should be sewn on to a piece of durable fabric that measures 55 x 130 cm. This equals to 4 doors in width and 6 doors in height. DOOR: The piece is first worked back and forth, then you work an edge around whole door. Work 29 chain stitches with hook size 3 mm and red. Turn and work 1 double crochet in the 2nd chain stitch from the hook, work 1 double crochet in each of the next 27 chain stitches = 28 double crochets. The next row is worked as follows: Work 1 chain stitch, 1 double crochet in each double crochet. REMEMBER THE CROCHET TENSION! Repeat the last row until piece measures 18 cm, finish with a row from the wrong side. Now crochet an edge around the whole door, turn and start in the top corner from the right side: Work 1 chain stitch, 1 double crochet in first double crochet, * 3 chain stitches, 1 treble crochet in first chain stitch, skip approx. 1½ cm, 1 double crochet in next double crochet *, repeat from *-* to end of round, adjust so that you get one double crochet in each corner of the door. Finish the round with 1 slip stitch in chain stitch at beginning of round. Cut and fasten strand. Sew a button to the door, approx. mid left side. ---------------------------------------------------------- DOOR-1: Work a door as described above. Then work an arched window, a hexagonal window, a wreath with bell and a heart. ARCHED WINDOW: The piece is first worked back and forth, then you crochet an edge around whole window. Work 18 chain stitches with hook size 3 mm and off white. ROW 1: Turn and work 1 double crochet in 2nd chain stitch from the hook, work 1 double crochet in each of the next 16 chain stitches = 17 double crochets. ROWS 2-12: Read CROCHET INFO! Work 1 double crochet in each double crochet. ROW 13: Work 2 DOUBLE CROCHETS TOGETHER - see description above, 1 double crochet in each double crochet until there are 2 double crochets left, work 2 double crochets together (= 2 double crochets decreased). ROW 14: Work 1 double crochet in each double crochet. Repeat rows 13 and 14 one more time, then repeat row 13 = 11 double crochets on last row. Cut and fasten strand. Work an edge around the window as follows: Start in bottom left corner. Work LOBSTER STITCH - see description above, along bottom edge of window. Then turn piece and work around as follows: Work * 3 chain stitches, 1 slip stitch in first chain stitch, skip 1 row/ double crochet, work 1 double crochet in next row/ double crochet *, repeat from *-* to beginning of round, i.e. bottom right corner. Cut and fasten strand. HEXAGONAL WINDOW: The window is worked in the round from the middle outwards. Work 4 chain stitches with hook size 3 mm and off white and form them to a ring with 1 slip stitch in first chain stitch. Work pattern in the round according to diagram A.1b a total of 6 times on the round - A.1a shows how rounds start and finish and is worked in addition to A.1b. Continue in the round until there is 1 round left. Change to beige and work last round. Cut and fasten strand. Work slip-stitch rows in the increases (6 stripes) with beige. WREATH WITH BELL: The piece is worked in the round, starting from the middle of the wreath and outwards. Work 24 chain stitches with hook size 3 mm and green and form them to a ring with 1 slip stitch in first chain stitch. Work pattern in the round according to diagram A.2b a total of 5 times on the round - A.2a shows how the rounds start and finish and is worked in addition to A.2b. Continue until A.2a/A.2b is finished, cut and fasten strand. Now work a round on the right side with the same double crochets as for first round. Fasten strand with1 slip stitch in first chain stitch at beginning of this round, then work pattern in the round according to diagram A.2d a total of 5 times on the round - A.2c shows how the rounds start and finish and is worked in addition to A.2d. Continue to end of round, cut and fasten strand. Work a bell as follows: Work 3 chain stitches with hook size 3 mm and strong yellow and form them to a ring with 1 slip stitch in first chain stitch. Work 4 double crochets around the ring, then work 2 rounds with 1 double crochet in each double crochet, then work 1 round with 2 double crochets in each of the 4 double crochets = 8 double crochets. Cut and fasten strand. Sew the bell to the wreath. HEART: Work 4 chain stitches with hook size 3 mm and green and form them to a ring with 1 slip stitch in first chain stitch. Then work pattern around the ring as shown in diagram A.3. When A.3 is finished, cut and fasten strand. ---------------------------------------------------------- DOOR-2: Work a door as described above. Then work a straight-edged oval window, a Christmas tree, a reindeer and a heart. STRAIGHT-EDGED OVAL WINDOW: The piece is worked in the round, starting from the middle of the window and outwards. Work 11 chain stitches (including 1 chain stitch to turn) with hook size 3 mm and off white. Turn and work 1 double crochet in 2nd chain stitch from the hook, work 1 double crochet in each of the next 8 chain stitches, 2 double crochets in the last double crochet. Continue in the round and work on the opposite side of the chain-stitch row as follows: 1 double crochet in each of the first 8 chain stitches, 1 double crochet in same chain stitch as first double crochet. Then work pattern in the round according to diagram A.4 as follows: A.4a shows how the rounds start and finish, * A.4b, A.4c and A.4 d *, work from *-* a total of 2 times on the round. Continue in the round until there is 1 round left. Change to medium grey and work the last round. Cut and fasten strand. CHRISTMAS TREE: The piece is first worked back and forth, then you work an edge around the whole Christmas tree. Work 8 chain stitches with hook size 3 mm and green. ROW 1: Turn and work 1 double crochet in 2nd chain stitch from hook, work 1 double crochet in each of the next 6 chain stitches = 7 double crochets. ROWS 2-3: Read CROCHET INFO! Work 1 double crochet in each double crochet. ROW 4: Work 1 slip stitch in first double crochet, 1 double crochet in each of the next 5 double crochets = 5 double crochets. ROWS 5-6: Work 1 double crochet in each double crochet. ROW 7: Work 1 slip stitch in first double crochet, 1 double crochet in each of the next 3 double crochets = 3 double crochets. ROWS 8-11: Work 1 double crochet in each double crochet. Cut and fasten strand. EDGE: Start with 1 double crochet with green around first row in bottom right corner, * skip 1 row, work 6 treble crochets around next row, skip 1 row, 1 double crochet around next row *, repeat from *-* 1 more time, skip 1 row, around middle of next row work as follows: Work 3 treble crochets, 2 double treble crochets, 3 chain stitches, 1 slip stitch in first chain stitch, 2 double treble crochets and 3 treble crochets, * skip 1 row, work 1 double crochet around next row, skip 1 row, work 6 treble crochets around next row *, repeat from *-* 1 more time, skip 1 row and finish with 1 double crochet around last row. Cut and fasten strand. Sew candles with strong yellow around the chain stitches at top of tree. Embroider light onto tree by working stitches up and down over the whole tree with strong yellow and cerise. REINDEER: The piece is worked back and forth. Work 3 chain stitches with hook size 3 mm and light brown and form them to a ring with 1 slip stitch in first chain stitch. ROW 1 - Read CROCHET INFO! Work 6 double crochets around chain-stitch ring. ROWS 2-7: Turn. Work 1 double crochet in each double crochet. ROW 8 (ear): Work 2 chain stitches, 1 treble crochet in first double crochet - but wait with the last yarn over and pull through, work 1 treble crochet in next double crochet and pull strand through all loops on hook. Cut and fasten strand. Work the other ear in the same way on the opposite side, start with 1 slip stitch. Cut and fasten strand. ANTLERS: Work 15 loose chain stitches with hook size 3 mm and beige, work 1 double crochet in each of the middle 2 double crochets on row 7, then work 15 loose chain stitches. Cut strand. Then work short chain-stitch rows out to each side of both of these 15 chain stitches. Work 1 part as follows: Fasten with 1 slip stitch on the chain-stitch row and work 4 chain stitches. Cut and fasten strand. Work 2 such parts on each of the 15 chain-stitch rows. Sew a couple of stitches for eyes with off white. HEART: Work 4 chain stitches with hook size 3 mm and green and form them to a ring with 1 slip stitch in first chain stitch. Continue by working pattern in the round according to diagram A.3. When A.3 is finished, cut and fasten strand. ---------------------------------------------------------- DOOR-3: Work a door as described above. Then work an oval window, a heart and a star. OVAL WINDOW: The piece is worked in the round, starting from the middle of the window and outwards. Work 4 chain stitches with hook size 3 mm and off white and form them to a ring with 1 slip stitch in first chain stitch. Work pattern in the round according to diagram A.5b a total of 2 times on the round - A.5a shows how the rounds start and finish and is worked in addition to A.5b. Continue in the round until there is 1 round left. Change to beige and work last round. Cut and fasten strand. HEART: Work 4 chain stitches with hook size 3 mm and green and form them to a ring with 1 slip stitch in first chain stitch. Continue working around the ring as shown in diagram A.3. When A.3 is finished, cut and fasten strand. STAR: The piece is worked in the round, starting from the middle of the star and outwards. Work 4 chain stitches with hook size 3 mm and off white and form them to a ring with 1 slip stitch in first chain stitch. Continue by working pattern in the round as shown in diagram A.6. When A.6 is finished, cut and fasten strand. ---------------------------------------------------------- DOOR-4: Work a door as described above. Then work a small square window, a wreath with berries, a small parcel, a large parcel and a candy stick. SMALL SQUARE WINDOW: The piece is worked back and forth, then crochet an edge around the whole window. Work 13 chain stitches (including 1 chain stitch to turn) with hook size 3 mm and off white. Turn and work 1 double crochet in 2nd chain stitch from hook, work 1 double crochet in each of the next 11 chain stitches = 12 double crochets. The next row is worked as follows: Work 1 chain stitch, 1 double crochet in each double crochet. Repeat the last row until you have worked a total of 11 rows. Now work an edge around the whole window, turn and start in the top corner as follows: Work 1 chain stitch, 1 double crochet in first double crochet, * 3 chain stitches, 1 treble crochet in first chain stitch, skip approx. 1½ cm, 1 double crochet in next double crochet *, repeat from *-* to end of round, adjust so that you have a double crochet in each corner of the window. Finish round with 1 slip stitch in the chain stitch at the beginning of the round. Cut and fasten strand. WREATH WITH BERRIES: The piece is worked in the round, starting from the middle of the wreath outwards. Work 24 chain stitches with hook size 3 mm and green and form them to a ring with 1 slip stitch in first chain stitch. Work pattern in the round according to diagram A.7b a total of 6 times on the round - A.7a shows how the rounds start and finish and is worked in addition to A.7b. Continue until A.7 has been completed. Cut and fasten strand. Berries: Work 1 berry as follows: Work 3 chain stitches with hook size 3 mm and red, work 3 treble crochets in the first of the 3 chain stitches, take the hook out and insert it into the 3rd chain stitch, pick up loop from last treble crochet and then pull loop through 3rd chain stitch. Cut and fasten strand. Work 2 more berries in the same way and sew them onto the top of the wreath. SMALL PARCEL: The piece is worked back and forth. Work 10 chain stitches (including 1 chain stitch to turn) with hook size 3 mm and cerise. Turn and work 1 double crochet in 2nd chain stitch from hook, work 1 double crochet in each of the next 8 chain stitches = 9 double crochets. Next row is worked as follows: Work 1 chain stitch, 1 double crochet in each double crochet. Repeat the last row until you have worked a total of 7 rows. Cut and fasten strand. Work 1 chain-stitch row with strong yellow of approx. 6 cm, tie a tight knot in each end and cut the strand. Fasten it across the parcel. Work 1 chain-stitch row with cerise of approx. 15 cm, tie a tight knot in each end. Tie this around the parcel in height and tie a bow at the top. LARGE PARCEL: The piece is worked back and forth. Work 13 chain stitches (including 1 chain stitch to turn) with hook size 3 mm and medium grey. Turn and work 1 double crochet in 2nd chain stitch from hook, work 1 double crochet in each of the next 11 chain stitches = 12 double crochets. The next row is worked as follows: Work 1 chain stitch, 1 double crochet in each double crochet. Repeat the last row until you have worked a total of 10 rows. Cut and fasten strand. Work 1 chain-stitch row with cerise of approx. 8 cm, tie a tight knot in each end and cut strand. Fasten it across the parcel. Work 1 chain-stitch row with cerise of approx. 20 cm, tie a tight knot in each end. Tie this around the parcel in height and tie a bow at the top. CANDY STICK: The piece is worked back and forth. Work 4 chain stitches (including 1 chain stitch to turn) with hook size 3 mm and off white. Turn and work 1 double crochet in 2nd chain stitch from hook, work 1 double crochet in each of the next 2 chain stitches = 3 double crochets. Next row worked as follows: Work 1 chain stitch, 1 double crochet in each double crochet. Repeat the last row until you have worked a total of 12 rows, finish with 6 chain stitches on last row. Turn, work 1 double crochet in 2nd chain stitch from hook, 1 double crochet in each of the next 4 chain stitches, 1 double crochet in each of the next 3 double crochets = 8 double crochets. Next row worked as follows: Work 1 chain stitch, 1 double crochet in each double crochet. Repeat last row 1 more time. Cut and fasten strand. Work 1 chain-stitch row with red of approx. 60 chain stitches, tie a tight knot in each end and cut strand. Wind it around the candy stick and fasten at back. |
||||||||||||||||||||||||||||||||||||||||||||||
Diagram explanations |
||||||||||||||||||||||||||||||||||||||||||||||
|
||||||||||||||||||||||||||||||||||||||||||||||

|
||||||||||||||||||||||||||||||||||||||||||||||
|
||||||||||||||||||||||||||||||||||||||||||||||
|
Have you made this or any other of our designs? Tag your pictures in social media with #dropsdesign so we can see them! Do you need help with this pattern?You'll find tutorial videos, a Comments/Questions area and more by visiting the pattern on garnstudio.com. © 1982-2024 DROPS Design A/S. We reserve all rights. This document, including all its sub-sections, has copyrights. Read more about what you can do with our patterns at the bottom of each pattern on our site. |
||||||||||||||||||||||||||||||||||||||||||||||


With over 40 years in knitting and crochet design, DROPS Design offers one of the most extensive collections of free patterns on the internet - translated to 17 languages. As of today we count 304 catalogues and 11422 patterns - 11422 of which are translated into English (UK/cm).
We work hard to bring you the best knitting and crochet have to offer, inspiration and advice as well as great quality yarns at incredible prices! Would you like to use our patterns for other than personal use? You can read what you are allowed to do in the Copyright text at the bottom of all our patterns. Happy crafting!
Comments / Questions (5)
Hay alguna forma de comprar todo el material q necesito?
04.09.2023 - 18:54DROPS Design answered:
Hola Angels, puedes encontrar las tiendas es España/ que venden a España en el siguiente enlace: https://www.garnstudio.com/findastore.php?id=23&cid=23. En las propias tiendas puedes seleccionar los ovillos que necesites o contactar con ellos para obtener información sobre el stock.
10.09.2023 - 19:02Ik kom niet uit het patroon van de krans met bel. Is hier een geschreven patroon van? Of anders, hoeveel toeren zijn het in totaal?
19.07.2019 - 19:59DROPS Design answered:
Dag Marja,
Het geschreven patroon staat bij 'KRANS MET BEL'. Je haakt eerst 24 lossen die je sluit met een ring. Dan haak je de eerste toer van A.2 (vasten, beginnend met 1 lossen) Op de volgende toer begin met het eerste symbool in A.2a (= de toer begint met 2 lossen ) dan haak je een half stokje in de eerste vaste van de vorige toer. Dan haak je 4 lossen, dan 1 stokje in de 2e losse van die vier lossen en 1 dubbel stokje in de 1e losse van die vier lossen, sla 2 stokjes over en haak dan weer een half stokje in de volgende vaste, herhaal op deze manier (kijk ook naar het telpatroon).
23.07.2019 - 11:50-Ik ga geen suikerwater gebruiken: dit trekt ongedierte aan. Ik naai de lapjes L-vormig vast+ een stukje rechtsonder en een haakje rechtsboven. -De koordjes met strik om de pakjes zijn te kort: ik heb resp. 30 en 40cm gemaakt. -Ik werk de draadjes in eerste instantie niet weg maar gebruik ze voor het bevestigen op de ondergrond.
28.01.2019 - 11:53-Ik ga geen suikerwater gebruiken, dit trekt ongedierte aan. ik naai de lapjes L-vormig vast+ een stukje rechtsonder. Haakje rechtsboven.\r\n-De koordjes met strik om de pakjes zijn te kort: ik heb resp. 30 en 40cm gemaakt.\r\n-draadjes werk ik in eerste instantie niet weg: veel er van zijn te gebruiken voor bevestigen aan de ondergrond.\r\n-Veel maar leuk werk!
28.01.2019 - 11:49Als de deurtjes aan de linkerkant worden vastgenaaid en aan de rechterkant een knoop zit is de rest los en kunnen er geen kleinigheidjes in verstopt. Dat is toch de bedoeling van een Adventkalender? Bovendien: als je het deurtje openmaakt zakt het dan niet slap uit?
14.10.2018 - 18:45DROPS Design answered:
Dag Anneke, Daar heb je inderdaad wel gelijk aan. Dit zou je op kunnen lossen door de deurtjes op te stijven door ze in suikerwater te leggen en dan plat te laten drogen. Door het opgedroogde suiker worden de lapjes stijf en krullen ze niet om.
15.10.2018 - 21:44