DROPS Air
DROPS Air
65% Alpaca, 28% Polyamide, 7% Wool
from 6.45 $ /50g
Get the yarn to make this pattern from 19.35$.

The yarn cost is calculated from the pattern’s smallest size and the yarn’s cheapest product type. Looking for an even better price? You might find it on the DROPS Deals!

DROPS Super Sale

Winter Nap

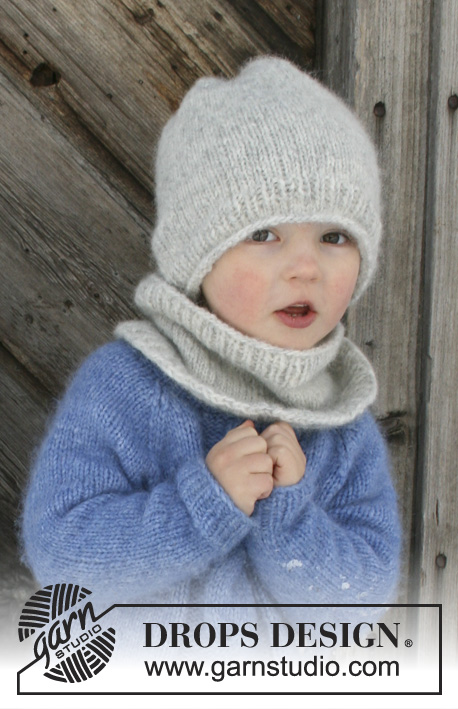
Knitted children’s sweater with cable and raglan. Sizes 2 - 12 years. The piece is worked in DROPS Air.

DROPS Children 30-7
DROPS Design: Pattern no ai-012-bn
Yarn group C or A + A
-----------------------------------------------------------
Sizes: 2 - 3/4 - 5/6 - 7/8 - 9/10 - 11/12 years

Materials:
DROPS AIR from Garnstudio (belongs to yarn group C)
150-150-200-200-250-250 g color 16, blue

The piece can also be knitted with yarn from:
"Alternative yarn (Yarn Group C)" – see the link below.

DROPS DOUBLE POINTED NEEDLES AND CIRCULAR NEEDLE (60 or 80 cm / 24'' or 32'') SIZE 5.5 MM/US 9 – or the size needed to get 16 stitches and 20 rows stockinette stitch on 10 cm / 4'' in width and 10 cm / 4'' in height.

DROPS DOUBLE POINTED NEEDLES AND CIRCULAR NEEDLE (40 + 60 or 80 cm / 16" + 24'' or 32'') SIZE 4.5 mm/US 7 for rib - or the size needed to get 18 stitches and 23 rows stockinette stitch on 10 cm / 4'' in width and 10 cm / 4'' in height.

DROPS CABLE NEEDLE - for cable.

-------------------------------------------------------

Alternative Yarn – See how to change yarns here
Yarn Groups A to F – Use the same pattern and change the yarn here
Yarn usage using an alternative yarn – Use our yarn converter here

-------------------------------------------------------

DROPS Air
DROPS Air
65% Alpaca, 28% Polyamide, 7% Wool
from 6.45 $ /50g
Get the yarn to make this pattern from 19.35$.

The yarn cost is calculated from the pattern’s smallest size and the yarn’s cheapest product type. Looking for an even better price? You might find it on the DROPS Deals!

DROPS Super Sale

SAVE 30% on 6 cotton favorites!
Valid until 04.12.2024

Pattern instructions

NOTE: This pattern is written in American English. All measurements in charts are in cm. For conversion from inches to cm - click here. There are different terms for crocheting in American and British English. If this pattern includes crochet, click for "crochet terms" here. For this pattern in British English, please click here.
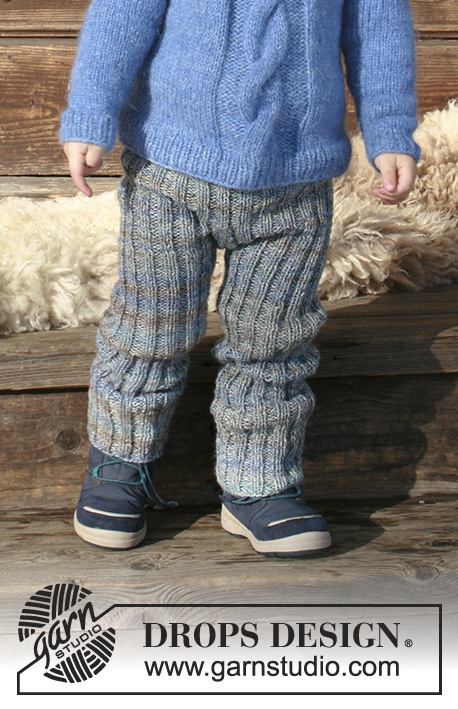
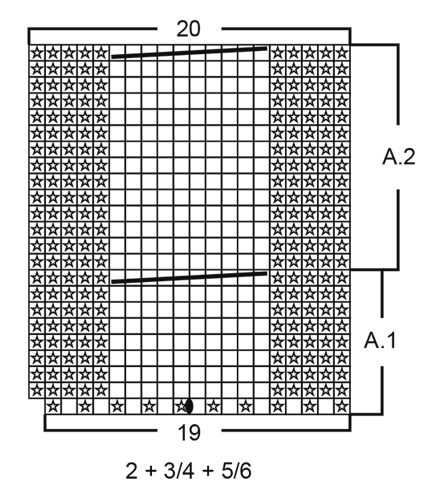
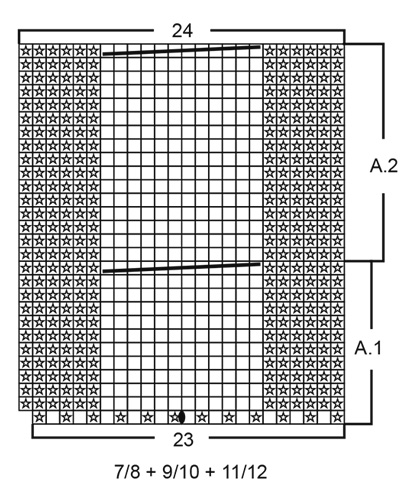
INFORMATION FOR THE PATTERN:

DECREASE TIP:
To work out how to decrease evenly, count the number of stitches to be decreased over (e.g. 25 stitches) and divide by the number of decreases to be made (e.g. 5) = 5. In this example, knit every 4th and 5th stitch together.

PATTERN:
See diagrams A.1 and A.2. Choose diagram for your size.

RAGLAN:
Decrease to raglan in each transition between body and sleeves. All decreases are worked from the right side!
Decrease as follows before the marker: Start 2 stitches before the marker and knit 2 together (= 1 stitch decreased).
Decrease as follows after the marker: Slip 1 stitch as if to knit, knit 1, pass the slipped stitch over the knitted stitch (= 1 stitch decreased).

INCREASE TIP (for mid under sleeve):
Start 1 stitch after the marker thread, make 1 yarn over, work until there is 1 stitch left on the round, make 1 yarn over and knit 1 (= 2 stitches increased). On the next round knit the yarn overs twisted to prevent holes.
----------------------------------------------------------

SWEATER:
The body is worked in the round with circular needle as far as the armholes. The sleeves are worked in the round with double pointed needles, then the body and sleeves are put together and worked to finished length.

BODY:
Cast on 136-144-152-160-168-176 stitches with circular needle size 4.5 mm / US 7. Knit 1 round. Then work rib (= knit 1 / purl 1) for 4 cm / 1½''. Change to circular needle SIZE 5.5 mm/US 9 / US 9. Insert 1 marker thread at the beginning of the round (= in the side). The next round is worked as follows: Knit the first 25-27-29-29-31-33 stitches and at the same time decrease 5 stitches evenly over these stitches - read DECREASE TIP, work A.1 (choose diagram for your size = 19-19-19-23-23-23 stitches which are increased to 20-20-20-24-24-24 stitches on the first round), knit 25-27-29-29-31-33 stitches and at the same time decrease 5 stitches evenly over these stitches, insert 1 marker thread (= in the side), knit the next 67-71-75-79-83-87 stitches and at the same time decrease 11-11-11-13-13-13 stitches evenly over these stitches. There are now 60-64-68-72-76-80 stitches between the marker threads on the front piece and 56-60-64-66-70-74 stitches on the back piece = a total of 116-124-132-138-146-154 stitches on the needle. The next round is worked as follows: 20-22-24-24-26-28 stitches stockinette stitch, continue A.1 (= 20-20-20-24-24-24 stitches) and work stockinette stitch to end of round. Continue the pattern in this way. When A.1 has been completed, work A.2 over these 20-20-20-24-24-24 stitches. Repeat A.2 upwards. When the piece measures 20-23-26-29-32-35 cm / 8"-9"-10 1/4"-11½"-12½"-13 3/4" bind off 4-4-4-6-6-6 stitches in each side for the armholes (bind off 2-2-2-3-3-3 stitches on each side of both marker threads). There are now 56-60-64-66-70-74 stitches on the front piece and 52-56-60-60-64-68 stitches on the back piece. Lay the piece to one side and work the sleeves.

SLEEVE:
Cast on 30-32-32-34-34-36 stitches with double pointed needles size 4.5 mm / US 7. Knit 1 round. Then work rib (= knit 1 / purl 1) for 4 cm / 1½''. Change to double pointed needles SIZE 5.5 mm/US 9 / US 9. Insert 1 marker thread at the beginning of the round (= mid under the sleeve). Knit 1 round where you decrease 4 stitches evenly on round in all sizes – read DECREASE TIP = 26-28-28-30-30-32 stitches. Continue working stockinette stitch in the round. When the piece measures 6 cm / 2 3/8'' increase 2 stitches mid under the sleeve – read INCREASE TIP. Increase in this way every 2½-3½-3½-4-5-5½ cm / 7/8"-1 1/4"-1 1/4"-1½"-2"-2 1/4" a total of 6-6-7-7-7-7 times = 38-40-42-44-44-46 stitches. When the piece measures 22-26-30-34-38-42 cm / 8 3/4"-10 1/4"-11 3/4"-13½"-15"-16½" bind off 4-4-4-6-6-6 stitches mid under sleeve (bind off 2-2-2-3-3-3 stitches on each side of the marker thread) = 34-36-38-38-38-40 stitches. Lay the piece to one side and work another sleeve in the same way.

YOKE:
Place the sleeves on the same circular needle as the body, where you have bind off stitches for the armhole = 176-188-200-202-210-222 stitches. Insert 1 marker in each transition between body and sleeve (= 4 markers). Continue as before with stockinette stitch and A.2 mid front. AT THE SAME TIME on the first round, decrease to RAGLAN – see description above. Decrease to raglan every 2nd round a total of 13-14-15-16-17-18 times.
AT THE SAME TIME when there are 2 decreases to raglan left (if your knitting gauge is right in height, the piece now measures approx. 31-35-39-43-47-51 cm / 12 1/4"-13 3/4"-15 1/4"-17"-18½"-20'' mid front), knit together the 10-10-10-12-12-12 stitches over the cable mid front, 2 and 2 (= 5-5-5-6-6-6 stitches decreased). On the next round place the middle 21-23-25-24-26-28 stitches on 1 thread for the neck. Continue working the piece back and forth on the needle from the neck and bind off 1 stitch at the beginning of the next 2 rows for the neck. After all the decreases to raglan and neck, there are 44-46-48-42-40-42 stitches left on the needle.

NECKLINE:
Knit up from the right side approx. 67-71-75-68-68-72 stitches around the neck (including the stitches on the thread in front) with short circular needle size 4.5 mm / US 7. Knit 1 round where you decrease evenly to 58-60-62-64-66-68 stitches. Continue by working rib in the round (= knit 1 / purl 1) for 3 cm / 1''. Loosely bind off with knit over knit and purl over purl.
The sweater measures approx. 36-40-44-48-52-56 cm / 14 1/4"-15 3/4"-17 1/4"-19"-20½"-22'' from the shoulder down.

ASSEMBLY:
Sew the openings under the sleeves.


----------------------------------------------------------
Pants:
See DROPS Children 30-22 or “Related patterns” in patterns on-line.
----------------------------------------------------------

Diagram

All measurements in charts are in cm.

symbols = knit from right side, purl from wrong side
symbols = purl from right side, knit from wrong side
symbols = between 2 stitches make 1 yarn over, on next round knit yarn over twisted to prevent holes.
symbols = place 5 stitches on cable needle behind piece, knit 5, knit 5 from cable needle
symbols = place 6 stitches on cable needle behind piece, knit 6, knit 6 from cable needle
diagram
diagram
diagram

Each of our patterns has specific tutorial videos to help you.

Do you have a question? See a list of frequently asked questions (FAQ)

Knitting tension is what determines the final measurements of your work, and is usually measured per 10 x 10 cm. It is provided like so: number of stitches in width x number of rows in height - eg: 19 stitches x 26 rows = 10 x 10 cm.

The knitting tension is very individual; some people knit/crochet loosely while others work tightly. You adjust the knitting tension with the needle size, which is why the suggested needle size only serve as a guide! You need to adjust this (up or down) to ensure that YOUR knitting tension matches the knitting tension provided in the pattern. If you work with a different knitting tension than provided you will have a different yarn consumption, and your work will have different measurements than what the pattern suggests.

The knitting tension also determines which yarns can replace each other. As long as you achieve the same knitting tension you can replace one yarn with another.

See DROPS lesson: How to measure your tension/gauge

See DROPS video: How to make a gauge tension swatch

The required amount of yarn is provided in grams, eg: 450 g. To calculate how many balls you’ll need you first need to know how many grams are in 1 ball (25g, 50g or 100g). This information is available if you click on the individual yarn quality on our pages. Divide the amount required with the amount of each ball. For example, if each ball is 50g (the most common amount), the calculation will be as follows: 450 / 50 = 9 balls.

The important thing when changing from one yarn to another is that the knitting/crochet tension remains the same. This is so that the measurements of the finished piece will be the same as on the sketch provided. It is easier to achieve the same knitting tension using yarns from the same yarn group. It is also possible to work with multiple strands of a thinner yarn to achieve the knitting tension of a thicker one. Please try our yarn converter. We recommend you to always work a test swatch.

Please NOTE: when changing yarn the garment might have a different look and feel to the garment in the photo, due to individual properties and qualities of each yarn.

See DROPS lesson: Can I use a different yarn than the one mentioned in the pattern?

All our yarns are categorised into yarn groups (from A to F) according to thickness and knitting tension – group A contains the thinnest yarns and group F the thickest. This makes it easier for you to find alternative yarns to our patterns, should you wish to switch yarn. All yarns within the same group have a similar knitting tension and can easily replace each other. However, different yarn qualities have different structures and properties which will give the finished work a unique look and feel.

Click here for an overview of the yarns in each yarn group

At the top of all our patterns you’ll find a link to our yarn converter, which is a helpful tool should you wish to use a different yarn than suggested. By filling in the yarn quality you wish to replace, the amount (in your size) and number of strands, the converter will present good alternative yarns with the same knitting tension. Additionally it will tell you how much you’ll require in the new qualities and whether you’ll need to work with multiple strands. Most skeins are 50g (some are 25g or 100g).

If the pattern is worked with multiple colours, every colour will have to be converted separately. Similarly, if the pattern is worked with several strands of different yarns (for example 1 strand Alpaca and 1 strand Kid-Silk) you will have to find alternatives for each, individually.

Click here to see our yarn converter

Since different yarns have different qualities and textures we have chosen to keep the original yarn in our patterns. However, you can easily find options among our available qualities by using our yarn converter, or simply pick a yarn from the same yarn group.

It is possible that some retailers still have discontinued yarns in stock, or that someone has a few skeins at home that they would like to find patterns for.

The yarn converter will provide both alternative yarn as well as required amount in the new quality.

If you think it's hard to decide what size to make, it can be a good idea to measure a garment you own already and like the size of. Then you can pick the size by comparing those measures with the ones available in the pattern's size chart.

You'll find the size chart at the bottom of the pattern.

See DROPS lesson: How to read size chart

The needle size provided in the pattern serves only as a guide, the important thing is to follow the knitting tension. And since knitting tension is very individual, you will have to adjust the needle size to ensure that YOUR tension is the same as in the pattern – maybe you’ll have to adjust 1, or even 2 needle sizes, up or down to achieve the correct tension. For this, we recommend that you work test swatches.

Should you work with a different knitting tension than the one provided, the measurements of the finished garment might deviate from the measurement sketch.

See DROPS lesson: How to measure your tension/gauge

See DROPS video: How to make a gauge tension swatch

Working a garment top-down provides more flexibility and room for personal adjustment. For example it is easier to try the garment on while working, as well as making adjustments to length of yoke and shoulder caps.

The instructions are carefully explaining every step, in the correct order. Diagrams are adjusted to the knitting direction and are worked as usual.

The diagram depicts all rows/rounds, and every stitch seen from the right side. It is read from bottom to top, from right to left. 1 square = 1 stitch.

When working back and forth, every other row is worked from the right side and every other row is worked from the wrong side. When working from the wrong side, the diagram will have to be worked reversed: from left to right, knit stitches are purled, purl stitches are knit etc.

When working in the round every round is worked from the right side and the diagram are worked from right to left on all rounds.

See DROPS lesson: How to read knitting diagrams

The diagram depicts all rows/rounds, and every stitch seen from the right side. It is worked from bottom to top, from right to left.

When working back and forth every other row is worked from the right side: from right to left and every other row is worked from the wrong side: from left to right.

When working in the round, every row in the diagram are worked from the right side, from right to left.

When working a circular diagram you start in the middle and work your way outwards, counter clockwise, row by row.

The rows usually start with a given number of chain stitches (equivalent to the height of the following stitch), this will either be depicted in the diagram or explained in the pattern.

See DROPS lesson: How to read crochet diagrams

Instructions for working several diagrams after each other on the same row/round, will often be written like so: “work A.1, A.2, A.3 a total of 0-0-2-3-4 times". This means you work A.1 once, then A.2 is worked once, and A.3 is repeated (in width) the number of times provided for your size – in this case like so: S = 0 times, M = 0 times, L=2 times, XL= 3 times and XXL = 4 times.

The diagrams are worked as usual: begin with the first row in A.1, then work the first row in A.2 etc.

See DROPS lesson: How to read knitting diagrams

See DROPS lesson: How to read crochet diagrams

The total width of the garment (from wrist-to-wrist) will be larger in the larger sizes, despite the actual sleeves being shorter. The larger sizes have longer sleeve caps and wider shoulders, so there will be a good fit in all sizes.

The measurement sketch/schematic drawing provides information regarding the full length of the garment. If it’s a jumper or a jacket the length is measured from the highest point on the shoulder (usually closest to the neckline), and straight down to the bottom of the garment. It is NOT measured from the tip of shoulder. Similarly, the length of yoke is measured from the highest point on the shoulder and down to where yoke is split into body and sleeves.

See DROPS lesson: How to read a schematic drawing

Diagrams are often repeated on the round or in height. 1 repeat is the diagram the way it appears in the pattern. If it says to work 5 repeats of A.1 in the round, then you work A.1 a total of 5 times after/next to each other in the round. If it says to work 2 repeats of A.1 vertically/in height you work the entire diagram once, then begin again at the start and work the entire diagram one more time.

Chain stitches are slightly narrower than other stitches and to avoid working the cast-on edge too tight, we simply chain more stitches to begin with. The stitch count will be adjusted on the following row to fit the pattern and measurement sketch.

The rib edge is more elastic and will contract slightly compared to, for example, stocking stitch. By increasing before the rib edge, you avoid a visible difference in width between the rib edge and the rest of the body.

It’s very easy to cast off too tightly, and by making yarn overs while casting off (and simultaneously casting these off) you avoid a too tight cast off edge.

See DROPS video: How to bind off with yarn overs (yo)

To achieve an even increase (or decrease) you can increase on, for example: every 3rd and 4th row alternately, like so: work 2 rows and increase on the 3rd row, work 3 rows and increase on the 4th. Repeat this until the increase is complete.

See DROPS lesson: Increase or decrease 1 st on every 3rd and 4th row alternately

Should you prefer to work in the round instead of back and forth, you may of course adjust the pattern. You’ll need to add steeks mid-front (usually 5 stitches), and follow the instructions. When you would normally turn and work from the wrong side, simply work across the steek and continue in the round. At the end you’ll cut the piece open, pick up stitches to work bands, and cover the cut edges.

See DROPS video: How to knit steeks and cut open

Should you prefer to work back and forth instead of in the round, you may of course adjust the pattern so you work the pieces separately and then assemble them at the end. Divide the stitches for the body in 2, add 1 edge stitch in each side (for sewing) and work the front and back pieces separately.

See DROPS lesson: Can I adapt a pattern for circular needles into straight needles?

Pattern repeats can vary slightly in the different sizes, in order to get the correct proportions. If you’re not working the exact same size as the garment in the photo, yours might deviate slightly. This has been carefully developed and adjusted so that the complete impression of the garment is the same in all sizes.

Make sure to follow instructions and diagrams for your size!

If you have found a pattern you like which is available in women’s size it’s not very difficult to convert it to men’s size. The biggest difference will be the length of sleeves and body. Start working on the women size that you think would fit across the chest. The additional length will be worked right before you cast off for the armhole/sleeve cap. If the pattern is worked top-down you can add the length right after the armhole or before the first decrease on sleeve.

Regarding additional yarn amount, this will depend on how much length you add, but it is better with a skein too many than too few.

All yarns will have excess fibres (from production) that might come off as lint or shedding. Brushed yarns (ie hairier yarns) have more of these loose, excess fibres, causing more shedding.

Shedding also depends on what is worn under or over the garment, and whether this pulls at the yarn fibres. It’s therefore not possible to guarantee that there will be no shedding

Below are some tips on how to get the best result when working with hairier yarns:

1. When the garment is finished (before you wash it) shake it vigorously so the looser hairs come off. NOTE: do NOT use a lint roller, brush or any method that pulls at the yarn.

2. Place the garment in a plastic bag and put it in your freezer - the temperature will cause the fibres to become less attached to each other, and excess fibres will come off easier.

3. Leave in the freezer for a few hours before taking it out and shaking it again.

4. Wash the garment according to the instructions on the yarn label.

Pilling is a natural process that happens to even the most exclusive of fibers. It's a natural sign of wear and tear that is hard to avoid, and that is most visible in high friction areas of your garment like a sweater's arms and cuffs.

You can make your garment look as new by removing the pilling, using a fabric comb or a pill/lint remover.

Still can't find the answer you need? Then scroll down and leave your question so one of our experts can try to help you. This will be done normally within 5 to 10 working days.
In the meantime, you can read the questions and answers that others have left to this pattern or join the DROPS Workshop on Facebook to get help from fellow knitters/crocheters!

You might also like...

Winter Nap

Martina, Afghanistan

Kinderpulli

Evelina, Sweden

Post a comment to pattern DROPS Children 30-7

We would love to hear what you have to say about this pattern!

If you want to leave a question, please make sure you select the correct category in the form below, to speed up the answering process. Required fields are marked *.

Comments / Questions (21)

country flag Mieke wrote:

Ik kom er nog steeds niet uit mbt de kabel en het patroon nl op de foto heeft de trui twee kabels die elkaar kruisen en dat zie ik niet terug in het patroon. Kunt u mij aub het juiste patroon vertellen zodat ik de voorkant krijg conform de foto? Bij voorbaat heel hartelijk dank! Ik brei de kleine maat.....

01.11.2022 - 15:39

DROPS Design answered:

Dag Mieke,

Als je het patroon volgt dan ontstaat er vanzelf een kabel zoals op de foto. Dit is in het telpatroon aangegeven met 1 schuine streep die over een aantal steken loopt. Daarbij plaats je een aantal steken op een kabelnaald (afhankelijk van de maat die je aan het breien bent 5 of 6 steken)en houd deze achter het werk. Vervolgens brei je een aantal steken (afhankelijk van de maat die je aan het breien bent 5 of 6 steken) en daarna brei je weer de steken van de kabelnaald.

02.11.2022 - 14:48

country flag Mieke wrote:

Je bedoeld misschien grote maten 6 steken op de kabelnaald en kleine 3 maten 5? En klopt het dat de kabelnaald met de steken steeds ACHTER het werk moeten?

30.10.2022 - 21:34

DROPS Design answered:

Dag Mieke,

Bij de grote maten 6 steken op een kabelnaald zetten, 6 steken breien en dan de 6 steken van de kabelnaald breien. Je houd de steken van de kabelnaald inderdaad steeds achter het werk.

02.11.2022 - 14:49

country flag Mieke wrote:

Ik snap het kabelpatroon niet nl wanneer moet ik 5 steken op de kabelnaald zetten en wanneer 6 steken. Ik zien telpatroon nl geen verschil

28.10.2022 - 18:36

DROPS Design answered:

Dag Mieke,

Alleen voor de grootste 3 maten zet je 5 steken op een kabelnaald en alleen voor de kleinste 3 maten zet je steeds 5 steken op een kabelnaald.

30.10.2022 - 17:09

country flag Tigresse wrote:

Bonjour, il doit y avoir des erreurs dans les explications. J'ai Voulu faire la taille 5/6 ans mais en mesurant la largeur je n'ai pas 40 cm mais 28. J'ai tout fait comme dit la première partie. Merci de m'éclairer.

18.03.2022 - 18:42

DROPS Design answered:

Bonjour Tigresse, avez-vous bien la bonne tension, soit 16 mailles x 20 rangs jersey = 10 x 10 cm? Avec cette tension, vous devez avoir 132 mailles/2 = 66 mailles pour le devant & le dos = environ 41 cm jersey soit environ 40 cm (à cause de la torsade). Bon tricot!

21.03.2022 - 07:40

country flag Staytru wrote:

I\'m knitting size 5/6 and found the section written for the Yoke unclear. It says to do a total of 15 raglan decreases every other row. However, from my interpretation, you complete 13 raglan decreases + 1 even row, and then on the 14th raglan decrease, you k2tog across the 10 cable stitches. Then would you knit another even row to put 25 stitches on scrap yarn? But then we are missing another raglan decrease.

05.03.2022 - 00:50

DROPS Design answered:

Dear Staytru, you are correct, but after putting the 25 stitches on scrap yarn, on the next row, you need to work the last raglan decrease, while casting off a stitch on each side of the neck. Happy knitting!

06.03.2022 - 13:09

country flag Viv wrote:

I am attempting this pattern for the second time. The first one I ended up pulling the whole thing undone! There appears to be a few errors with stitch counts both on the sleeve and yoke. I am knitting the second size. The cast off stitches for the neck also seem wrong. On both attempts the neck begins so far down the front that the shape is entirely wrong. Before I give up with this pattern and throw it away, can you please tell me if this problem has already been remedied?

31.01.2022 - 11:25

DROPS Design answered:

Dear Viv, in the 2nd time, neck is worked when piece measures 35 cm from cast on edge, and whole piece measures a total of 40 cm from shoulder down. You will then work 3 cm ribbing edge for collar. What kind of errors did you find? Please share so that we can check and fw our design team. Thank you!

31.01.2022 - 17:36

country flag Muriel wrote:

Bonjour, pour l'emplacement, diminuer tous les deux rangs, cela veut il dire un rang sur deux ou bien un rang avec diminutions et deux rangs sans?

25.08.2021 - 23:34

DROPS Design answered:

Bonjour Muriel, quand on doit diminuer tous les 2 tours/rangs, on tricote ainsi: *1 tour/rang de diminutions, 1 tour/rang sans diminutions*, et on répète de *-*. Bon tricot!

26.08.2021 - 08:35

country flag Glenda Novotny wrote:

I am struggling to understand the pattern in the yoke section. After the measurements mid front (size 5/6 - 39cm it says “knit together the 10 stitches over the cable mid front “2 and 2 (=5 stitches decreased)” what does this mean? I look forward to hearing from you. Regards Glenda

15.06.2021 - 15:20

DROPS Design answered:

Dear Mrs Novotny, you need more stitches for a cable than for stocking stitch, so in order to avoid the stitches on neck to be too wide, you will work the middle 10 stitches together 2 by 2 (= k2 tog a total of 5 times = 5 sts decreased, 5 sts remain). Hope this helps. Happy knitting!

15.06.2021 - 16:38

country flag Lisbeth wrote:

Hej, Jeg har nu sat masker på tråden som skal være over snoningen. Jeg har dog ikke laver snoningen, og jeg synes at jeg har alt for mange masker tilbage op pinden. Hvad gør jeg? Tager jeg “bare” et antal masker ind så det passer med slutantallet?

19.01.2021 - 09:01

DROPS Design answered:

Hei Lisbeth. Hvor mange masker har du til overs og hvilken str strikker du? Har du husket å strikkes de midterste maskene over fletten midt foran rett sammen 2 og 2, før du på neste omgang skal sette de midterste maskene på 1 tråd til hals? Om du følger oppskriften skal maskeantallet stemme. mvh DROPS design

25.01.2021 - 13:01

country flag Johanne Auger wrote:

Puis-je faire ce modèle avec des aiguilles normales et non circulaire?

07.01.2021 - 21:11

DROPS Design answered:

Bonjour Mme Auger, il vous faudra faire quelques ajustements, cette leçon explique comment adapter un modèle sur aiguilles droites. Bon tricot!

08.01.2021 - 07:31