
Popular categories
Looking for a yarn?


Comments / Questions (35)
![]() Merja wrote:
Merja wrote:
Hei! Minulla on ongelma. Teen kokoa M, kuvio A.5b loppuu kerroksella 52, kuvio A 3b jatkuu kerrokselle 57. Jatkan A 5b kuvion 1. kerrokselta jatkaen vielä A. 3b kerrokselle 57 asti. Kun sitten aloitan A.3b kuvion 1.kertokselta on A 5b jo kerroksella 6. Etumuksen kuviot eivät enää jatku samalaisina!! Miten jatkan ???????
09.10.2024 - 15:11DROPS Design answered:
Hei, piirrokset on suunniteltu siten, että niiden mallikertoja voidaan toistaa. Tärkeintä on, että piirroksen A.5b kuvio jatkuu kuten aiemmin ja että piirroksen A.3b kuvio jatkuu kuten aiemmin.
11.10.2024 - 18:12
![]() Merja wrote:
Merja wrote:
Hei! Minulla on ongelma. Teen kokoa M, kuvio A.5b loppuu kerroksella 52, kuvio A 3b jatkuu kerrokselle 57. Jatkan A 5b kuvion 1. kerrokselta jatkaen vielä A. 3b kerrokselle 57 asti. Kun sitten aloitan A.3b kuvion 1.kertokselta on A 5b jo kerroksella 6. Etumuksen kuviot eivät enää jatku samalaisina!! Miten jatkan ???????
09.10.2024 - 11:54
![]() Hanna wrote:
Hanna wrote:
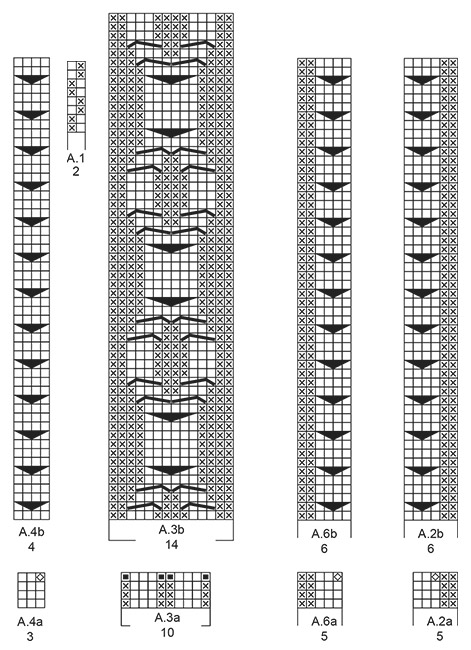
Ovatko ruutupiirrosten A.2b, A.4b ja A.6b kolmiot väärinpäin (pitäisi osoittaa ylöspäin, kuten piirroksen selityksessä)?
17.06.2024 - 11:59
![]() Marijke wrote:
Marijke wrote:
Ik heb deze trui gebreid in maat XL. Nu is de trui af en zie dat de breedte van de trui geen 57 cm is, maar 51 cm. Ik vond het ook al vreemd dat ik 2 bollen wol overhoud. Mijn proeflapje kwam overeen met de stekenverhouding zoals in het patroon is aangegeven. Heb ik nu iets fout gedaan of over het hoofd gezien? Is staat er en fout in het patroon? Met vriendelijke groet, Marijke
08.12.2023 - 15:53DROPS Design answered:
Dag Marijke,
Als de stekenverhouding klopte in je proeflapje en je hebt gewoon het patroon gevolgd dan zou dat goed moeten gaan met de maten. Het is altijd goed om tussendoor ook het werk op te meten om te kijken of je stekenverhouding nog steeds klopt. Helaas kan ik vanaf hier niet meekijken wat er eventueel fout is gegaan.
10.12.2023 - 16:30
![]() Mia wrote:
Mia wrote:
Stickar tröjan i storlek S. Har satt alla delar på samma rundsticka och stickat ca 10 varv. Upplever att raglan inte hamnar i armvecket utan oväntat nära flätmönstret på framdelen. Kan det verkligen stämma? Tack! /mia
21.11.2023 - 16:46DROPS Design answered:
Hej Mia, stickar du i DROPS Karisma og har du måttet som står i måttskissen nederst i mönstret?
24.11.2023 - 13:48
![]() Manon wrote:
Manon wrote:
Merci pour l'info sur diagrammes (-b se tricotent jusqu'à la f, lorsqu'ils sont terminés en hauteur, reprenez-les au 1er rang.) AUTRE QUESTON Svp: les diagrammes ont un nbr de rangs différents ex. A.3b=57rgs et A5b 52 rgs , comment dois-je tric les 5 rg en ecart ? Merci!
03.03.2023 - 03:29DROPS Design answered:
Bonjour Manon, répétez chaque diagramme en hauteur indépendamment de la hauteur des autres, autrement dit, quand A.5b est terminé, reprenez-le au 1er rang (continuez les autres diagrammes comme avant); quand A.3b est terminé, reprenez-le au 1er rang (continuez les autres diagrammes comme avant). Bon tricot!
03.03.2023 - 09:15
![]() Manon wrote:
Manon wrote:
Merci pour vos patrons gratuits! DOS/DECANT - Première serie des diagramrs complétée pour XL, a quelle ligne devons nous techiquement recommencer les diagrame pour tric l'ouvrage jusqu'a 35cm? Merci
01.03.2023 - 06:53DROPS Design answered:
Bonjour Manon, les diagrammes (a) sont répétés en hauteur jusqu'à ce que les côtes mesurent 5 cm. Les diagrammes -b se tricotent jusqu'à la fin; autrement dit, lorsqu'ils sont terminés en hauteur, reprenez-les au 1er rang. Bon tricot!
01.03.2023 - 10:10
![]() Manon wrote:
Manon wrote:
Quel est le nom de ces mailles svp? (Je ne retrouve pas de tuto, merci symbol = tricoter 2 fois la même maille à l'endroit (alternativement dans le brin avant et le brin arrière) symbols = tricoter 2 fois la même maille à l'envers (alternativement dans le brin avant et le brin arrière)
14.02.2023 - 14:05DROPS Design answered:
Bonjour Manon, c'est une technique qui permet d'augmenter une maille endroit ou une maille envers - retrouvez la vidéo pour tricotez 2 fois 1 maille à l'endroit ici, procédez de la même façon pour augmenter 1 m envers, mais tricotez cette fois la maille à l'envers. Bon tricot!
14.02.2023 - 14:22
![]() Manon wrote:
Manon wrote:
Bonjour - size XL dos/devant , debut de section est ambigüe pour moi, j'ai l'impression de commencer les diagramme à même les cotes 2/2 dès le premier tour , merci de clarifier. Tric en côtes (2/ 2) au-dessus des 32-40-44 premières m , 2 mailles endroit, A.2a (= A.4a, A.3a, A.6a (= 5 mailles), tricoter en côtes (2 / 2 ) au-dessus des 180-200-220 dernières m.
13.02.2023 - 01:36DROPS Design answered:
Bonjour Manon, vous commencez effectivement les diagrammes mais ne tricotez que les 3 premiers rangs de ces diagrammes pendant 5 cm, vous diminuerez ensuite le nombre de mailles en côtes 2/2 de chaque côté du pull puis vous tricoterez le 4ème tour des diagrammes en augmentant comme indiqué par ce dernier rang, vos mailles seront ainsi bien en place pour les torsades. Bon tricot!
13.02.2023 - 10:32
![]() Manon wrote:
Manon wrote:
Suggestion: Certains patrons ont beaucoup de bonnes questions, il serait bien de pouvoir filtrer les commentaires par langue pour facilement retrouver les reponses déjà données. Merci!! (Canada francais)
13.02.2023 - 01:10
|
|||||||||||||||||||||||||
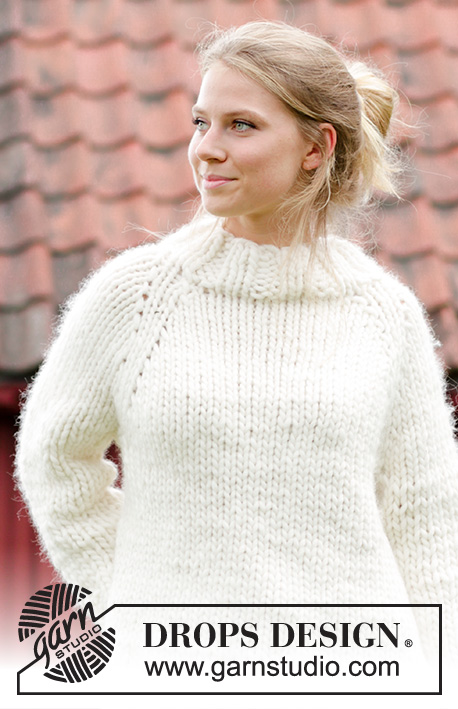
Polar Days#polardayssweater |
|||||||||||||||||||||||||
 |
 |
||||||||||||||||||||||||
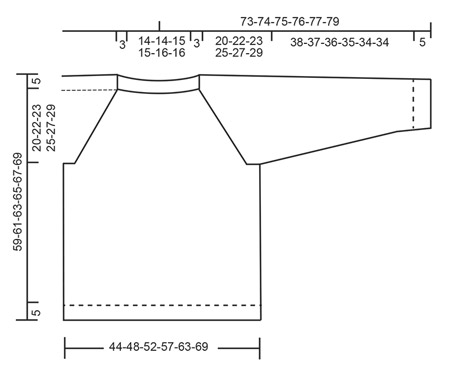
Knitted jumper with cables and raglan. Sizes S - XXXL. The piece is worked in DROPS Karisma.
DROPS 184-7 |
|||||||||||||||||||||||||
|
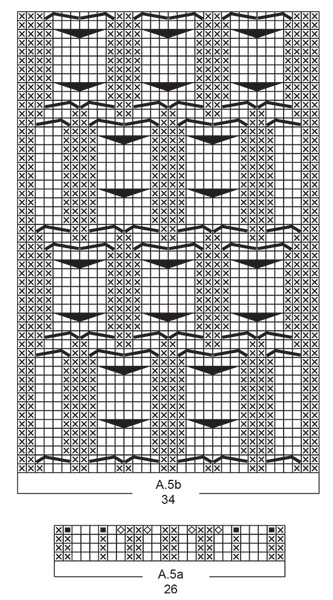
INFORMATION FOR THE PATTERN: PATTERN: See diagrams A.1 to A.6 (diagrams A.2 and A.6 are for sizes XL, XXL and XXXL). The diagrams show all the rows in the pattern seen from the right side. INCREASE TIP (for under sleeves): Work until there is 1 stitch left before the marker thread, 1 yarn over, work 2 stitches in pattern A.1 as before (the marker thread sits in the middle of these 2 stitches), 1 yarn over. On the next round the yarn overs are knitted/purled twisted and then worked into pattern A.1. RAGLAN: Work until there are 3 stitches left before the marker thread. Purl 2 stitches together, knit 2 (the marker thread sits in the middle of these 2 stitches), purl 2 stitches together. Repeat the decreases at each of the remaining marker threads (= 8 stitches decreased on the round). DECREASE/INCREASE TIP (evenly spaced): To work out how to decrease/increase evenly, count the number of stitches to be decrease/increase over (e.g. 26 stitches) and divide the stitches with the number of decreases/increases to be made (e.g. 6) = 4.3. In this example, knit approx. every 3rd and 4th stitch together. If you are increasing (in this example) make 1 yarn over after approx. every 4th stitch. On the next round, work the yarn overs twisted to prevent holes. ---------------------------------------------------------- JUMPER: The body is worked in the round with circular needle, bottom up. You will work cables on the front piece and moss stitch in the sides, on the back piece and sleeves. The sleeves are worked in the round with double pointed needles. NOTE: Sizes XL, XXL and XXXL have a small cable (= A.2/A.6) further towards each side than shown in the picture. BODY: Cast on 218-234-254-276-304-328 stitches with circular needle size 3.5 mm and Karisma. Knit 1 round. Insert 1 marker thread at the beginning of the round (= the side). Now work rib in the different sizes as follows: SIZES S, M AND L: Work rib (knit 2, purl 2) over the first 24-28-32 stitches, knit 2, A.3a (= 10 stitches), A.4a (= 3 stitches), A.5a (= 26 stitches), A.4a, A.3a, work rib (knit 2, purl 2) over the remaining 140-152-168 stitches. SIZES XL, XXL AND XXXL: Work rib (knit 2 / purl 2) over the first 32-40-44 stitches, knit 2, work A.2a (= 5 stitches), A.3a (= 10 stitches), A.4a (= 3 stitches), A.5a (= 26 stitches), A.4a, A.3a, A.6a (= 5 stitches), work rib (knit 2 / purl 2) over the remaining 180-200-220 stitches. Continue in the round in this way and repeat the first 3 rounds in the diagrams until the rib measures 5 cm. The next round is worked as follows: Knit the first 26-30-34-34-42-46 stitches and decrease, at the same time, 6-6-6-8-8-8 stitches evenly over these stitches – read DECREASE TIP, work the last row in the diagrams over the next 52-52-52-62-62-62 stitches, knit the next 26-30-34-34-42-46 stitches and decrease, at the same time, 6-6-6-8-8-8 stitches evenly over these stitches, knit the remaining stitches on the round and decrease, at the same time, 26-26-30-32-32-36 stitches evenly over these stitches = 198-214-230-248-276-296 stitches. Change to circular needle size 4.5 mm. Now work pattern in the different sizes as follows: SIZES S, M AND L: (the marker in the side sits here = start of the round), work A.1 (= 2 stitches) over the first 20-24-28 stitches, A.3b (= 14 stitches), A.4b (= 4 stitches), A.5b (= 34 stitches), A.4b, A.3b, A.1 over the next 20-24-28 stitches, insert a marker thread here (= the other side), work A.1 over the next 88-96-104 stitches. SIZES XL, XXL AND XXXL: (the marker in the side sits here = start of the round), work A.1 (= 2 stitches) over the first 26-34-38 stitches, A.2b (= 6 stitches), A.3b (= 14 stitches), A.4b (= 4 stitches), A.5b (= 34 stitches), A.4b, A.3b, A.6b (= 6 stitches), A.1 over the next 26-34-38 stitches, insert a marker thread here (= the other side), work A.1 over the next 114-126-138 stitches. Continue the pattern in the round in this way. REMEMBER THE KNITTING TENSION! When the piece measures 34-34-35-35-35-35 cm work a round where you cast off 10-10-12-12-14-16 stitches under each sleeve for the armholes (= 5-5-6-6-7-8 stitches on each side of the marker threads in each side = 178-194-206-224-248-264 stitches on the round. Cut the strand. Lay the piece to one side and work the sleeves. SLEEVES: The sleeves are worked in the round with double pointed needles. Cast on 56-60-60-64-64-68 stitches with double pointed needles size 3.5 mm and Karisma. Work rib (knit 2 / purl 2) for 5 cm. Knit 1 round where you decrease 14-16-14-16-14-16 stitches evenly on round = 42-44-46-48-50-52 stitches. Change to double pointed needles size 4.5 mm. Insert a marker thread at the beginning of the round. Work pattern A.1 in the round. When the sleeve measures 14-11-11-8-6-5 cm increase 1 stitch on each side of the marker thread mid under sleeve (= 2 stitches increased) – read INCREASE TIP. Increase in this way every 6th-5th-4th-4th-4th-4th round a total of 12-15-18-19-20-21 times = 66-74-82-86-90-94 stitches. When the sleeve measures 43-42-41-40-39-39 cm (NOTE: Shorter measurements in larger sizes due to longer yoke) cast off the middle 10-10-12-12-14-16 stitches under the sleeve (i.e. 5-5-6-6-7-8 stitches on each side of the marker thread) = 56-64-70-74-76-78 stitches. Lay the piece to one side and work 1 more sleeve. YOKE: Place the sleeves on the same circular needle as the body where you cast off stitches for the armholes = 290-322-346-372-400-420 stitches. THE PIECE IS NOW MEASURED FROM HERE. Start in the transition after the sleeve and before the body on the back piece and work pattern as before as follows: Work 2-2-2-1-2-6 stitches, insert a marker thread here (NOTE: this becomes the start of the round), work 74-82-88-100-108-110 stitches (= back piece), insert a marker thread here, work 64-72-78-82-88-94 stitches (= sleeve), insert a marker thread here, work 88-96-102-108-116-122 stitches (= front piece), insert a marker thread here, work 64-72-78-82-88-94 stitches (= sleeve). Continue the pattern as before and knit 1 stitch on each side of the 4 marker threads in the piece. On the next round, start the decreases to RAGLAN – see description above. Decrease in this way every 4th round a total of 3-2-0-0-0-0 times and every 2nd round 19-24-29-31-34-37 times = 114-114-114-124-128-124 stitches. After a while as you decrease to raglan and there are not enough stitches left to work the cables on the front piece, you knit over knit and purl over purl. When all the decreases are finished, the piece measures approx. 20-22-23-25-27-29 cm. Knit as far as the first marker thread on the front piece, work to the next marker thread and decrease at the same time 14-14-14-8-8-4 stitches evenly over these stitches, knit the remaining stitches on the round = 100-100-100-116-120-120 stitches NECKLINE: Change to circular needle size 3.5 mm. Purl 1 round. Knit 1 round where you increase 8-8-12-8-8-8 stitches evenly on round – Remember INCREASE TIP = 108-108-112-124-128-128 stitches. Purl 1 round and knit 1 round. Work rib (knit 2 / purl 2) for 3 cm. Cast off with knit over knit and purl over purl. Cut and fasten the strand. ASSEMBLY: Sew the openings under the sleeves. |
|||||||||||||||||||||||||
Diagram explanations |
|||||||||||||||||||||||||
|
|||||||||||||||||||||||||
|
|||||||||||||||||||||||||
|
|||||||||||||||||||||||||
|
|||||||||||||||||||||||||
Have you finished this pattern?Tag your pictures with #dropspattern #polardayssweater or submit them to the #dropsfan gallery. Do you need help with this pattern?You'll find 27 tutorial videos, a Comments/Questions area and more by visiting the pattern on garnstudio.com. © 1982-2025 DROPS Design A/S. We reserve all rights. This document, including all its sub-sections, has copyrights. Read more about what you can do with our patterns at the bottom of each pattern on our site. |
|||||||||||||||||||||||||


With over 40 years in knitting and crochet design, DROPS Design offers one of the most extensive collections of free patterns on the internet - translated to 17 languages. As of today we count 314 catalogues and 11822 patterns translated into English (UK/cm).
We work hard to bring you the best knitting and crochet have to offer, inspiration and advice as well as great quality yarns at incredible prices! Would you like to use our patterns for other than personal use? You can read what you are allowed to do in the Copyright text at the bottom of all our patterns. Happy crafting!
Post a comment to pattern DROPS 184-7
We would love to hear what you have to say about this pattern!
If you want to leave a question, please make sure you select the correct category in the form below, to speed up the answering process. Required fields are marked *.