
Popular categories
Looking for a yarn?


Comments / Questions (55)
![]() Birgitte Sørensen wrote:
Birgitte Sørensen wrote:
Efter at have strikket de første 10 pinde, står der at næste pind strikke fra ret siden., men det er jo vrangsiden af arbejdet, når mønster begynder på 11. Pind ?
18.05.2025 - 09:04
![]() Dorte wrote:
Dorte wrote:
Hej Findes der mon en opskrift, hvor man ikke skal bruge et diagram? Venlig hilsen Dorte
18.04.2025 - 21:13DROPS Design answered:
Hei Dorte. Ja, det har vi. Se f.eks på baby teppet i 46-1 (uten blomst), 46-16, 46-6, 36-9. Men bruk vår søkemotor og søk på Baby tepper og blad igjennom og se om du finner et teppe du liker. mvh DROPS Design
30.04.2025 - 08:53
![]() Ludwig Plochberger wrote:
Ludwig Plochberger wrote:
Liebes drops-team, welches maß/welche größe hat die decke? freundliche grüße belinda mahringer
07.02.2025 - 13:28DROPS Design answered:
Liebe Frau Plochberg, die Decke ist ca 68 cm breit und ca 87 cm lang - das finden Sie unter Tab "Anleitung" oben der Seite. Viel Spaß beim Stricken!
07.02.2025 - 15:30
![]() Katja wrote:
Katja wrote:
Hei, Neulotaanko tässä ohjeessa nurjapuoli aina oikein? Terveisin, Katja
05.02.2025 - 10:57DROPS Design answered:
Hei, nurjan puolen kerroksilla kaikki silmukat neulotaan nurin.
05.02.2025 - 17:55
![]() Agneta wrote:
Agneta wrote:
Jag har rätt garn, rätt sticka och ha gjort en provlapp. Men när jag stickat 22 rapporter mäter min filt bara 65 centimeter
02.02.2025 - 16:13
![]() Petra Van Der Weij Otten wrote:
Petra Van Der Weij Otten wrote:
In het telpatroon zijn 2x 2 hokjes niet getekend, (A2 en A3) is dat een fout of wat moet ik daar doen? Groetjes, Petra
27.01.2025 - 10:06DROPS Design answered:
Dag Petra,
Dit zijn geen steken, je begint met het eerste hokje De steken van het telpatroon ernaast vallen hier als het ware in.
29.01.2025 - 13:15
![]() Lola wrote:
Lola wrote:
Merci pour la réponse toutefois si je tricote les jetés a l\'envers simplement les trous sont énormes ! Faut il les tricoter a l\'envers mais par le brin arrière ?
14.01.2025 - 17:57DROPS Design answered:
Bonjour Lola, les jetés sont censés être aussi large qu'une maille tricotée, essayez de faire les vôtres plus serrés ou bien essayez dans le brin arrière s'ils sont trop grands. Bon tricot!
15.01.2025 - 09:40
![]() Lola wrote:
Lola wrote:
Merci pour la réponse toutefois si je tricote les jetés a l\'envers simplement les trous sont énormes ! Faut il les tricoter a l\'envers mais par le brin arrière ?
14.01.2025 - 17:57
![]() Lola wrote:
Lola wrote:
Sur le rang envers, les jetés sont tricotes torse ou normal ? Merci
13.01.2025 - 20:48DROPS Design answered:
Bonjour Lola, sur l'envers, tricotez les jetés des diagrammes à l'envers, pour qu'ils forment des trous. Bon tricot!
14.01.2025 - 10:21
![]() Jette wrote:
Jette wrote:
Jeg har overhovedet ikke brugt den mængde garn der står i opskriften. Strikkefastheden overholdt og størrelsen passer.
12.01.2025 - 19:53
|
||||||||||||||||
Lay Down#laydownblanket |
||||||||||||||||
|
|
||||||||||||||||
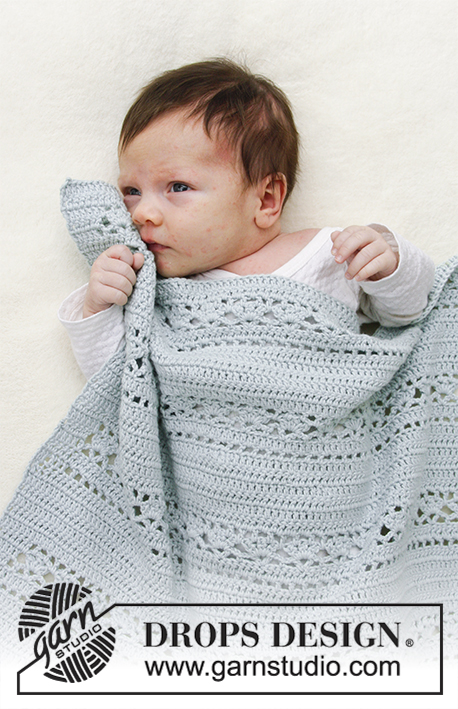
Baby blanket with lace pattern. The piece is knitted in DROPS BabyMerino.
DROPS Baby 29-8 |
||||||||||||||||
|
INFORMATION FOR PATTERN: GARTER STITCH (back and forth): 1 ridge = knit 2 rows. PATTERN: See diagrams A.1 to A.3. Diagrams show all rows in pattern seen from the right side. ---------------------------------------------------------- BLANKET: Cast on 163 stitches on circular needle size 3 mm with Baby Merino. Work 5 ridges in GARTER STITCH - see explanation above. Work next row as follows from right side: 5 stitches in garter stitch, A.1 (= 4 stitches), work A.2 over the next 144 stitches (= 18 repetitions of 8 stitches), A.3 (= 5 stitches) and finish with 5 stitches in garter stitch. Continue pattern like this. REMEMBER THE KNITTING TENSION! When piece measures approx. 85 cm (= approx. 22 repetitions of pattern vertically), work 5 ridges in garter stitch. Cast off. |
||||||||||||||||
Diagram explanations |
||||||||||||||||
|
||||||||||||||||

|
||||||||||||||||
Have you finished this pattern?Tag your pictures with #dropspattern #laydownblanket or submit them to the #dropsfan gallery. Do you need help with this pattern?You'll find 16 tutorial videos, a Comments/Questions area and more by visiting the pattern on garnstudio.com. © 1982-2025 DROPS Design A/S. We reserve all rights. This document, including all its sub-sections, has copyrights. Read more about what you can do with our patterns at the bottom of each pattern on our site. |
||||||||||||||||


With over 40 years in knitting and crochet design, DROPS Design offers one of the most extensive collections of free patterns on the internet - translated to 17 languages. As of today we count 314 catalogues and 11822 patterns translated into English (UK/cm).
We work hard to bring you the best knitting and crochet have to offer, inspiration and advice as well as great quality yarns at incredible prices! Would you like to use our patterns for other than personal use? You can read what you are allowed to do in the Copyright text at the bottom of all our patterns. Happy crafting!
Post a comment to pattern DROPS Baby 29-8
We would love to hear what you have to say about this pattern!
If you want to leave a question, please make sure you select the correct category in the form below, to speed up the answering process. Required fields are marked *.