DROPS BabyAlpaca Silk
70% Alpaca, 30% Silk
Discontinued
find alternatives
DROPS SS24

My Sweetie Slippers

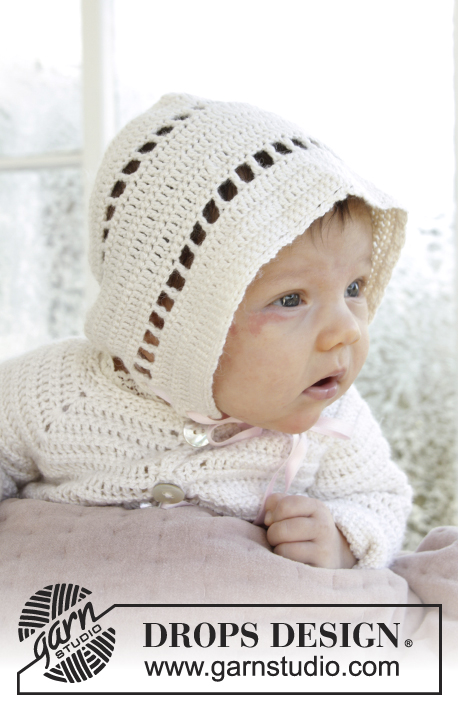
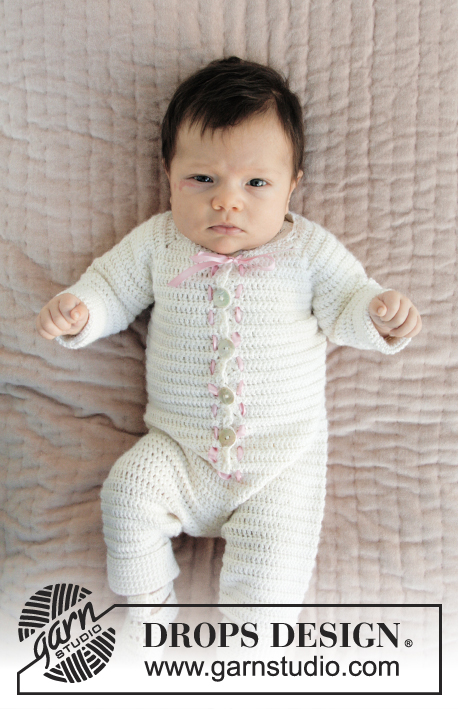
Crocheted slipper for Christening or special occasions in DROPS BabyAlpaca Silk. Sizes 15 - 23.

DROPS Baby 29-7
DROPS Design: Pattern no bs-015-by
Yarn group A
-----------------------------------------------------------
Sizes: 15/17 - 18/19 - 20/21 - 22/23
For foot length: 10-11-12-13 cm
Materials:
DROPS BABYALPACA SILK from Garnstudio (belongs to yarn group A)
50 g for all sizes in colour 1101, white

DROPS CROCHET HOOK SIZE 3 MM – or the size needed to get 24 treble crochets in width and 13 rows in height on 10 x 10 cm.
DROPS MOTHER OF PEARL BUTTONS: Arched (white) NO 521: 2 items in all sizes.
----------------------------------------------------------

-------------------------------------------------------

Alternative Yarn – See how to change yarns here
Yarn Groups A to F – Use the same pattern and change the yarn here
Yarn usage using an alternative yarn – Use our yarn converter here

-------------------------------------------------------

More like this:
Baby Baby Socks & Booties
DROPS BabyAlpaca Silk
70% Alpaca, 30% Silk
Discontinued
find alternatives

Pattern instructions

NOTE: This pattern is written in British English. All measurements in charts are in cm. For conversion from cm to inches - click here. There are different terms for crocheting in British and American English. If this pattern includes crochet, click for "crochet terms" here. For this pattern in American English, please click here.
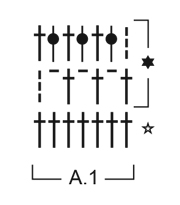
CROCHET INFO:
At the beginning of each round/row of double crochets, replace the first double crochet with 1 chain stitch. When working in the round, the round finishes with 1 slip stitch in the chain stitch from the beginning of the round. When working back and forth, the row finishes with 1 double crochet in the 3rd chain stitch from the beginning of the previous row.
At the beginning of each round/row of treble crochets, replace the first treble crochet with3 chain stitches. When working in the round, the round finishes with 1 slip stitch in the 3rd chain stitch from the beginning of the round. When working back and forth, the row finishes with 1 treble crochet in the chain stitch from the beginning of the previous row.
Work in each stitch, (not between stitches).

DECREASE TIP:
Decrease at the beginning of the row as follows: Replace 1 double crochet/treble crochet with 1 slip stitch.
Decrease at the end of the row as follows: Turn the piece when the number of double crochets/treble crochets left on the hook is the number to be decreased and work back.

2 TREBLE CROCHETS TOGETHER:
Work1 treble crochet, but wait with the last yarn over and pull through (= 2 loops on the hook), then work the next treble crochet, but when you are working the last pull through, pull the strand through all the loops on the hook (you have now decreased 1 treble crochet).

LOBSTER STITCH:
Work double crochets from the left to the right.

PATTERN:
See diagram A.1.
----------------------------------------------------------

LEFT SLIPPER:
READ CROCHET INFO and start with the sole. Work 18-20-22-26 chain stitches (including 1 chain stitch to turn) with hook size 3 mm and BabyAlpaca Silk. 
The first row is worked as follows: 1 double crochet in the 2nd chain stitch from the hook, 1 double crochet in each of the next 16-18-20-24 chain stitches = 18-20-22-26 double crochets, turn the piece. On the next row, work 3 double crochets in the first double crochet, 1 double crochet in each double crochet until there is 1 double crochet left on the row and 3 double crochets in the last double crochet = 22-24-26-30 double crochets on the row. Continue by working double crochets back and forth (with 1 double crochet in each double crochet) until there is 1 row left before the piece measures 3-4-4-5 cm. REMEMBER THE CROCHET TENSION! Now cast off 2 double crochets in each side – READ DECREASE TIP= 18-20-22-26 double crochets on the row and the piece measures approx. 3-4-4-5 cm. Cut and fasten the strand. Insert 1 marker thread in each corner = 4 marker threads. Continue working treble crochets around the sole as follows:
ROUND 1: Start mid back (= middle of the one short side) - Work 1 slip stitch in the first stitch, 3 chain stitches (equivalent to 1 treble crochet), work 2-3-3-4 treble crochets up to the corner, 2 treble crochets in the corner, 18-20-22-26 treble crochets along the side, 2 treble crochets in the corner, 5-7-7-9 treble crochets along the other short side (= the toe), 2 treble crochets in the corner, 18-20-22-26 treble crochets along the side, 2 treble crochets in the corner and 2-3-3-4 treble crochets to mid back, finish with 1 slip stitch in the 3rd chain stitch from the beginning of the round = 54-62-66-78 treble crochets.
ROUND 2: Work as for round 1, but the 2 treble crochets in each corner at the front of the slipper (by the toe) are worked 2 TREBLE CROCHETS TOGETHER – see description above = 52-60-64-76 treble crochets.
Continue by working 2-2-3-3 rounds with treble crochets (work 1 treble crochet in each treble crochet) without decreasing. The piece now measures approx. 3-3-4-4 cm in height.

ANKLE STRAP:
Remember CROCHET INFO! Start from the right side, work 2 rows with treble crochets back and forth over the middle 5-5-5-7 treble crochets mid back on the slipper and finish by working 33-34-35-36 chain stitches at the end of the last row, turn the piece. Work 1 treble crochet in the 4th chain stitch from the hook, 1 treble crochet in the next treble crochet, 1 chain stitch, skip 1 treble crochet (= buttonhole), then work 1 treble crochet in each of the remaining 27-28-29-30 chain stitches and 1 treble crochet in each of the last remaining 5-5-5-7 treble crochets. Cut and fasten the strand.

TOP:
Remember CROCHET INFO! Start from the right side and work 1 treble crochet in each of the middle 7-9-9-11 treble crochets mid front of the slipper. Continue by working pattern back and forth according to A.1. Repeat rows 1 and 2 in A.1 until the top measures approx. 4-4-5-5 cm. Cut and fasten the strand. Fasten the top in each side of the slipper with small, neat stitches.

EDGE:
Work 1 round with LOBSTER STITCH – see description above, along the whole of the opening of the slipper and round the ankle strap. Cut and fasten the strand.

MIDDLE STRAP:
Work 1 double crochet in each of the middle 5 double crochets mid front of the slipper (the first row is worked at the back of the lobster stitches). Work double crochets until the strap measures approx. 6 cm. Fold the strap double towards the wrong side and fasten to the inside of the slipper with small, neat stitches.
Sew on a button mid back of the slipper approx. 0.5 cm from the top.

RIGHT SLIPPER:
Work as for the left slipper, but in reverse. In other words, work in the same way until the first 2 rows of treble crochets on the ankle strap have been completed. Now work 1 row with slip stitches back from the right side before working 33-34-35-36 chain stitches for the ankle strap, the rest of the slipper is worked in the same way as for the left slipper. 

Diagram

symbols = first row is described in the text
symbols = 1 repeat in height
symbols = chain stitch
symbols = treble crochet in stitch
symbols = treble crochet around the chain stitch
diagram
Do you have a question? See a list of frequently asked questions (FAQ)

Knitting tension is what determines the final measurements of your work, and is usually measured per 10 x 10 cm. It is provided like so: number of stitches in width x number of rows in height - eg: 19 stitches x 26 rows = 10 x 10 cm.

The knitting tension is very individual; some people knit/crochet loosely while others work tightly. You adjust the knitting tension with the needle size, which is why the suggested needle size is only meant as a guide! You need to adjust this (up or down) to ensure that YOUR knitting tension matches the knitting tension provided in the pattern. If you work with a different knitting tension than provided you will have a different yarn consumption, and your work will have different measurements than what the pattern suggests.

The knitting tension also determines which yarns can replace each other. As long as you achieve the same knitting tension you can replace one yarn with another.

See DROPS lesson: How to measure your tension/gauge

See DROPS video: How to make a gauge tension swatch

The required amount of yarn is provided in grams, eg: 450 g. To calculate how many balls you’ll need you first need to know how many grams are in 1 ball (25g, 50g or 100g). This information is available if you click on the individual yarn quality on our pages. Divide the amount required with the amount of each ball. For example, if each ball is 50g (the most common amount), the calculation will be as follows: 450 / 50 = 9 balls.

The important thing when changing from one yarn to another is that the knitting/crochet tension remains the same. This is so that the measurements of the finished piece will be the same as on the sketch provided. It is easier to achieve the same knitting tension using yarns from the same yarn group. It is also possible to work with multiple strands of a thinner yarn to achieve the knitting tension of a thicker one. Please try our yarn converter. We recommend you to always work a test swatch.

Please NOTE: when changing yarn the garment might have a different look and feel to the garment in the photo, due to individual properties and qualities of each yarn.

See DROPS lesson: Can I use a different yarn than the one mentioned in the pattern?

All our yarns are categorised into yarn groups (from A to F) according to thickness and knitting tension – group A contains the thinnest yarns and group F the thickest. This makes it easier for you to find alternative yarns to our patterns, should you wish to switch yarn. All yarns within the same group have a similar knitting tension and can easily replace each other. However, different yarn qualities have different structures and properties which will give the finished work a unique look and feel.

Click here for an overview of the yarns in each yarn group

At the top of all our patterns you’ll find a link to our yarn calculator, which is a helpful tool should you wish to use a different yarn than suggested. By filling in the yarn quality you wish to replace, the amount (in your size) and number of strands, the calculator will present good alternative yarns with the same knitting tension. Additionally it will tell you how much you’ll require in the new qualities and whether you’ll need to work with multiple strands. Most skeins are 50g (some are 25g or 100g).

If the pattern is worked with multiple colours, every colour will have to be calculated separately. Similarly, if the pattern is worked with several strands of different yarns (for example 1 strand Alpaca and 1 strand Kid-Silk) you will have to find alternatives for each, individually.

Click here to see our yarn calculator

Since different yarns have different qualities and textures we have chosen to keep the original yarn in our patterns. However, you can easily find options among our available qualities by using our yarn calculator, or simply pick a yarn from the same yarn group.

It is possible that some retailers still have discontinued yarns in stock, or that someone has a few skeins at home that they would like to find patterns for.

The yarn calculator will provide both alternative yarn as well as required amount in the new quality.

If you think it's hard to decide what size to make, it can be a good idea to measure a garment you own already and like the size of. Then you can pick the size by comparing those measures with the ones available in the pattern's size chart.

You'll find the size chart at the bottom of the pattern.

See DROPS lesson: How to read size chart

The needle size provided in the pattern serves only as a guide, the important thing is to follow the knitting tension. And since knitting tension is very individual, you will have to adjust the needle size to ensure that YOUR tension is the same as in the pattern – maybe you’ll have to adjust 1, or even 2 needle sizes, up or down to achieve the correct tension. For this, we recommend that you work test swatches.

Should you work with a different knitting tension than the one provided, the measurements of the finished garment might deviate from the measurement sketch.

See DROPS lesson: How to measure your tension/gauge

See DROPS video: How to make a tension/gauge swatch

Working a garment top-down provides more flexibility and room for personal adjustment. For example it is easier to try the garment on while working, as well as making adjustments to length of yoke and shoulder caps.

The instructions are carefully explaining every step, in the correct order. Diagrams are adjusted to the knitting direction and are worked as usual.

The diagram depicts all rows/rounds, and every stitch seen from the right side. It is read from bottom to top, from right to left. 1 square = 1 stitch.

When working back and forth, every other row is worked from the right side and every other row is worked from the wrong side. When working from the wrong side, the diagram will have to be worked reversed: from left to right, knit stitches are purled, purl stitches are knit etc.

When working in the round every round is worked from the right side and the diagram are worked from right to left on all rounds.

See DROPS lesson: How to read knitting diagrams

The diagram depicts all rows/rounds, and every stitch seen from the right side. It is worked from bottom to top, from right to left.

When working back and forth every other row is worked from the right side: from right to left and every other row is worked from the wrong side: from left to right.

When working in the round, every row in the diagram are worked from the right side, from right to left.

When working a circular diagram you start in the middle and work your way outwards, counter clockwise, row by row.

The rows usually start with a given number of chain stitches (equivalent to the height of the following stitch), this will either be depicted in the diagram or explained in the pattern.

See DROPS lesson: How to read crochet diagrams

Instructions for working several diagrams after each other on the same row/round, will often be written like so: “work A.1, A.2, A.3 a total of 0-0-2-3-4 times". This means you work A.1 once, then A.2 is worked once, and A.3 is repeated (in width) the number of times provided for your size – in this case like so: S = 0 times, M = 0 times, L=2 times, XL= 3 times and XXL = 4 times.

The diagrams are worked as usual: begin with the first row in A.1, then work the first row in A.2 etc.

See DROPS lesson: How to read knitting diagrams

See DROPS lesson: How to read crochet diagrams

The total width of the garment (from wrist-to-wrist) will be larger in the larger sizes, despite the actual sleeves being shorter. The larger sizes have longer sleeve caps and wider shoulders, so there will be a good fit in all sizes.

The measurement sketch/schematic drawing provides information regarding the full length of the garment. If it’s a jumper or a jacket the length is measured from the highest point on the shoulder closest to the neckline, and straight down to the bottom of the garment. It is NOT measured from the tip of shoulder. Similarly, the length of yoke is measured from the highest point on the shoulder and down to where yoke is split into body and sleeves.

On a jacket measures are never taken along bands, unless specifically stated. Always measure inside band stitches when measuring the length.

See DROPS lesson: How to read a schematic drawing

Diagrams are often repeated on the round or in height. 1 repeat is the diagram the way it appears in the pattern. If it says to work 5 repeats of A.1 in the round, then you work A.1 a total of 5 times after/next to each other in the round. If it says to work 2 repeats of A.1 vertically/in height you work the entire diagram once, then begin again at the start and work the entire diagram one more time.

Chain stitches are slightly narrower than other stitches and to avoid working the cast-on edge too tight, we simply chain more stitches to begin with. The stitch count will be adjusted on the following row to fit the pattern and measurement sketch.

The rib edge is more elastic and will contract slightly compared to, for example, stocking stitch. By increasing before the rib edge, you avoid a visible difference in width between the rib edge and the rest of the body.

It’s very easy to cast off too tightly, and by making yarn overs while casting off (and simultaneously casting these off) you avoid a too tight cast off edge.

See DROPS video: How to bind off with yarn overs (yo)

To achieve an even increase (or decrease) you can increase on, for example: every 3rd and 4th row alternately, like so: work 2 rows and increase on the 3rd row, work 3 rows and increase on the 4th. Repeat this until the increase is complete.

See DROPS lesson: Increase or decrease 1 st on every 3rd and 4th row alternately

Should you prefer to work in the round instead of back and forth, you may of course adjust the pattern. You’ll need to add steeks mid-front (usually 5 stitches), and follow the instructions. When you would normally turn and work from the wrong side, simply work across the steek and continue in the round. At the end you’ll cut the piece open, pick up stitches to work bands, and cover the cut edges.

See DROPS video: How to knit steeks and cut open

Should you prefer to work back and forth instead of in the round, you may of course adjust the pattern so you work the pieces separately and then assemble them at the end. Divide the stitches for the body in 2, add 1 edge stitch in each side (for sewing) and work the front and back pieces separately.

See DROPS lesson: Can I adapt a pattern for circular needles into straight needles?

Pattern repeats can vary slightly in the different sizes, in order to get the correct proportions. If you’re not working the exact same size as the garment in the photo, yours might deviate slightly. This has been carefully developed and adjusted so that the complete impression of the garment is the same in all sizes.

Make sure to follow instructions and diagrams for your size!

If you have found a pattern you like which is available in women’s size it’s not very difficult to convert it to men’s size. The biggest difference will be the length of sleeves and body. Start working on the women size that you think would fit across the chest. The additional length will be worked right before you cast off for the armhole/sleeve cap. If the pattern is worked top-down you can add the length right after the armhole or before the first decrease on sleeve.

Regarding additional yarn amount, this will depend on how much length you add, but it is better with a skein too many than too few.

All yarns will have excess fibres (from production) that might come off as lint or shedding. Brushed yarns (ie hairier yarns) have more of these loose, excess fibres, causing more shedding.

Shedding also depends on what is worn under or over the garment, and whether this pulls at the yarn fibres. It’s therefore not possible to guarantee that there will be no shedding

Below are some tips on how to get the best result when working with hairier yarns:

1. When the garment is finished (before you wash it) shake it vigorously so the looser hairs come off. NOTE: do NOT use a lint roller, brush or any method that pulls at the yarn.

2. Place the garment in a plastic bag and put it in your freezer - the temperature will cause the fibres to become less attached to each other, and excess fibres will come off easier.

3. Leave in the freezer for a few hours before taking it out and shaking it again.

4. Wash the garment according to the instructions on the yarn label.

Pilling is a natural process that happens to even the most exclusive of fibers. It's a natural sign of wear and tear that is hard to avoid, and that is most visible in high friction areas of your garment like a sweater's arms and cuffs.

You can make your garment look as new by removing the pilling, using a fabric comb or a pill/lint remover.

Still can't find the answer you need? Then scroll down and leave your question so one of our experts can try to help you. This will be done normally within 5 to 10 working days.
In the meantime, you can read the questions and answers that others have left to this pattern or join the DROPS Workshop on Facebook to get help from fellow knitters/crocheters!

You might also like...

Post a comment to pattern DROPS Baby 29-7

We would love to hear what you have to say about this pattern!

If you want to leave a question, please make sure you select the correct category in the form below, to speed up the answering process. Required fields are marked *.

Comments / Questions (2)

country flag Martine wrote:

Bonjour, Une question annexe: le forum est indisponible depuis un certain temps.... Est-ce général? Merci d'avance.

07.08.2019 - 13:49

DROPS Design answered:

Bonjour Martine, le forum francophone est effectivement actuellement indisponible pour des raisons techniques, si vous avez une question, vous pouvez volontiers utiliser cet espace ou contacter votre magasin DROPS, même par mail ou téléphone, merci pour votre compréhension.

08.08.2019 - 09:04

country flag Ulrike wrote:

Hallo Drops, ich habe das Unterteil des Schühchens gehäkelt. Am Knöchelriemen scheitert es. Ich verstehe nicht, wie ich anfangen muss, da man ja in der hinteren Mitte steht. Dann komme ich auch mit den Luftmaschen nicht zurecht. Da steht 1 Stäbchen in die 4. LM ab Nadel, dann ein stb in das nächste Stäbchen. Da sind dich erst nur LM oder. Können sie mir den Knöchelriemen bitte etwas verdeutlichen? Danke

30.04.2019 - 22:16

DROPS Design answered:

Liebe Ulrike, das Knöchelriemchen wird über die mittleren 5-5-5-7 Maschen gehäkelt: markieren Sie die mittlere Maschen und beginnen Sie in die 2.-2.-2.3. Masche vor dieser mittelren Maschen, dann 1 Stb in den nächsten 5-5-5-7 M, (hinten am Schühchen), dann häkeln Sie 33-34-35-36 Luftmaschen (einschl. 3 Wende-Lm) und jetzt 1 Reihe Stb über diese Lm häkeln: 1 Stb in die 4. Lm ab der Nadel, 1 Stb in das nächste Stb, 1 Lm, 1 Stb für den Knopfloch überspringen und 1 Stb in jede Lm bis zur Ende der Reihe (= die 27-28-29-30 Lm + die 5-5-5-7 Stb). Viel Spaß beim häkeln!

02.05.2019 - 09:18