
Looking for a yarn?


Comments / Questions (24)
![]() Britt-Marie Rahm wrote:
Britt-Marie Rahm wrote:
Vill gärna kunna se hur man virkar ihop remsorna till väskan My Daisy
11.06.2025 - 10:58DROPS Design answered:
Hej Britt-Marie, klicka på Videor överst i mönsteret, så ser du att vi har gjort en video som visar hur man syr ihop remsorna :)
12.06.2025 - 10:59
![]() Marit Roseth wrote:
Marit Roseth wrote:
Takk for fin oppskrift. Jeg bare lurer på om dere kan si hvor store hver rute skal være. Lurer på om jeg må gå ned på pinnestørrelsen :-) Mvh Marit
29.04.2025 - 11:27DROPS Design answered:
Hej Marit, nål nr 5 – eller den nålen du må bruke for å få 14 staver på 10 cm i bredden. En ruter måler 12 cm i bredden og 12 cm i høyden.
30.04.2025 - 09:54
![]() Maryse GIRAUD wrote:
Maryse GIRAUD wrote:
Bonjour, je voudrais réaliser ce sac, et commander la laine sur votre site; je voudrais savoir combien de pelotes faut il pour 100 gr ? deux ? merci de votre réponse
14.03.2025 - 14:40DROPS Design answered:
Bonjour Mme Giraud, tout à fait, DROPS Paris se présente sous la forme de pelotes de 50 g. Bon crochet!
14.03.2025 - 16:16
![]() Guenaele wrote:
Guenaele wrote:
J ai trouvé les explications pr faire la cordelette et la fixer insuffisante sinon le reste était très bien
25.02.2025 - 17:27
![]() Marja wrote:
Marja wrote:
Hallo, hoeveel garen heb ik nodig als ik de abrikoos, roze, lichtroze en perzik vervang voor 1 kleur?
15.06.2024 - 12:49DROPS Design answered:
Dag Marja,
Eerlijk gezegd weet ik dat niet. Je zou de hoeveelheid garen kunnen bestellen in 1 kleur en de bollen die je over houdt terug kunnen brengen naar de winkel. Vraag je winkel naar hun retourbeleid, zodat je weet wat de mogelijkheden zijn.
16.06.2024 - 19:19
![]() Wesley Perry wrote:
Wesley Perry wrote:
As long as credit for the pattern is given, is it okay to sell the finished project? Also what is the appropriate way to give credit for the pattern? I’m assuming on the tag, but would just like to know how to give credit to the designer while also making sure people understand that the person selling still handmade the item. Would “Handmade by insert name. Pattern by insert designer” be appropriate and/or what are alternative ways to do this? Thank you!
17.03.2024 - 16:05DROPS Design answered:
Dear Wesley, for details of how can youuse these patterns for making pieces for sale, please see the framed text at the bottom of the pattern. Happy Knitting!
19.03.2024 - 00:13
![]() Susan Viljoen wrote:
Susan Viljoen wrote:
I did read your answer on the strap, but I still dont get the 'picture' is there perhaps a tutorial on how to assemble the strap
16.09.2023 - 17:06DROPS Design answered:
Dear Susan, unfortunately, we have no tutorials for how to assemble the cord. When looking at the picture, try to follow the union of the white string (A) into the chain space (the triangular shape) and the black string (B) into the loops formed by the A string. Happy crochetting!
17.09.2023 - 21:50
![]() Rosemarie Morlet wrote:
Rosemarie Morlet wrote:
Can you give me a more in-depth explanation of how to attach the strap
31.07.2022 - 21:32DROPS Design answered:
Dear Mrs Morlet, insert the first strap = A (in chart) as shown in A.4, then insert the 2nd strap (B) the same way on the other side of bag - now you will insert the ends of strap B into the loop of A as shown in A.4 and knot both ends of B together. repeat on the other side with the ends of A into the loops of B (reversed). Happy assembly!
01.08.2022 - 12:03
![]() Paloma wrote:
Paloma wrote:
Me encantó hacer este bolso ❤ Creo que voy a repetirlo, está vez en otro colores. Gracias!!
10.04.2022 - 21:02
![]() Janette Gwillim wrote:
Janette Gwillim wrote:
Re, picture instructions versus written. I personally like the picture instruction, I do not see how they cannot be followed, you look at the picture and do what it shows, please continue with pictorial instructions. Thank you Janette
04.08.2021 - 10:47
|
|||||||||||||||||||||||||||||||
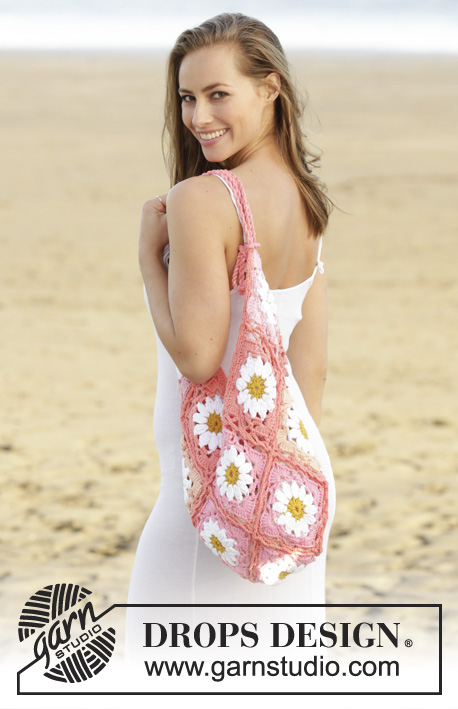
My Daisy#mydaisybag |
|||||||||||||||||||||||||||||||
 |
 |
||||||||||||||||||||||||||||||
Crochet bag with squares in DROPS Paris.
DROPS 175-17 |
|||||||||||||||||||||||||||||||
|
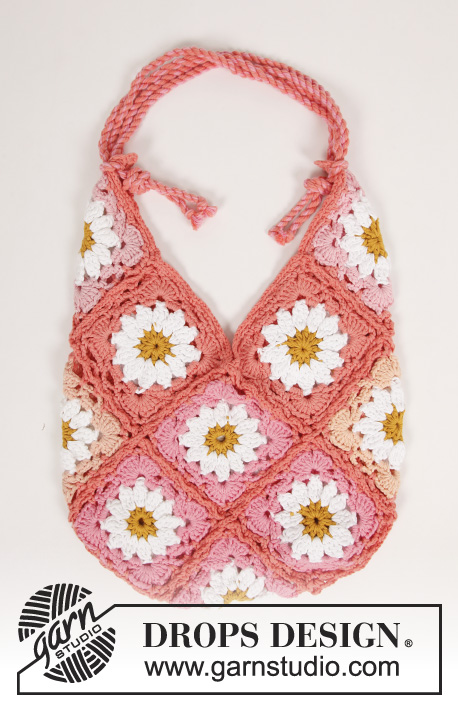
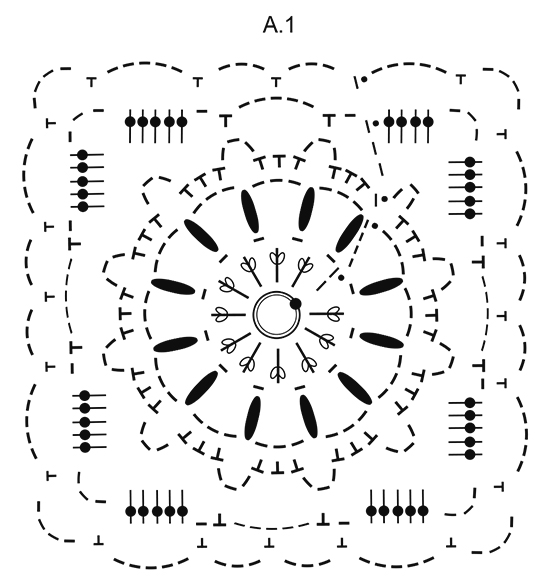
PATTERN: See diagrams A.1 to A.4. A.3 shows how the bag is crocheted together. SQUARE COLORS: Casting on and rounds 1, 2 and 5 are the same for all squares. Rounds 3 and 4 are worked in the square’s color. CASTING ON + ROUND 1: mustard ROUND 2: white ROUND 5: apricot SQUARE 1: Work 7 squares with medium pink. SQUARE 2: Work 2 squares with peach. SQUARE 3: Work 4 squares with apricot. SQUARE 4: Work 2 squares with light pink. COLOR CHANGE TIP: To get the neatest transition when changing colors work the last slip stitch of the round with the new color as follows: Insert the hook in the first chain stitch from the beginning of the round, 1 yarn over with the new color and pull the yarn through the loop on the hook. Fasten the strands as you go. ---------------------------------------------------------- BAG: The bag consists of 15 squares with 4 different color combinations – READ SQUARE COLORS. SQUARE: Work with hook size 5 mm / H/8 and Paris. Work A.1 – READ COLOR CHANGE TIP. REMEMBER CROCHET GAUGE! ASSEMBLY: Lay the squares out with the right square number as shown in A.2 (the broken line shows the squares which are folded in at the back, the other squares are laid double). The squares are worked together in strips, first diagonally in one direction, then diagonally in the other direction. Work the squares into strips as follows: Lay 2 squares together wrong side to wrong side and work through both layers with apricot as follows - see A.3 (A.3 shows the corners of 4 squares): 1 single crochet around the corner * 4 chain stitches, 1 single crochet around the next chain space *, repeat from *-* as far as the corner (= 5 chain spaces), work 4 chain stitches (= transition to the next 2 squares). Continue in the same way until all the squares are worked across. Cut the strand on each strip. CROCHET BORDER: To finish, work a border around the opening of the bag in apricot as follows: Start in one corner at the top. Work * 1 single crochet around the chain space in the corner, 4 chain stitches, 1 single crochet around the same corner, 4 chain stitches, (1 single crochet around the next chain space, 4 chain stitches), repeat from (-) to the next corner of the bag *, repeat from *-* along the 3 next sides, finish with 1 slip stitch in the first single crochet at the beginning of the round. TWISTED STRAP: Cut 4 strands apricot + 2 strands medium pink, 4 meters in length. Twist them together until they resist, fold the strap double so that it twines again. Tie a knot in each end. Make 1 more strap in the same way. Thread the one strap through the chain space in thecorner at the top of the bag – thread the strap as shown in A.4 (A). Thread the other strap in the same way, but in the top of the other side of the bag. Then pull the first strap through the second strap as shown in A.4 (B), tie the strap ends together with a knot in the end, do the same with the strap ends in the other side. |
|||||||||||||||||||||||||||||||
Diagram explanations |
|||||||||||||||||||||||||||||||
|
|||||||||||||||||||||||||||||||
|
|||||||||||||||||||||||||||||||

|
|||||||||||||||||||||||||||||||
Have you finished this pattern?Tag your pictures with #dropspattern #mydaisybag or submit them to the #dropsfan gallery. Do you need help with this pattern?You'll find 10 tutorial videos, a Comments/Questions area and more by visiting the pattern on garnstudio.com. © 1982-2025 DROPS Design A/S. We reserve all rights. This document, including all its sub-sections, has copyrights. Read more about what you can do with our patterns at the bottom of each pattern on our site. |
|||||||||||||||||||||||||||||||


With over 40 years in knitting and crochet design, DROPS Design offers one of the most extensive collections of free patterns on the internet - translated to 17 languages. As of today we count 314 catalogs and 11822 patterns - 11812 of which are translated into English (US/in).
We work hard to bring you the best knitting and crochet have to offer, inspiration and advice as well as great quality yarns at incredible prices! Would you like to use our patterns for other than personal use? You can read what you are allowed to do in the Copyright text at the bottom of all our patterns. Happy crafting!
Post a comment to pattern DROPS 175-17
We would love to hear what you have to say about this pattern!
If you want to leave a question, please make sure you select the correct category in the form below, to speed up the answering process. Required fields are marked *.