
Popular categories
Looking for a yarn?


Comments / Questions (7)
![]() Talli wrote:
Talli wrote:
Hello, Regarding the 10 neck sts placed on a stitch holder: these sts are not referred to again in the pattern. Are they included as part of the sts I am told to pick up for the neck? Thank you in advanced!
19.01.2019 - 20:05DROPS Design answered:
Dear Talli, those stitches used when you pick up he stitches around the neck for the neck edge. Their bunber is included in the number given 8for how many stitches should picked up). I hope this helps. Happy Knitting!
19.01.2019 - 20:50
![]() Kjersti wrote:
Kjersti wrote:
Denne oppskriften opplever jeg som umulig å følge!! Virker ikke gjennomarbeidet. Det legges opptil hoderegning på hver eneste linje i mønsteret, fordi det stemmer ikke med antall kast og 2 masker sammen. Etter 4 forsøk har jeg gitt opp. Glad jeg ikke betalte for oppskriften i alle fall. Synd, for garnet er herlig og genseren fin.
03.01.2018 - 22:15
![]() Kjersti wrote:
Kjersti wrote:
Det står i beskrivelsen når man strikker forstykket, og skal begynne på mønsteret. Jeg lurer også på- i den forbindelse: i linje 11 i mønsteret til str XXXL bakstykke- så slutter rapporten midt i to msk r sm. Og så begynner rapporten da igjen midt i to msk r sm. Skal det da være to msk r sm. 2, eller x1. Litt vanskelig å forstå!
28.03.2017 - 16:10DROPS Design answered:
Hei Kjersti. Du "skifter" rigtig nok mönster midt i en r-sammen her. Men det er ret nemt at strikke. For du strikker saadan her: 2 kant-m i rille, A.1A (= 3 m), gjenta A.1B over de neste 75 m (= 5 rapporter) = dvs, du strikker de 2 r sammen som der staar og fortsaetter lige over i naeste rapport (se stjerne, der har du 2 rapporter af A.1B, naar du saa naar til den 5e rapport, strikker du 2 r sammen (og du har nu 6 masker tilbage til A.1C (= 7 m), strik de 6 m: 2 r, 1 kast, 4 r og avslutt med 2 kant-m i rille.
29.03.2017 - 12:48
![]() Kjersti wrote:
Kjersti wrote:
Skjønte ikke helt det i mønsteret som er merket med stjerne og det står to omganger med A.1B. Hva betyr det, hvordan strikkes det?
22.02.2017 - 12:59DROPS Design answered:
Hej Kjersti. Du skal gentage beskrivelsen mellem stjernerne. Jeg kan ikke lige se hvor der staar to omgange af A.1B, saa hvis du kan uddybe? Tak
22.02.2017 - 14:27
![]() Hege Engevold wrote:
Hege Engevold wrote:
Hei :) Lurer bare på hvordan man går fram for å måle rillestrikk. Det står f.eks: "strikk 17 cm med riller". Skal jeg måle mens arbeidet ligger flatt, eller skal det strekkes ut. Vet jo at rillestrikk ofte strekker seg i lengden etter vask... Takker for svar :)
29.12.2016 - 01:28DROPS Design answered:
Hei Hege. Jeg ville holde det op naar jeg maaler - eller traekke let i det hvis du maaler fladt
30.12.2016 - 12:14
![]() Deborah wrote:
Deborah wrote:
Buonasera, grazie per il bel modello. Vorrei segnalarvi che nella traduzione italiana non sono indicati alcuni suggerimenti per il lavoro, ad esempio per le diminuzioni e per gli aumenti. Grazie ancora per il vostro impegno, cordiali saluti
26.12.2016 - 23:24DROPS Design answered:
Buongiorno Deborah. Abbiamo inserito la parte mancante. La ringraziamo per la segnalazione. Buon lavoro!
27.12.2016 - 08:38
![]() Hege Engevold wrote:
Hege Engevold wrote:
Ah... Jeg har jo lengtet etter denne her! Garn bestilt ;)
14.12.2016 - 21:18
|
||||||||||||||||
Golden Spikes |
||||||||||||||||
|
|
||||||||||||||||
Knitted jumper with garter st and lace pattern in 1 thread DROPS Cloud or 2 threads DROPS Air.
DROPS Extra 0-1355 |
||||||||||||||||
|
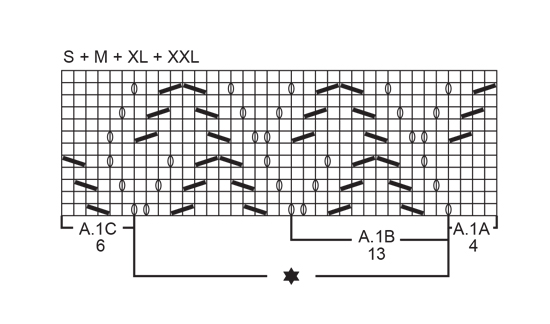
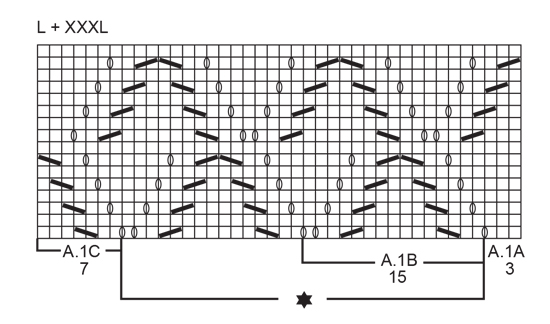
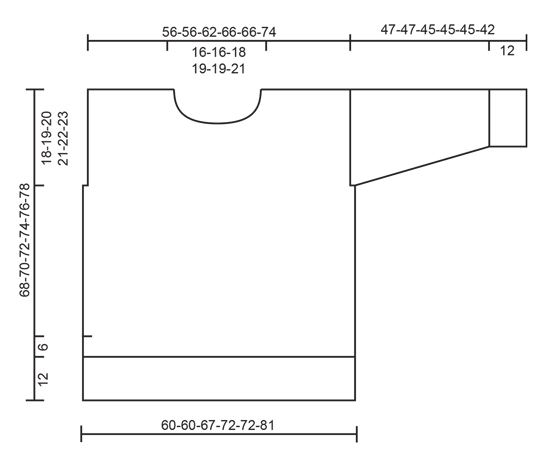
GARTER ST (back and forth): K all rows. 1 ridge = 2 rows K. DECREASE TIP: To calculate how often dec should be done, use the total no of sts on row (e.g. 79 sts) and divide sts by no of dec to be done (e.g. 13) = 6. I.e. in this example K approx. every 5th and 6th st tog. PATTERN: See diagram A.1 - NOTE: Choose diagram for correct size. The diagrams show all rows in pattern seen from RS. INCREASE TIP: Inc inside 2 edge sts in garter st in each side. Inc 1 st by making 1 YO. On next row work YO twisted to avoid holes - work inc sts in stocking st. ---------------------------------------------------------- JUMPER: Worked back and forth on circular needle in sections. BACK PIECE: Cast on 79-79-85-91-97-109 sts on circular needle size 7 mm with 1 thread Cloud or 2 threads Air. P 1 row from WS. Work next row as follows from RS: 2 edge sts in GARTER ST - see explanation above - * K 3, P 3 *, repeat from *-* until 5 sts remain and finish with K 3 and 2 edge sts in garter st. Continue rib like this until piece measures 12 cm. P 1 row from WS while dec 13-13-11-12-18-20 sts evenly - READ DECREASE TIP (continue the 2 edge sts in garter st in each side and do not dec over these sts) = 66-66-74-79-79-89 sts. Switch to circular needle size 8 mm and work next row from RS as follows: 2 edge sts in garter st, A.1A (= 4-4-3-4-4-3 sts), repeat A.1B over the next 52-52-60-65-65-75 sts (= 4-4-4-5-5-5 repetitions of 13-13-15-13-13-15 sts), work A.1C (= 6-6-7-6-6-7 sts) and finish with 2 edge sts in garter st. Continue pattern like this. REMEMBER THE KNITTING TENSION When piece measures 50-51-52-53-54-55 cm, switch to circular needle size 7 mm. Then work in garter st back and forth over all sts. AT THE SAME TIME cast off the first 2-2-3-3-3-4 sts at beg of next 2 rows for armholes = 62-62-68-73-73-81 sts. When piece measures 66-68-70-72-74-76 cm, cast off the middle 16-16-18-19-19-21 sts for neck and finish each shoulder separately. Cast off 1 st on next row from neck = 22-22-24-26-26-29 sts remain on the shoulder. Continue in garter st until piece measures 68-70-72-74-76-78 cm, and LOOSELY cast off. Repeat on the other shoulder. FRONT PIECE: Cast on and work as back piece. Switch to circular needle size 7 mm and cast off for armholes in each side as on back piece. Work in garter st until piece measures 60-62-64-65-67-69 cm. Now slip the middle 10-10-12-13-13-15 sts on 1 stitch holder for neck and finish each shoulder separately. Continue to cast off for neck at beg of every row from neck as follows: Cast off 2 sts 1 time and 1 st 2 times = 22-22-24-26-26-29 sts remain on shoulder. Continue in garter st until piece measures 68-70-72-74-76-78 cm, and LOOSELY cast off. Repeat on the other shoulder. SLEEVE: Cast on 31-31-31-31-37-37 sts on circular needle size 7 mm with 1 thread Cloud or 2 threads Air. P 1 row from WS. Work next row as follows from RS: 2 edge sts in garter st, * K 3, P 3 *, repeat from *-* until 5 sts remain on needle, finish with K 3 and 2 edge sts in garter st. Continue rib like this until piece measures 12 cm. P 1 row from WS while dec 8-6-6-5-9-9 sts evenly - READ DECREASE TIP (continue the 2 edge sts in garter st in each side and do not dec over these) = 23-25-25-26-28-28 sts. Switch to circular needle size 8 mm and work in stocking st with 2 edge st in garter st in each side. When piece measures 13 cm, inc 1 st inside 2 edge sts in garter st in each side - READ INCREASE TIP. Inc every 7th-7th-6th-5th-5th-4th row 7-7-8-9-9-10 times in total = 37-39-41-44-46-48 sts. When piece measures 45-45-42-42-42-38 cm (NOTE: Shorter measurements in the larger sizes because of wider shoulders) insert 1 marker in each side (marker should match with side on body when sleeves are sewn in). Continue until sleeve measures 47-47-45-45-45-42 cm and LOOSELY cast off. ASSEMBLY: Sew shoulder seams inside cast-off edge. Sew side seams from armholes – sew in outer loop of outermost st but stop when approx. 18 cm remain in each side (= vent). Sew sleeve seams in outer loop of outermost st and place sleeve approx. ½ cm in under edge in garter st along armhole - markers on sleeve should fit towards side on body. Fasten neatly. NECK: Pick up from RS approx. 48 to 62 sts around the neck on a short circular needle size 7 mm with 1 thread Cloud or 2 threads Air. K 1 round while inc evenly to 54-58-62-66-70-74 sts. Work rib in the round = K 2/P 2 for 4 cm. Then loosely cast off with K over K and P over P. |
||||||||||||||||
Diagram explanations |
||||||||||||||||
|
||||||||||||||||
|
||||||||||||||||
|
||||||||||||||||
|
||||||||||||||||
Have you finished this pattern?Tag your pictures with #dropspattern or submit them to the #dropsfan gallery. Do you need help with this pattern?You'll find 25 tutorial videos, a Comments/Questions area and more by visiting the pattern on garnstudio.com. © 1982-2025 DROPS Design A/S. We reserve all rights. This document, including all its sub-sections, has copyrights. Read more about what you can do with our patterns at the bottom of each pattern on our site. |
||||||||||||||||


With over 40 years in knitting and crochet design, DROPS Design offers one of the most extensive collections of free patterns on the internet - translated to 17 languages. As of today we count 314 catalogues and 11822 patterns translated into English (UK/cm).
We work hard to bring you the best knitting and crochet have to offer, inspiration and advice as well as great quality yarns at incredible prices! Would you like to use our patterns for other than personal use? You can read what you are allowed to do in the Copyright text at the bottom of all our patterns. Happy crafting!
Post a comment to pattern DROPS Extra 0-1355
We would love to hear what you have to say about this pattern!
If you want to leave a question, please make sure you select the correct category in the form below, to speed up the answering process. Required fields are marked *.