DROPS Cloud
DROPS Cloud
72% Alpaca, 21% Polyamide, 7% Wool
Discontinued
find alternatives
DROPS SS24

Winter is Coming

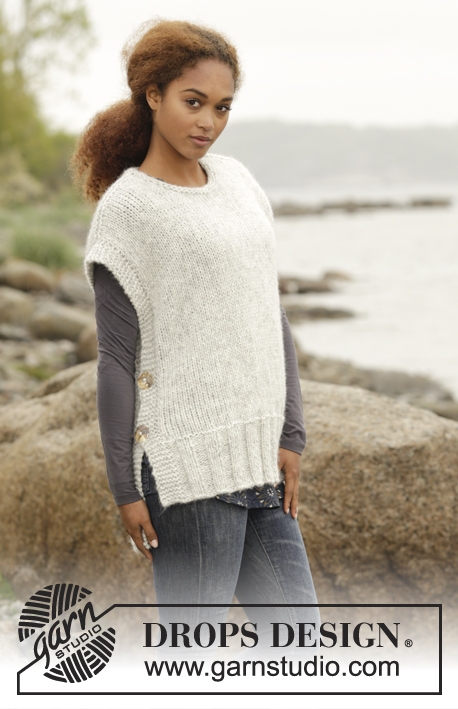
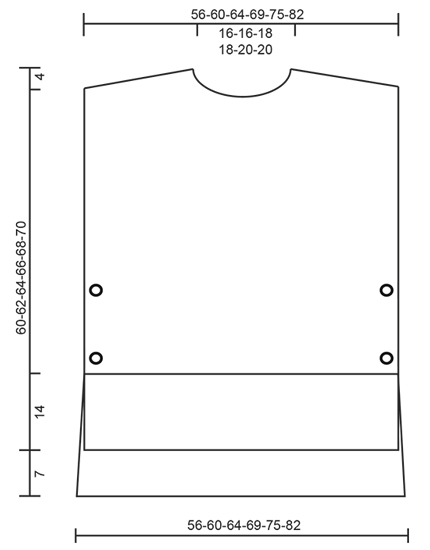
Knitted DROPS vest with vents in the side and round neck in 1 thread Cloud, 1 thread Wish or 2 threads Air. Size S-XXXL.

DROPS 173-47
DROPS design: Pattern no co-033
Yarn group E or C + C
----------------------------------------------------------
Size: S - M - L - XL - XXL - XXXL
Materials:
DROPS CLOUD from Garnstudio
450-450-500-550-600-700 g colour no 03, pearl grey

Or use:
DROPS WISH from Garnstudio
550-550-600-650-700-800 g colour no 03, light grey

Or use:
DROPS AIR from Garnstudio
500-500-550-600-650-750 g colour no 03, pearl grey

DROPS CIRCULAR NEEDLE (60 or 80 cm) SIZE 8 mm - or size needed to get 11 sts x 15 rows in stocking st with 1 thread Cloud or 1 thread Wish og 2 threads Air = 10 x 10 cm.
DROPS CIRCULAR NEEDLE (40 + 60 or 80 cm) SIZE 7 mm for rib and edge in garter st in neck - or size needed to get 12 sts x 16 rows in stocking st with 1 thread Cloud or 1 thread Wish og 2 threads Air = 10 x 10 cm.
DROPS MOTHER-OF-PEARL BUTTON ARCHED (white), NO 540: 4 pieces for all sizes

-------------------------------------------------------

Alternative Yarn – See how to change yarns here
Yarn Groups A to F – Use the same pattern and change the yarn here
Yarn usage using an alternative yarn – Use our yarn converter here

-------------------------------------------------------

DROPS Cloud
DROPS Cloud
72% Alpaca, 21% Polyamide, 7% Wool
Discontinued
find alternatives

Pattern instructions

NOTE: This pattern is written in British English. All measurements in charts are in cm. For conversion from cm to inches - click here. There are different terms for crocheting in British and American English. If this pattern includes crochet, click for "crochet terms" here. For this pattern in American English, please click here.
GARTER ST (back and forth):
K all rows. 1 ridge = 2 rows K.

DECREASE TIP:
To calculate how often dec should be done, use the total no of sts on row (e.g. 75 sts), minus edge sts (e.g. 12 sts) and divide the remaining sts by no of dec to be done (e.g. 13) = 4.8. I.e. in this example work approx. every 4th and 5th st tog (and do not dec of edge sts).

BUTTONHOLES:
Cast off for 2 buttonholes in each side on front piece. 1 buttonhole = cast off third and fourth st from edge and cast on 2 new sts on next row over these sts.
Cast off for buttonholes when piece measures 16 and 26 cm in all sizes (or desired length).
----------------------------------------------------------

VEST:
Worked back and forth on circular needle in 2 parts and sewn tog on the shoulder.

BACK PIECE:
Cast on 75-81-87-93-99-105 sts (incl 6 edge st in each side) on circular needle size 7 mm with 1 thread Cloud, 1 thread Wish or 2 threads Air. P 1 row from WS. Work next row as follows from RS: 6 edge st in GARTER ST - see explanation above - * P 3, K 3 *, repeat from *-* until 9 sts remain on needle and finish with P 3 and 6 edge sts in garter st. Continue rib like this until piece measures 21 cm. On next row from WS, switch to circular needle size 8 mm, at the same time dec 13-15-17-17-17-15 sts evenly - READ DECREASE TIP = 62-66-70-76-82-90 sts. Work in stocking st with 6 edge st in garter st in each side. REMEMBER THE KNITTING TENSION When piece measures 63-65-67-69-71-73 cm, slip the outermost sts at beg of every row in each side on 1 stitch holder for diagonal shoulder as follows (NOTE: To avoid cutting the yarn being used, work the sts before slipping them on the stitch holder): Slip 7-8-8-9-10-11 sts 2-3-2-2-3-2 times in total and 8-0-9-10-0-12 sts 1-0-1-1-0-1 time on stitch holder in each side.
AT THE SAME TIME when piece measures 65-67-69-71-73-75 cm, cast off the middle 16-16-18-18-20-20 sts for neck and finish each shoulder separately. Cast off 1 st on next row from neck. When all sts have been dec/put on a stitch holder, there are 22-24-25-28-30-34 sts on stitch holder for shoulder and back piece measures approx. 67-69-71-73-75-77 cm from the top of shoulder and down. Slip sts from stitch holder on circular needle size 7 mm. K 1 row from WS (to avoid holes in transitions where sts were slipped on stitch holder put loop between 2 sts on needle and K twisted tog with next st on needle). Then LOOSELY cast off with K from RS. Repeat on the other shoulder.

FRONT PIECE:
Cast on and work as back piece, but when rib measures 14 cm, dec evenly as on back piece (front piece is 7 cm shorter than back piece). Work as back piece but when piece measures 16 and 26 cm, dec for BUTTONHOLE in each side - see explanation above! Continue to work until piece measures 53-55-57-58-60-62 cm. Now slip the middle 10-10-12-12-14-14 sts on 1 stitch holder for neck and finish each shoulder separately. Continue to cast off for neck at beg of every row from neck as follows: Cast off 2 sts 1 time and 1 st 2 times. AT THE SAME TIME when piece measures 56-58-60-62-64-66 cm, slip sts on a stitch holder for diagonal shoulder as on back piece. When all sts have been put on a stitch holder/cast off, there are 22-24-25-28-30-34 sts on stitch holder for shoulder and front piece measures approx. 60-62-64-66-68-70 cm from the top of shoulder and down. Slip sts from stitch holder on circular needle size 7 mm and K 1 row from WS as on back piece before casting off with K from RS. Repeat on the other shoulder.

ASSEMBLY:
Sew shoulder seams inside cast-off edge - make sure the seam is not tight. Place edge in garter st with buttonholes (front piece) in one side of piece over edge in garter st on back piece and sew on buttons. Repeat in the other side.

NECK EDGE:
Pick up from RS approx. 46 to 58 around the neck (incl sts on stitch holder at the front) on a short circular needle size 7 mm with 1 thread Cloud, 1 thread Wish ig 2 threads Air. P 1 round, K 1 round and P 1 round before LOOSELY casting off with K.

This pattern has been corrected.

Updated online: 08.11.2023
Small correction after ribbing edge on both front and back pieces.

Diagram

diagram measurements

Each of our patterns has specific tutorial videos to help you.

Do you have a question? See a list of frequently asked questions (FAQ)

Knitting tension is what determines the final measurements of your work, and is usually measured per 10 x 10 cm. It is provided like so: number of stitches in width x number of rows in height - eg: 19 stitches x 26 rows = 10 x 10 cm.

The knitting tension is very individual; some people knit/crochet loosely while others work tightly. You adjust the knitting tension with the needle size, which is why the suggested needle size is only meant as a guide! You need to adjust this (up or down) to ensure that YOUR knitting tension matches the knitting tension provided in the pattern. If you work with a different knitting tension than provided you will have a different yarn consumption, and your work will have different measurements than what the pattern suggests.

The knitting tension also determines which yarns can replace each other. As long as you achieve the same knitting tension you can replace one yarn with another.

See DROPS lesson: How to measure your tension/gauge

See DROPS video: How to make a gauge tension swatch

The required amount of yarn is provided in grams, eg: 450 g. To calculate how many balls you’ll need you first need to know how many grams are in 1 ball (25g, 50g or 100g). This information is available if you click on the individual yarn quality on our pages. Divide the amount required with the amount of each ball. For example, if each ball is 50g (the most common amount), the calculation will be as follows: 450 / 50 = 9 balls.

The important thing when changing from one yarn to another is that the knitting/crochet tension remains the same. This is so that the measurements of the finished piece will be the same as on the sketch provided. It is easier to achieve the same knitting tension using yarns from the same yarn group. It is also possible to work with multiple strands of a thinner yarn to achieve the knitting tension of a thicker one. Please try our yarn converter. We recommend you to always work a test swatch.

Please NOTE: when changing yarn the garment might have a different look and feel to the garment in the photo, due to individual properties and qualities of each yarn.

See DROPS lesson: Can I use a different yarn than the one mentioned in the pattern?

All our yarns are categorised into yarn groups (from A to F) according to thickness and knitting tension – group A contains the thinnest yarns and group F the thickest. This makes it easier for you to find alternative yarns to our patterns, should you wish to switch yarn. All yarns within the same group have a similar knitting tension and can easily replace each other. However, different yarn qualities have different structures and properties which will give the finished work a unique look and feel.

Click here for an overview of the yarns in each yarn group

At the top of all our patterns you’ll find a link to our yarn calculator, which is a helpful tool should you wish to use a different yarn than suggested. By filling in the yarn quality you wish to replace, the amount (in your size) and number of strands, the calculator will present good alternative yarns with the same knitting tension. Additionally it will tell you how much you’ll require in the new qualities and whether you’ll need to work with multiple strands. Most skeins are 50g (some are 25g or 100g).

If the pattern is worked with multiple colours, every colour will have to be calculated separately. Similarly, if the pattern is worked with several strands of different yarns (for example 1 strand Alpaca and 1 strand Kid-Silk) you will have to find alternatives for each, individually.

Click here to see our yarn calculator

Since different yarns have different qualities and textures we have chosen to keep the original yarn in our patterns. However, you can easily find options among our available qualities by using our yarn calculator, or simply pick a yarn from the same yarn group.

It is possible that some retailers still have discontinued yarns in stock, or that someone has a few skeins at home that they would like to find patterns for.

The yarn calculator will provide both alternative yarn as well as required amount in the new quality.

If you think it's hard to decide what size to make, it can be a good idea to measure a garment you own already and like the size of. Then you can pick the size by comparing those measures with the ones available in the pattern's size chart.

You'll find the size chart at the bottom of the pattern.

See DROPS lesson: How to read size chart

The needle size provided in the pattern serves only as a guide, the important thing is to follow the knitting tension. And since knitting tension is very individual, you will have to adjust the needle size to ensure that YOUR tension is the same as in the pattern – maybe you’ll have to adjust 1, or even 2 needle sizes, up or down to achieve the correct tension. For this, we recommend that you work test swatches.

Should you work with a different knitting tension than the one provided, the measurements of the finished garment might deviate from the measurement sketch.

See DROPS lesson: How to measure your tension/gauge

See DROPS video: How to make a tension/gauge swatch

Working a garment top-down provides more flexibility and room for personal adjustment. For example it is easier to try the garment on while working, as well as making adjustments to length of yoke and shoulder caps.

The instructions are carefully explaining every step, in the correct order. Diagrams are adjusted to the knitting direction and are worked as usual.

The diagram depicts all rows/rounds, and every stitch seen from the right side. It is read from bottom to top, from right to left. 1 square = 1 stitch.

When working back and forth, every other row is worked from the right side and every other row is worked from the wrong side. When working from the wrong side, the diagram will have to be worked reversed: from left to right, knit stitches are purled, purl stitches are knit etc.

When working in the round every round is worked from the right side and the diagram are worked from right to left on all rounds.

See DROPS lesson: How to read knitting diagrams

The diagram depicts all rows/rounds, and every stitch seen from the right side. It is worked from bottom to top, from right to left.

When working back and forth every other row is worked from the right side: from right to left and every other row is worked from the wrong side: from left to right.

When working in the round, every row in the diagram are worked from the right side, from right to left.

When working a circular diagram you start in the middle and work your way outwards, counter clockwise, row by row.

The rows usually start with a given number of chain stitches (equivalent to the height of the following stitch), this will either be depicted in the diagram or explained in the pattern.

See DROPS lesson: How to read crochet diagrams

Instructions for working several diagrams after each other on the same row/round, will often be written like so: “work A.1, A.2, A.3 a total of 0-0-2-3-4 times". This means you work A.1 once, then A.2 is worked once, and A.3 is repeated (in width) the number of times provided for your size – in this case like so: S = 0 times, M = 0 times, L=2 times, XL= 3 times and XXL = 4 times.

The diagrams are worked as usual: begin with the first row in A.1, then work the first row in A.2 etc.

See DROPS lesson: How to read knitting diagrams

See DROPS lesson: How to read crochet diagrams

The total width of the garment (from wrist-to-wrist) will be larger in the larger sizes, despite the actual sleeves being shorter. The larger sizes have longer sleeve caps and wider shoulders, so there will be a good fit in all sizes.

The measurement sketch/schematic drawing provides information regarding the full length of the garment. If it’s a jumper or a jacket the length is measured from the highest point on the shoulder closest to the neckline, and straight down to the bottom of the garment. It is NOT measured from the tip of shoulder. Similarly, the length of yoke is measured from the highest point on the shoulder and down to where yoke is split into body and sleeves.

On a jacket measures are never taken along bands, unless specifically stated. Always measure inside band stitches when measuring the length.

See DROPS lesson: How to read a schematic drawing

Diagrams are often repeated on the round or in height. 1 repeat is the diagram the way it appears in the pattern. If it says to work 5 repeats of A.1 in the round, then you work A.1 a total of 5 times after/next to each other in the round. If it says to work 2 repeats of A.1 vertically/in height you work the entire diagram once, then begin again at the start and work the entire diagram one more time.

Chain stitches are slightly narrower than other stitches and to avoid working the cast-on edge too tight, we simply chain more stitches to begin with. The stitch count will be adjusted on the following row to fit the pattern and measurement sketch.

The rib edge is more elastic and will contract slightly compared to, for example, stocking stitch. By increasing before the rib edge, you avoid a visible difference in width between the rib edge and the rest of the body.

It’s very easy to cast off too tightly, and by making yarn overs while casting off (and simultaneously casting these off) you avoid a too tight cast off edge.

See DROPS video: How to bind off with yarn overs (yo)

To achieve an even increase (or decrease) you can increase on, for example: every 3rd and 4th row alternately, like so: work 2 rows and increase on the 3rd row, work 3 rows and increase on the 4th. Repeat this until the increase is complete.

See DROPS lesson: Increase or decrease 1 st on every 3rd and 4th row alternately

Should you prefer to work in the round instead of back and forth, you may of course adjust the pattern. You’ll need to add steeks mid-front (usually 5 stitches), and follow the instructions. When you would normally turn and work from the wrong side, simply work across the steek and continue in the round. At the end you’ll cut the piece open, pick up stitches to work bands, and cover the cut edges.

See DROPS video: How to knit steeks and cut open

Should you prefer to work back and forth instead of in the round, you may of course adjust the pattern so you work the pieces separately and then assemble them at the end. Divide the stitches for the body in 2, add 1 edge stitch in each side (for sewing) and work the front and back pieces separately.

See DROPS lesson: Can I adapt a pattern for circular needles into straight needles?

Pattern repeats can vary slightly in the different sizes, in order to get the correct proportions. If you’re not working the exact same size as the garment in the photo, yours might deviate slightly. This has been carefully developed and adjusted so that the complete impression of the garment is the same in all sizes.

Make sure to follow instructions and diagrams for your size!

If you have found a pattern you like which is available in women’s size it’s not very difficult to convert it to men’s size. The biggest difference will be the length of sleeves and body. Start working on the women size that you think would fit across the chest. The additional length will be worked right before you cast off for the armhole/sleeve cap. If the pattern is worked top-down you can add the length right after the armhole or before the first decrease on sleeve.

Regarding additional yarn amount, this will depend on how much length you add, but it is better with a skein too many than too few.

All yarns will have excess fibres (from production) that might come off as lint or shedding. Brushed yarns (ie hairier yarns) have more of these loose, excess fibres, causing more shedding.

Shedding also depends on what is worn under or over the garment, and whether this pulls at the yarn fibres. It’s therefore not possible to guarantee that there will be no shedding

Below are some tips on how to get the best result when working with hairier yarns:

1. When the garment is finished (before you wash it) shake it vigorously so the looser hairs come off. NOTE: do NOT use a lint roller, brush or any method that pulls at the yarn.

2. Place the garment in a plastic bag and put it in your freezer - the temperature will cause the fibres to become less attached to each other, and excess fibres will come off easier.

3. Leave in the freezer for a few hours before taking it out and shaking it again.

4. Wash the garment according to the instructions on the yarn label.

Pilling is a natural process that happens to even the most exclusive of fibers. It's a natural sign of wear and tear that is hard to avoid, and that is most visible in high friction areas of your garment like a sweater's arms and cuffs.

You can make your garment look as new by removing the pilling, using a fabric comb or a pill/lint remover.

Still can't find the answer you need? Then scroll down and leave your question so one of our experts can try to help you. This will be done normally within 5 to 10 working days.
In the meantime, you can read the questions and answers that others have left to this pattern or join the DROPS Workshop on Facebook to get help from fellow knitters/crocheters!

You might also like...

Post a comment to pattern DROPS 173-47

We would love to hear what you have to say about this pattern!

If you want to leave a question, please make sure you select the correct category in the form below, to speed up the answering process. Required fields are marked *.

Comments / Questions (55)

country flag Inger Englund wrote:

Jag hittar inte garnet drops clous. MVH/ Inger Englund

26.08.2022 - 08:44

DROPS Design answered:

Hei Inger. Garnet DROPS Cloud er utgått fra vårt sortiment, men du kan fint bruke 1 tråd DROPS Wish eller 2 tråder DROPS Air. mvh DROPS Design

29.08.2022 - 10:34

country flag Karin Susanne Reason wrote:

Opskrift 173-47 damevest Jeg vil bruge drops air garn og der står 2 tråde, men antal af garnnøgler, er næsten det samme, som ved brug af de andre garn, hvor der kun står 1 tråd, så er lidt forvirret.

08.04.2022 - 09:22

DROPS Design answered:

Hej Karin, jo det stemmer, når du strikker med dobbelt tråd Air, bliver løbelængden samme som når du strikker med DROPS Wish eller Cloud :)

08.04.2022 - 12:02

country flag Marianne Bergon wrote:

Bonjour, J'ai cliqué sur "imprimer". J'ai obtenu un fichier PDF incomplet. Il manque l'explication pour le devant Merci pour vos jolis modèles. Cordialement. Marianne

30.03.2022 - 14:26

DROPS Design answered:

Bonjour Mme Bergon, pensez à bien vérifier que toutes les pages sont sélectionnées lors de l'impression (même en format pdf), vous devez avoir 5 pages au total (le devant est sur la 3ème page et le schéma sur la 4ème). Bon tricot!

30.03.2022 - 15:01

country flag Carmen wrote:

Que significa " aguja circular"? Es que existe otro tipo de aguja? Gracias

10.03.2022 - 19:59

DROPS Design answered:

Hola Carmen, la aguja circular es aquella formada por dos agujas conectadas con un cable. También existen las agujas rectas, con punta por un lado y tope por el otro y las agujas de doble punta, con puntas en ambos lados.

11.03.2022 - 17:54

country flag Nicoletta wrote:

Buongiorno, ho un dubbio. Quando devo trasferire le prime maglie su un fermamaglie, ci si riferisce anche alle maglie di vivagno, o trasferisco le prime maglie successive a quelle di vivano? Grazie

21.01.2022 - 14:45

DROPS Design answered:

Buonasera Nicoletta, deve trasferire sul fermamaglie tutte le maglie indicate, comprese le maglie di vivagno. Buon lavoro!

22.01.2022 - 18:34

country flag Birgitte Pallesen wrote:

Hejsa. Kan jeg bruge DROPS Brushed Alpaca Silk til denne vest?\r\nHvis ja - hvor meget garn skal jeg så bruge? Mvh. Birgitte

12.01.2022 - 13:23

country flag Semra wrote:

Sayfanız çok güzel, istediğim modele kalıbı ile ulaşabiliyorum, üstelik hiç uğraşmadan. Teşekkür ederim

27.12.2021 - 09:54

country flag Sue wrote:

I found Air Lux at Webs. Is this ok? Thanks again.

13.12.2021 - 05:08

DROPS Design answered:

Dear Sue, sorry, we don't know this yarn, we only can recommand using one of our yarn - find the list of DROPS stores shipping to US here. Happy knitting!

13.12.2021 - 10:21

country flag Sue wrote:

Where can I find the yarn for pattern “Winter Is Coming”? Thank you.

13.12.2021 - 02:31

DROPS Design answered:

Dear Sue, The Cloud yarn is discontinued, however it can be substituted with double strands of teh Air. You can buy Air at the usual places, please find the "Sind a store tab" and search for the one closest to you. Happy Knitting.

13.12.2021 - 03:57

country flag Nicoletta Chiavinato wrote:

Buonasera, non riesco a capire come devo avviare il lavoro. Dopo aver messo le maglie sui ferri devo fare subito un giro a rovescio? Perché c'è scritto di fare un giro a rovescio sul rovescio del lavoro; non capisco... Il primo giro quindi è questo? O il primo giro lo faccio a dritto? Grazie mille

04.11.2021 - 22:38

DROPS Design answered:

Buonasera Nicoletta, il primo giro è a rovescio sul rovescio del lavoro, poi prosegue come indicato. Buon lavoro!

04.11.2021 - 23:26