DROPS Karisma
DROPS Karisma
100% Wool
from 2.30 £ /50g
Get the yarn to make this pattern from 29.90£.

The yarn cost is calculated from the pattern’s smallest size and the yarn’s cheapest product type. Looking for an even better price? You might find it on the DROPS Deals!

DROPS SS24

Ólafur

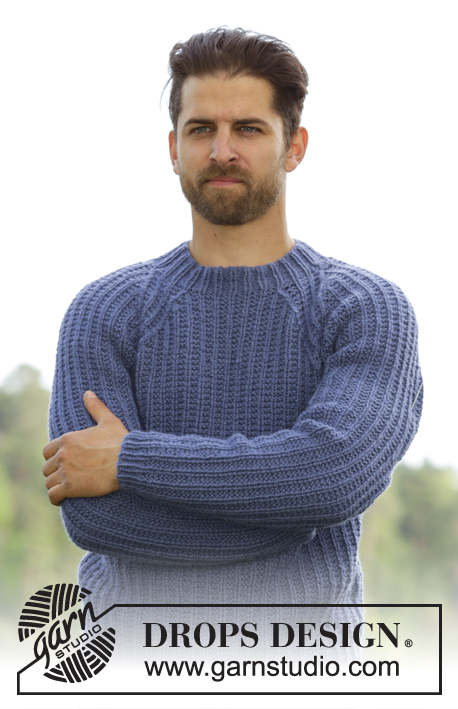
Men's knitted jumper in DROPS Karisma or DROPS Merino Extra Fine, with raglan and Norwegian pattern. Worked top down. Size: S - XXXL.

DROPS Extra 0-1146
DROPS design: Pattern no u-756
Yarn group B
----------------------------------------------------------
Size: S - M - L - XL - XXL - XXXL
Materials:
DROPS KARISMA from Garnstudio
350-400-450-500-550-600 g colour no 37, dark grey blue
150-150-200-200-200-250 g colour no 01, off white
100-100-100-100-100-150 g colour no 70, light blue grey
50-50-50-50-50-50 g colour no 48, wine red

Or use:
DROPS MERINO EXTRA FINE from Garnstudio
350-400-450-500-550-600 g colour no 20, dark blue
150-150-200-200-200-250 g colour no 01, off white
100-100-100-100-100-150 g colour no 15, light greyish green
50-50-50-50-50-50 g colour no 11, red

DROPS DOUBLE POINTED NEEDLES AND CIRCULAR NEEDLE (40 and 80 cm) SIZE 4 mm - or size needed to get 21 sts x 28 rows in stocking st = 10 x 10 cm.
DROPS DOUBLE POINTED NEEDLES and CIRCULAR NEEDLE (40 and 80 cm) SIZE 3 mm - for rib.

-------------------------------------------------------

Alternative Yarn – See how to change yarns here
Yarn Groups A to F – Use the same pattern and change the yarn here
Yarn usage using an alternative yarn – Use our yarn converter here

-------------------------------------------------------

DROPS Karisma
DROPS Karisma
100% Wool
from 2.30 £ /50g
Get the yarn to make this pattern from 29.90£.

The yarn cost is calculated from the pattern’s smallest size and the yarn’s cheapest product type. Looking for an even better price? You might find it on the DROPS Deals!

Pattern instructions

NOTE: This pattern is written in British English. All measurements in charts are in cm. For conversion from cm to inches - click here. There are different terms for crocheting in British and American English. If this pattern includes crochet, click for "crochet terms" here. For this pattern in American English, please click here.
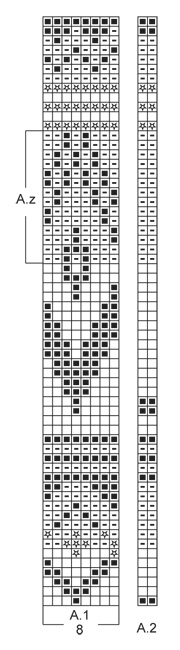
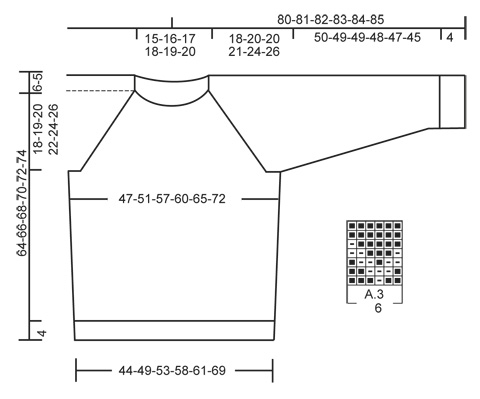
See diagrams A.1 to A.3. The diagrams are worked in stocking st.

INCREASE TIP:
Increase with YO, knit YO twisted over on next round to avoid holes.

DECREASE TIP:
Dec 1 st before marker as follows: Work until 2 sts remain before marker, slip 1 st as if to K, K 1, psso.
Dec 1 st after marker as follows: K 2 tog.
----------------------------------------------------------

JUMPER:
Worked in the round on circular needle, top down. Cast on 86-90-94-100-104-108 sts on circular needle size 3 mm with off white. K 1 round. Switch to dark grey blue Karisma / dark blue Merino Extra Fine. Then work in stocking st. Switch to off white and circular needle size 4 mm when piece measures 6 cm. Work 1 round in stocking st.

On next round, inc 26-30-34-34-44-52 sts evenly = 112-120-128-134-148-160 sts. On next round work as follows from mid back: K 16-18-18-19-24-27, insert 1st marker, K 2, insert 2nd marker, K 16-16-20-21-19-19, insert 3rd marker, K 2 (= sleeve), insert 4th marker, K 39-43-43-45-53-59, insert 5th marker (= front piece), K 2, insert 6th marker, K 16-16-20-21-19-19, insert 7th marker, K 2 (= sleeve), insert 8th marker, K 17-19-19-20-25-28.

READ ALL OF THE FOLLOWING SECTION BEFORE CONTINUING!
Work an elevation at the back of neck from mid back AT THE SAME TIME inc for raglan.
ELEVATION:
K 8 sts past marker, turn, tighten yarn and P 16 sts back, turn, tighten yarn and K 24 sts, turn, continue to work 8 sts more in stocking st for every turn until a total of 80 sts have been worked after last turn.
RAGLAN:
Inc for raglan on every row from RS as follows: Inc 1 st before 1st and 7th marker and 1 st after 2nd and 8th marker. There are 6-6-6-6-4-4 sts inc in total on back piece and 3-3-3-2-2-2 sts on each sleeve.
When elevation has been worked, there are 124-132-140-144-156-168 sts on needle. Fasten off. Now work in the round from 1st marker.

Work next round as follows: (1st marker), K 2 (2nd marker), K 19-19-23-23-21-21, (3rd marker), K 2, (= sleeve), (4th marker), K 39-43-43-45-53-59 (= front piece), (5th marker), K 2, (6th marker), K 19-19-23-23-21-21, (7th marker), K 2, (8th marker) (= sleeve), K 39-43-43-45-53-59 (= back piece).

On next round beg inc for raglan. NOTE: Inc differently on body and sleeves. REMEMBER THE KNITTING TENSION

RAGLAN BODY:
Inc before 1st and 5th marker and after 4th and 8th marker as follows - READ INCREASE TIP: Inc every round 4-8-12-10-8-10 times, then every other round 13-11-11-12-14-13 times. There are 73-81-89-89-97-105 sts on front and back piece.

RAGLAN SLEEVE:
Inc after 2nd and 6th marker and before 3rd and 7th marker as follows: Inc every other round 15-15-17-17-18-18 times in total = 53-53-61-61-61-61 sts on each sleeve.

After inc for raglan, there are 252-268-300-300-316-332 sts in total. Then work pattern as follows: A.2 (= 2 sts), A.1 (= 8 sts) 6-6-7-7-7-7 times in total, work first st in A.1 (to make it the same in both sides), A.2, A.1 9-10-11-11-12-13 times in total, work first st in A.1, A.2, A.1 6-6-7-7-7-7 times in total, work first st in A.1, A.2, A.1 9-10-11-11-12-13 times in total, work first st in A.1. Continue with pattern like this AT THE SAME TIME continue to inc for raglan as follows:

RAGLAN:
NOTE: Inc differently on body and sleeves. Work the inc sts in the pattern A.1.
RAGLAN BODY:
Inc before 1st and 5th marker and after 4th and 8th marker as follows:
Inc every other round 8-6-11-14-15-18 times, then every 4th round 1-3-0-0-0-0 times. There are 91-99-111-117-127-141 sts on front and back piece.
RAGLAN SLEEVE:
Inc after 2nd and 6th marker and before 3rd and 7th marker as follows:
Inc every other round 0-0-0-0-1-2 times, every 4th round 5-6-1-1-7-8 times and every 6th round 0-0-3-4-0-0 times. There are 63-65-69-71-77-81 sts for each sleeve.

When all inc are done there are 308-328-360-376-408-444 sts on needle. Continue with pattern as before. Work next round as follows: Slip the first 63-65-69-71-77-81 sts on a stitch holder for sleeve, cast on 8-8-8-10-10-10 sts under sleeve (insert a marker in the middle of the new sts), work 91-99-111-117-127-141 sts, slip the next 63-65-69-71-77-81 sts on a stitch holder for sleeve, cast on 8-8-8-10-10-10 sts under sleeve (insert a marker in the middle of the new sts), work 91-99-111-117-127-141 sts = 198-214-238-254-274-302 sts. Work the 8-8-8-10-10-10 new sts under each sleeve in pattern, i.e. pattern is reversed at the markers in the side. NOW MEASURE PIECE FROM HERE!

BODY:
Continue with A.1 until it has been worked 1 time vertically, then continue piece with dark grey blue Karisma / dark blue Merino Extra Fine. When piece measures 4 cm, dec 1 st on each side of markers in the side - READ DECREASE TIP (= 4 sts dec). Repeat dec every 14-30-10-14-10-14 cm 2-1-3-2-3-2 more times = 186-206-222-242-258-290 sts. When piece measures 39-40-41-41-41-41 cm (approx. 7 cm remain in total on body), K 1 round while AT THE SAME TIME dec 0-2-0-2-0-2 sts evenly = 186-204-222-240-258-288 sts. Then work A.3 (= 6 sts) 31-34-37-40-43-48 times in total in width. When A.3 has been worked 1 time vertically, continue with dark grey blue / dark blue Merino Extra Fine. On next round, dec 9-6-3-6-9-6 sts evenly = 177-198-219-234-249-282 sts. Switch to circular needle size 3 mm. Work rib = K 1/P 2. When rib measures 4 cm, K 1 round. Cast off.

SLEEVE:
Worked in the round on double pointed needles.
Slip the 63-65-69-71-77-81 sts from stitch holder back on double pointed needles size 4 mm. Cast on 8-8-8-10-10-10 new sts under sleeve, insert 1 marker in the middle of the new sts = 71-73-77-81-87-91 sts. NOW MEASURE PIECE FROM HERE! Continue with A.1 over all sts. Work the 8-8-8-10-10-10 new sts and sts from A.2 in pattern A.1, i.e. pattern is reversed at the marker. When A.1 has been work to A.z, skip A.z on sleeve and continue on first row after A.z. When piece measures 4 cm, dec 1 st on each side of marker. Repeat dec every 5½-5½-4½-4-3-2½ cm 7-7-8-9-11-12 more times = 55-57-59-61-63-65 sts. When piece measures 47-47-46-45-44-42 cm, dec 1-3-5-1-3-5 sts evenly = 54-54-54-60-60-60 sts. Approx. 7 cm remain until total length of sleeve. Work A.3 9-9-9-10-10-10 times in total in width. When A.3 has been worked 1 time vertically, continue with dark grey blue Karisma / dark blue Merino Extra Fine. K 1 round. Switch to double pointed needles size 3 mm and work rib = K 1/P 2. Cast off when piece measures 54-54-53-52-51-49 cm (shorter measurements in the larger sizes because of wider shoulders). Work the other sleeve the same way.

ASSEMBLY:
Sew the openings under the sleeves. Fold neckband double to wrong side and stitch in place loosely.

This pattern has been corrected.

Updated online: 30.01.2020
ELEVATION - RAGLAN:
Inc for raglan on every row from RS as follows: Inc 1 st before 1st and 7th marker and 1 st after 2nd and 8th marker.

Diagram

symbols = off white
symbols = dark grey blue Karisma / dark blue Merino Extra Fine
symbols = wine red Karisma / red Merino Extra Fine
symbols = light blue grey Karisma / light greyish green Merino Extra Fine
diagram
diagram

Each of our patterns has specific tutorial videos to help you.

Do you have a question? See a list of frequently asked questions (FAQ)

Knitting tension is what determines the final measurements of your work, and is usually measured per 10 x 10 cm. It is provided like so: number of stitches in width x number of rows in height - eg: 19 stitches x 26 rows = 10 x 10 cm.

The knitting tension is very individual; some people knit/crochet loosely while others work tightly. You adjust the knitting tension with the needle size, which is why the suggested needle size is only meant as a guide! You need to adjust this (up or down) to ensure that YOUR knitting tension matches the knitting tension provided in the pattern. If you work with a different knitting tension than provided you will have a different yarn consumption, and your work will have different measurements than what the pattern suggests.

The knitting tension also determines which yarns can replace each other. As long as you achieve the same knitting tension you can replace one yarn with another.

See DROPS lesson: How to measure your tension/gauge

See DROPS video: How to make a gauge tension swatch

The required amount of yarn is provided in grams, eg: 450 g. To calculate how many balls you’ll need you first need to know how many grams are in 1 ball (25g, 50g or 100g). This information is available if you click on the individual yarn quality on our pages. Divide the amount required with the amount of each ball. For example, if each ball is 50g (the most common amount), the calculation will be as follows: 450 / 50 = 9 balls.

The important thing when changing from one yarn to another is that the knitting/crochet tension remains the same. This is so that the measurements of the finished piece will be the same as on the sketch provided. It is easier to achieve the same knitting tension using yarns from the same yarn group. It is also possible to work with multiple strands of a thinner yarn to achieve the knitting tension of a thicker one. Please try our yarn converter. We recommend you to always work a test swatch.

Please NOTE: when changing yarn the garment might have a different look and feel to the garment in the photo, due to individual properties and qualities of each yarn.

See DROPS lesson: Can I use a different yarn than the one mentioned in the pattern?

All our yarns are categorised into yarn groups (from A to F) according to thickness and knitting tension – group A contains the thinnest yarns and group F the thickest. This makes it easier for you to find alternative yarns to our patterns, should you wish to switch yarn. All yarns within the same group have a similar knitting tension and can easily replace each other. However, different yarn qualities have different structures and properties which will give the finished work a unique look and feel.

Click here for an overview of the yarns in each yarn group

At the top of all our patterns you’ll find a link to our yarn calculator, which is a helpful tool should you wish to use a different yarn than suggested. By filling in the yarn quality you wish to replace, the amount (in your size) and number of strands, the calculator will present good alternative yarns with the same knitting tension. Additionally it will tell you how much you’ll require in the new qualities and whether you’ll need to work with multiple strands. Most skeins are 50g (some are 25g or 100g).

If the pattern is worked with multiple colours, every colour will have to be calculated separately. Similarly, if the pattern is worked with several strands of different yarns (for example 1 strand Alpaca and 1 strand Kid-Silk) you will have to find alternatives for each, individually.

Click here to see our yarn calculator

Since different yarns have different qualities and textures we have chosen to keep the original yarn in our patterns. However, you can easily find options among our available qualities by using our yarn calculator, or simply pick a yarn from the same yarn group.

It is possible that some retailers still have discontinued yarns in stock, or that someone has a few skeins at home that they would like to find patterns for.

The yarn calculator will provide both alternative yarn as well as required amount in the new quality.

If you think it's hard to decide what size to make, it can be a good idea to measure a garment you own already and like the size of. Then you can pick the size by comparing those measures with the ones available in the pattern's size chart.

You'll find the size chart at the bottom of the pattern.

See DROPS lesson: How to read size chart

The needle size provided in the pattern serves only as a guide, the important thing is to follow the knitting tension. And since knitting tension is very individual, you will have to adjust the needle size to ensure that YOUR tension is the same as in the pattern – maybe you’ll have to adjust 1, or even 2 needle sizes, up or down to achieve the correct tension. For this, we recommend that you work test swatches.

Should you work with a different knitting tension than the one provided, the measurements of the finished garment might deviate from the measurement sketch.

See DROPS lesson: How to measure your tension/gauge

See DROPS video: How to make a tension/gauge swatch

Working a garment top-down provides more flexibility and room for personal adjustment. For example it is easier to try the garment on while working, as well as making adjustments to length of yoke and shoulder caps.

The instructions are carefully explaining every step, in the correct order. Diagrams are adjusted to the knitting direction and are worked as usual.

The diagram depicts all rows/rounds, and every stitch seen from the right side. It is read from bottom to top, from right to left. 1 square = 1 stitch.

When working back and forth, every other row is worked from the right side and every other row is worked from the wrong side. When working from the wrong side, the diagram will have to be worked reversed: from left to right, knit stitches are purled, purl stitches are knit etc.

When working in the round every round is worked from the right side and the diagram are worked from right to left on all rounds.

See DROPS lesson: How to read knitting diagrams

The diagram depicts all rows/rounds, and every stitch seen from the right side. It is worked from bottom to top, from right to left.

When working back and forth every other row is worked from the right side: from right to left and every other row is worked from the wrong side: from left to right.

When working in the round, every row in the diagram are worked from the right side, from right to left.

When working a circular diagram you start in the middle and work your way outwards, counter clockwise, row by row.

The rows usually start with a given number of chain stitches (equivalent to the height of the following stitch), this will either be depicted in the diagram or explained in the pattern.

See DROPS lesson: How to read crochet diagrams

Instructions for working several diagrams after each other on the same row/round, will often be written like so: “work A.1, A.2, A.3 a total of 0-0-2-3-4 times". This means you work A.1 once, then A.2 is worked once, and A.3 is repeated (in width) the number of times provided for your size – in this case like so: S = 0 times, M = 0 times, L=2 times, XL= 3 times and XXL = 4 times.

The diagrams are worked as usual: begin with the first row in A.1, then work the first row in A.2 etc.

See DROPS lesson: How to read knitting diagrams

See DROPS lesson: How to read crochet diagrams

The total width of the garment (from wrist-to-wrist) will be larger in the larger sizes, despite the actual sleeves being shorter. The larger sizes have longer sleeve caps and wider shoulders, so there will be a good fit in all sizes.

The measurement sketch/schematic drawing provides information regarding the full length of the garment. If it’s a jumper or a jacket the length is measured from the highest point on the shoulder closest to the neckline, and straight down to the bottom of the garment. It is NOT measured from the tip of shoulder. Similarly, the length of yoke is measured from the highest point on the shoulder and down to where yoke is split into body and sleeves.

On a jacket measures are never taken along bands, unless specifically stated. Always measure inside band stitches when measuring the length.

See DROPS lesson: How to read a schematic drawing

Diagrams are often repeated on the round or in height. 1 repeat is the diagram the way it appears in the pattern. If it says to work 5 repeats of A.1 in the round, then you work A.1 a total of 5 times after/next to each other in the round. If it says to work 2 repeats of A.1 vertically/in height you work the entire diagram once, then begin again at the start and work the entire diagram one more time.

Chain stitches are slightly narrower than other stitches and to avoid working the cast-on edge too tight, we simply chain more stitches to begin with. The stitch count will be adjusted on the following row to fit the pattern and measurement sketch.

The rib edge is more elastic and will contract slightly compared to, for example, stocking stitch. By increasing before the rib edge, you avoid a visible difference in width between the rib edge and the rest of the body.

It’s very easy to cast off too tightly, and by making yarn overs while casting off (and simultaneously casting these off) you avoid a too tight cast off edge.

See DROPS video: How to bind off with yarn overs (yo)

To achieve an even increase (or decrease) you can increase on, for example: every 3rd and 4th row alternately, like so: work 2 rows and increase on the 3rd row, work 3 rows and increase on the 4th. Repeat this until the increase is complete.

See DROPS lesson: Increase or decrease 1 st on every 3rd and 4th row alternately

Should you prefer to work in the round instead of back and forth, you may of course adjust the pattern. You’ll need to add steeks mid-front (usually 5 stitches), and follow the instructions. When you would normally turn and work from the wrong side, simply work across the steek and continue in the round. At the end you’ll cut the piece open, pick up stitches to work bands, and cover the cut edges.

See DROPS video: How to knit steeks and cut open

Should you prefer to work back and forth instead of in the round, you may of course adjust the pattern so you work the pieces separately and then assemble them at the end. Divide the stitches for the body in 2, add 1 edge stitch in each side (for sewing) and work the front and back pieces separately.

See DROPS lesson: Can I adapt a pattern for circular needles into straight needles?

Pattern repeats can vary slightly in the different sizes, in order to get the correct proportions. If you’re not working the exact same size as the garment in the photo, yours might deviate slightly. This has been carefully developed and adjusted so that the complete impression of the garment is the same in all sizes.

Make sure to follow instructions and diagrams for your size!

If you have found a pattern you like which is available in women’s size it’s not very difficult to convert it to men’s size. The biggest difference will be the length of sleeves and body. Start working on the women size that you think would fit across the chest. The additional length will be worked right before you cast off for the armhole/sleeve cap. If the pattern is worked top-down you can add the length right after the armhole or before the first decrease on sleeve.

Regarding additional yarn amount, this will depend on how much length you add, but it is better with a skein too many than too few.

All yarns will have excess fibres (from production) that might come off as lint or shedding. Brushed yarns (ie hairier yarns) have more of these loose, excess fibres, causing more shedding.

Shedding also depends on what is worn under or over the garment, and whether this pulls at the yarn fibres. It’s therefore not possible to guarantee that there will be no shedding

Below are some tips on how to get the best result when working with hairier yarns:

1. When the garment is finished (before you wash it) shake it vigorously so the looser hairs come off. NOTE: do NOT use a lint roller, brush or any method that pulls at the yarn.

2. Place the garment in a plastic bag and put it in your freezer - the temperature will cause the fibres to become less attached to each other, and excess fibres will come off easier.

3. Leave in the freezer for a few hours before taking it out and shaking it again.

4. Wash the garment according to the instructions on the yarn label.

Pilling is a natural process that happens to even the most exclusive of fibers. It's a natural sign of wear and tear that is hard to avoid, and that is most visible in high friction areas of your garment like a sweater's arms and cuffs.

You can make your garment look as new by removing the pilling, using a fabric comb or a pill/lint remover.

Still can't find the answer you need? Then scroll down and leave your question so one of our experts can try to help you. This will be done normally within 5 to 10 working days.
In the meantime, you can read the questions and answers that others have left to this pattern or join the DROPS Workshop on Facebook to get help from fellow knitters/crocheters!

You might also like...

Ólafur

Titta, Finland

Sweater for lillebror

Annika, Germany

Ólafur jumper

@fantantisch, Germany

Post a comment to pattern DROPS Extra 0-1146

We would love to hear what you have to say about this pattern!

If you want to leave a question, please make sure you select the correct category in the form below, to speed up the answering process. Required fields are marked *.

Comments / Questions (120)

country flag Anneliese Mühlbauer wrote:

In Ihrer Beschreibung heißt es u.a. "A2 (=2 M) 1x, A1 (=8 M9 7X, dann die erste Masche von A 1". Wie soll ich das verstehen?

08.02.2021 - 05:07

DROPS Design answered:

Liebe Frau Mühlbauer, Die Runden beginnen Sie mit die 2 Maschen wie in A.2 (= Raglanmaschen) gezeigt, dann wiederholen Sie die 8 Maschen in A.1, und dann stricken Sie die 1. Masche in A.1 damit das Muster symetrisch wird (= das Diagram beginnt und endet mit der selben Masche). Hoffentlich kann es Ihnen helfen. Viel Spaß beim stricken!

08.02.2021 - 11:02

country flag Elisabeth Horn wrote:

Jeg strikker L . Før mønstret påbegyndes står der , at der nu er 89 på hvert ryg-/forstykke samt 61 på hvert ærme ialt 300 m på pinden. Jeg har 308 m. Tidligere har I svaret en svensk bruger , at raglan maskerne indgår i ærmerne?? Det kan jo ikke passe med det jeg beskriver ovenfor. Jeg er helt forvirret. Hvad skal jeg gå ud fra ? For intet passer !! Jeg er meget øvet og rutineret strikker, og synes desværre opskriften er meget uoverskuelig!

25.01.2021 - 18:13

DROPS Design answered:

Hej Elisabeth, det lyder til at du kan taget ud en gang for meget på både ryg, forstykke og ærmer. Du starter med 140 masker. Forstykke/ryg 43+43+(4x12=48)+(4x11=44)= 178/2=89 m Ærme 140-86=54/2=27+(17x2=34)=61 Totalt 89+89+61+161= 300 masker

03.02.2021 - 10:59

country flag Eva wrote:

Hello, about the elevation/increases. I’ve finish this part, on one side of the sleeve, however, I have 19 stitches left and on the second sleeve I got 17. I’m pretty sure I’ve followed the instructions and it is not the first elevation/raglan increase jumper I’ve knitted. Where did I go wrong please? I tried to draw it down, still I can count on one side two more increases. If I K8 then turn and K16, I’ll be one stitch more than where I started, is that correct? Please help. Thank you

13.01.2021 - 10:57

DROPS Design answered:

Dear Eva, you should have worked the same number of stitches on each side of piece, when you work K8 from RS after marker, and work P16 from WS you are working P8 before marker + P8 after marker = the same number of sts on each side of marker. And then you always work 8 more sts before turning, so again same number of sts on each side should be worked after each P row. Hope this helps, happy knitting!

13.01.2021 - 12:36

country flag Pete Constantinou wrote:

Thanks. So should I make the final increases around markers 7 and 8 on my last short row of 80 stitches worked from the wrong side?

11.01.2021 - 15:28

DROPS Design answered:

Dear Mrs Constantinou, the increases on raglan when you work short rows for elevation are only worked on the RS rows, not on the WS rows - but the last row of the elevation will be worked over 80 sts from WS. Hope this helps. Happy knitting!

11.01.2021 - 16:48

country flag Pete Constantinou wrote:

Hi, looking forward to knitting this. RE: increases for the raglan/elevation section (male L size). If I understand correctly, I will work 10 short rows (K8, P16, K24, P32, K40 (with increase either side of markers 1 and 2), P48, K56 (with increase either side of markers 7 and 8 and 1 and 2... etc)). This means after the final turn I will P80 on WS and won't have done the final increases around markers 7 and 8. Do I knit back to the middle of back piece (and do increases)? What do I fasten off?

08.01.2021 - 17:39

DROPS Design answered:

Dear Mr Constantinou, last row of short rows on elevation will be worked from WS over 80 sts, cut the yarn at the end of this row. Join yarn working now from the right side and from 1st marker (before the 2 raglan stitches) and continue in the round; Happy knitting!

11.01.2021 - 07:09

country flag Silvia wrote:

Si li ho contati e ne risultano 10 di aumenti e non 12 come fate capire voi che debba risultare; perchè se io ho 120 punti sui ferri e mi dite che alla fine ne devo avere 132 vuol dire che in totale devono uscirmi 12 aumenti ma invece ne vengono 10.Voi percaso non avete a disposizione un disegnino per poter affrontare questa parte dell'alzata sul coppino in contemporanea agli aumenti raglan? grazie mille

23.11.2020 - 08:57

DROPS Design answered:

Buonasera Silvia, ci sono 6 aumenti sul dietro e 3 aumenti per manica per un totale di 12 aumenti, quindi da 120 si passa a 132. Buon lavoro!

25.11.2020 - 23:04

country flag Silvia wrote:

Alzate/Raglan;lavoro in ferri di andata e ritorno con 8 maglie, poi 16, poi 24 ecc; se aumento solo nei ferri di andata prima del 1° e 7° marcapunto e dopo il 2° ed 8° marcapunto, vuol dire che faccio 2 aumenti al 5° ferro, poi 4 aumenti al 7° ferro e 4° aumenti al 9° ferro per un totale di 10 aumenti; in questo modo arrivo a 130 punti e non 132 come indicato nel pattern. Dove sbaglio?

18.11.2020 - 15:42

DROPS Design answered:

Buonasera Silvia, ha contato gli aumenti per il raglan nelle maglie che deve lavorare per l'alzata? Buon lavoro!

20.11.2020 - 21:17

country flag Dror wrote:

Elevation + Raglan: row 1: k8 row 2: p16 row 3: k24 row 4: p32 when I get to row5: k40, that is the first inc. do i count these inc. as worked stitches for the k40? or do they not count? should I basically do - k26, m1, k2, m1, k12? (26+2+12=40. m1 do not count) or k26, m1, k2, m1, k10 (26+1+2+1+10 = 40. m1 DO count)

18.11.2020 - 08:17

DROPS Design answered:

Dear Mrs Dror, yes the increases for raglan are counted into the number of stitches worked for the elevation. Happy knitting!

19.11.2020 - 09:57

country flag Ingrid Nordqvist Johansson wrote:

Har snart stickat fram och bakstycke klart men blir frustrerad när jag kommer längst ner på fram- och bakstycket. Då står det "[minska till] 186-204-222-240-258-288 m. Sedan stickas A.3 [...]. På nästa v ***ökas*** det 9-6-3-6-9-6 m jämnt fördelat = 177-198-219-234-249-282 m." Ska det inte stå minskas och inte ökas? Eller =195-210-225-246-267-294???? Detta borde verkligen ha rättats till eftersom mönstret har funnits några år.....

17.11.2020 - 14:05

DROPS Design answered:

Hej Ingrid. Du har rätt, det ska stå minskas. Vi ska rätta detta, tack för info! Mvh DROPS Design

20.11.2020 - 13:33

country flag Hennie wrote:

Hallo , Klopt het patroon bij de opzet wel. Ik lees opzetten met naturel 1 nld recht breien dan verder met blauw in tricotsteek. Moet het geen boordsteek zijn? Het lijkt mij een blauw boordje bij de hals. Gr, Hennie

19.10.2020 - 19:22

DROPS Design answered:

Dag Hennie,

De boord wordt inderdaad ook met recht gebreid in dit patroon, maar natuurlijk kun je ook kiezen voor boordsteek als je dat mooier vindt.

18.11.2020 - 18:04