DROPS Cotton Merino
DROPS Cotton Merino
50% Wool, 50% Cotton
from 3.55 £ /50g
Get the yarn to make this pattern from 35.50£.

The yarn cost is calculated from the pattern’s smallest size and the yarn’s cheapest product type. Looking for an even better price? You might find it on the DROPS Deals!

DROPS Super Sale

Toulouse

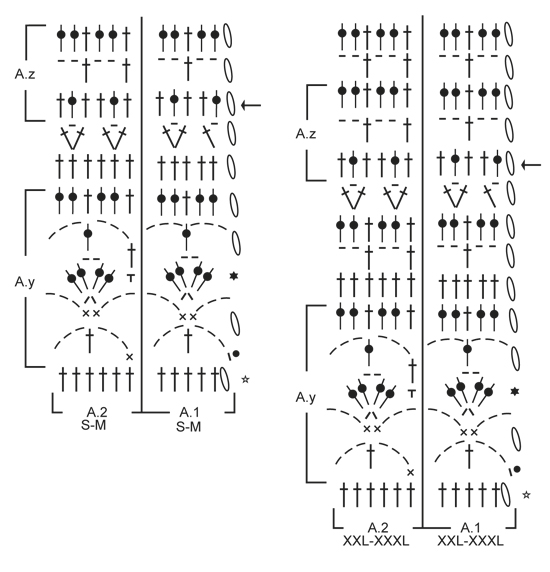
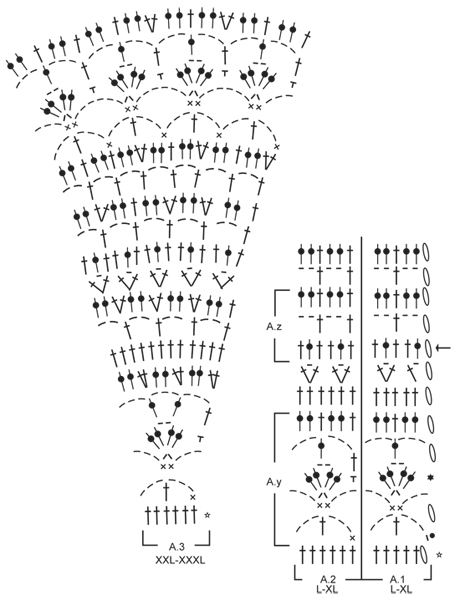
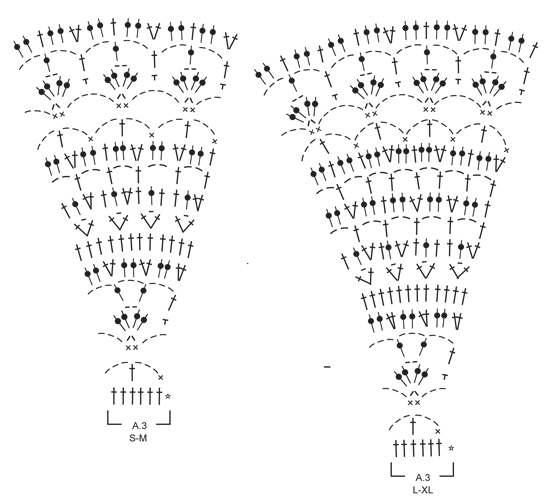
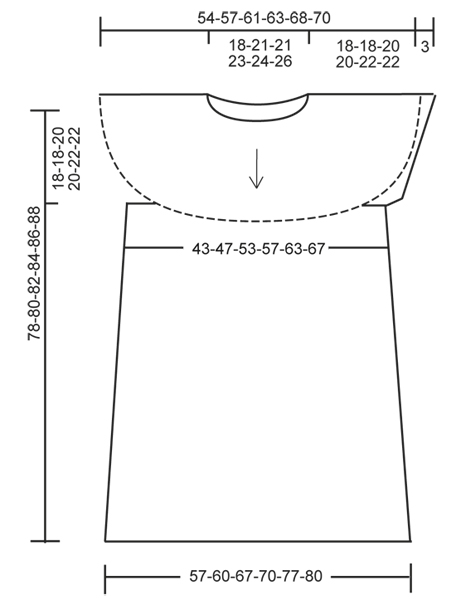
Crochet DROPS dress with lace pattern and round yoke, worked top down in ”Cotton Merino”. Size: S - XXXL.

DROPS 165-36
DROPS design: Pattern no cm-035
Yarn group B
----------------------------------------------------------
Size: S - M - L - XL - XXL - XXXL
Materials:
DROPS COTTON MERINO from Garnstudio
500-550-650-700-750-850 g colour no 23, lavender

DROPS CROCHET HOOK SIZE 4 mm – or size needed to get 18 tr x 9 rounds = 10 x 10 cm.

-------------------------------------------------------

Alternative Yarn – See how to change yarns here
Yarn Groups A to F – Use the same pattern and change the yarn here
Yarn usage using an alternative yarn – Use our yarn converter here

-------------------------------------------------------

DROPS Cotton Merino
DROPS Cotton Merino
50% Wool, 50% Cotton
from 3.55 £ /50g
Get the yarn to make this pattern from 35.50£.

The yarn cost is calculated from the pattern’s smallest size and the yarn’s cheapest product type. Looking for an even better price? You might find it on the DROPS Deals!

DROPS Super Sale

SAVE 30% on 6 cotton favourites!
Valid until 12.04.2024

Pattern instructions

NOTE: This pattern is written in British English. All measurements in charts are in cm. For conversion from cm to inches - click here. There are different terms for crocheting in British and American English. If this pattern includes crochet, click for "crochet terms" here. For this pattern in American English, please click here.
CROCHET INFO:
On every tr round, replace first tr with 3 ch and finish round with 1 sl st in first 3rd ch from beg of round.

INCREASE TIP:
Inc 1 tr by working 2 tr in 1 tr.

PATTERN:
See diagrams A.1 to A.3. Choose diagram for correct size. A.1 shows how pattern beg and ends.
----------------------------------------------------------

YOKE:
Worked in the round, top down, beg mid back. Work 128-138-138-163-168-173 ch on hook size 4 mm with Cotton Merino and form a ring with 1 sl st in first ch. Work next round as follows: Work 3 ch (= 1 tr) - READ CROCHET INFO, 1 tr in first ch from ch-ring, 1 tr in each of the next 2 ch, * skip 1 ch, 1 tr in each of the next 4 ch *, repeat from *-* the entire round, finish with 1 sl st in 3rd ch at beg of round = 104-112-112-132-136-140 tr. On next round, inc 16-20-20-24-44-52 tr evenly - READ INCREASE TIP = 120-132-132-156-180-192 tr.

Continue to work as follows: Work A.1 over the first 6 tr, A.2 over the next 12-12-12-18-24-24 tr (= 2-2-2-3-4-4 times in total), A.3 over the next 12 tr (= 2 times in total), A.2 over the next 6-6-6-12-12-12 tr (= 1-1-1-2-2-2 times), A.3 over the next 12 tr (= 2 times), A.2 over the next 30-36-36-42-54-60 tr (= 5-6-6-7-9-10 times), A.3 over the next 12 tr (= 2 times), A.2 over the next 6-6-6-12-12-12 tr (= 1-1-1-2-2-2 times), A.3 over the next 12 tr (= 2 times), A.2 over the last 12-18-18-18-24-30 tr (= 2-3-3-3-4-5 times). NOTE: In size S+XL+XXL beg round a little towards one side so that pattern fits. Continue pattern like this. REMEMBER THE CROCHET TENSION! When A.1/A.2 have been worked 1 time vertically, repeat them upwards.

When A.3 has been worked 1 time vertically, there are 240-252-292-316-340-352 tr on round. Piece measures approx. 18-18-20-20-22-22 cm (measured from neck edge).

Now work as follows (= 6th round in A.1/A.2): Work 1 tr in each of the first 39-39-44-50-56-56 tr (= half back piece), work 6-6-8-8-8-8 ch, skip 48-48-58-64-64-64 tr (= armhole), work 1 tr in each of the next 72-78-88-94-106-112 tr (= front piece), work 6-6-8-8-8-8 ch, skip 48-48-58-64-64-64 tr (= armhole), work 1 tr in each of the last 33-39-44-44-50-56 tr = 144-156-176-188-212-224 tr and 6-6-8-8-8-8 ch in each side of piece (= 156-168-192-204-228-240 sts in total). Insert 1 marker in piece, NOW MEASURE PIECE FROM HERE.

BODY:
Work next round as follows (= 7th round in A.1/A.2): Work A.1 1 time, then work A.2 over the remaining 150-162-186-198-222-234 tr/ch (= 25-27-31-33-37-39 times in total in width). Continue working the pattern vertically. AT THE SAME TIME on round with arrow in diagram inc 12 tr evenly (i.e. work 2 tr in every 13th-14th-16th-17th-19th-20th tr) = 168-180-204-216-240-252 tr. Repeat A.2 2 times more in width. Repeat inc every 10 cm, adjust to inc on a round with tr, 3 more times = 204-216-240-252-276-288 tr. For every inc, repeat A.2 2 times more in width. After last inc, repeat A.2 33-35-39-41-45-47 times in total in width. When piece measures approx. 44-46-46-48-48-50 cm (from marker) – adjust so that last round is a round with tr, work A.y 3 times in total vertically. Then work A.z 1 time vertically. Piece measures approx. 78-80-82-84-86-88 cm in total from neck edge. Fasten off.

SLEEVE EDGE:
Worked in the round. Beg mid under sleeve. Work 1 sl st in 4th ch mid under sleeve, 3 ch, 1 tr in each of the next 2-2-4-4-4-4 ch, 1 tr in each of the 48-48-58-64-64-64 tr for sleeve AT THE SAME TIME dec 6-6-4-4-0-0 tr evenly and 1 tr in each of the last 3 ch cast on under sleeve = 48-48-62-68-72-72 tr. Work 2 rounds with 1 tr in every tr. Fasten off. Work a sleeve edge on the other sleeve.

Diagram

symbols = ch
symbols = sl st
symbols = dc in st
symbols = dc around ch
symbols = tr in st
symbols = tr around ch
symbols = beg round with 4 ch and finish with 1 sl st in 4th ch
symbols = beg round with 3 ch and finish with 1 sl st in 3rd ch
symbols = first round is explained in pattern
symbols = crochet direction
diagram
diagram
diagram
diagram
Do you have a question? See a list of frequently asked questions (FAQ)

Knitting tension is what determines the final measurements of your work, and is usually measured per 10 x 10 cm. It is provided like so: number of stitches in width x number of rows in height - eg: 19 stitches x 26 rows = 10 x 10 cm.

The knitting tension is very individual; some people knit/crochet loosely while others work tightly. You adjust the knitting tension with the needle size, which is why the suggested needle size is only meant as a guide! You need to adjust this (up or down) to ensure that YOUR knitting tension matches the knitting tension provided in the pattern. If you work with a different knitting tension than provided you will have a different yarn consumption, and your work will have different measurements than what the pattern suggests.

The knitting tension also determines which yarns can replace each other. As long as you achieve the same knitting tension you can replace one yarn with another.

See DROPS lesson: How to measure your tension/gauge

See DROPS video: How to make a gauge tension swatch

The required amount of yarn is provided in grams, eg: 450 g. To calculate how many balls you’ll need you first need to know how many grams are in 1 ball (25g, 50g or 100g). This information is available if you click on the individual yarn quality on our pages. Divide the amount required with the amount of each ball. For example, if each ball is 50g (the most common amount), the calculation will be as follows: 450 / 50 = 9 balls.

The important thing when changing from one yarn to another is that the knitting/crochet tension remains the same. This is so that the measurements of the finished piece will be the same as on the sketch provided. It is easier to achieve the same knitting tension using yarns from the same yarn group. It is also possible to work with multiple strands of a thinner yarn to achieve the knitting tension of a thicker one. Please try our yarn converter. We recommend you to always work a test swatch.

Please NOTE: when changing yarn the garment might have a different look and feel to the garment in the photo, due to individual properties and qualities of each yarn.

See DROPS lesson: Can I use a different yarn than the one mentioned in the pattern?

All our yarns are categorised into yarn groups (from A to F) according to thickness and knitting tension – group A contains the thinnest yarns and group F the thickest. This makes it easier for you to find alternative yarns to our patterns, should you wish to switch yarn. All yarns within the same group have a similar knitting tension and can easily replace each other. However, different yarn qualities have different structures and properties which will give the finished work a unique look and feel.

Click here for an overview of the yarns in each yarn group

At the top of all our patterns you’ll find a link to our yarn calculator, which is a helpful tool should you wish to use a different yarn than suggested. By filling in the yarn quality you wish to replace, the amount (in your size) and number of strands, the calculator will present good alternative yarns with the same knitting tension. Additionally it will tell you how much you’ll require in the new qualities and whether you’ll need to work with multiple strands. Most skeins are 50g (some are 25g or 100g).

If the pattern is worked with multiple colours, every colour will have to be calculated separately. Similarly, if the pattern is worked with several strands of different yarns (for example 1 strand Alpaca and 1 strand Kid-Silk) you will have to find alternatives for each, individually.

Click here to see our yarn calculator

Since different yarns have different qualities and textures we have chosen to keep the original yarn in our patterns. However, you can easily find options among our available qualities by using our yarn calculator, or simply pick a yarn from the same yarn group.

It is possible that some retailers still have discontinued yarns in stock, or that someone has a few skeins at home that they would like to find patterns for.

The yarn calculator will provide both alternative yarn as well as required amount in the new quality.

If you think it's hard to decide what size to make, it can be a good idea to measure a garment you own already and like the size of. Then you can pick the size by comparing those measures with the ones available in the pattern's size chart.

You'll find the size chart at the bottom of the pattern.

See DROPS lesson: How to read size chart

The needle size provided in the pattern serves only as a guide, the important thing is to follow the knitting tension. And since knitting tension is very individual, you will have to adjust the needle size to ensure that YOUR tension is the same as in the pattern – maybe you’ll have to adjust 1, or even 2 needle sizes, up or down to achieve the correct tension. For this, we recommend that you work test swatches.

Should you work with a different knitting tension than the one provided, the measurements of the finished garment might deviate from the measurement sketch.

See DROPS lesson: How to measure your tension/gauge

See DROPS video: How to make a tension/gauge swatch

Working a garment top-down provides more flexibility and room for personal adjustment. For example it is easier to try the garment on while working, as well as making adjustments to length of yoke and shoulder caps.

The instructions are carefully explaining every step, in the correct order. Diagrams are adjusted to the knitting direction and are worked as usual.

The diagram depicts all rows/rounds, and every stitch seen from the right side. It is read from bottom to top, from right to left. 1 square = 1 stitch.

When working back and forth, every other row is worked from the right side and every other row is worked from the wrong side. When working from the wrong side, the diagram will have to be worked reversed: from left to right, knit stitches are purled, purl stitches are knit etc.

When working in the round every round is worked from the right side and the diagram are worked from right to left on all rounds.

See DROPS lesson: How to read knitting diagrams

The diagram depicts all rows/rounds, and every stitch seen from the right side. It is worked from bottom to top, from right to left.

When working back and forth every other row is worked from the right side: from right to left and every other row is worked from the wrong side: from left to right.

When working in the round, every row in the diagram are worked from the right side, from right to left.

When working a circular diagram you start in the middle and work your way outwards, counter clockwise, row by row.

The rows usually start with a given number of chain stitches (equivalent to the height of the following stitch), this will either be depicted in the diagram or explained in the pattern.

See DROPS lesson: How to read crochet diagrams

Instructions for working several diagrams after each other on the same row/round, will often be written like so: “work A.1, A.2, A.3 a total of 0-0-2-3-4 times". This means you work A.1 once, then A.2 is worked once, and A.3 is repeated (in width) the number of times provided for your size – in this case like so: S = 0 times, M = 0 times, L=2 times, XL= 3 times and XXL = 4 times.

The diagrams are worked as usual: begin with the first row in A.1, then work the first row in A.2 etc.

See DROPS lesson: How to read knitting diagrams

See DROPS lesson: How to read crochet diagrams

The total width of the garment (from wrist-to-wrist) will be larger in the larger sizes, despite the actual sleeves being shorter. The larger sizes have longer sleeve caps and wider shoulders, so there will be a good fit in all sizes.

The measurement sketch/schematic drawing provides information regarding the full length of the garment. If it’s a jumper or a jacket the length is measured from the highest point on the shoulder closest to the neckline, and straight down to the bottom of the garment. It is NOT measured from the tip of shoulder. Similarly, the length of yoke is measured from the highest point on the shoulder and down to where yoke is split into body and sleeves.

On a jacket measures are never taken along bands, unless specifically stated. Always measure inside band stitches when measuring the length.

See DROPS lesson: How to read a schematic drawing

Diagrams are often repeated on the round or in height. 1 repeat is the diagram the way it appears in the pattern. If it says to work 5 repeats of A.1 in the round, then you work A.1 a total of 5 times after/next to each other in the round. If it says to work 2 repeats of A.1 vertically/in height you work the entire diagram once, then begin again at the start and work the entire diagram one more time.

Chain stitches are slightly narrower than other stitches and to avoid working the cast-on edge too tight, we simply chain more stitches to begin with. The stitch count will be adjusted on the following row to fit the pattern and measurement sketch.

The rib edge is more elastic and will contract slightly compared to, for example, stocking stitch. By increasing before the rib edge, you avoid a visible difference in width between the rib edge and the rest of the body.

It’s very easy to cast off too tightly, and by making yarn overs while casting off (and simultaneously casting these off) you avoid a too tight cast off edge.

See DROPS video: How to bind off with yarn overs (yo)

To achieve an even increase (or decrease) you can increase on, for example: every 3rd and 4th row alternately, like so: work 2 rows and increase on the 3rd row, work 3 rows and increase on the 4th. Repeat this until the increase is complete.

See DROPS lesson: Increase or decrease 1 st on every 3rd and 4th row alternately

Should you prefer to work in the round instead of back and forth, you may of course adjust the pattern. You’ll need to add steeks mid-front (usually 5 stitches), and follow the instructions. When you would normally turn and work from the wrong side, simply work across the steek and continue in the round. At the end you’ll cut the piece open, pick up stitches to work bands, and cover the cut edges.

See DROPS video: How to knit steeks and cut open

Should you prefer to work back and forth instead of in the round, you may of course adjust the pattern so you work the pieces separately and then assemble them at the end. Divide the stitches for the body in 2, add 1 edge stitch in each side (for sewing) and work the front and back pieces separately.

See DROPS lesson: Can I adapt a pattern for circular needles into straight needles?

Pattern repeats can vary slightly in the different sizes, in order to get the correct proportions. If you’re not working the exact same size as the garment in the photo, yours might deviate slightly. This has been carefully developed and adjusted so that the complete impression of the garment is the same in all sizes.

Make sure to follow instructions and diagrams for your size!

If you have found a pattern you like which is available in women’s size it’s not very difficult to convert it to men’s size. The biggest difference will be the length of sleeves and body. Start working on the women size that you think would fit across the chest. The additional length will be worked right before you cast off for the armhole/sleeve cap. If the pattern is worked top-down you can add the length right after the armhole or before the first decrease on sleeve.

Regarding additional yarn amount, this will depend on how much length you add, but it is better with a skein too many than too few.

All yarns will have excess fibres (from production) that might come off as lint or shedding. Brushed yarns (ie hairier yarns) have more of these loose, excess fibres, causing more shedding.

Shedding also depends on what is worn under or over the garment, and whether this pulls at the yarn fibres. It’s therefore not possible to guarantee that there will be no shedding

Below are some tips on how to get the best result when working with hairier yarns:

1. When the garment is finished (before you wash it) shake it vigorously so the looser hairs come off. NOTE: do NOT use a lint roller, brush or any method that pulls at the yarn.

2. Place the garment in a plastic bag and put it in your freezer - the temperature will cause the fibres to become less attached to each other, and excess fibres will come off easier.

3. Leave in the freezer for a few hours before taking it out and shaking it again.

4. Wash the garment according to the instructions on the yarn label.

Pilling is a natural process that happens to even the most exclusive of fibers. It's a natural sign of wear and tear that is hard to avoid, and that is most visible in high friction areas of your garment like a sweater's arms and cuffs.

You can make your garment look as new by removing the pilling, using a fabric comb or a pill/lint remover.

Still can't find the answer you need? Then scroll down and leave your question so one of our experts can try to help you. This will be done normally within 5 to 10 working days.
In the meantime, you can read the questions and answers that others have left to this pattern or join the DROPS Workshop on Facebook to get help from fellow knitters/crocheters!

You might also like...

Post a comment to pattern DROPS 165-36

We would love to hear what you have to say about this pattern!

If you want to leave a question, please make sure you select the correct category in the form below, to speed up the answering process. Required fields are marked *.

Comments / Questions (33)

country flag Anette Schwarz wrote:

Hallo liebes Drops- Team, Wie kommt es, dass ich für die Anleitung für dieses Kleid auf einer anderen Webseite 3€ bezahlen muss? Lg

11.07.2023 - 11:08

DROPS Design answered:

Liebe Anette, Alle unsere Modelle sind kostenlos auf unserer Website verfügbar. Sie können sie hier einsehen und als PDF herunterladen. Viele Spass beim häkeln!

27.07.2023 - 10:06

country flag Ute Wilson-Oertel wrote:

Hi, the size is XL . The pattern A3 confuses me, I do not know how to proceed or how it repeats itself . It would help me, if I knew how the pattern is continuing. Thanks a lot

27.02.2023 - 10:43

DROPS Design answered:

Dear Mrs Wilson-Oertel, you just have to work all diagrams at the same time in this order: A.1 over the first 6 tr, A.2 over the next 18 tr (= 3 times in total), A.3 over the next 12 tr (= 2 times in total), A.2 over the next 12 tr (= 2 times), A.3 over the next 12 tr (= 2 times), A.2 over the next 42 tr (= 7 times), A.3 over the next 12 tr (= 2 times), A.2 over the next 12 tr (= 2 times), A.3 over the next 12 tr (= 2 times), A.2 over the last 18 tr (= 3 times) = 156 trebles. Then work 2nd row all diagrams, 3rd row all diagrams etc... You should increase only in A.3 - insert markers between diagrams/repeats can help you tracking the number of sts. Can this help?

27.02.2023 - 11:25

country flag Ute Wilson-Oertel wrote:

Hallo, A3 habe ich Probleme. Bei den Reihen mit den Stäbchen, weiß ich nicht wie es danach weiter geht, da es abgehackt ist und ich nicht weiß, ob der Anfang mitgezählt wird. Eine Reihe beginnt mit 5 Stäbchen ,dann werden am Ende 8 Stäbchen angezeigt und dann? Wie fahre ich weiter? Danke

26.02.2023 - 13:19

country flag Ute Wilson-Oertel wrote:

Hallo, A3 habe ich Probleme. Bei den Reihen mit den Stäbchen, weiß ich nicht wie es danach weiter geht, da es abgehackt ist und ich nicht weiß, ob der Anfang mitgezählt wird. Z.B. Reihe 13 beginnt mit 5 Stäbchen ,dann werden am Ende 8 Stäbchen angezeigt und dann? Wie fahre ich weiter? Danke

26.02.2023 - 13:18

DROPS Design answered:

Liebe Frau Wilson-Oertel, können Sie uns bitte mitteilen, welche Größe Sie häkeln? Da es sind 3 verschieden A.3, würde es uns helfen, Ihnen dann weiterzuhelfen. Danke im voraus für Ihr Verständnis.

27.02.2023 - 10:28

country flag Tracey wrote:

I completed 3 rd row now. So now it asking when a1 a2 have been worked 1 time vertically repeat them upwards. So do I do a1 row then a2. Then a1 then a2. Or just go up on a2 chart thanks.

29.11.2019 - 14:40

DROPS Design answered:

Dear Tracey, you continue working the same diagrams as for previous round, ie A.1, A.2, A.3 , etc... in the same order as before, working each row in each diagram. You are increasing stitches in A.3, while the number of stitches in A.1 and A.2 will remain the same. Happy crocheting!

29.11.2019 - 15:48

country flag Tracey wrote:

Hi I have done 1 row as 4 tr and skip stitch. 4 tr. to end. Then second row I increased so I have 120 now. Instead of 104. So I know that right. But now it says continue to work as follows. Work a1 over the first 6 tr. is that 1 row Cause if I do 30 times tr 5 times. And the other stitches aswell. It not going to fit on the same row. As I only got 120 sts. As I’m doing the small size. Plz help with diagram. I’m still learning to do crochet.

29.11.2019 - 12:25

DROPS Design answered:

Dear Tracey, work first row each diagram at a time, ie row 1 in A.1 over the first 6 sts, then repeat row 1 in A.2 a total of 2 times (= over the next 12 sts), row 1 in A.3 over the next 12 sts (= 2 times in width), and so on. On next round, work row 2 each diagram, then row 3 and so on. read more here. Happy crocheting!

29.11.2019 - 13:00

Irma wrote:

: Work A.1 over the first 6 dc, A.2 over the next 12-12-12-18-24-24 dc (= 2-2-2-3-4-4 times in total), A.3 over the next 12 dc (= 2 times in total), A.2 over the next 6-6-6-12-12-12 dc (= 1-1-1-2-2-2 times), A.3 over the next 12 dc (= 2 times), ............... A.3 over the next 12 dc (= 2 times), A.2 over the last 12-18-18-18-24-30 dc (= 2-3-3-3-4-5 times) After above round how many stitches should i have for xl.

28.09.2017 - 15:45

DROPS Design answered:

Dear Irma, after this round, you will still have 156 sts in XL,ie as before since you work 1 st in the st from previous row, see diagram. Happy crocheting!

28.09.2017 - 17:22

country flag Afshan Raheel wrote:

How many stitches after row 2?

27.09.2017 - 18:43

DROPS Design answered:

Dear Mrs Afsha, after row 1 you will have the same number of sts as you will not increase in row 1 - It can be a good idea to insert a marker between each repetition so that you can easily follow your work and the diagram. Happy crocheting!

28.09.2017 - 09:31

country flag Afsha Raheel wrote:

Plz help me with 2nd row of yoke. It will be double crochet in each stich ? If we do not divide in a1 a2 a3? And 3rd row. What is above a1 6 dc? If its according to diagram then what does row 2 mentions a2 4 time a3 2 time????

27.09.2017 - 18:22

DROPS Design answered:

Dear Mrs Afsha, on 2nd round on yoke you will work 1st row in each diagram as stated, ie in the 2 larger sizes you will work 2nd round as follows: A.1 over the first 6dc, A.2 over the next 24dc (= 4times in total = repeat 4 times in width row 1 in A.2)), A.3 over the next 12dc (= 2times in total), A.2 over the next 12 dc (= 2 times), A.3 over the next 12 dc (= 2 times), A.2 over the next 54-60 dc (= 9-10 times), A.3 over the next 12 dc (= 2 times), A.2 over the next 12 dc (= 2 times), A.3 over the next 12 dc (= 2 times), A.2 over the last 24-30 dc (= 4-5 times). Happy crocheting!

28.09.2017 - 09:30

Asraa wrote:

Hi. I have just completed A3 and the 5th rounds of A1 and A2 for the size medium. However the count of my tr stitches is only 196.If I count the chain stitches in between then the stitch count goes well over 252. However if I apply some mathematics and get the stitch by multiplying the number of tr stitches in each mode (A1,A2,A3) by the number of times they are repeated it comes out as 196= 2 (for A1) +26(for A2) +168(for A3). Kindly help me with this.

30.08.2017 - 19:22

DROPS Design answered:

Dear Asraa, by the time you finish the last row of pattern A.3 you should have the following stitch counts: A.1 (6 sts), A.2 (12 sts), A.3 (2 x 21= 42 sts), A.2 (6 sts), A.3 (42 sts), A.2 (36 sts), A.3 (42 sts), A.2 (6 sts), A.3 (42 sts) A.2 (18 sts) that adds up to 252 sts, hich is the number of stitches you have to continue to work with. I hope this helps. Happy Crocheting!

31.08.2017 - 06:12