
Popular categories
Looking for a yarn?


|
||||||||||||||||||||||||||||||||||||||||
Ros |
||||||||||||||||||||||||||||||||||||||||
 |
 |
|||||||||||||||||||||||||||||||||||||||
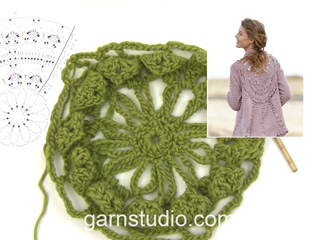
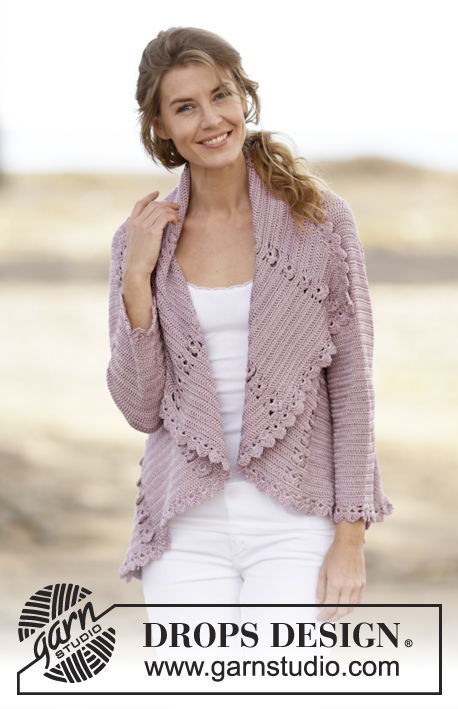
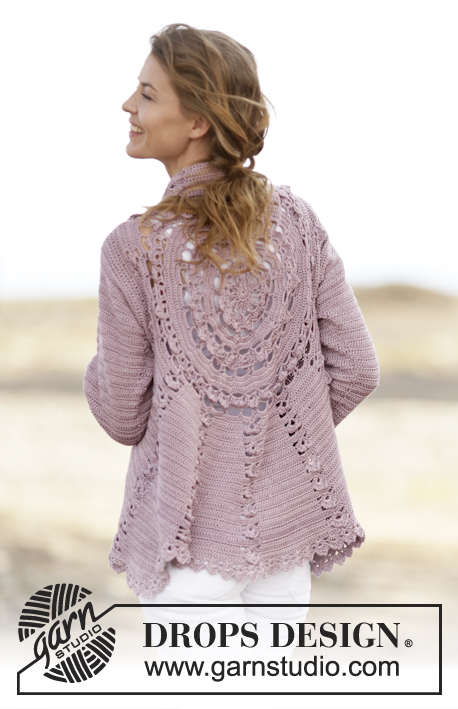
Crochet DROPS jacket worked in a circle with lace pattern in ”Cotton Viscose”. Size: S - XXXL.
DROPS 162-11 |
||||||||||||||||||||||||||||||||||||||||
|
PICOT: Work ch 2, 1 sc in the 2nd ch from hook. CROCHET INFO: Beg every dc round/row with 3 ch that replace first dc and finish every round/row with 1 sl st in 3rd ch from beg of round/row. PATTERN: See diagrams A.1-A.2. After 3rd round, repeat A.1 6 times in total on round. CROCHET 3 dc TOG: Work 3 dc into 1 dc at beg of row as follows: Work 3 ch (= replace 1 dc), work 1 dc, but wait with last pull through (= 2 strands on hook), then work next dc but on last pull through, pull yarn through all sts on hook. DECREASE TIP (applies to sleeves): Dec at beg of row by working 1 sl st over the dc to be dec. Dec at end of row by working until 1 dc to be dec remains, turn piece. ---------------------------------------------------------- CIRCLE: Work 7 ch on hook size 3.5 mm/E/4 with Cotton Viscose and form a ring with 1 sl st in first ch. Then work A.1 as follows: ROUND 1: Work ch 3, 12 dc in ch-ring, finish with 1 sl st in 3rd ch from beg of round. ROUND 2: Work ch 1, * 1 sc in first dc, 14 ch *, repeat from *-* 12 times in total, finish with 1 sl st in first sc. Fasten off. ROUND 3: Work 1 sl st in first ch-space, ch 5, * 1 sl st in next ch-space, 5 ch *, repeat from *-* 11 times in total, finish with 1 sl st in first ch-space. A.1 is repeated 6 times in total on round. ROUND 4: Work ch 3, in first ch-space work: * 2 dc, ch 3, 2 dc in same ch-space, 1 ch *, repeat from *-* 12 times in total, finish with 1 sl st in 3rd ch from beg of round. ROUND 5: Work ch 1, in first ch-space work 2 dc, 2 tr, 1 PICOT – see explanation above, 2 tr, 2 dc, 1 sc in next ch, * in next ch-space work 2 dc, 2 tr, 1 picot, 2 tr, 2 dc, 1 sc in next ch *, repeat from *-* 11 times in total, finish with 1 sl st in first ch = 12 leaves. ROUND 6: Work ch 1, * ch 6, 1 sc in sc and ch (from 5th and 4th round) *, repeat from *-* 12 times in total, finish with 1 sl st in first ch. ROUND 7: Work ch 4, * ch 3, 1 dc in next ch-space, ch 7, 1 dc in next ch-space, ch 3, 1 dc in same ch-space, 4 ch *, repeat from *-* 6 times in total, finish with 1 sl st in 4th ch. ROUND 8: Work ch 3, 3 dc in next ch-space, * 1 dc in next dc, 7 dc in next ch-space, 1 dc in next dc, 1 dc in next ch-space, ch 3, 1 dc in same ch-space, 1 dc in next dc, 7 dc in next ch-space *, repeat from *-* 5 times in total, 1 dc in next dc, 7 dc in next ch-space, 1 dc in next dc, 1 dc in next ch-space, ch 3, 1 dc in same ch-space, 1 dc in next dc, 4 dc in first ch-space, finish with 1 sl st in 3rd ch = 114 dc. REMEMBER THE CROCHET GAUGE! ROUND 9: Work ch 3, * 1 dc in every dc until ch-space, in ch-space as follows: 1 dc, ch 3, 1 dc *, repeat from *-* the entire round, finish with 1 sl st in 3rd ch = 126 dc. ROUND 10: Work ch 1, * ch 7, skip 6 dc, 1 sl st in next dc, ch 7, skip 6 dc, 1 sl st in next dc, ch 5, 1 sl st in next dc, ch 7, skip 6 dc, 1 sl st in next dc *, repeat from *-* 5 times in total, ch 7, skip 6 dc, 1 sl st in next dc, ch 7, skip 6 dc, 1 sl st in next dc, ch 5, 1 sl st in next dc, ch 7, skip 6 dc, 1 sl st in first ch. ROUND 11: Work ch 3, in every ch-space work 2 dc, ch 3, 2 dc, ch 1, finish with 1 sl st in 3rd ch. ROUND 12: Work ch 1, * in next ch-space work 2 dc, 2 tr, 1 picot, 2 tr, 2 dc, 1 sc in next ch *, repeat from *-* 24 times in total, finish with 1 sl st in first ch = 24 leaves. ROUND 13: Work ch 1, * ch 6, 1 sc in sc and ch (from 12th and 11th round) *, repeat from *-* 24 times in total, finish with 1 sl st in first ch. ROUND 14: Work ch 4, * ch 3, 1 dc in next ch-space, ch 7, 1 dc in next ch-space, ch 3, 1 dc in same ch-space, 4 ch *, repeat from *-* 12 times in total, finish with 1 sl st in 4th ch. ROUND 15: Work 3 ch - READ CROCHET INFO, work 4 dc in first ch-space (i.e. ch-space with 3 ch), now work dc in all ch-space with 7 ch from previous round, do not work in ch-space with 3 ch from previous round. Work * 8 dc in each of the next 7 ch-spaces, 9 dc in next ch-space *, repeat from *-* 2 times in total, 8 dc in each of the next 7 ch-spaces, 5 dc in last ch-space (i.e. ch-space with 4 ch) = 195 dc. ROUND 16: Work * 1 dc in each of the first 14 dc, 2 dc in next dc *, repeat from *-* 13 times in total = 208 dc. ROUND 17: Work * 2 dc in first dc, 1 dc in each of the next 15 dc *, repeat from *-* 13 times in total AT THE SAME TIME inc 1 dc extra on round = 222 dc. ROUND 18: Work ch 1, * ch 6, skip 5 dc, 1 sl st in next dc *, repeat from *-* 37 times in total, finish with 1 sl st in first ch. ROUND 19:Work as round 11 in A.1: Work ch 3, in every ch-space work 2 dc, ch 3, 2 dc, ch 1, finish with 1 sl st in 3rd ch. ROUND 20: Work as round 12 in A.1: Work ch 1, * in next ch-space work 2 dc, 2 tr, 1 picot, 2 tr, 2 dc, 1 ch *, repeat from *-* 37 times in total, finish with 1 sl st in first ch = 37 leaves. ROUND 21: Work as round 13 in A.1: Work ch 1, * ch 6, 1 sc in sc and ch (from 20th and 19th round) *, repeat from *-* 37 times in total, finish with 1 sl st in first ch. ROUND 22: Work as round 14 in A.1: Work ch 4, * ch 3, 1 dc in next ch-space, ch 7, 1 dc in next ch-space, ch 3, 1 dc in same ch-space, 4 ch *, repeat from *-* 18 times in total, work ch 3, 1 dc in last ch-space, ch 4, finish with 1 sl st in 4th ch. ROUND 23: Work 4 dc in first ch-space (i.e. ch-space with 3 ch), now work dc in all ch-space with 7 ch from previous round, do not work in ch-space with 3 ch from previous round. Work * 7 dc in next ch-space, 8 dc in next ch-space, 7 dc in next ch-space *, repeat from *-* 11 times in total, 8 dc in next ch-space, 8 dc in next ch-space, 7 dc in next ch-space, 4 dc in last ch-space (i.e. ch-space with 4 ch) = 273 dc. Then work piece back and forth. Work every row tog at the end of row with 1 sl st in 3rd ch from beg of row. Turn piece. ROW 24 (= WS): Work * 2 dc in next dc, 1 dc in each of the next 11 dc (= dc-group), A.2 *, repeat from *-* 13 times in total = 169 dc and 13 A.2. Turn piece. A.2 is repeated vertically until finished measurements. ROW 25 (= RS): Work A.2, 2 dc in first dc, 1 dc in each of the next dc in dc-group, * A.2, 2 dc in first dc in dc-group, 1 dc in each of the next dc *, repeat from *-* until 1 dc-group remains, 2 dc in first dc, 1 dc in each of the next dc = 182 dc. Turn piece. ROW 26: Work as row 24 = 195 dc (15 dc between every A.2). ROW 27: Work as row 25 = 208 dc (16 dc between every A.2). Repeat row 24-27 0-1-1 more time = 208-260-260 dc (= 16-20-20 dc between every A.2). Piece measures approx. 20-23-23 cm / 8"-9"-9" from middle and outwards. Now work arm holes as follows: ROW 28 (= from WS): Work 2 dc in first dc, 1 dc in each of the next 15-19-19 dc, A.2 as before, 2 dc in next dc, 1 dc in each of the next 15-19-19 dc, A.2, 54-62-62 loose ch (= right armhole), skip: 16-20-20 dc + A.2 + 16-20-20 dc + A.2, work * 2 dc in next dc, 1 dc in each of the next 15-19-19 dc, A.2 *, repeat from *-* 5 times in total, 2 dc in first dc, 1 dc in each of the next 15-19-19 dc, 54-62-62 loose ch (= left armhole), skip: A.2 + 16-20-20 dc + A.2 + 16-20-20 dc, work A.2, 2 dc in next dc, 1 dc in each of the next 15-19-19 dc, A.2 = 153-189-189 dc, 9 A.2 and 108-124-124 ch. ROW 29 (from RS): Work A.2, 2 dc in next dc, 1 dc in each of the next 16-20-20 dc, A.2, in ch-row (= left armhole) work as follows: 1 dc in each of the 54-62-62 ch, * 2 dc in next dc, 1 dc in each of the next 16-20-20 dc, A.2 *, repeat from *-* 5 times in total, 2 dc in next dc, 1 dc in each of the next 16-20-20 dc, in next ch-row (= right armhole) work as follows: 1 dc in each of the 54-62-62 ch, then work A.2, 2 dc in next dc, 1 dc in each of the next 16-20-20 dc, A.2, 2 dc in next dc, 1 dc in each of the next 16-20-20 dc = 270-322-322 dc and 9 A.2. ROW 30 (= from WS): Work 1 dc in each of the next 18-22-22 dc, A.2 as before, 1 dc in each of the next 18-22-22 dc, A.2, 1 dc in each of the next 18-22-22 dc, A.2 (adjust row according to the other repetitions), 1 dc in each of the next 18-22-22 dc, A.2, * 1 dc in each of the next 18-22-22 dc, A.2 *, repeat from *-* 5 times in total, 1 dc in each of the next 18-22-22 dc, A.2, 1 dc in each of the next 18-22-22 dc, A.2, 1 dc in each of the next 18-22-22 dc, A.2, 1 dc in each of the next 18-22-22 dc, A.2 = 234-286-286 dc and 13 A.2. Work pattern as before but now inc only on every row from RS until 52-52-60 rows have been worked in total = 377-429-481 dc (29-33-37 dc in every dc-group). Insert 4 markers in the piece as follows from WS: Work 29-33-37 dc, A.2, 14-16-18 dc, insert 1st marker, work 15-17-19 dc, * A.2, 29-33-37 dc *, repeat from *-* 4 times in total, insert 2nd marker here (1st-2nd marker = right front piece). Work A.2, 29-33-37 dc, A.2, 29-33-37 dc and A.2, insert 3rd marker here. * Work 29-33-37 dc, A.2 *, repeat from *-* 4 times in total, 15-17-19 dc, insert 4th marker. (3rd-4th marker = left front piece), 14-16-18 dc, A.2. dc between 1st and 4th marker are up towards neck. Fasten off. RIGHT FRONT PIECE: Now work right front piece between 1st and 2nd marker, beg from 2nd marker (i.e. from RS) = 131-149-167 dc and 4 A.2. Continue inc in dc-groups as before BUT do not inc in dc-groups in each side of front piece - AT THE SAME TIME dec 2 dc at beg of every row by CROCHET 3 dc TOG - see explanation above. Work until 10-12-12 cm / 4"-4 3/4"-4 3/4" over front piece have been worked, adjust to finish with 1 whole repetition of A.2. Fasten off. LEFT FRONT PIECE: Work left front piece between 3rd and 4th marker the same way as right front piece, beg from 4th marker (i.e. from RS). EDGE: Work an edge around the entire jacket as follows: Work the first 2 rounds of A.2, when working first round of A.2 over dc-rows, skip 2 dc-rows on each side of dc-group. Beg every round with 3 ch and finish with 1 sl st in 3rd ch. SLEEVES: Work back and forth from armhole and down, work every row tog with 1 sl st at the end of row. Insert 1 marker in piece, NOW MEASURE PIECE FROM HERE. Beg by working 86-94-102 dc evenly around the opening for sleeve, beg of row should be under sleeve. Then work 3 rows with 1 dc in every dc. Continue with 1 dc in every dc - AT THE SAME TIME dec differently in the different sizes as follows: READ DECREASE TIP! SIZE S/M: Dec 1 st in each side of piece alternately every 3rd and 2nd row 16 times in total = 54 dc. SIZE L/XL: Dec 1 st in each side of piece every other row 20 times in total = 54 dc. SIZE XXL/XXXL: Dec 1 st in each side of piece every other row 24 times = 54 dc. ALL SIZES: Work 1 dc in every dc until sleeve measures approx. 47 cm / 18½'', adjust so that next row is from WS. Then work the first 2 rounds of A.2 (= 6 repetitions in width). Fasten off. Work the other sleeve the same way. |
||||||||||||||||||||||||||||||||||||||||
Diagram explanations |
||||||||||||||||||||||||||||||||||||||||
|
||||||||||||||||||||||||||||||||||||||||

|
||||||||||||||||||||||||||||||||||||||||

|
||||||||||||||||||||||||||||||||||||||||

|
||||||||||||||||||||||||||||||||||||||||
|
Have you made this or any other of our designs? Tag your pictures in social media with #dropsdesign so we can see them! Do you need help with this pattern?You'll find tutorial videos, a Comments/Questions area and more by visiting the pattern on garnstudio.com. © 1982-2024 DROPS Design A/S. We reserve all rights. This document, including all its sub-sections, has copyrights. Read more about what you can do with our patterns at the bottom of each pattern on our site. |
||||||||||||||||||||||||||||||||||||||||


With over 40 years in knitting and crochet design, DROPS Design offers one of the most extensive collections of free patterns on the internet - translated to 17 languages. As of today we count 304 catalogs and 11422 patterns - 11417 of which are translated into English (US/in).
We work hard to bring you the best knitting and crochet have to offer, inspiration and advice as well as great quality yarns at incredible prices! Would you like to use our patterns for other than personal use? You can read what you are allowed to do in the Copyright text at the bottom of all our patterns. Happy crafting!
Comments / Questions (264)
Bonjour, je suis au rang 23 mais je arrive pas à avoir 273B. Je me retrouve avec 279 pourtant j’ai suivi à la lettre, calculer maintes et maintes fois mais rien n’y fait. Pouvez vous m’aider svp?\r\nMerci
03.07.2022 - 15:44DROPS Design answered:
Bonjour Sandra, vérifiez qu'à la fin du tour 22 vous avez bien 36 arceaux + 2 arceaux de 3 ml (1 au début + 1 à la fin du tour), vous aurez ainsi: 4 b + (7b+8b+7b) x 11 (=33arceaux) + 8b+8b+7b (+3arceaux) + 4 b = 1 arceau de 3 ml + 36 arceaux + 1 arceau de 3 ml = 4+ (242) + 23+4=273b. Bon crochet!
04.07.2022 - 08:50Merci pour votre réponse rapide mais permettez moi d’insister mais je ne suis pas sure d’avoir compris qu’est ce que je dois faire après avoir piqué mon crochet dans la maille serrée du rang 4? Je continue dans la maille serre du rang 5 ou je pique alternativement? Auriez-vous un schéma du motif? Je vous remercie pour votre réponse Sandra
29.06.2022 - 19:21DROPS Design answered:
Bonjour Sandra, vous piquez le crochet sous la maille en l'air du 4ème tour et terminez votre maille serrée de sorte qu'elle va entourer la maille serrée du 5ème tour, autrement dit, cette maille serrée va se faire autour de la maille serrée du 5ème tour. Est-ce que cela peut vous aider? Vous pouvez également le voir dans le diagramme, le 9ème symbole correspond à cette maille serrée crochetée autour de l'arceau du rang 4 + de la maille serrée du rang 5. Bon crochet!
30.06.2022 - 08:48Bonjour, j’essaie de faire ce modèle mais je bloque sur le rang 6. Pourriez-vous m’expliquer s’il vous plaît? Je vous remercie de votre aide. Sandra
28.06.2022 - 17:49DROPS Design answered:
Bonjour Sandra, commencez par 1 ml, puis crochetez tout le tour ainsi: *6 mailles en l'air (= arceau), 1 maille serrée en piquant le crochet sous la maille en l'air du 4ème tour (celle qui se trouve entre les 2 brides) vous allez ainsi crocheter autour de la maille serrée du tour 5*, et répétez de *-* tout le tour. Bon crochet!
29.06.2022 - 09:01Hello I'm following the pattern over and over but I seam to have more stitches then in the photo for the circle I'm stuck on Number 7 or 8 my pattern seems to not match up I'm not sure if it's correct. If I could send a photo maybe you can see what is going wrong. Thankyou
20.05.2022 - 15:13DROPS Design answered:
Dear Linda, you can share photos in our DROPS help groups in social media, like Facebook. Your circle may be different, depending on the size you are working. The model usually has a size M, so if you work a larger size you will probably have more stitches and more rounds. Happy crocheting!
22.05.2022 - 23:42Hello I'm following the pattern over and over but I seam to have more stitches then in the photo for the circle I'm stuck on Number 7 or 8 my pattern seems to not match up I'm not sure if it's correct. If I could send a photo maybe you can see what is going wrong. Thankyou
20.05.2022 - 15:13DROPS Design answered:
Dear Linda, please see answer above.
22.05.2022 - 23:42For row 30 of the body, none of the instructions/stitch counts appear to include the counts for the sleeve holes made in row 29. (62 stitches in the sleeve opening)
09.04.2022 - 20:57DROPS Design answered:
Dear Karen, the chain stitches for the sleeve holes are worked in row 28. In row 29 you work 1 dc in each of the chain stitches. In row 30, you work according to the pattern, so you don't need to work/take into account the sleeve hole stitches. Happy crochetting!
10.04.2022 - 19:58Köszönöm a gyors ,segítőkész válaszukat így már mindent értek 🤣🤣🤣🤣ja ...nem😂
28.03.2022 - 20:01Hello! Most jutottam el a jobb elejéhez. Sajnos nekem ott pont forditva jön ki az A2 .minta. Ennek így kell lennie,vagy én csináltam valamit rosszul? Tehát a darabon a levél mindenhol a színén van ,végig egyformán állnak,vagy az eleje horgolásnál átfordul a másik oldalra? Köszönöm szépen ha segítséget kapok . Edit
16.03.2022 - 16:52I am trying your patterns for the first time. I am stuck in design A2, row no. 26. Doest row 26 is row 3 from A2?? Any visual reference will help me
01.03.2022 - 12:18DROPS Design answered:
Dear Mrs Kulkarni , you start with A.2 on row 24, you will then work row 1 in A.2 on row 24, you work row 2 in A.2 on row 25, you work row 3 in A.2 and on row 26 and you will work row 4 in A.5 on row 27. Continue like this repeating these 4 rows in A.2. Happy crocheting!
01.03.2022 - 13:56Bonjour, je souhaiterais réaliser ce modèle mais malheureusement les fils sont épuisés. J'ai essayer de regarder les alternatives mais je n'y comprends rien. Pourriez-vous me donner un exemples de fils voir même une référence SVP ? J'aimerais le faire dans un gris clair. Je vous remercie de votre réponse ainsi que l'aide que vous allé m'apporter. Très bonne journée. Sandra
07.02.2022 - 14:35DROPS Design answered:
Bonjour Sandra, utilisez notre convertisseur pour voir les alternatives proposées et la quantité correspondante; dans cette nouvelle fenêtre, vous pourrez choisir le fil que vous souhaitez parmi ceux du groupe A. Votre magasin saura également vous conseiller de façon plus personnalisée si besoin - même par mail ou téléphone. Bon crochet!
07.02.2022 - 15:53