Baby Blues by DROPS Design

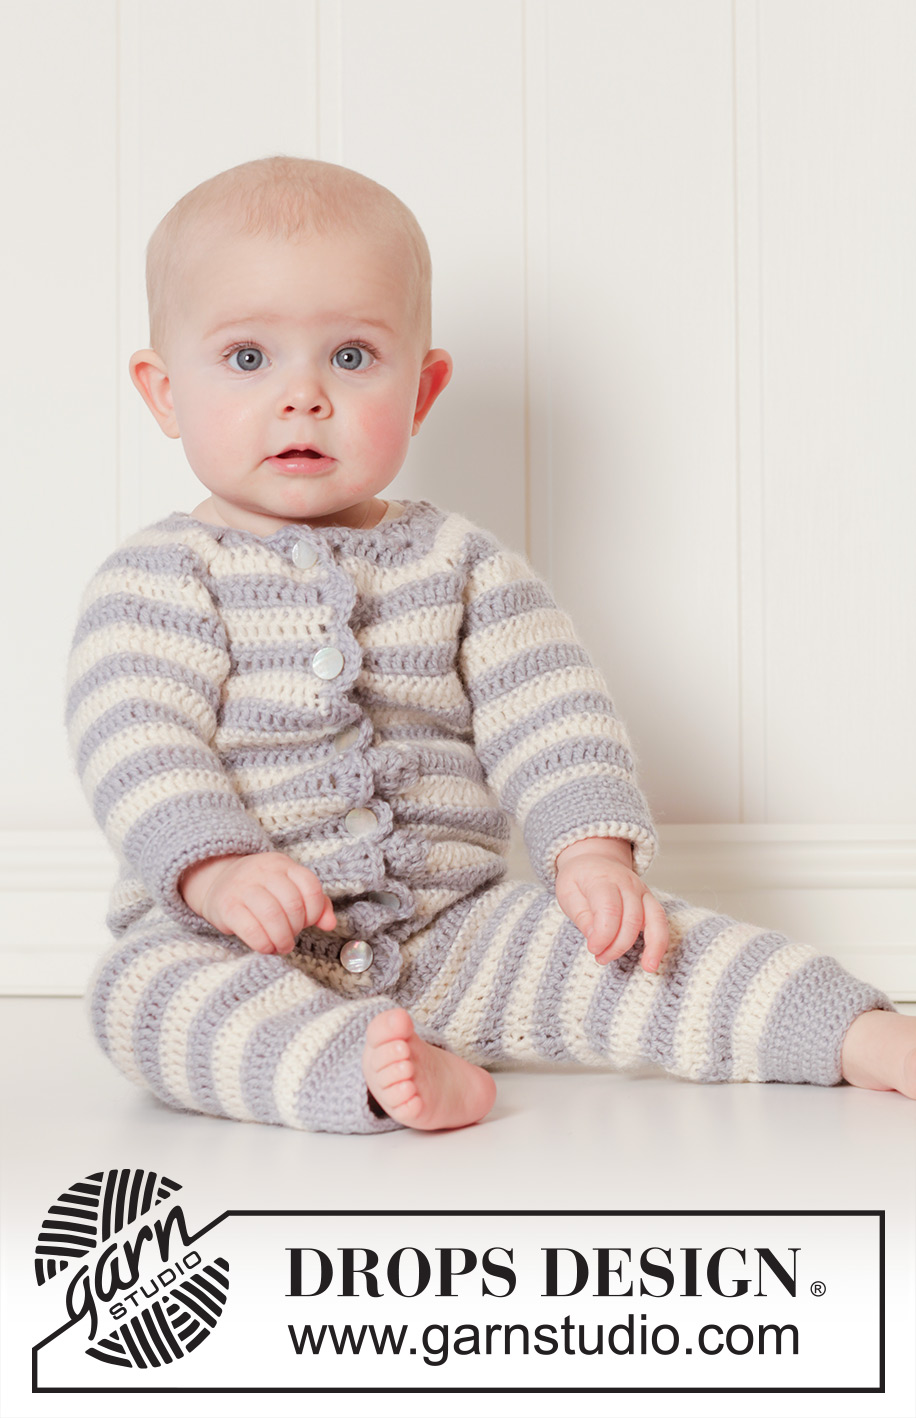
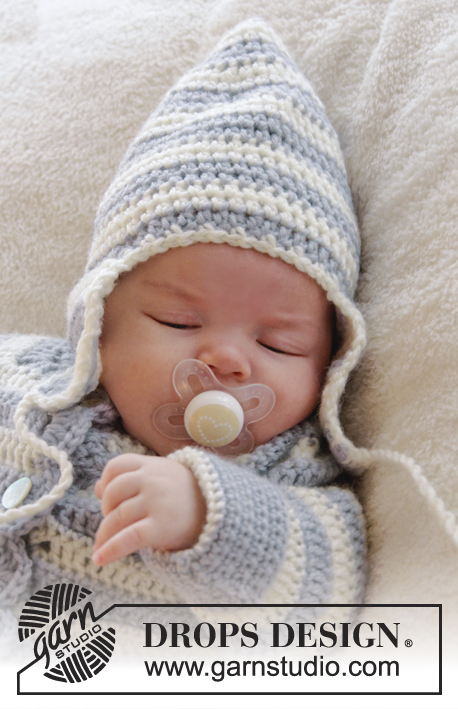
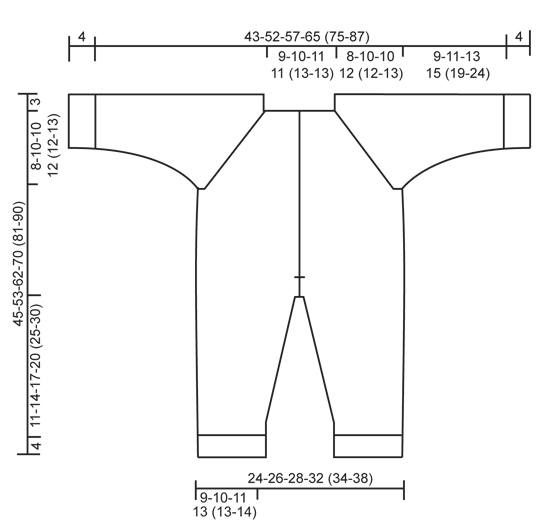
Crochet baby overall with raglan and stripes in DROPS Karisma. Size 0 - 4 years.

DROPS Baby 25-34
DROPS design: Pattern no u-055-by
Yarn group B
-----------------------------------------------------------
Size: 0/1 - 1/3 - 6/9 - 12/18 months (2 - 3/4) years
Finished measurements:
Bust: 48-52-56-64 (68-76) cm / 19”-20½”-22”-25¼” (26¾”-30”)
Full length: 45-53-62-70 (81-90) cm / 17¾”-21”-24½”-27½” (32”-35½”)

Materials:
DROPS KARISMA from Garnstudio
150-200-200-200 (250-250) g color no 70, light blue gray
150-150-150-200 (200-200) g color no 01, off white

DROPS CROCHET HOOK SIZE 4.5 mm/US 7 – or size needed to get 16 dc/sc in width x 6 texture rows vertically = 4’’ x 4’’ (10 x 10 cm).

DROPS MOTHER-OF-PEARL BUTTON NO 523: 4-5-5-6 (7-7) pieces.

-------------------------------------------------------

Alternative Yarn – See how to change yarns here
Yarn Groups A to F – Use the same pattern and change the yarn here
Yarn usage using an alternative yarn – Use our yarn converter here

-------------------------------------------------------


100% Wool
from 3.00 $ /50g
DROPS Karisma uni colour DROPS Karisma uni colour 3.00 $ /50g
Wool Warehouse Direct Ltd
Order
DROPS Karisma mix DROPS Karisma mix 3.00 $ /50g
Wool Warehouse Direct Ltd
Order
needles DROPS Needles & Hooks
You can get the yarn to make this pattern from 18.00$. Read more.

Pattern instructions

NOTE: This pattern is written in American English. All measurements in charts are in cm. For conversion from inches to cm - click here. There are different terms for crocheting in American and British English. If this pattern includes crochet, click for "crochet terms" here. For this pattern in British English, please click here.
CROCHET INFO:
Replace first sc at beg of every sc row with ch 1, finish row with 1 sc in 3rd ch from beg of previous row.
Replace first dc at beg of every dc row with ch 3, finish row with 1 dc in ch from beg of previous row.

TEXTURE ROWS:
* 1 row sc (worked from WS), 1 row dc (worked from RS) *, repeat from *-* (1 row sc + 1 row dc = 1 texture row).

STRIPES:
Work entire suit in stripes as follows: * 1 row sc from WS with off white and then 1 row dc from RS with off white, 1 row sc from WS with light blue gray and then 1 row dc from RS with light blue gray *, repeat from *-*.

INCREASE TIP:
Inc 1 sc/dc by working 2 sc/dc in same st.

DECREASE TIP:
Work 1 sc/dc but wait with last pull through (= 2 sts on hook), then work next sc/dc but on last pull through, pull yarn through all sts on hook = 1 sc/dc dec.
----------------------------------------------------------

SUIT:
Read US/UK above! The piece is worked top down. Worked back and forth from mid front.

YOKE:
Ch 37-41-45-45 (49-49) LOOSELY on hook size 4.5 mm/US 7 with light blue gray.
Work 1 sc in 2nd ch from hook, then work 1 sc in every ch the entire row = 36-40-44-44 (48-48) sc.
Turn piece and work 1 row with sc back from WS while AT THE SAME TIME inc 8 sc evenly – READ INCREASE TIP = 44-48-52-52 (56-56) sc on row.
Now insert 4 markers in piece for raglan as follows (beg mid front – NOTE: Do NOT work while inserting markers):
Skip 6-7-8-8 (9-9) sc (= left front piece), insert 1 marker in next sc, skip 8 sc (= sleeve), insert 1 marker in next sc, skip 12-14-16-16 (18-18) sc (= back piece), insert 1 marker in next sc, skip 8 sc (= sleeve) and insert last marker in next sc (there are now 6-7-8-8 (9-9) sc on right front piece after last marker).

READ ALL OF THE FOLLOWING SECTION BEFORE CONTINUING:
Work next row as follows from RS:
Work 1 dc in every sc but in every sc with marker work 2 dc + 2 ch + 2 dc = 56-60-64-64 (68-68) dc on row.
Then work TEXTURE ROWS and STRIPES – see explanation above (work back and forth with 1 sc/dc in every st from previous row but on every row with sc from WS work 2 ch over the 2 ch from previous row in raglan lines).
AT THE SAME TIME on 1st row from RS (i.e. row with dc) inc for raglan as follows: Work 2 dc + 2 ch + 2 dc in every ch-space in every raglan line (= 16 dc inc on row - NOTE: Work in both ch-spaces). Repeat inc on every row from RS 3-4-4-5 (5-6) more times (= 4-5-5-6 (6-7) times in total) = 120-140-144-160 (164-180) sts. REMEMBER THE CROCHET GAUGE!
After last inc for raglan work 1 row with sc from WS as before.
Work next row as follows from RS:
Work 1 dc in each of the first 16-19-20-22 (23-25) dc (= left front piece), skip the next 28-32-32-36 (36-40) sc (= sleeve), ch 4-4-4-6 (6-8), work 1 dc in each of the next 32-38-40-44 (46-50) sc (= back piece), skip the next 28-32-32-36 (36-40) sc (= sleeve), ch 4-4-4-6 (6-8) and work 1 dc in each of the last 16-19-20-22 (23-25) sc (= right front piece).
Then finish body and sleeves separately.

BODY:
NOW MEASURE PIECE FROM HERE!
Work 1st row from WS – work 1 sc in every dc from previous row and 1 sc in each of the 4-4-4-6 (6-8) ch under each armhole = 72-84-88-100 (104-116) sc on row.
Continue back and forth with texture rows and stripes as before – remember CROCHET INFO! AT THE SAME TIME on 1st row (= dc from RS), inc 4-0-2-2 (4-6) dc evenly = 76-84-90-102 (108-122) dc.
When piece measures approx. 24-29-34-39 (44-48) cm / 9½”-11½”-13½”-15¼” (17¼”-19”) from neck (i.e. approx. 27-32-37-42 (47-51) cm / 10½”-12½”-14½”-16½” (18½”-20”) from shoulder) – make sure that last row is 1 row with off white and dc from RS, finish opening for band mid front. Insert a marker in each side. Continue back and forth as before.
When piece measures 27-32-38-43 (49-53) cm / 10½”-12½”-15”-17” (19¼”-21”) from neck (and 30-35-41-46 (52-56) cm / 11¾”-13¾”-16”-18” (20½”-22”) from shoulder), divide for legs and finish each leg separately.

LEG:
Insert 1 marker – NOW MEASURE PIECE FROM HERE.
Continue with texture rows and stripes back and forth over the first 38-42-45-51 (54-61) sts on row (i.e. over half of sts).
When leg measures 2 cm / 3/4’’ from marker, dec 1 sc/dc in each side - READ DECREASE TIP.
Repeat dec every 2-2-3-3½ (3½-3½) cm / 3/4”-3/4”-1 1/8”-1¼” (1¼”-1¼”) 4-4-4-4 (5-7) more times (= 5-5-5-5 (6-8) times in total) = 28-32-35-41 (42-45) sts.
When leg measures 11-14-17-20 (25-30) cm / 4½”-5½”-6¾”-8” (9¾”-11¾”) from marker, switch to light blue gray and work sc back and forth for 4 cm / 1½’’. Fasten off.
Leg measures approx. 15-18-21-24 (29-34) cm / 6”-7”-8¼”-9½” (11½”-13½”) and entire suit measures approx. 45-53-62-70 (81-90) cm / 17¾”-21”-24½”-27½” (32”-35½”) from shoulder.
Work the other leg the same way.

SLEEVE:
= 28-32-32-36 (36-40) sts. Insert 1 marker here – NOW MEASURE PIECE FROM HERE.
Work first row as follows from RS (continue stripes as before):
Work 2-2-2-3 (3-4) ch, work 1 dc in every st and work 2-2-2-3 (3-4) ch. Turn piece, work 1 sc in 2nd ch from hook, work 1 sc in each of the next 0-0-0-1 (1-2) ch, 1 sc in every dc from previous row and 1 sc in each of the 2-2-2-3 (3-4) ch from beg of previous row = 32-36-36-42 (42-48) sts on row. Continue the texture rows and stripes back and forth as before. AT THE SAME TIME when sleeve measures 2 cm / 3/4’’ from marker, dec 1 st in each side - READ DECREASE TIP.
Repeat dec every 2-2-2½-2 (2-2) cm / 3/4”-3/4”-7/8”-3/4” (3/4”-3/4”), 3-4-4-7 (7-9) more times (= 4-5-5-8 (8-10) times in total) = 24-26-26-26 (26-28) sts.
When sleeve measures 9-11-13-15 (19-24) cm / 3½”-4½”-5”-6” (7½”-9½”) from marker, switch to light blue gray. Work sc back and forth for 4 cm / 1½’’, fasten off.
Sleeve measures 13-15-17-19 (23-28) cm / 5”-6”-6¾”-7½” (9”-11”) from marker.
Work the other sleeve the same way.

ASSEMBLY:
Sew sleeve seams tog edge to edge in outer loops of edge sts. Sew the openings under the sleeves. If desired fold up the edge at the bottom of sleeves.
Sew the opening mid front from markers where band ends and down to dividing for legs - sew in front loop of outermost st.

LEFT BAND:
Beg from WS at the bottom on left front piece with light blue gray and work 1 sc in dc at the edge on the off white stripe, * work 2 dc + 2 ch + 2 dc in next dc (i.e. in dc at the edge on light blue gray stripe), 1 sc in next dc (i.e. in dc at the edge on off white stripe) *, repeat from *-* up along left front piece to neck and finish with 1 sl st at the edge on corner by neck.
Turn piece and work as follows back from RS:
ch 3 (= 1 dc), then work 1 dc between every st and 1 dc in ch-space in every dc-group.
Fasten off.
Fasten band at the bottom by dividing for legs.

RIGHT BAND AND NECK EDGE:
Work as left band but beg from RS at the bottom on right front piece, work as left band up to neck but instead of finishing with 1 sl st in the corner by neck, continue edge around the neck as follows:
Work 1 sc in every st along the neck until 3 sts remain before raglan line, skip these 3 sts and work 4 dc in st in raglan line, skip the next 3 sts and continue with 1 sc in every st until 3 sts remain before next raglan line, skip these 3 sts and work 4 dc in st in next raglan line.
Continue like this around the neck and finish with 1 sl st at the edge on row. Turn piece and work 2nd row as on left band. Fasten off.

MORE ASSEMBLY:
Sew the buttons on to the left band. Begin with 1 button in the upper light blue gray stripe, then place 1 button in every other light blue gray stripe.
Button through hole on the inside of "fan" on band.

This pattern has been corrected. .

Updated online: 30.07.2019
Correction - SLEEVE: Work first row as follows from RS (continue stripes as before): Work 2-2-2-3 (3-4) ch, work 1 dc in every st and work 2-2-2-3 (3-4) ch. Turn piece, work 1 sc in 2nd ch from hook, work 1 sc in each of the next 0-0-0-1 (1-2) ch, 1 sc in every dc from previous row and 1 sc in each of the 2-2-2-3 (3-4) ch from beg of previous row = 32-36-36-42 (42-48) sts on row

Diagram

All measurements in charts are in cm.

diagram measurements

Do you need help with this pattern?

Thank you for choosing a DROPS Design pattern. We take pride in providing patterns that are correct and easy to understand. All patterns are translated from Norwegian and you can always check the original pattern (DROPS Baby 25-34) for measurements and calculations.

Are you having trouble following the pattern? See below for a list of resources to help you finish your project in no time - or why not, learn something new.

signature-image signature

Are you having trouble following the pattern? See below for a list of resources to help you finish your project in no time - or why not, learn something new.

We have also step-by-step guides for different techniques which you'll find here.

1) Why is the knitting/crochet tension so important?

Knitting tension is what determines the final measurements of your work, and is usually measured per 10 x 10 cm. It is provided like so: number of stitches in width x number of rows in height - eg: 19 stitches x 26 rows = 10 x 10 cm.

The knitting tension is very individual; some people knit/crochet loosely while others work tightly. You adjust the knitting tension with the needle size, which is why the suggested needle size only serve as a guide! You need to adjust this (up or down) to ensure that YOUR knitting tension matches the knitting tension provided in the pattern. If you work with a different knitting tension than provided you will have a different yarn consumption, and your work will have different measurements than what the pattern suggests.

The knitting tension also determines which yarns can replace each other. As long as you achieve the same knitting tension you can replace one yarn with another.

See DROPS lesson: How to measure your tension/gauge

See DROPS video: How to make a gauge tension swatch

to top

2) What are the yarn groups?

All our yarns are categorised into yarn groups (from A to F) according to thickness and knitting tension – group A contains the thinnest yarns and group F the thickest. This makes it easier for you to find alternative yarns to our patterns, should you wish to switch yarn. All yarns within the same group have a similar knitting tension and can easily replace each other. However, different yarn qualities have different structures and properties which will give the finished work a unique look and feel.

Click here for an overview of the yarns in each yarn group

to top

3) Can I use a different yarn than what the pattern suggests?

The important thing when changing from one yarn to another is that the knitting/crochet tension remains the same. This is so that the measurements of the finished piece will be the same as on the sketch provided. It is easier to achieve the same knitting tension using yarns from the same yarn group. It is also possible to work with multiple strands of a thinner yarn to achieve the knitting tension of a thicker one. Please try our yarn converter. We recommend you to always work a test swatch.

Please NOTE: when changing yarn the garment might have a different look and feel to the garment in the photo, due to individual properties and qualities of each yarn.

See DROPS lesson: Can I use a different yarn than the one mentioned in the pattern?

to top

4) How do I use the yarn converter?

At the top of all our patterns you’ll find a link to our yarn converter, which is a helpful tool should you wish to use a different yarn than suggested. By filling in the yarn quality you wish to replace, the amount (in your size) and number of strands, the converter will present good alternative yarns with the same knitting tension. Additionally it will tell you how much you’ll require in the new qualities and whether you’ll need to work with multiple strands. Most skeins are 50g (some are 25g or 100g).

If the pattern is worked with multiple colours, every colour will have to be converted separately. Similarly, if the pattern is worked with several strands of different yarns (for example 1 strand Alpaca and 1 strand Kid-Silk) you will have to find alternatives for each, individually.

Click here to see our yarn converter

to top

5) Why do I get the wrong knitting tension with the suggested needle size?

The needle size provided in the pattern serves only as a guide, the important thing is to follow the knitting tension. And since knitting tension is very individual, you will have to adjust the needle size to ensure that YOUR tension is the same as in the pattern – maybe you’ll have to adjust 1, or even 2 needle sizes, up or down to achieve the correct tension. For this, we recommend that you work test swatches.

Should you work with a different knitting tension than the one provided, the measurements of the finished garment might deviate from the measurement sketch.

See DROPS lesson: How to measure your tension/gauge

See DROPS video: How to make a gauge tension swatch

to top

6) Why is the pattern worked top-down?

Working a garment top-down provides more flexibility and room for personal adjustment. For example it is easier to try the garment on while working, as well as making adjustments to length of yoke and shoulder caps.

The instructions are carefully explaining every step, in the correct order. Diagrams are adjusted to the knitting direction and are worked as usual.

to top

7) Why are the sleeves shorter in larger sizes?

The total width of the garment (from wrist-to-wrist) will be larger in the larger sizes, despite the actual sleeves being shorter. The larger sizes have longer sleeve caps and wider shoulders, so there will be a good fit in all sizes.

to top

8) What is a repeat?

Diagrams are often repeated on the round or in height. 1 repeat is the diagram the way it appears in the pattern. If it says to work 5 repeats of A.1 in the round, then you work A.1 a total of 5 times after/next to each other in the round. If it says to work 2 repeats of A.1 vertically/in height you work the entire diagram once, then begin again at the start and work the entire diagram one more time.

to top

9) How do I work according to a knitting diagram?

The diagram depicts all rows/rounds, and every stitch seen from the right side. It is read from bottom to top, from right to left. 1 square = 1 stitch.

When working back and forth, every other row is worked from the right side and every other row is worked from the wrong side. When working from the wrong side, the diagram will have to be worked reversed: from left to right, knit stitches are purled, purl stitches are knit etc.

When working in the round every round is worked from the right side and the diagram are worked from right to left on all rounds.

See DROPS lesson: How to read knitting diagrams

to top

10) How do I work according to a crochet diagram?

The diagram depicts all rows/rounds, and every stitch seen from the right side. It is worked from bottom to top, from right to left.

When working back and forth every other row is worked from the right side: from right to left and every other row is worked from the wrong side: from left to right.

When working in the round, every row in the diagram are worked from the right side, from right to left.

When working a circular diagram you start in the middle and work your way outwards, counter clockwise, row by row.

The rows usually start with a given number of chain stitches (equivalent to the height of the following stitch), this will either be depicted in the diagram or explained in the pattern.

See DROPS lesson: How to read crochet diagrams

to top

11) How do I work several diagrams simultaneously on the same row/round?

Instructions for working several diagrams after each other on the same row/round, will often be written like so: “work A.1, A.2, A.3 a total of 0-0-2-3-4 times". This means you work A.1 once, then A.2 is worked once, and A.3 is repeated (in width) the number of times provided for your size – in this case like so: S = 0 times, M = 0 times, L=2 times, XL= 3 times and XXL = 4 times.

The diagrams are worked as usual: begin with the first row in A.1, then work the first row in A.2 etc.

See DROPS lesson: How to read knitting diagrams

See DROPS lesson: How to read crochet diagrams

to top

12) Why does the piece start with more chain stitches than it’s worked with?

Chain stitches are slightly narrower than other stitches and to avoid working the cast-on edge too tight, we simply chain more stitches to begin with. The stitch count will be adjusted on the following row to fit the pattern and measurement sketch.

to top

13) Why increase before the rib edge when the piece is worked top-down?

The rib edge is more elastic and will contract slightly compared to, for example, stocking stitch. By increasing before the rib edge, you avoid a visible difference in width between the rib edge and the rest of the body.

to top

14) Why increase in the cast-off edge?

It’s very easy to cast off too tightly, and by making yarn overs while casting off (and simultaneously casting these off) you avoid a too tight cast off edge.

See DROPS video: How to bind off with yarn overs (yo)

to top

15) How do I increase/decrease on every 3rd and 4th row/round alternately?

To achieve an even increase (or decrease) you can increase on, for example: every 3rd and 4th row alternately, like so: work 2 rows and increase on the 3rd row, work 3 rows and increase on the 4th. Repeat this until the increase is complete.

See DROPS lesson: Increase or decrease 1 st on every 3rd and 4th row alternately

to top

16) Why is the pattern slightly different than what I see in the photo?

Pattern repeats can vary slightly in the different sizes, in order to get the correct proportions. If you’re not working the exact same size as the garment in the photo, yours might deviate slightly. This has been carefully developed and adjusted so that the complete impression of the garment is the same in all sizes.

Make sure to follow instructions and diagrams for your size!

to top

17) How can I work a jacket in the round instead of back and forth?

Should you prefer to work in the round instead of back and forth, you may of course adjust the pattern. You’ll need to add steeks mid-front (usually 5 stitches), and follow the instructions. When you would normally turn and work from the wrong side, simply work across the steek and continue in the round. At the end you’ll cut the piece open, pick up stitches to work bands, and cover the cut edges.

See DROPS video: How to knit steeks and cut open

to top

18) Can I work a jumper back and forth instead of in the round?

Should you prefer to work back and forth instead of in the round, you may of course adjust the pattern so you work the pieces separately and then assemble them at the end. Divide the stitches for the body in 2, add 1 edge stitch in each side (for sewing) and work the front and back pieces separately.

See DROPS lesson: Can I adapt a pattern for circular needles into straight needles?

to top

19) Why do you show discontinued yarns in the patterns?

Since different yarns have different qualities and textures we have chosen to keep the original yarn in our patterns. However, you can easily find options among our available qualities by using our yarn converter, or simply pick a yarn from the same yarn group.

It is possible that some retailers still have discontinued yarns in stock, or that someone has a few skeins at home that they would like to find patterns for.

The yarn converter will provide both alternative yarn as well as required amount in the new quality.

to top

20) How do I make a women’s size garment into a men’s size one?

If you have found a pattern you like which is available in women’s size it’s not very difficult to convert it to men’s size. The biggest difference will be the length of sleeves and body. Start working on the women size that you think would fit across the chest. The additional length will be worked right before you cast off for the armhole/sleeve cap. If the pattern is worked top-down you can add the length right after the armhole or before the first decrease on sleeve.

Regarding additional yarn amount, this will depend on how much length you add, but it is better with a skein too many than too few.

to top

21) How do I prevent a hairy garment from shedding?

All yarns will have excess fibres (from production) that might come off as lint or shedding. Brushed yarns (ie hairier yarns) have more of these loose, excess fibres, causing more shedding.

Shedding also depends on what is worn under or over the garment, and whether this pulls at the yarn fibres. It’s therefore not possible to guarantee that there will be no shedding

Below are some tips on how to get the best result when working with hairier yarns:

1. When the garment is finished (before you wash it) shake it vigorously so the looser hairs come off. NOTE: do NOT use a lint roller, brush or any method that pulls at the yarn.

2. Place the garment in a plastic bag and put it in your freezer - the temperature will cause the fibres to become less attached to each other, and excess fibres will come off easier.

3. Leave in the freezer for a few hours before taking it out and shaking it again.

4. Wash the garment according to the instructions on the yarn label.

to top

22) Where on the garment is the length measured?

The measurement sketch/schematic drawing provides information regarding the full length of the garment. If it’s a jumper or a jacket the length is measured from the highest point on the shoulder (usually closest to the neckline), and straight down to the bottom of the garment. It is NOT measured from the tip of shoulder. Similarly, the length of yoke is measured from the highest point on the shoulder and down to where yoke is split into body and sleeves.

See DROPS lesson: How to read a schematic drawing

to top

23) How do I know how many balls of yarn I need?

The required amount of yarn is provided in grams, eg: 450 g. To calculate how many balls you’ll need you first need to know how many grams are in 1 ball (25g, 50g or 100g). This information is available if you click on the individual yarn quality on our pages. Divide the amount required with the amount of each ball. For example, if each ball is 50g (the most common amount), the calculation will be as follows: 450 / 50 = 9 balls.

to top

Have you purchased DROPS yarn to make this pattern? Then you are entitled to receive help from the store where you bought the yarn. Find a list of DROPS stores here!
Still can't find the answer you need? Then scroll down and leave your question so one of our experts can try to help you. This will be done normally within 5 to 10 working days. In the meantime, you can read the questions and answers that others have left to this pattern or join the DROPS Workshop on Facebook to get help from fellow knitters/crocheters!

Comments / Questions (54)

country flag MONICA wrote:

* 1 hilera de p.b. (trabajada por el LR), 1 hilera de p.a. (trabajada por el LD) *, repetir de *a* (1 hilera de p.b. + 1 hilera de p.a. = 1 hilera texturada). 1. ¿A que se refieren con texturada? 2. ¿ A qué se refieren con LR y LD ? Gracias

03.04.2023 - 20:31

DROPS Design answered:

Hola Monica, LR y LD son Lado Revés y Lado Derecho, respectivamente. Fila texturada o fila de patrón de textura, está definida en FILAS DE TEXTURA como 1 hilera de p.b por el lado revés + 1 hilera de p.a por el lado derecho.

06.04.2023 kl. 23:54

country flag Vivia wrote:

Hvad skal jeg gøre med de to lm buer, når jeg hækler for og bag stykket, og ærmer? Jeg har hæklet denne opskrift før, men kan ikke huske hvad jeg har lavet. Jeg overvejer at ikke hækle de to buer, i de sidste raglan rækker, fordig jeg vil ikke have to ekstra buer, der ikke har en grund til at være der.

23.11.2022 - 06:02

DROPS Design answered:

Hei Vivia. De 2 luftmaskene = raglanlinjene. Om du ikke ønsker å ha de på siste rad med raglanøkningen, pass på at du har nok masker i forhold til oppskriften og at det ikke strammer når du hekler videre. mvh DROPS Design

28.11.2022 kl. 10:04

country flag Maja wrote:

Hej! Jag förstår verkligen inte hur armarna ska virkas. Eftersom jag hoppar över 32 maskor för att lämna öppning till armen men samtidigt då virkar 4 lm så har ju ärmhålet 36 maskor och inte 32 som det står i beskrivningen för ärmarna. Sen står det att jag ska virka två lm och sedan en stolpe i varje maska, men var ska jag börja? Ska jag fästa tråden innan jag virkar 2 lm eller ska jag virka två lm på garnet och sedan fästa i arbetet med den första stolpen?

01.11.2022 - 10:41

DROPS Design answered:

Hej Maja, jo se videon nederst i opskriften: Hur man virkar raglan ovanifrån och ner :)

02.11.2022 kl. 14:14

country flag Sherry Lewis wrote:

Thank you for the pattern! I am so happy that you made the pattern available in the variety of sizes. I have a 5 week old grandson and a 14 month old grandson I made these for. I did take a little liberties with the pattern and made red outfits, turned them backwards, and made "Thing 1" and "Thing 2" from Cat In the Hat. I wish I could post you pictures.

01.11.2022 - 02:52

country flag Karin wrote:

Hi, ich arbeite gearde an der Blende und verstehe nicht wie die . Reihe gearbeitet werden muss. 1stb zwischen alle M und 1 stb in die LM. Soll das heissen 1 stb in jede M und 1 stb in die LM kette?

01.07.2022 - 11:27

DROPS Design answered:

Liebe Karin, anstatt 1 Stb in jede Masche zu häkeln, stechen Sie die Häkelnadel zwischen 2 Stäbchen/2 Maschen (z.B zwischen 1 fM und 1 Stb). So häklenSie die ganze Reihe, mit 1 Stäbchem um die Luftmaschenbogen. Viel Spaß beim häkeln!

01.07.2022 kl. 16:10

country flag Melissa wrote:

Hei, Jeg følger oppskriften for 6/9. Etter 5 strukturader på raglan får jeg 128 st og 137 m. Hva gjør eg galt? Viss eg lage en ny rad ser eg at eg får 144 st (som er tallet eg skal oppnå), men i oppskriften står det m for masker og ikke st for staver, og ikke glemme at det vil være det sjette raden jeg lager. Hva må jeg gjøre? På forhand, tusen takk for svar.

25.03.2022 - 22:16

DROPS Design answered:

Hej Melissa, er det fordi at du også skal regne "masker" for "staver"? Hvis du får det antal masker/staver som står ifølge opskriften, så bare fortsæt :)

30.03.2022 kl. 14:25

country flag Vivia wrote:

Jeres video der forklarer viftemønster, går ikke op ved hvad er skrevet i opskriften. Og jeg har ikke anelse hvad jeg skal lave i 2. række. Vend arb og hækl således tilbage fra retsiden: 3 lm (modsvarer 1 st), videre hækles der 1 st mellem hver m og 1 st om lm-buen i hver st-gruppe. Vil dette kun gøre viftene større? Ellers hved jeg ikke hvad jeg laver.

01.03.2022 - 11:49

DROPS Design answered:

Hei Vivia. Videoen er en generell video på vifte teknikk, ikke spesielt til denne oppskriften. Venstre stolpe hekles frem og tilbake (slik det står beskrevet i oppskiften). Denne kanten ser du ikke på bildet, da den ligger under høyre stolpekant Høyre stolpekant + halskanten hekles bare en vei (viftemønster) som du ser på bildet. mvh DROPS Design

08.03.2022 kl. 09:27

country flag Helga Eitel wrote:

Guten Tag, meine 2 Fragen wurden so schnell beantwortet dass ich keine Pause beim Häkeln machen musste. Ganz herzlichen Dank dafür. Ich stricke und häkle seit Jahren nur mit DROPS- Wolle. Eine andere Wolle gibt es für mich nicht. Einfach hervorragend. Danke.

05.01.2022 - 14:32

country flag Helga Eitel wrote:

Vielen Dank für die schnelle Antwort, meinen Fehler habe ich gefunden. Nun habe ich noch eine Frag zu der Raglanschrägung. In jeder Reihe mit festen Maschen mache ich 2 Lm über die 2 Lm der Vor-R. So müsste ich in der Reihe mit Stb. 2 Luftmaschenbögen von je 2 Lm umhäkeln . Ist das richtig, wird dann etwas dicker.

04.01.2022 - 17:29

DROPS Design answered:

Liebe Frau Eitel, richtig, die 2 Stäbchen + 2 Lm + 2 Stäbchen werden um den Lufmaschenbogen von der vorrigen Stäbchen Reihe gehäkelt (die festen Maschen werden so "versteckt"). So dicker wird es auch nicht. Viel Spaß beim häkeln!

05.01.2022 kl. 07:47

country flag Helga Eitel wrote:

Overall 25-34 für 2 Jahre: 49 bzw. 48 M., dann 8 M. zunehmen = 56 M. 4 Markierer anbringen ab hört. Mitte. 9 M. überspringen, Mark. nächste M., also 10 M. 8 M. überspr. Mark. nächste M., also 9 M. 18 M. 8M. überspringen, = 19 u. 9 M.nötig. Verbleibt 1 Masche anstatt 9 M. Was mache ich falsch??

04.01.2022 - 09:35

DROPS Design answered:

Liebe Frau Eitel, es fehlen Ihnen die letzte Markierung nach den 8 M für die 2. Ärmel und vor den 9 letzten Maschen. Es sind insgesamt 4 Markeirungen. Viel Spaß beim häkeln!

04.01.2022 kl. 12:18

Post a comment to pattern DROPS Baby 25-34

We would love to hear what you have to say about this pattern!

If you want to leave a question, please make sure you select the correct category in the form below, to speed up the answering process. Required fields are marked *.