
Popular categories
Looking for a yarn?


Comments / Questions (16)
![]() Jessica wrote:
Jessica wrote:
Hey, ich möchte für eine bekannte so eine mütze gerne häkeln, problem ist das, das baby bzw. kind einen kopfumfang von 50 cm hat. wie sollte ich da am besten vorgehen?
09.02.2025 - 12:40DROPS Design answered:
Liebe Jessica, für ein Kopfumgang von 50 cm können Sie die grösserre Grösse wählen. Viel Spaß beim Stricken!
10.02.2025 - 10:47
![]() Chiara Brambilla wrote:
Chiara Brambilla wrote:
How do I know when I have to change colour in the hat to obtain the light blue and white lines? / come faccio a capire quando cambiare colore nel cappello?
24.12.2020 - 19:17DROPS Design answered:
Hi Chiara! STRIPES: * 2 rows/rounds htr with light blue grey, 2 rows/rounds htr with off white *, repeat from *-*. And follow the instrucions :) Happy crocheting!
24.12.2020 - 23:27
![]() Angélique wrote:
Angélique wrote:
Bonjour, Je ne comprends pas le début de l'étape bonnet.J'ai monté mes 7 ml mais après faut-il utiliser ces ml pour effectuer les db dans le premier cache-oreille déjà fait ou bien je fais mes 7ml que je mets de côté et je continue en db dans mes 12 db monté du cache-oreille puis je continue avec les 18 ml puis je rajoute le 2eme cache-oreille puis 7 ml.Je ne comprends pas ce passage?Pourriez-vous m'expliquer?Un grand merci d'avance.Angélique
13.11.2019 - 15:04DROPS Design answered:
Bonjour Angélique, après les 7 ml (demi-dos), vous crochetez un des cache-oreilles soit 12 dB, puis vous crochetez 16 ml (devant du bonnet), le 2ème cache-oreille soit 12 dB et 7 ml (demi-dos) et terminez par 1 mc dans la 1ère des ml du tour = vous avez maintenant 2 x 7 ml au milieu dos et 16 ml pour le devant du bonnet. Bon crochet!
13.11.2019 - 15:48
![]() Sylvia Brown wrote:
Sylvia Brown wrote:
I'm not sure what yarn type B is. Would be the same as a 3? And I also want you to know how much I love your patterns!!
21.08.2019 - 19:10DROPS Design answered:
Dear Mrs Brown, you'll find here the list of your yarn group B - you can read more about the yarn used here in its Shadecard. Happy crocheting!
22.08.2019 - 09:29
![]() SOLVEIG GARNES HAUGEN wrote:
SOLVEIG GARNES HAUGEN wrote:
Iflg oppskriften skal jeg hekle 18 lm, og deretter halvstaver over neste øreklaff. Dette blir jo alt for kort? Samtidig står det (=midt foran), noe som får meg til å lure på om det betyr at jeg skal hekle 18 lm til før jeg hekler over den andre øreklaffen. Hva er riktig? Når jeg hekler 18 lm på nål 4,5 blir det omtrent passelig til dukken...
05.06.2018 - 00:08
![]() Rebecca wrote:
Rebecca wrote:
Have previously made earflap hats, all of which were part of the hat, not separate. Because these earflaps are made separately and there are no pattern directions regarding best way to attach, plus cm from mid-front of "newborn" hat body to "cheek-side" edge of each earflap, I need help in making these determinations. If the newborn lived near me, this would not be an issue, but little Daniel lives 3,000 miles from my home. Appreciate your assistance. Kindest regards.
01.03.2018 - 02:15DROPS Design answered:
Dear Rebecca, if your tension is correct, then just follow the pattern crocheting first 7 ch, then 1 hdc in each of the st from 1st earflap, 16 ch (= mid front), 1 hdc in each of the st from 2nd earflap, then 7 ch and join in the round = you should have now 54 sts (ch on back piece + front piece and hdc over both earflaps). Happy crocheting!
01.03.2018 - 09:27
![]() Jessica wrote:
Jessica wrote:
Hejsa. Jeg har et spørgsmål: De 2 lm jeg starter hver række med, skal jeg der i den ene af dem lave 1 halv-st i på hver række? Og i forhold til udtagning, menes der den sidste halv-st inden de 2lm eller næst sidste halv-st? Mvh. Jessica
18.04.2017 - 10:14DROPS Design answered:
Hej Jessica, hvis du har erstattet en halv-st med 2 lm, så tæller de med som halv-st. Ja du tager ud i næst yderste halv-st, som der står under udtagningstipset. God fornøjelse!
28.04.2017 - 08:58
![]() Melanie wrote:
Melanie wrote:
Hallo. Ich habe eine Frage zu den Ohrenklappen. Ich beginne mit 5 Luftmaschen. Muss ich auch hier breits der häkelinfo1 folgen und bereits hier zwei Luftmaschen zusätzlich machen? OderUSS man hier einfach in die zweite LM stechen und dann 4 halbe Stäbchen häkeln? Vielen Dank bereits im Voraus für Ihre Hilfe. MfG
02.04.2017 - 17:48DROPS Design answered:
Liebe Melanie, die 2 Lm zum wenden sind in den 5 Lm inbegriffen, dh 5 Lm häkeln, und 1 H-Stb in die 3. Lm von der Nadeln, und 1 H-Stb in die 2 nächsten Lm = 4 H-Stb (= die 2 Lm = erste H-Stb). Viel Spaß beim häkeln!
03.04.2017 - 10:55Sally Jensen wrote:
I would like to also make the sweater that matches the Baby Blue Hat pattern - Baby Drops 25-35 pattern. Could you tell me where I would find this pattern. Thank you for all your time and help. I LOVE this site and all the help. Sally
29.05.2016 - 04:01DROPS Design answered:
Dear Mrs Jensen you can find the related suit under the tab "related patterns" next to the picture: it's the pattern 25-34. Happy crocheting!
29.05.2016 - 10:22
![]() Rose Keßler wrote:
Rose Keßler wrote:
Hallo, gibt es auch die Anleitung für das passende Jäckchen? Mit lieben Grüßen Rose Keßler
16.05.2016 - 13:30DROPS Design answered:
Liebe Rose, das Kleidungsstück, das man auf dem Foto sieht, ist der Strampelanzug Modell b25-34.
17.05.2016 - 08:38
|
|
Baby Blues Hat#babyblueshat |
|
|
|
|
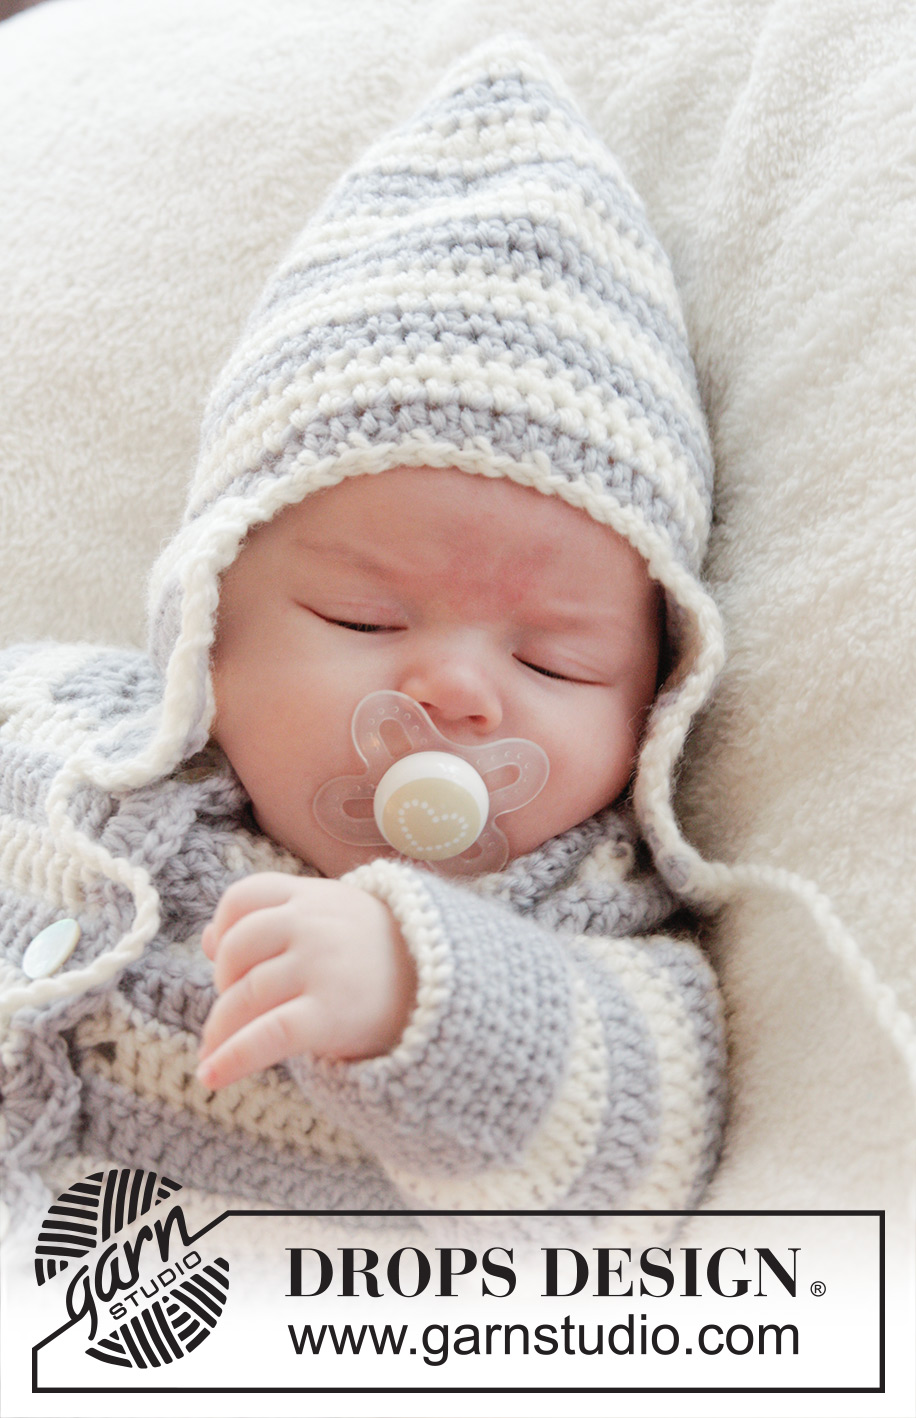
Crochet baby hat with stripes in DROPS Karisma. Size 0 - 4 years.
DROPS Baby 25-35 |
|
|
CROCHET INFO 1: Replace first hdc on every row with 2 ch. Finish every row with 1 hdc in 2nd ch from beg of previous row. CROCHET INFO 2: Replace first hdc at beg of every round with 2 ch. Finish every round with 1 sl st in 2nd ch from beg of round. STRIPES: * 2 rows/rounds hdc with light blue gray, 2 rows/rounds hdc with off white *, repeat from *-*. INCREASE TIP: Inc 1 hdc by working 2 hdc in second and next to last hdc. CROCHET HDC TOG: Dec a hdc by working 2 hdc tog, i.e. work a hdc but wait with last YO and pull through (= 3 sts on hook), work 1 hdc in next st and pull last YO through all 5 sts on hook. CROCHET SC TOG: Crochet 2 sc tog into 1 sc as follows: Insert hook in first st and pull yarn through, insert hook in next st and pull yarn through, make a YO and pull yarn through all 3 sts on hook. -------------------------------------------------------- EAR FLAP: Ch 5 on hook size 4.5 mm/US 7 with light blue gray. Work 1 hdc in 3rd ch from hook, 1 hdc in the next 2 ch = 4 hdc, turn piece. READ CROCHET INFO 1. Then work STRIPES - see explanation above - while AT THE SAME TIME working as follows: Work 1 row hdc while AT THE SAME TIME inc 1 hdc in each side - READ INCREASE TIP. Repeat inc in each side on every row 4-5 (6) times in total = 12-14 (16) hdc. Continue with hdc and finish when ear flap measures 5-6 (8) cm / 2"-2½" (3") – stop after two rows with off white. Put piece aside and work another ear flap. HAT: READ CROCHET INFO 2. Ch 7-7 (7) with light blue gray, work hdc over one ear flap, ch 16-18 (20) (= mid front), work hdc over the other ear flap, ch 7-7 (7) and finish with 1 sl st in first ch = 54-60 (66) ch/hdc. Beg round = mid back. On next round work 1 hdc in every ch/hdc. Continue with hdc in the round in stripes. When piece measures 8-10 (11) cm / 3"-4" (4½") from mid back, work next round with dec as follows: * 1 hdc in each of the first 4 sts, then work the next 2 hdc tog – see explanation above *, repeat from *-* the entire round (9-10-11 hdc have been dec on round). Work 1 round without dec and then next round as follows: * 1 hdc in each of the 3 first sts, then work 2 hdc tog *, repeat from *-* the entire round. Repeat dec every other round (with 1 hdc less between dec every time) 2 more times = 18-20 (22) hdc on round. Work 2-2 (3) rounds without dec. On next round work all hdc tog 2 by 2 = 9-10 (11) hdc remain on round. Cut the yarn and pull it through the remaining sts, tighten tog and fasten. Hat measures approx. 16-18 (20) cm / 6 ¼"-7" (8") from the top and down. CROCHET EDGE: Work on hook size 4.5 mm/US 7 with off white around the opening on hat as follows: * 1 sc in first st, ch 1, skip 1 st/row *, repeat from *-* the entire round and finish with 1 sl st in first sc. TWINED STRING: Cut 2 lengths off white yarn of 150 cm / 60" each. Twine them tog until they resist, thread the string through one end on ear flap (at the bottom and in the middle), place the string double and let it twine again. Make a knot at the end. Make another string at the bottom of the other ear flap. |
|
Have you finished this pattern?Tag your pictures with #dropspattern #babyblueshat or submit them to the #dropsfan gallery. Do you need help with this pattern?You'll find 8 tutorial videos, a Comments/Questions area and more by visiting the pattern on garnstudio.com. © 1982-2025 DROPS Design A/S. We reserve all rights. This document, including all its sub-sections, has copyrights. Read more about what you can do with our patterns at the bottom of each pattern on our site. |


With over 40 years in knitting and crochet design, DROPS Design offers one of the most extensive collections of free patterns on the internet - translated to 17 languages. As of today we count 314 catalogs and 11822 patterns - 11812 of which are translated into English (US/in).
We work hard to bring you the best knitting and crochet have to offer, inspiration and advice as well as great quality yarns at incredible prices! Would you like to use our patterns for other than personal use? You can read what you are allowed to do in the Copyright text at the bottom of all our patterns. Happy crafting!
Post a comment to pattern DROPS Baby 25-35
We would love to hear what you have to say about this pattern!
If you want to leave a question, please make sure you select the correct category in the form below, to speed up the answering process. Required fields are marked *.