
Popular categories
Looking for a yarn?


|
||||||||||||||||
DROPS 73-1 |
||||||||||||||||
 |
 |
|||||||||||||||
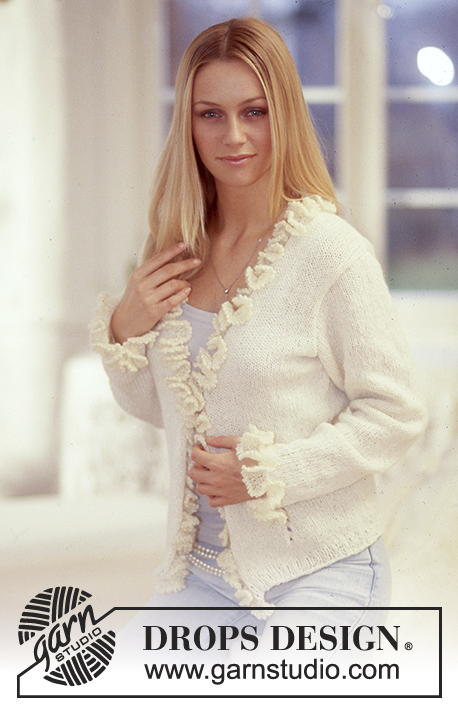
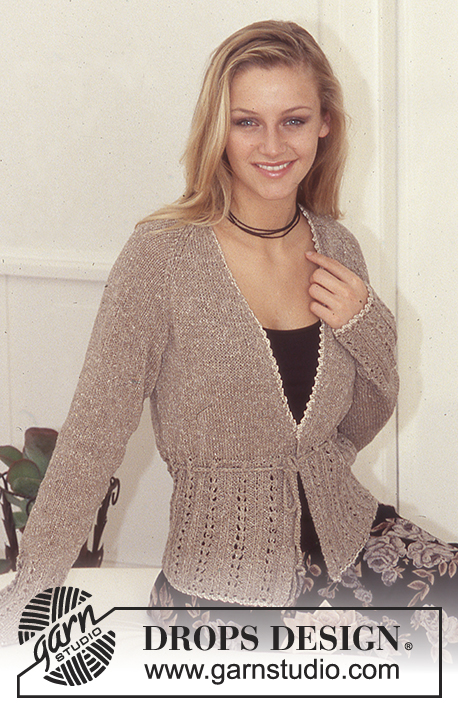
DROPS jacket and DROPS jumper in "Cotton Viscose" and "Safran" with pattern on front
DROPS 73-1 |
||||||||||||||||
|
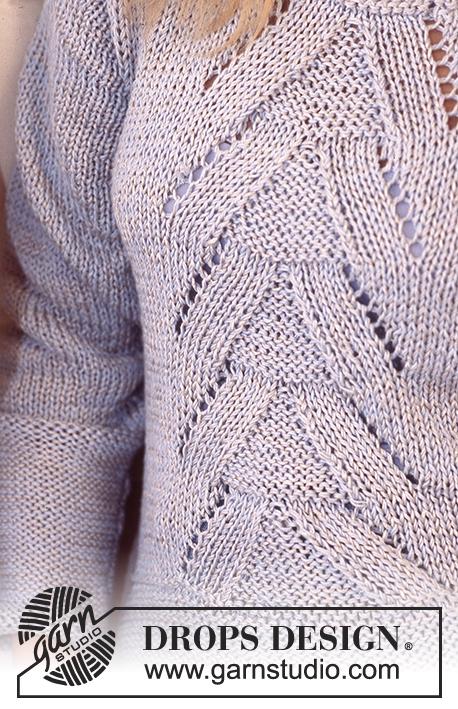
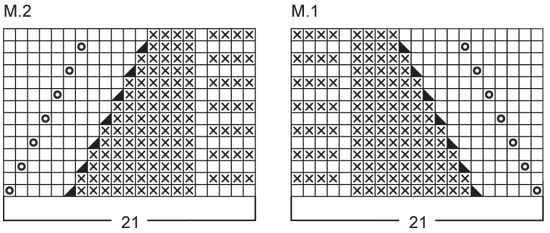
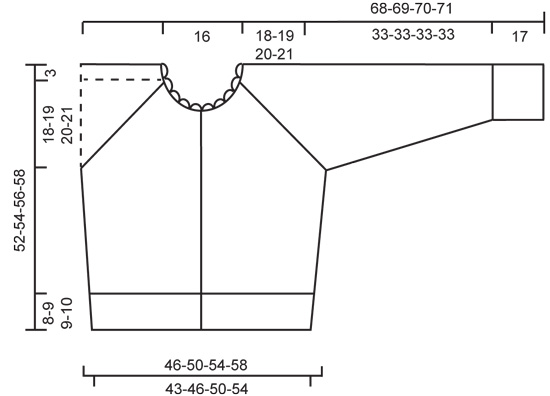
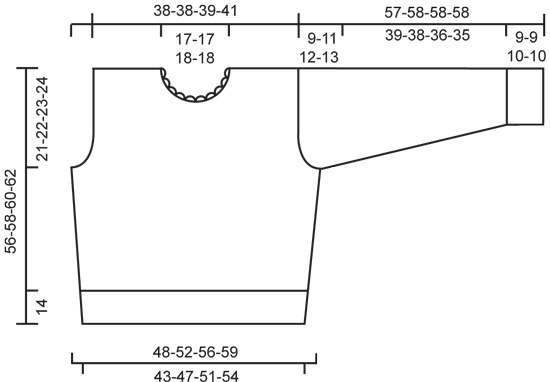
Knitting tension: 16 stitches x 20 rows with 1 strand Safran + 1 strand Cotton Viscose and needle size 5.5 mm and stocking stitch = 10 x 10 cm. Remember needle size is only a guide! Ridge/Garter stitch (back and forth on needle): 1 ridge = Knit 2 rows. DROPS jacket: Pattern: See diagrams M.1 and M.2. The pattern in the diagram is seen from the right side. 1 diagram = 1 repeat. Decrease tip (for raglan decreases on body): All decreases are worked from the right side! Decrease on inside of 4 stitches which are worked as follows from the edge: 1 edge stitch, 3 stitches stocking stitch. Decrease as follows after these 4 stitches: Slip 1 stitch as if to knit, K1, pass slipped stitch over. Decrease as follows before these 4 stitches: K2 together. ---------------------------------------------------------- Left front piece: Cast on 39-42-45-48 stitches (incl. 1 edge stitch in the side and 5 band stitches towards mid front) with needle size 5 mm and 1 strand Cotton Viscose and 1 strand Safran. Work 1 ridge, change to needle size 5.5 mm and continue with stocking stitch with the wrong side out, but the 5 band stitches are worked as follows from the edge all the way up: 4 stitches garter stitch + 1 stitch stocking stitch. Remember the knitting tension! When piece measures approx. 8-9-9-10 cm - adjust so that the next row is from the wrong side - purl 1 row from the wrong side where you increase 1 stitch in the side = 40-43-46-49 stitches, purl 1 row from the right side and purl 1 row from the wrong side again. Then work the next row as follows from the right side: 1 edge stitch, 18-21-24-27 stitches stocking stitch with right side out, then work M.1. Continue the pattern, at the same time increase 1 stitch in the side when piece measures 18 cm and 26 cm = 42-45-48-51 stitches. When piece measures 31-32-33-34 cm cast off 6 stitches in the side = 36-39-42-45 stitches. Read the whole of the next section before continuing! Raglan: Continue by decreasing to raglan - see Decrease tip: 1 stitch 2 times every 4th row, 1 stitch 11-10-9-8 times every 2nd row and then 1 stitch every row as far as you can, i.e. until the raglan decreases meet the neck decreases. Neckline: At the same time, when the piece measures 40-42-44-46 cm cast off for neck towards mid front every 2nd row: 7 stitches 1 time, 2 stitches 3 times and 1 stitch until all stitches are cast off. Piece measures approx 49-52-55-58 cm. Right front piece: Cast on and work as for left, but, instead of M.1, work M.2 from mid front so that the patterns match on each side of mid front. At the same time, work 5 buttonholes on band. 1 buttonhole = cast off 3rd stitch from mid front (working from right side) and cast on 1 new stitch over the cast off stitch on the next row. Work buttonholes when piece measures: Size S: 8, 16, 24 and 32 cm. Size M: 9, 17, 25 and 33 cm. Size L: 9, 18, 26 and 35 cm. Size XL: 10, 19, 28 and 37 cm. NOTE: The last buttonhole is worked when you have 1 ridge left on band before neckline. Back piece: Cast on 70-76-82-88 stitches (incl. 1 edge stitch in each side) with needle size 5 mm and 1 strand Safran + 1 strand Cotton Viscose. Work 1 ridge, Change to needle size 5 .5 mm and continue with stocking stitch with the wrong side out. When piece measures approx 8-9-9-10 cm - adjust so that the next row is from the wrong side - purl 1 row from the wrong side at the same time as you increase 1 stitch in each side = 72-78-84-90 stitches. Then purl 1 row from the right side and purl 1 row from the wrong side again. Continue with stocking stitch with the right side out over all stitches. At the same time, when piece measures 18 and 26 cm increase 1 stitch in each side = 76-82-88-94 stitches. When piece measures 31-32-33-34 cm cast off 6 stitches in each side = 64-70-76-82 stitches. Read the whole of the next section before continuing! Raglan: Continue by decreasing to raglan - see Decrease tip: 1 stitch 2 times every 4th row, 1 stitch 11-10-9-8 times every 2nd row and then 1 stitch 6-10-14-18 times every row. Cast off the remaining 26 stitches , piece measures approx 49-51-53-55 cm. Sleeve: Cast on 34-36-38-38 stitches (incl. 1 edge stitch in each side) with needle size 5 mm and 1 strand Cotton Viscose and 1 strand Safran. Work 1 ridge, change to needle size 5.5 mm and continue with stocking stitch with wrong side out. When piece measures 9 cm increase 1 stitch in each side every 3-3-3-2.5 cm a total of 13-13-14-15 times = 60-62-66-68 stitches. At the same time, when piece measures 17 cm work 1 ridge before continuing with stocking stitch with the right side out to finished length. When sleeve measures 50 cm cast off 6 stitches in each side. Continue to decrease for sleeve cap in each side - decrease from edge: 1 stitch every 2nd row 15-16-17-18 times. Then decrease on the back side of the sleeve: 1 stitch 3 times every 2nd row - at the same time as you decrease on the front of the sleeve: 4 stitches 3 times every 2nd row, then cast off the remaining stitches. Sleeve measures approx. 68-69-70-71 cm at the longest point, Work 1 more sleeve, where the top decreases for raglan are in reverse. Assembly: Sew raglan seams inside the 1 edge stitch on both body and sleeves so that you have 3 stitches stocking stitch between the decreases. Sew sleeve and side seams in one go inside the 1 edge stitch. Neck: Knit up approx. 75 to 82 stitches around neck with needle size 5 mm and 1 strand Safran + 1 strand Cotton Viscose. Knit 1 row from wrong side, then cast off. Crochet edge: Work around the neck with Cotton Viscose and hook size 3.5 mm as follows: Row 1: 1 double crochet in each stitch, finish with 3 chain stitches, turn piece. Row 2: 2 treble crochets in the first double crochet, * 1 chain stitch, skip 2 double crochets, 3 treble crochets in next double crochet *, repeat from *-*, cut the strand. Sew on buttons. DROPS jumper: Pattern: See diagram M.3 - pattern in diagram seen from right side. 1 diagram = 1 repeat. Decrease tip: Decrease on inside of 6 stitches which are worked as follows from edge: 5 stitches stocking stitch, 1 stitch garter stitch. All decreases are worked from the right side. Decrease as follows after these 6 stitches: Slip 1 stitch as if to knit, K1, pass slipped stitch over. Decrease as follows before these 6 stitches: K2 together. ---------------------------------------------------------------- Front piece: cast on 71-77-83-89 stitches (incl. 1 edge stitch in each side) with needle size 5 mm and 1 strand Cotton Viscose and 1 strand Safran. Work 1 ridge. Change to needle size 5.5 mm and continue with stocking stitch with the wrong side out. Remember the knitting tension! When piece measures approx. 14 cm - adjust so that the next row is worked from the wrong side - purl 1 row from the wrong side at the same time as you increase 1 stitch in each side = 73-79-85-91 stitches, then purl 1 row from the right side and purl 1 row from the wrong side again. Continue by working the next row as follows from the right side: 24-27-30-33 stitches stocking stitch with the right side out, M.3 (= 25 stitches), 24-27-30-33 stitches stocking stitch with the right side out. Continue this pattern at the same time as you increase 1 stitch in each side when piece measures 20, 26 and 32 cm = 79-85-91-97 stitches. When piece measures 35-36-37-38 cm, cast off 4-4-5-5 stitches in each side for armholes. Continue to cast off 2 stitches in each side every 2nd row: 0-1-1-2 times. Then cast off 1 stitch in each side every 2nd row on inside of the 6 stitches - see Decrease tip: 5-6-7-7 times = 61-61-63-65 stitches. Continue with 6th stitch from edge in each side in garter stitch. When piece measures approx. 46-48-50-52 cm - adjust to after 1 complete repeat of pattern - cast off the middle 13-13-15-15 stitches for neck. Then decrease on each side of neck every 2nd row: 2 stitches 1 time and 1 stitch 5 times = 17-17-17-18 stitches left on each shoulder. Cast off when piece measures 56-58-60-62 cm. Back piece: Cast on and work as for front piece, but do not work M.3 - work stocking stitch over these stitches. Cast off for armholes as for front piece and continue working until piece measures 54-56-58-60 cm. Now cast off the middle 25-25-27-27 stitches for neck. Continue by decreasing 1 stitch on next row towards neck = 17-17-17-18 stitches left on each shoulder. Cast off when piece measures 56-58-60-62 cm. Sleeve: Sleeve: Cast on 34-36-38-38 stitches (incl. 1 edge stitch in each side) with needle size 5 mm and 1 strand Cotton Viscose and 1 strand Safran. Work 1 ridge, change to needle size 5.5 mm and continue with stocking stitch with wrong side out. When piece measures 9-9-10-10 cm increase 1 stitch in each side every 2.5-2.5-2-2 cm a total of 15-15-16-17 times = 64-66-70-72 stitches. At the same time, when piece measures 17 cm, work 1 ridge before continuing with stocking stitch with the right side out to finished length. When sleeve measures 48-47-46-45 cm decrease for sleeve cap in each side every 2nd row: 3 stitches 1 time, 2 stitches 4 times and 1 stitch 1-2-3-4 times, then decrease 2 stitches until piece measures 56-57-57-57 cm then decrease 3 stitches 1 time. Piece measures approx. 57-58-58-58 cm, cast off the remaining stitches. Assembly: Sew right shoulder seam. Neck: Knit up approx. 70 to 78 stitches around the neck with needle size 5 mm and 1 strand Cotton Viscose + 1 strand Safran. Knit 1 row from wrong side and then cast off. Sew left shoulder seam and up along neck edge. Crochet edge: Work around neckline with Cotton Viscose and hook size 3.5 mm as follows: Row 1: 1 double crochet in each stitch, finish with 1 slip stitch in first double crochet at beginning of round. Row 2: 3 chain stitches, 2 treble crochets in first double crochet, * 1 chain stitch, skip 2 double crochets, 3 treble crochets in next double crochet *, repeat from *-*, finish with 1 slip stitch in 3rd chain stitch at beginning of round. Sew in sleeves and sew sleeve and side seams in one go inside the 1 edge stitch. |
||||||||||||||||
Diagram explanations |
||||||||||||||||
|
||||||||||||||||
|
||||||||||||||||

|
||||||||||||||||
|
||||||||||||||||
|
||||||||||||||||
|
Have you made this or any other of our designs? Tag your pictures in social media with #dropsdesign so we can see them! Do you need help with this pattern?You'll find tutorial videos, a Comments/Questions area and more by visiting the pattern on garnstudio.com. © 1982-2024 DROPS Design A/S. We reserve all rights. This document, including all its sub-sections, has copyrights. Read more about what you can do with our patterns at the bottom of each pattern on our site. |
||||||||||||||||


With over 40 years in knitting and crochet design, DROPS Design offers one of the most extensive collections of free patterns on the internet - translated to 17 languages. As of today we count 304 catalogues and 11422 patterns - 11422 of which are translated into English (UK/cm).
We work hard to bring you the best knitting and crochet have to offer, inspiration and advice as well as great quality yarns at incredible prices! Would you like to use our patterns for other than personal use? You can read what you are allowed to do in the Copyright text at the bottom of all our patterns. Happy crafting!
Comments / Questions (10)
Ho riscontrato che tutti I vostri modelli hanno le maniche per me troppo lunghe. Ho le braccia corte e il mio Busto misura 110 cm. Nel mio caso, dal polso all\'inizio scalfo, la manica misura 35-36cm, per l\'arrotondamento proseguo adattando le diminuzioni fino a quando il lavoro (dalle prime 4 maglie iniziali per lato) misura dai 18 ai 20 cm. La manica mi piace a giro e con un colmo ben modellato. Potete darmi un suggerimento più valido da usare nei vostri modelli? Grazie mille
22.09.2022 - 20:54DROPS Design answered:
Buonasera Michela, purtroppo non possiamo adattare le spiegazioni alle singole esigenze, ma può rivolgersi al suo rivenditore DROPS di fiducia per un'assistenza personalizzata. Buon lavoro!
22.09.2022 - 23:20Ho riscontrato che tutti I vostri modelli hanno le maniche per me troppo lunghe. Ho le braccia corte e il mio Busto misura 110 cm. Nel mio caso, dal polso all\'inizio scalfo, la manica misura 35-36cm, per l\'arrotondamento proseguo adattando le diminuzioni fino a quando il lavoro (dalle prime 4 maglie iniziali per lato) misura dai 18 ai 20 cm. La manica mi piace a giro e con un colmo ben modellato. Potete darmi un suggerimento più valido da usare nei vostri modelli? Grazie mille
22.09.2022 - 20:52DROPS Design answered:
Buonasera Michela, purtroppo non possiamo adattare le spiegazioni alle singole esigenze, ma può rivolgersi al suo rivenditore DROPS di fiducia per un'assistenza personalizzata. Buon lavoro!
22.09.2022 - 23:21Hallo, ja ich lese die Anleitung für diesen Pulli durch und werde immer verwirrter. Von wo fängt der Pulli an. von Oben oder unten? Und was ist mit krausrippe gemeint? Muss ich in der Hinreihe li. stricken? Ziemlich kompliziert so ohne ein Foto vom Pulli mit ganzer Ansicht oder einem Video dazu.
01.05.2022 - 18:06DROPS Design answered:
Liebe Frau Langer, der Pullover wird von unten nach oben gestrickt; 1 Krausrippe bedeutet 2 reihen rechts stricken (= 1 Hinreihe rechts + 1 Rückreihe rechts). Viel Spaß beim stricken!
02.05.2022 - 10:14I have been given some three ply wool and just wondered if any of your lovely patterns would be suitable for three ply wool? Any help you can give would be much appreciated. Many thanks.
19.01.2022 - 10:19DROPS Design answered:
Dear Mrs Symondson, you will find all our yarn sorted by group/tension here this might help you. Happy knitting!
19.01.2022 - 17:00Bonjour de très beaux modèles pas assez en aller retour lexique du point 73 1 mal expliquer réponse vous assez rapide j avais poser une question sur un autre pull jamais eu de réponse merci d avance expliquer vos point avec un numéro en mettant rang pair impair merci
23.05.2021 - 15:23DROPS Design answered:
Bonjour Mme Sassano, si les aiguilles circulaires vous dérangent, vous trouverez ici comment adapter sur aiguilles droites. Tous les rangs du point fantaisie figurent dans les diagrammes, vous trouverez ici comment lire ces diagrammes. Bon tricot!
25.05.2021 - 09:48Grazie,decisamente meglio!
10.11.2016 - 08:28Buonasera, sono a modellare l'arrotondamento della manica e non ho capito come proseguire dopo aver intrecciato le 6 m.a ogni lato. Potete aiutarmi ad andare avanti? Grazie
09.11.2016 - 22:57DROPS Design answered:
Buonasera Benedetta. Abbiamo modificato le spiegazioni dell'arrotondamento della manica. Ci riscriva se si trova ancora in difficoltà. Buon lavoro!
09.11.2016 - 23:45Grazie,anche x me è a m.rasata!Anche se la spiegazione parla di m.rasata rov.
29.10.2016 - 11:45Buonasera, non riesco a capire se il cardigan è lavorato a rasata rov o a diritto.Dalla fotografia è lavorato a rasata dir.mentre nelle spiegazioni è lavorato a rasata rovina. Sto facendo il dietro del cardigan.Grazie
28.10.2016 - 17:48DROPS Design answered:
Buonasera Benedetta. Chiederemo una verifica alla casa madre. Stando alla fotografia si lavora a maglia rasata diritta. Buon lavoro!
28.10.2016 - 21:17Buongiorno sto eseguendo il cardigan mi S -dietro.Il modello è lavorato a rasata rov ma nelle diminuzioni del raglan è spiegato di lavorare a diritto.Scusate ma non riesco a capire.Potete aiutarmi?grazie
27.10.2016 - 10:52DROPS Design answered:
Buonasera Benedetta. Molto probabilmente la lavorazione è a maglia rasata diritta come si vede nella fotografia e quindi le indicazioni per il raglan sono corrette. Buon lavoro!
28.10.2016 - 21:19