
Popular categories
Looking for a yarn?


Comments / Questions (8)
![]() Christine wrote:
Christine wrote:
Hi, I think there maybe an error at the point of 21cm and the decreasing shaping the V neck. It says to dec 1 st every 6 rows. Should it be every 4 rows otherwise there will be too many rows worked before the arm hole? I hope that makes sense. Thanks.
23.10.2023 - 22:51DROPS Design answered:
Dear Christine, V-neck decreases are right that way, they start quite soon, ie before the armhole and are smoothy worked on every 6th row. Happy knitting!
24.10.2023 - 09:03
![]() Margit wrote:
Margit wrote:
Ich habe eine Frage zum Muster am Ärmel. In M2 heißt es in Reihe 4, dass die 3 Maschen von links gestrickt werden sollen: 1 li abheben, 2 li zusammen stricken, die abgehobene überziehen. Wie mache ich das beim Rundstricken des Ärmels? Da habe ich ja kein stricken von li, und wenn ich das von rechts stricke, sieht es anders aus.
02.02.2022 - 16:23DROPS Design answered:
Liebe Margit, wenn Sie M.2 in Runden stricken, stricken Sie 3 Maschen rechts zusammen. Viel Spaß beim stricken!
03.02.2022 - 08:29
![]() Tina wrote:
Tina wrote:
Beim Raglan abketten schreiben sie: 1 M total 20-18-15-17 Mal auf alle 2.Ndl und 1 M total 10-16-24-24 Mal auf alle Ndl. Bedeutet dass, das 20 mal nur auf der Hinreihe abgekettet wird, und dann 10 mal auf der Hin- und Rückreihe? Oder was bedeutet: auf alle 2. Ndl, und auf alle Ndl?
09.11.2021 - 09:19DROPS Design answered:
Liebe Tina, ja genau, 20 Mal in jeder Hinreihe dann 10 Mal in jeder Reihe (Hin- sowie Rückreihen). Viel Spaß beim stricken!
09.11.2021 - 13:12
![]() Kate Beckett wrote:
Kate Beckett wrote:
With the band ditches do I need to add these in myself ? How far apart how many stitches ?
02.11.2021 - 22:36
![]() Kate Beckett wrote:
Kate Beckett wrote:
I don’t understand how the band stitches are added in. Are these already included or do I need to add them ? How many stitches would it require ? And how many spaces ?
02.11.2021 - 22:35
![]() Janne wrote:
Janne wrote:
Hvilken garngruppe tilhørte garnet Silke-Tweed som er utgått til denne oppskriften 73-12? Hva kan jeg bruke som alternativ?
02.06.2021 - 11:28
![]() Sylvia Karlsson wrote:
Sylvia Karlsson wrote:
Mönstret i diagram 2 stämmer inte. Rättelse
19.11.2014 - 17:13
![]() Meg wrote:
Meg wrote:
Er det ikke feil i v-fellinga. Begge er etter kantmaskene.
15.01.2014 - 21:03DROPS Design answered:
Det stemmer, inden de 3 m strikker du 2 r sammen. God fornøjelse!
06.02.2014 - 08:02
|
||||||||||||||||
DROPS 73-12 |
||||||||||||||||
|
|
||||||||||||||||
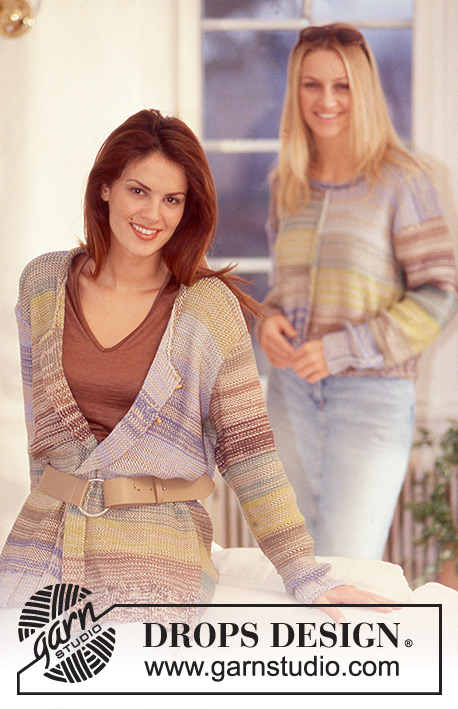
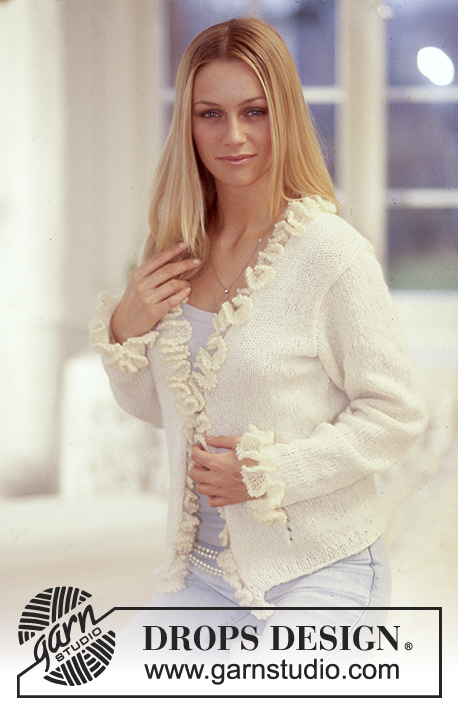
DROPS jacket with lace pattern and belt and crochet edges in "Silke-Tweed"
DROPS 73-12 |
||||||||||||||||
|
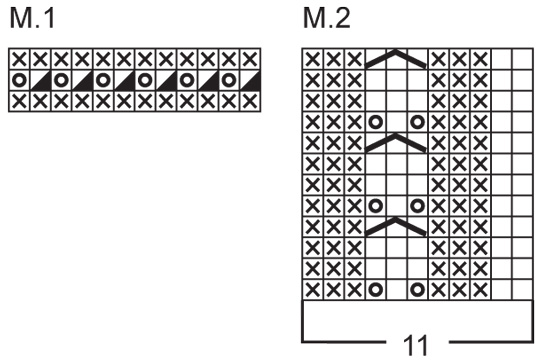
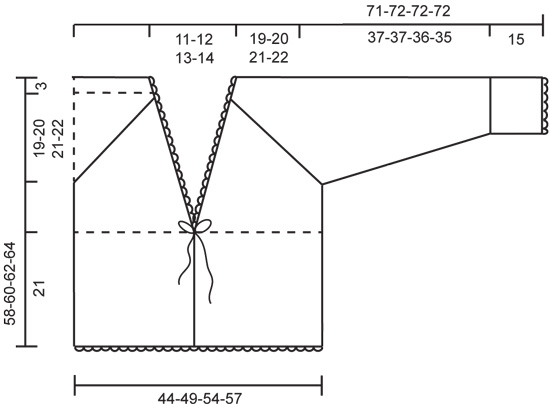
Knitting tension: 21 stitches x 26 rows = 10 x 10 cm with needle size 4 mm and stocking stitch. Remember needle size is only a guide! Ridge/Garter stitch (back and forth on needle): 1 ridge = Knit 2 rows. Pattern: See diagrams - M.1 and M.2. Pattern in diagram is seen from right side. M.2 contracts - to keep to the measurements in the sketch, you must dampen the pattern. Band: The bands are worked in garter stitch upwards - to make the bands neat, you need to work quite tightly. Decrease tip-1 (for V-neck): Decrease on inside of 3 edge stitches in garter stitch. All decreases are worked from the right side! Decrease as follows after these 3 stitches: Slip 1 stitch as if to knit, K1, pass slipped stitch over. Decrease as follows before the 3 stitches: K2 together. Decrease tip-2 (for decreases to raglan): Decrease on inside of 2 stitches as described in text. Decrease as follows from the right side: After raglan stitches: K2 together. Before raglan stitches: Slip 1 stitch as if to knit, K1, pass slipped stitch over. Decrease as follows from wrong side: After raglan stitches: Purl 2 twisted together. Before raglan stitches: Purl 2 together. ------------------------------------------------------------- Body: The jacket is worked back and forth with circular needle, from mid front. Cast on 183-205-227-239 stitches (incl. 3 band stitches in each side towards mid front) with circular needle size 4 mm and Silke-Tweed and work M.1, but band stitches are not worked into pattern. NOTE! Row 1 = wrong side - on row 2 in pattern finish with knit 1 and 3 band stitches. After M.1 increase 1 stitch in Sizes S, M and L = 184-206-228-239 stitches, at the same time on next row work as follows: 3 band stitches in garter stitch, M.2 over the next 176-198-220-231 stitches, finish with knit 2 and 3 band stitches in garter stitch. Remember the knitting tension! Read the whole of the next section before continuing! Continue with M.2 until piece measures approx. 21 cm - adjust to after 1 whole repeat of pattern. Now insert 1 marker thread 46-52-57-60 stitches in from each side = 92-102-114-119 stitches between marker threads on back piece. Continue with stocking stitch to finished length. At the same time, when piece measures 21 cm decrease for V-neck - see Decrease tip-1: 1 stitch a total of 12-13-14-15 times every 6th row. When piece measures 36-37-38-39 cm, cast off 8 stitches in each side for armholes (i.e. 4 stitches on each side of marker threads). There are now 84-94-106-111 stitches on back piece. Lay piece to one side and work sleeves. Sleeve: Cast on 56-56-56-56 stitches with double pointed needles size 4 mm and Silke-Tweed and work M.1. After M.1 continue with M.2 at the same time as, on the first round, you decrease 1 stitch in all sizes = 55-55-55-55 stitches. When piece measures 15 cm, continue with stocking stitch to finished length. At the same time, increase 2 stitches mid under the sleeve a total of 13-16-16-18 times, for Size S: Every 7th round. Size M: Every 6th round. Size L: Every 5th round and Size XL: Every 4th round. NOTE! In Sizes L and XL continue to increase 2 stitches mid under sleeve a total of 4 times every 2nd round = 81-87-95-99 stitches. When piece measures 52-52-51-50 cm cast off 8 stitches mid under sleeve for armholes = 73-79-87-91 stitches. Lay piece to one side and work 1 more sleeve. Yoke: Place sleeves on the same circular needle as the body where you have cast off stitches for armholes. Insert 1 marker thread in all transitions between body and sleeves = 4 marker threads. Continue with stocking stitch back and forth on needle at the same time as you decrease to raglan: Raglan decrease: Read the whole section before continuing. There are 8 decreases per row and 2 stitches between decreases (i.e. 1 stitch on each side of the marker threads). These 2 stitches = raglan stitches and are worked in stocking stitch. Decrease on each side of the raglan stitches - see Decrease tip: 1 stitch a total of 20-18-15-17 times every 2nd row and 1 stitch a total of 10-16-24-24 times every row. NOTE! On the front pieces, the raglan decreases will eventually overlap with the neck decreases and there will, therefore, not be as many as on the back piece - the numbers above are for the decreases on the back piece, decreases on front pieces continue until you meet the neck. After all decreases to raglan and neck there are approx. 50 stitches on needle and piece measures approx. 57-60-62-64 cm up to shoulder. NOTE! After decreases to raglan, place the 3 garter stitch stitches in each side on 1 thread. Assembly: Place the 3 garter stitch stitches on left front piece on needle size 4 mm. Continue with garter stitch until edge measures approx. 10-12 cm (measured to mid back, the edge will be stretched slightly when sewn on). Repeat over the 3 stitches on right front piece. Sew the two ridge edges together mid back and neatly sew the edge to the neckline in the outermost loop of the outermost stitch. Sew the opening under the sleeves. Neckline: Crochet with hook size 3 mm and Cotton Viscose - start after M.2 on right front piece, i.e. where the neckline begins. Work as follows: 1 double crochet, * 3 chain stitches, skip 4 rows (= 2 ridges), 1 double crochet in next row *, repeat from *-* around the neck and finish where the neckline starts on left front piece. Crochet in the same way around bottom of body and sleeves, but work 1 double crochet in each yarn over from M.1. Button loop: Crochet a loop on the wrong side of the right front piece where M.2 stops. Work with Silke-Tweed and hook size 3 mm: 1 double crochet, 3 chain stitches, fasten with 1 double crochet 1 cm higher up. Sew 1 button on wrong side of left front piece. “Belt”: Work a line of chain stitches - approx. 130 cm long - and thread it into the last row of holes in M.2 on body. |
||||||||||||||||
Diagram explanations |
||||||||||||||||
|
||||||||||||||||
|
||||||||||||||||
|
||||||||||||||||
Have you finished this pattern?Tag your pictures with #dropspattern or submit them to the #dropsfan gallery. Do you need help with this pattern?You'll find 27 tutorial videos, a Comments/Questions area and more by visiting the pattern on garnstudio.com. © 1982-2025 DROPS Design A/S. We reserve all rights. This document, including all its sub-sections, has copyrights. Read more about what you can do with our patterns at the bottom of each pattern on our site. |
||||||||||||||||


With over 40 years in knitting and crochet design, DROPS Design offers one of the most extensive collections of free patterns on the internet - translated to 17 languages. As of today we count 314 catalogues and 11822 patterns translated into English (UK/cm).
We work hard to bring you the best knitting and crochet have to offer, inspiration and advice as well as great quality yarns at incredible prices! Would you like to use our patterns for other than personal use? You can read what you are allowed to do in the Copyright text at the bottom of all our patterns. Happy crafting!
Post a comment to pattern DROPS 73-12
We would love to hear what you have to say about this pattern!
If you want to leave a question, please make sure you select the correct category in the form below, to speed up the answering process. Required fields are marked *.