
Looking for a yarn?


Comments / Questions (19)
![]() Chris wrote:
Chris wrote:
Van het 3d schaappatroon met de lussteek lukt het mij niet om toer 23 te beginnen. Of ik doe iets verkeerd of de uitleg begrijp ik niet. Willen en kunnen jullie mij ajb helpen, ik zou het heel erg vinden als ik na alle inspanningen van de lussteken moet stoppen terwijl het bijna klaar is op het kopje na. Alvast bedankt!!!
10.03.2024 - 14:26DROPS Design answered:
Dag Chris,
Nadat je de hals hebt gehaakt, hecht je de draad af en haak je als het ware dwars op de 6 rijen van de hals, dus 6 lussteken, Dan haakje halve vasten ien elk van de lussteken aan de voorkant, dit herhaal je aan de andere kant van de hals en tot slot haak je weer 6 lussteken in de 6 rijen op de andere kant van het 'dwarse' stukje.
11.03.2024 - 21:23
![]() CLAIRE MOMPO wrote:
CLAIRE MOMPO wrote:
Bonjour, Pouvez-vous me donner les mesures du mouton une fois terminé? D'avance merci, Cordialement,
04.02.2024 - 11:03DROPS Design answered:
Bonjour Mme Mompo, il mesure environ 12 cm de hauteur totale - cf en-tête (où vous retrouverez aussi les quantités, la laine utilisée et l'échantillon). Bon crochet!
05.02.2024 - 09:15
![]() Jana wrote:
Jana wrote:
Dobrý deň, snažím sa uháčkovať ovečku podľa návodu, ktorý tu máte zverejnený. Mám urobené telo ovečky. Chcem pokračovať krkom a hlavičkou, avšak neviem na to prísť ako mám ďalej postupovať. Nemôžete prosím zverejniť video ako postupovať alebo mi to nejako jednoducho vysvetliť? V háčkovaní som začiatočník. Ďakujem za pomoc.
15.03.2022 - 10:22
![]() Alba Ioseffini wrote:
Alba Ioseffini wrote:
Come trovare il tutorial per la pecorella? 💖
29.12.2021 - 11:33DROPS Design answered:
Ciao Alba, no ci sono. E solo il tutorial per 'Punti a occhiello all'uncinetto' QUI. Buon lavoro!
29.12.2021 - 15:22
![]() C Jan wrote:
C Jan wrote:
Hallo, ik maak dit schaapje met een heel ander bobbeltjes garen. Hebben jullie misschien ook een tekening van het patroon? Vr bedankt alvast
20.03.2019 - 13:10
![]() Charlotte wrote:
Charlotte wrote:
How do you make those little flowers in the grass?
24.02.2019 - 08:14DROPS Design answered:
Dear Charlotte, work 2 chain stitches and then 6 double crochets in the first chain stitch, and join with 1 slip stitch in the 2nd chain stitch. You'll find more crochet flower patterns here. Happy crocheting!
05.03.2019 - 14:24
![]() Sanchez wrote:
Sanchez wrote:
Bonjour, l'étape 23 du mouton est le moment de commencer la tête et je ne comprends pas votre explication, une petite vidéo serait elle possible? Merci
18.05.2017 - 17:21DROPS Design answered:
Bonjour Mme Sanchez, au tour 23, vous crochetez la tête en rond dans les mailles tout autour du cou: 6 m bouclette le long du côté du cou (rangs 17-22), 7 mc le long du devant (les m du tour 16 non crochetées au rang 17), 6 m bouclette le long de l'autre côté du cou et 6 m bouclettes dans le rang 22 = 25 m au total. Bon crochet!
19.05.2017 - 09:07
![]() Sanchez wrote:
Sanchez wrote:
Bonjour. Je n'arrive pas à comprendre la 23 ème étape, je suis complètement bloquée, pourriez vous m'aider en vidéo s'il vous plaît? Merci pour votre réponse
11.05.2017 - 21:16DROPS Design answered:
Bonjour Mme Sanchez, qu'appelez-vous la 23ème étape? À quel niveau en êtes-vous? Merci d'avance pour ces précisions complémentaires.
12.05.2017 - 08:44
![]() Gabi wrote:
Gabi wrote:
Liebes Drops Team Ich verstehe die 23 Reihe überhaupt nicht. Was ist damit gemeint, Schlingen-M seitlich in die in Hin und Rück-R gehäkelten Schlingen-M des Nackens häkeln 1Kett M in jede Schlingen -M usw. Danke im voraus Gabi
23.02.2016 - 13:32
![]() Marjan wrote:
Marjan wrote:
How to crochet the horns like the grey sheep has on his head? I could not find how to do this. Thanks for your answer
25.02.2015 - 16:12DROPS Design answered:
Dear Marjan, please click here to get the pattern for the horns, ie in the pattern to the ram. Happy crocheting!
25.02.2015 - 16:20
|
|
Dolly |
|
 |
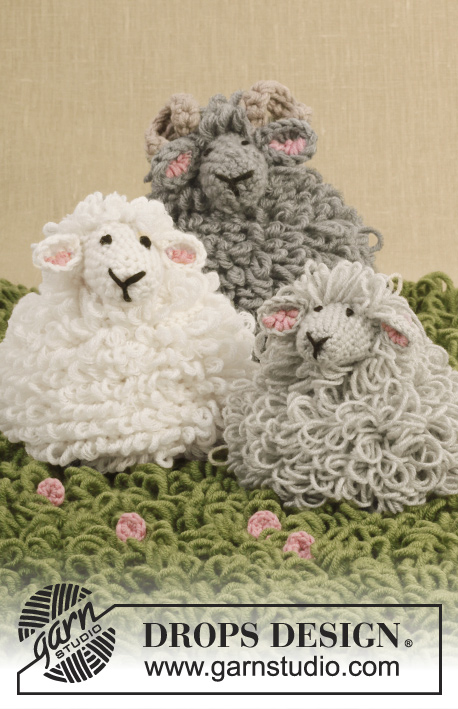 |
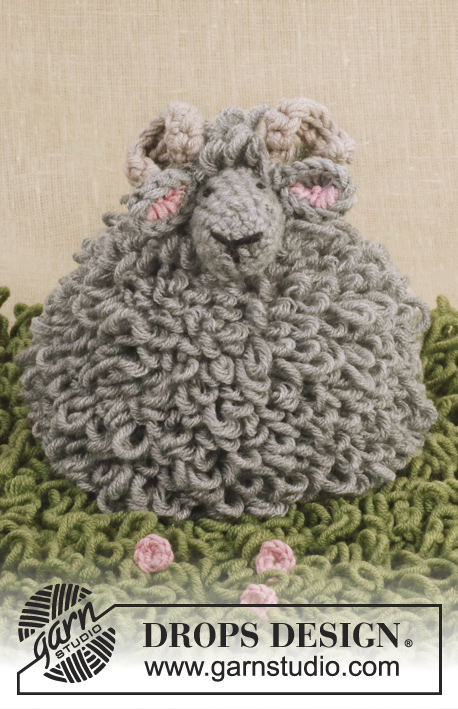
Crochet DROPS sheep with loop sts in ”Merino Extra Fine”. DROPS design: Pattern no me-065
DROPS Extra 0-947 |
|
|
CROCHET INFO: Beg every round with 1 ch (this does not replace first st but is extra). Finish with 1 sl st in first st from beg of round. DECREASE TIP: Dec 1 sc by working 2 sc tog as follows: * Insert hook in next sc, get yarn *, repeat from *-* one more time, make 1 YO and pull yarn through all 3 sts on hook. LOOP STS: Work as follows: * Pull out some yarn with your left finger, insert hook through st, get the yarn behind the finger and pull it through the st, there are now 2 sts on hook and a loop on your finger. Pull yarn end to make loop the right size. Get yarn end and pull it through both sts on hook the regular way *, repeat from *-*. MAGIC CIRCLE: When piece is worked in the round, start with this technique to avoid holes in the middle (instead of ch-ring): Hold the yarn end and wind the yarn one time around the index finger to make a loop. Hold the loop with left thumb and middle finger, place the yarn over left index finger. Insert hook through the loop, make a YO and pull yarn through loop, ch 1, then work sc around the loop. When the desired no of sc have been reached, pull the yarn end to tighten the loop. ---------------------------------------------------------- SHEEP: Piece is worked from bottom up, work from inside of piece so that loop sts are on the outside of piece. Work a base to be under the sheep, fasten this to the sheep when finished. BODY AND HEAD: Chain 50 with off white Merino Extra Fine on hook size 3.5 mm/E. Form a ring with 1 sl st into first ch. ROUND 1: READ CROCHET INFO! Work 1 sc in every ch the entire round. ROUND 2: Work LOOP STS - read explanation above, in all sc on round = 50 loop sts. ROUND 3-12: Work as 2nd round. ROUND 13: Work 1 loop st in first st, * skip 1 st, work 1 loop st in next st *, repeat from *-* the entire round = 25 loop sts. ROUND 14: Work loop sts in every loop st on round = 25 loop sts. ROUND 15: * Work 1 loop st in each of the first 3 sts, skip 1 st, work 1 loop st in each of the next 2 sts, skip 1 st *, repeat from *-* 2 more times and finish with 1 loop st in each of the last 4 sts = 19 loop sts. ROUND 16: Work loop sts in every loop st on round = 19 loop sts. Now work back and forth to make neck on sheep. ROW 17: (= inside) Work 12 loop sts from where previous round ended, turn piece. ROW 18: (= outside) Work 12 loop sts. Place loops towards you so that loops are on the outside. Or work as before and pull loops on to outside with a crochet hook afterwards. Turn piece. ROW 19: (= inside) Work 12 loop sts, turn piece. ROW 20: (= outside) Work 12 loop sts. Place loops towards you so that loops are on the outside. Or work as before and pull loops on to outside with a crochet hook afterwards. Turn piece. ROW 21: (= inside) Work 12 loop sts, turn piece. ROW 22: (= outside) Work 1 loop st in first st, * skip 1 st, work 1 loop st in next st *, repeat from *-* the entire row = 6 loop sts. Fasten off. Now work in the round to make the head on sheep. Continue to work with off white from inside, beg on left side of neck. ROUND 23: * Work loop sts in the side of loop sts worked back and forth on neck (= 6 loop sts) *. Work 1 sl st in each of the loop sts at the front of neck (= 7 sl sts). Repeat from *-* up along the other side of neck and finish with 1 loop st in each of the 6 loop sts from 22ND ROUND = 25 sts around the head. ROUND 24: Work loop sts in all loop sts and sl sts in all sl sts the entire round. ROUND 25-26: Work loop sts in all sts on round = 25 loop sts. Now work the snout with sc as follows: ROUND 27: READ DECREASE TIP! Work 1 sc in each of the next 4 sc, dec 1 sc, work 1 sc in each of the next 7 sc, dec 1 sc, work 1 sc in each of the next 10 sc = 23 sc on round. ROUND 28-30: Work 1 sc in every sc the entire round. ROUND 31: Work 1 sc in each of the next 4 sc, dec 1 sc, work 5 sc, dec 1 sc, work 1 sc in each of the next 10 sc = 21 sc on round. ROUND 32: * Work 1 sc in each of the next 3 sc, dec 1 sc *, repeat from *-* 3 more times, work 1 in last sc = 17 sc. ROUND 33: Work 1 sc in every sc the entire round. ROUND 34: * Work 1 sc in each of the next 3 sc, dec 1 sc *, repeat from *-* 2 more times and finish with 1 sc in each of the last 2 sc = 14 sc. ROUND 35: Work sc tog 2 by 2 the entire round = 7 sc. ROUND 36: Work 1 sc in every sc the entire round. Cut the yarn, baste it around the opening and the front on snout and tighten tog. Fasten the strand and embroider eyes, nose and mouth with black. BASE: Worked in the round in a circle. Loop sts are looser than regular sc and to make the base fit, do not tighten too much when working the base. ROUND 1: Beg by making a MAGIC CIRCLE – see explanation above, with 6 sc in circle. ROUND 2: Work 2 sc in every sc the entire round = 12 sc. ROUND 3: * Work 1 sc in next sc, 2 sc in next sc *, repeat from *-* the entire round = 18 sc. ROUND 4: * Work 1 sc in each of the next 2 sc, then 2 sc in next sc *, repeat from *-* the entire round = 24 sc. ROUND 5: * Work 1 sc in each of the next 3 sc, then 2 sc in next sc *, repeat from *-* the entire round = 30 sc. ROUND 6: * Work 1 sc in each of the next 4 sc, then 2 sc in next sc *, repeat from *-* the entire round = 36 sc. ROUND 7: * Work 1 sc in each of the next 5 sc, then 2 sc in next sc *, repeat from *-* the entire round = 42 sc. ROUND 8: * Work 1 sc in each of the next 6 sc, then 2 sc in next sc *, repeat from *-* the entire round = 48 sc. ROUND 9: Work 1 sc in every sc while AT THE SAME TIME inc 2 sts on round = 50 sc. Fill the sheep with some poly stuffing. Place the base under the sheep. Work parts tog with sl sts through sc from the base and ch on underside of sheep. Fasten off. If the base is too small, you can continue to inc evenly the same way as before after 8th round, but then you must sew the base on the underside. EAR: Work 4 ch on hook size 3.5 mm with off white and form a ring with 1 sl st in first ch. Work 3 ch and 13 dc in ch-ring, finish with 1 sl st in 3rd ch from beg of round. Embroider small sts inside the ear with pink. Fasten strands and fasten ear on the side of head. Work another ear the same way. LAWN: Ch 66 on hook size 5 mm / H/8 double strand olive Big Merino, turn piece. Work 1 sc in every ch the entire row. READ LOOP STS! Then work loop sts back and forth. NOTE! Make sure to place the loops towards the same side the entire way. Or work as before and pull loops on to one side with a crochet hook afterwards. Work until piece measures approx. 35 cm / 14" or desired measurements. Fasten off. |
|
Have you finished this pattern?Tag your pictures with #dropspattern or submit them to the #dropsfan gallery. Do you need help with this pattern?You'll find 7 tutorial videos, a Comments/Questions area and more by visiting the pattern on garnstudio.com. © 1982-2025 DROPS Design A/S. We reserve all rights. This document, including all its sub-sections, has copyrights. Read more about what you can do with our patterns at the bottom of each pattern on our site. |
|


With over 40 years in knitting and crochet design, DROPS Design offers one of the most extensive collections of free patterns on the internet - translated to 17 languages. As of today we count 314 catalogs and 11822 patterns - 11812 of which are translated into English (US/in).
We work hard to bring you the best knitting and crochet have to offer, inspiration and advice as well as great quality yarns at incredible prices! Would you like to use our patterns for other than personal use? You can read what you are allowed to do in the Copyright text at the bottom of all our patterns. Happy crafting!
Post a comment to pattern DROPS Extra 0-947
We would love to hear what you have to say about this pattern!
If you want to leave a question, please make sure you select the correct category in the form below, to speed up the answering process. Required fields are marked *.