DROPS Big Merino
DROPS Big Merino
100% Wool
from 4.55 $ /50g
Get the yarn to make this pattern from 9.10$.

The yarn cost is calculated from the pattern’s smallest size and the yarn’s cheapest product type. Looking for an even better price? You might find it on the DROPS Deals!

DROPS Super Sale

Big Billy

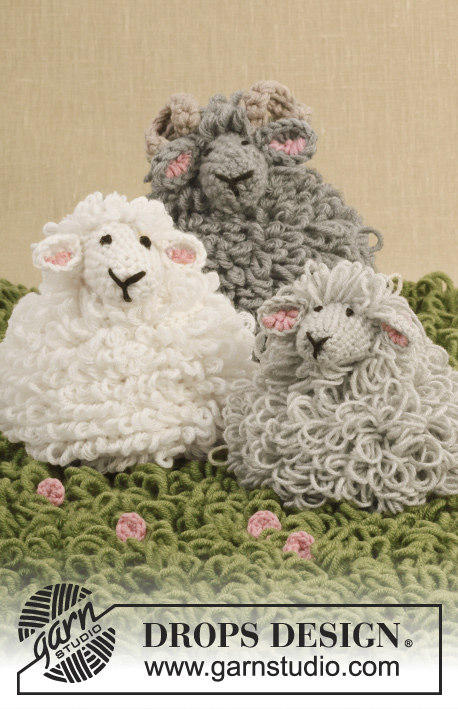
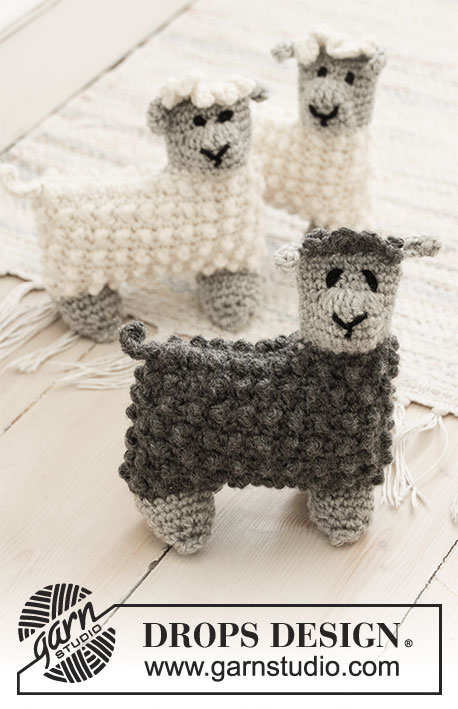
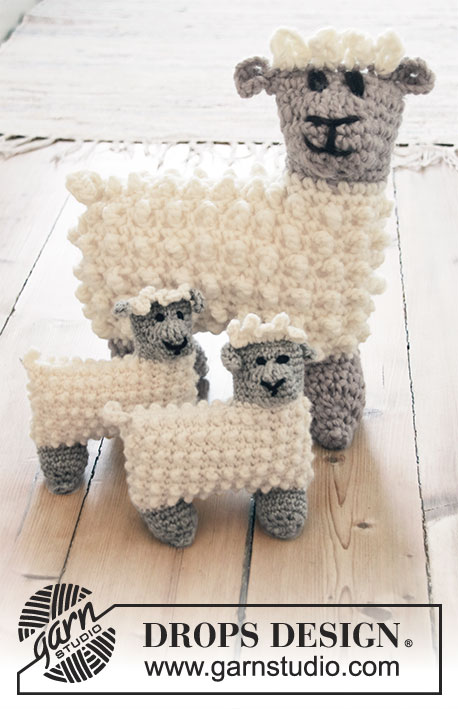
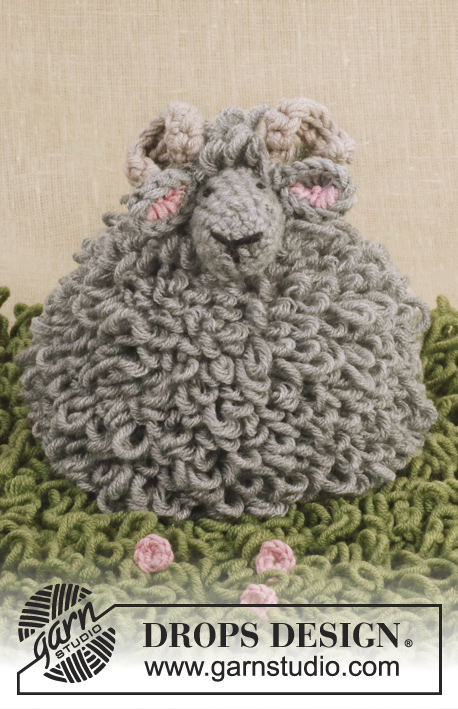
Crochet DROPS Ram with loop sts in "Big Merino". DROPS design: Pattern no mb-009

DROPS Extra 0-946
Yarn group C
-----------------------------------------------------------
RAM:
Measurements: approx. 14 cm / 5½’’ vertically.

Materials:
DROPS BIG MERINO from Garnstudio
100 g color no 02, gray
Some left-over black, light gray and pink for decoration.


LAWN:
Measurements: approx. 60 x 35 cm / 23½” x 14”
Materials:
DROPS BIG MERINO from Garnstudio
400 g color no 13, olive

DROPS CROCHET Hook size 5 mm / H/8
ACCESSORIES: Some poly stuffing for filling

Categories:
Children Home Kids Room Plushies Toys
Keywords:
animals

-------------------------------------------------------

Alternative Yarn – See how to change yarns here
Yarn Groups A to F – Use the same pattern and change the yarn here
Yarn usage using an alternative yarn – Use our yarn converter here

-------------------------------------------------------

DROPS Big Merino
DROPS Big Merino
100% Wool
from 4.55 $ /50g
Get the yarn to make this pattern from 9.10$.

The yarn cost is calculated from the pattern’s smallest size and the yarn’s cheapest product type. Looking for an even better price? You might find it on the DROPS Deals!

DROPS Super Sale

SAVE 30% on 6 cotton favorites!
Valid until 04.12.2024

Pattern instructions

NOTE: This pattern is written in American English. All measurements in charts are in cm. For conversion from inches to cm - click here. There are different terms for crocheting in American and British English. If this pattern includes crochet, click for "crochet terms" here. For this pattern in British English, please click here.
CROCHET INFO:
Beg every round with sc and loop sts with 1 ch (this does not replace first st but is extra). Finish with 1 sl st in first sc/loop st from beg of round.

DECREASE TIP:
Dec 1 sc by working 2 sc tog as follows: * Insert hook in next sc, get yarn *, repeat from *-* one more time, make 1 YO and pull yarn through all 3 sts on hook.

LOOP STS:
Work as follows: * Pull out some yarn with your left finger, insert hook through st, get the yarn behind the finger and pull it through the st, there are now 2 sts on hook and a loop on your finger. Pull yarn end to make loop the right size. Get yarn end and pull it through both sts on hook the regular way *, repeat from *-*.

MAGIC CIRCLE:
When piece is worked in the round, start with this technique to avoid holes in the middle (instead of ch-ring): Hold the yarn end and wind the yarn one time around the index finger to make a loop. Hold the loop with left thumb and middle finger, place the yarn over left index finger. Insert hook through the loop, make a YO and pull yarn through loop, ch 1, then work sc around the loop. When the desired no of sc have been reached, pull the yarn end to tighten the loop.
----------------------------------------------------------

RAM:
Piece is worked from bottom up, work from inside of piece so that loop sts are on the outside of piece. Work a base to be under the ram, fasten this to the ram when finished.

BODY AND HEAD:
Ch 50 with gray Big Merino on hook size 5 mm / H/8. Form a ring with 1 sl st in first ch.
ROUND 1: READ CROCHET INFO! Work 1 sc in every ch the entire round.
ROUND 2: Work LOOP STS - read explanation above, in all sc on round = 50 loop sts.
ROUND 3-12: Work as 2nd round.
ROUND 13: Work 1 loop st in first st, * skip 1 st, work 1 loop st in next st *, repeat from *-* the entire round = 25 loop sts.
ROUND 14: Work loop sts in every loop st on round = 25 loop sts.
ROUND 15: * Work 1 loop st in each of the first 3 sts, skip 1 st, work 1 loop st in each of the next 2 sts, skip 1 st *, repeat from *-* 2 more times and finish with 1 loop st in each of the last 4 sts = 19 loop sts.
ROUND 16: Work loop sts in every loop st on round = 19 loop sts.

Now work back and forth to make neck on ram.
ROW 17: (= inside) Work 12 loop sts from where previous round ended, turn piece.
ROW 18: (= outside) Work 12 loop sts. Place loops towards you so that loops are on the outside. Or work as before and pull loops on to outside with a crochet hook afterwards. Turn piece.
ROW 19: (= inside) Work 12 loop sts, turn piece.
ROW 20: (= outside) Work 12 loop sts. Place loops towards you so that loops are on the outside. Or work as before and pull loops on to outside with a crochet hook afterwards. Turn piece.
ROW 21: (= inside) Work 12 loop sts, turn piece.
ROW 22: (= outside) Work 1 loop st in first st, * skip 1 st, work 1 loop st in next st *, repeat from *-* the entire row = 6 loop sts. Fasten off.

Now work in the round to make the head on ram. Continue to work with gray from inside, beg on left side of neck.
ROUND 23: * Work loop sts in the side of loop sts worked back and forth on neck (= 6 loop sts) *. Work 1 sl st in each of the loop sts at the front of neck (= 7 sl sts). Repeat from *-* up along the other side of neck and finish with 1 loop st in each of the 6 loop sts from 22ND ROUND = 25 sts around the head.
ROUND 24: Work loop sts in all loop sts and sl sts in all sl sts the entire round.
ROUND 25-26: Work loop sts in all sts on round = 25 loop sts.

Now work the snout with sc as follows:
ROUND 27: READ DECREASE TIP! Work 1 sc in each of the next 4 sc, dec 1 sc, work 1 sc in each of the next 7 sc, dec 1 sc, work 1 sc in each of the next 10 sc = 23 sc on round.
ROUND 28-30: Work 1 sc in every sc the entire round.
ROUND 31: Work 1 sc in each of the next 4 sc, dec 1 sc, work 5 sc, dec 1 sc, work 1 sc in each of the next 10 sc = 21 sc on round.
ROUND 32: * Work 1 sc in each of the next 3 sc, dec 1 sc *, repeat from *-* 3 more times, work 1 sc in last sc = 17 sc.
ROUND 33: Work 1 sc in every sc the entire round.
ROUND 34: * Work 1 sc in each of the next 3 sc, dec 1 sc *, repeat from *-* 2 more times and finish with 1 sc in each of the last 2 sc = 14 sc.
ROUND 35: Work sc tog 2 by 2 the entire round = 7 sc.
ROUND 36: Work 1 sc in every sc the entire round. Cut the yarn, baste it around the opening and the front on snout and tighten tog. Fasten the strand and embroider eyes, nose and mouth with black.

BASE:
Worked in the round in a circle with gray on hook size 5 mm / H/8. Loop sts are looser than regular sc and to make the base fit, do not tighten too much when working the base.
ROUND 1: Beg by making a MAGIC CIRCLE – see explanation above, with 6 sc in circle.
ROUND 2: Work 2 sc in every sc the entire round = 12 sc.
ROUND 3: * Work 1 sc in next sc, 2 sc in next sc *, repeat from *-* the entire round = 18 sc.
ROUND 4: * Work 1 sc in each of the next 2 sc, then 2 sc in next sc *, repeat from *-* the entire round = 24 sc.
ROUND 5: * Work 1 sc in each of the next 3 sc, then 2 sc in next sc *, repeat from *-* the entire round = 30 sc.
ROUND 6: * Work 1 sc in each of the next 4 sc, then 2 sc in next sc *, repeat from *-* the entire round = 36 sc.
ROUND 7: * Work 1 sc in each of the next 5 sc, then 2 sc in next sc *, repeat from *-* the entire round = 42 sc.
ROUND 8: * Work 1 sc in each of the next 6 sc, then 2 sc in next sc *, repeat from *-* the entire round = 48 sc.
ROUND 9: Work 1 sc in every sc while AT THE SAME TIME inc 2 sts on round = 50 sc.
Fill the ram with some poly stuffing. Place the base under the ram. Work parts tog with sl sts through sc from the base and ch on underside of ram.
Fasten off. If the base is too small, you can continue to inc evenly the same way as before after 8TH ROUND, but then you must sew the base on the underside.

EAR:
Ch 4 on hook size 5 mm / H/8 with gray and form a ring with 1 sl st in first ch. Work 3 ch and 13 dc in ch-ring, finish with 1 sl st in 3rd ch from beg of round. Embroider small sts inside the ear with pink. Fasten strands and fasten ear on the side of head. Work another ear the same way.

HORN:
Ch 12 with double yarn with some left-over light gray on hook size 5 mm / H/8. Turn, beg to work in 2nd ch from hook, work 1 sc in each of the next 9 ch, finish with 1 sl st in last ch.
Cut the yarn and pull it through, fasten the horn right behind the ear. Work another horn the same way.

LAWN:
Ch 66 on hook size 5 mm / H/8 double strand olive Big Merino, turn piece. Work 1 sc in every ch the entire row. READ LOOP STS!
Then work loop sts back and forth. NOTE! Make sure to place the loops towards the same side the entire way. Or work as before and pull loops on to one side with a crochet hook afterwards.
Work until piece measures approx. 35 cm / 14’’ or desired measurements. Fasten off.
Do you have a question? See a list of frequently asked questions (FAQ)

Knitting tension is what determines the final measurements of your work, and is usually measured per 10 x 10 cm. It is provided like so: number of stitches in width x number of rows in height - eg: 19 stitches x 26 rows = 10 x 10 cm.

The knitting tension is very individual; some people knit/crochet loosely while others work tightly. You adjust the knitting tension with the needle size, which is why the suggested needle size only serve as a guide! You need to adjust this (up or down) to ensure that YOUR knitting tension matches the knitting tension provided in the pattern. If you work with a different knitting tension than provided you will have a different yarn consumption, and your work will have different measurements than what the pattern suggests.

The knitting tension also determines which yarns can replace each other. As long as you achieve the same knitting tension you can replace one yarn with another.

See DROPS lesson: How to measure your tension/gauge

See DROPS video: How to make a gauge tension swatch

The required amount of yarn is provided in grams, eg: 450 g. To calculate how many balls you’ll need you first need to know how many grams are in 1 ball (25g, 50g or 100g). This information is available if you click on the individual yarn quality on our pages. Divide the amount required with the amount of each ball. For example, if each ball is 50g (the most common amount), the calculation will be as follows: 450 / 50 = 9 balls.

The important thing when changing from one yarn to another is that the knitting/crochet tension remains the same. This is so that the measurements of the finished piece will be the same as on the sketch provided. It is easier to achieve the same knitting tension using yarns from the same yarn group. It is also possible to work with multiple strands of a thinner yarn to achieve the knitting tension of a thicker one. Please try our yarn converter. We recommend you to always work a test swatch.

Please NOTE: when changing yarn the garment might have a different look and feel to the garment in the photo, due to individual properties and qualities of each yarn.

See DROPS lesson: Can I use a different yarn than the one mentioned in the pattern?

All our yarns are categorised into yarn groups (from A to F) according to thickness and knitting tension – group A contains the thinnest yarns and group F the thickest. This makes it easier for you to find alternative yarns to our patterns, should you wish to switch yarn. All yarns within the same group have a similar knitting tension and can easily replace each other. However, different yarn qualities have different structures and properties which will give the finished work a unique look and feel.

Click here for an overview of the yarns in each yarn group

At the top of all our patterns you’ll find a link to our yarn converter, which is a helpful tool should you wish to use a different yarn than suggested. By filling in the yarn quality you wish to replace, the amount (in your size) and number of strands, the converter will present good alternative yarns with the same knitting tension. Additionally it will tell you how much you’ll require in the new qualities and whether you’ll need to work with multiple strands. Most skeins are 50g (some are 25g or 100g).

If the pattern is worked with multiple colours, every colour will have to be converted separately. Similarly, if the pattern is worked with several strands of different yarns (for example 1 strand Alpaca and 1 strand Kid-Silk) you will have to find alternatives for each, individually.

Click here to see our yarn converter

Since different yarns have different qualities and textures we have chosen to keep the original yarn in our patterns. However, you can easily find options among our available qualities by using our yarn converter, or simply pick a yarn from the same yarn group.

It is possible that some retailers still have discontinued yarns in stock, or that someone has a few skeins at home that they would like to find patterns for.

The yarn converter will provide both alternative yarn as well as required amount in the new quality.

If you think it's hard to decide what size to make, it can be a good idea to measure a garment you own already and like the size of. Then you can pick the size by comparing those measures with the ones available in the pattern's size chart.

You'll find the size chart at the bottom of the pattern.

See DROPS lesson: How to read size chart

The needle size provided in the pattern serves only as a guide, the important thing is to follow the knitting tension. And since knitting tension is very individual, you will have to adjust the needle size to ensure that YOUR tension is the same as in the pattern – maybe you’ll have to adjust 1, or even 2 needle sizes, up or down to achieve the correct tension. For this, we recommend that you work test swatches.

Should you work with a different knitting tension than the one provided, the measurements of the finished garment might deviate from the measurement sketch.

See DROPS lesson: How to measure your tension/gauge

See DROPS video: How to make a gauge tension swatch

Working a garment top-down provides more flexibility and room for personal adjustment. For example it is easier to try the garment on while working, as well as making adjustments to length of yoke and shoulder caps.

The instructions are carefully explaining every step, in the correct order. Diagrams are adjusted to the knitting direction and are worked as usual.

The diagram depicts all rows/rounds, and every stitch seen from the right side. It is read from bottom to top, from right to left. 1 square = 1 stitch.

When working back and forth, every other row is worked from the right side and every other row is worked from the wrong side. When working from the wrong side, the diagram will have to be worked reversed: from left to right, knit stitches are purled, purl stitches are knit etc.

When working in the round every round is worked from the right side and the diagram are worked from right to left on all rounds.

See DROPS lesson: How to read knitting diagrams

The diagram depicts all rows/rounds, and every stitch seen from the right side. It is worked from bottom to top, from right to left.

When working back and forth every other row is worked from the right side: from right to left and every other row is worked from the wrong side: from left to right.

When working in the round, every row in the diagram are worked from the right side, from right to left.

When working a circular diagram you start in the middle and work your way outwards, counter clockwise, row by row.

The rows usually start with a given number of chain stitches (equivalent to the height of the following stitch), this will either be depicted in the diagram or explained in the pattern.

See DROPS lesson: How to read crochet diagrams

Instructions for working several diagrams after each other on the same row/round, will often be written like so: “work A.1, A.2, A.3 a total of 0-0-2-3-4 times". This means you work A.1 once, then A.2 is worked once, and A.3 is repeated (in width) the number of times provided for your size – in this case like so: S = 0 times, M = 0 times, L=2 times, XL= 3 times and XXL = 4 times.

The diagrams are worked as usual: begin with the first row in A.1, then work the first row in A.2 etc.

See DROPS lesson: How to read knitting diagrams

See DROPS lesson: How to read crochet diagrams

The total width of the garment (from wrist-to-wrist) will be larger in the larger sizes, despite the actual sleeves being shorter. The larger sizes have longer sleeve caps and wider shoulders, so there will be a good fit in all sizes.

The measurement sketch/schematic drawing provides information regarding the full length of the garment. If it’s a jumper or a jacket the length is measured from the highest point on the shoulder (usually closest to the neckline), and straight down to the bottom of the garment. It is NOT measured from the tip of shoulder. Similarly, the length of yoke is measured from the highest point on the shoulder and down to where yoke is split into body and sleeves.

See DROPS lesson: How to read a schematic drawing

Diagrams are often repeated on the round or in height. 1 repeat is the diagram the way it appears in the pattern. If it says to work 5 repeats of A.1 in the round, then you work A.1 a total of 5 times after/next to each other in the round. If it says to work 2 repeats of A.1 vertically/in height you work the entire diagram once, then begin again at the start and work the entire diagram one more time.

Chain stitches are slightly narrower than other stitches and to avoid working the cast-on edge too tight, we simply chain more stitches to begin with. The stitch count will be adjusted on the following row to fit the pattern and measurement sketch.

The rib edge is more elastic and will contract slightly compared to, for example, stocking stitch. By increasing before the rib edge, you avoid a visible difference in width between the rib edge and the rest of the body.

It’s very easy to cast off too tightly, and by making yarn overs while casting off (and simultaneously casting these off) you avoid a too tight cast off edge.

See DROPS video: How to bind off with yarn overs (yo)

To achieve an even increase (or decrease) you can increase on, for example: every 3rd and 4th row alternately, like so: work 2 rows and increase on the 3rd row, work 3 rows and increase on the 4th. Repeat this until the increase is complete.

See DROPS lesson: Increase or decrease 1 st on every 3rd and 4th row alternately

Should you prefer to work in the round instead of back and forth, you may of course adjust the pattern. You’ll need to add steeks mid-front (usually 5 stitches), and follow the instructions. When you would normally turn and work from the wrong side, simply work across the steek and continue in the round. At the end you’ll cut the piece open, pick up stitches to work bands, and cover the cut edges.

See DROPS video: How to knit steeks and cut open

Should you prefer to work back and forth instead of in the round, you may of course adjust the pattern so you work the pieces separately and then assemble them at the end. Divide the stitches for the body in 2, add 1 edge stitch in each side (for sewing) and work the front and back pieces separately.

See DROPS lesson: Can I adapt a pattern for circular needles into straight needles?

Pattern repeats can vary slightly in the different sizes, in order to get the correct proportions. If you’re not working the exact same size as the garment in the photo, yours might deviate slightly. This has been carefully developed and adjusted so that the complete impression of the garment is the same in all sizes.

Make sure to follow instructions and diagrams for your size!

If you have found a pattern you like which is available in women’s size it’s not very difficult to convert it to men’s size. The biggest difference will be the length of sleeves and body. Start working on the women size that you think would fit across the chest. The additional length will be worked right before you cast off for the armhole/sleeve cap. If the pattern is worked top-down you can add the length right after the armhole or before the first decrease on sleeve.

Regarding additional yarn amount, this will depend on how much length you add, but it is better with a skein too many than too few.

All yarns will have excess fibres (from production) that might come off as lint or shedding. Brushed yarns (ie hairier yarns) have more of these loose, excess fibres, causing more shedding.

Shedding also depends on what is worn under or over the garment, and whether this pulls at the yarn fibres. It’s therefore not possible to guarantee that there will be no shedding

Below are some tips on how to get the best result when working with hairier yarns:

1. When the garment is finished (before you wash it) shake it vigorously so the looser hairs come off. NOTE: do NOT use a lint roller, brush or any method that pulls at the yarn.

2. Place the garment in a plastic bag and put it in your freezer - the temperature will cause the fibres to become less attached to each other, and excess fibres will come off easier.

3. Leave in the freezer for a few hours before taking it out and shaking it again.

4. Wash the garment according to the instructions on the yarn label.

Pilling is a natural process that happens to even the most exclusive of fibers. It's a natural sign of wear and tear that is hard to avoid, and that is most visible in high friction areas of your garment like a sweater's arms and cuffs.

You can make your garment look as new by removing the pilling, using a fabric comb or a pill/lint remover.

Still can't find the answer you need? Then scroll down and leave your question so one of our experts can try to help you. This will be done normally within 5 to 10 working days.
In the meantime, you can read the questions and answers that others have left to this pattern or join the DROPS Workshop on Facebook to get help from fellow knitters/crocheters!

You might also like...

Post a comment to pattern DROPS Extra 0-946

We would love to hear what you have to say about this pattern!

If you want to leave a question, please make sure you select the correct category in the form below, to speed up the answering process. Required fields are marked *.

Comments / Questions (6)

country flag Loyaux wrote:

Bonjour, comment trouver les explicationd en français sui sont diso=ponible selon ravelry ?

29.11.2023 - 22:13

DROPS Design answered:

Bonjour Mme Loyaux, cliquez sur le menu déroulant sous la photo pour changer la langue et ainsi accéder aux explications en français de ce modèle (mais aussi accéder à tous nos autres modèles en français). Bon crochet!

30.11.2023 - 10:14

country flag Hanna Van Opstal wrote:

Leuk

17.04.2023 - 17:07

country flag LECOMTE wrote:

Bonjour, je suis en train de crocheter le modèle Extra 0-946 et je ne comprends pas l'explication du tour 23. Que signifie "Crocheter sur le côté des mailles" ? Pourriez vous m'aider ? Je ne comprends pas comment on arrive à 25 mailles. Je vous remercie de votre réponse. Sylvie Guigo Lecomte

23.06.2021 - 21:47

DROPS Design answered:

Bonjour Mme Lecomte, vous avez crocheté le corps en rond sur 19 m au dernier tour puis le cou en rangs sur 12 m seulement. Au tour 23, vous crochetez de nouveau en rond le long des rangs 17 à 22 (= 1 m dans chaque début/fin de rang) + dans les mailles laissées libres du tour 16 (= 7 mailles) + le long de l'autre côté des rangs 17 à 22 (= 1 m dans chaque début/fin de rang) + dans les 6 m du dernier rang, vous devez ainsi avoir 25 m au total. Bon crochet!

24.06.2021 - 08:31

country flag Sewon wrote:

I'm following instruction but it is so hard to understand what does that mean from 23rd to 26th round. As I understood, it should be knitted from left to right, then how can I get 25sts in the end? And should I work on 7sts left 16th round while I'm working on knitting side to side? Or just let those and then do sl st later?

28.06.2020 - 23:30

DROPS Design answered:

Dear Mrs Sewon, when you crochet in the round, you always crochet from the right towards the left - you should have 25 stitches on each of the round 23 and 25-26. This video below might help you to crochet the loop pattern. Happy crocheting!

29.06.2020 - 08:56

country flag Micheline wrote:

Ce modèle est très joli et relativement simple une fois qu'on a compris les bouclettes. Merci beaucoup!!!!

17.07.2019 - 14:50

country flag Célié wrote:

Ce modele peut il etre tricoté aux aiguilles

23.05.2018 - 09:39

DROPS Design answered:

Bonjour Mme Célié, ce modèle peut être probablement adapté pour être tricoté au lieu d'être crocheté, mais nous ne sommes malheureusement pas en mesure de pouvoir ajuster chaque modèle à chaque demande individuelle. Pour toute assistance complémentaire, merci de bien vouloir vous adresser au magasin où vous avez acheté votre laine. Bon tricot!

23.05.2018 - 14:32