
Looking for a yarn?


Comments / Questions (37)
![]() Manuela Pereira wrote:
Manuela Pereira wrote:
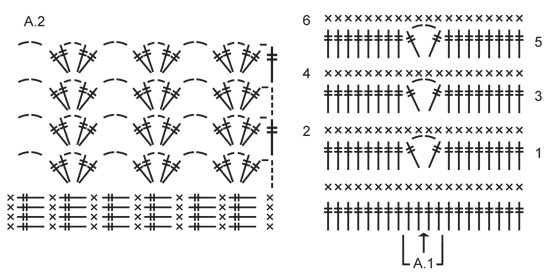
Obrigada pela partilha deste bonito modelo. Estou na fase das orlas frentes, diagrama A.2, e não sei o que fazer com os 2 pc do fim de cada carreira. É que as instruções não dizem como finalizar o último leque de cada carreira. Obrigada.
02.11.2022 - 23:33DROPS Design answered:
Bom dia, Os 2 pc servem para ligar os leques. No fim de cada carreira, faz 1 pad tal como fez no princípio. Bons crochés!
03.11.2022 - 10:07
![]() Ourd59 wrote:
Ourd59 wrote:
Bonjour Je veux réaliser ce modèle , j’ai réalisé l’échantillon et je constate que les DB sont sur l’envers Est ce normal ? Merci
14.12.2021 - 22:03DROPS Design answered:
Bonjour Ourd59, en général, les rangs de double-brides sont sur l'endroit et ceux de mailles serrées sur l'envers, mais ce peut être un choix personnel. Si vous voulez les double-brides sur l'endroit, considérez le tout premier rang du bas de la veste comme un rang sur l''envers. Bon crochet!
15.12.2021 - 08:06
![]() Ourd59 wrote:
Ourd59 wrote:
Bonjour , J’ai l’intention de réaliser ce gilet et j’ai fait l’échantillon et je constate que les DB sont sur l’envers de l’ouvrage et les ms sur l’endroit . Est ce normal ? Merci
14.12.2021 - 21:58
![]() Stephanie wrote:
Stephanie wrote:
Bonjour. Je ne comprend pas la 2ème partie du DOS.après les 60cm de hauteur. Que faire? Merci
11.06.2019 - 14:15DROPS Design answered:
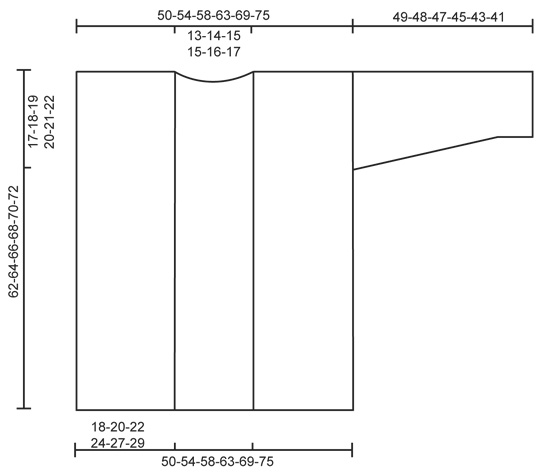
Bonjour Stéphanie, vous allez maintenant former l'encolure en ne crochetant que les 22 premières du rang (taille S): tournez, crochetez 1 rang de double-brides sur les 22 premières mailles, tournez, crochetez 1 rang de ms sur ces 22 m, coupez le fil. Crochetez maintenant les 22 m de l'autre épaule de la même façon en laissant les 16 mailles centrales non travaillées, elles vont former l'encolure dos. Bon crochet!
11.06.2019 - 14:59
![]() Becky wrote:
Becky wrote:
Hi! Lovely pattern - quick question. This is the first piece of clothing I’ve ever crocheted. When I do the assembly, which side of the fabric is the “right” side? I see texture on both! Would it be the side that is facing me when I am working the single crochet? (I am right handed.) Thank you!
07.08.2018 - 05:23DROPS Design answered:
Dear Becky, the right side of piece is the side where you crocheted trebles (the single crochets were worked from WS). Happy crocheting!
07.08.2018 - 09:41
![]() Val wrote:
Val wrote:
Hello\r\nI have worked the jacket front & back pieces to the point where all is level at 64cm tall (size M). I do not understand where the next instructions are worked. \"Now work 1 texture row back and forth over the outermost 24 sts on shoulder\"\r\nI have not cut the yarn at the end of the back piece but I am not sure I then continue from the same point. The picture or diagrams are not helpful to me. Please help. Thanks in advance. Val :-)
13.04.2018 - 16:52DROPS Design answered:
Dear Val, When back piece measures 62 cm in size M (or adjust after a row with dc), you will now shape neck working only on the first sts on each side for the shoulder, ie turn and work 1 textured row over the first 24 sts, cut yarn. And work now 1 textured row over the first 24 sts from the other side = leave the middle 17 sts unworked for neckline on back piece. Happy crocheting!
13.04.2018 - 17:16
![]() Val wrote:
Val wrote:
Hello I am making this in size M but may want the jacket to be slightly longer than 64cm. If I add more rows to the jacket, will it mess up the band later? I have read the instructions for the band and it seems to me that the band works with a certain number of rows. Could you please confirm what multiples I need to work with? Thanks in advance :-)
02.04.2018 - 17:04DROPS Design answered:
Dear Val, each fan in A.2 is worked over 4 sts, to get A.2 working around you will have to get the number of rows matching. You can always adjust by working the front bands skipping more/less rows to get the front band working. Happy crocheting!
03.04.2018 - 09:32
![]() Martha Van Dam wrote:
Martha Van Dam wrote:
Waar kan ik maten vinden zodat ik kan kijken welke ik moet nemen bedankt Martha
27.01.2016 - 13:25DROPS Design answered:
Hoi Martha. Onderaan het patroon vind je de afmetingen per maat in cm.
27.01.2016 - 15:26Rose wrote:
Is the jacket part of the pattern supposed to be just the back of the cardigan of does it include the from as well ? My current jacket part has an enormous width (100 cm) and I'm reaching gauge. It's either too big for just the back or too small for being both...
09.01.2016 - 12:41DROPS Design answered:
Dear Rose, the jacket part consists on both front pieces + back piece worked together to armholes, you then finish each piece separately. You will find check measurements for each size in chart at the bottom of the pattern. Happy crocheting!
11.01.2016 - 09:41
![]() Beth wrote:
Beth wrote:
I will be starting this pattern shortly. I just want to clarify when the pattern says it is written in American English that means i do not have to convert from UK crochet terms. I was a little confused by the note in that same paragraph that says "If this pattern includes crochet, click for "crochet terms" here." That seems to indicate i need to be doing US DC when the pattern says TR??? Thanks in advance
08.09.2015 - 22:03DROPS Design answered:
Dear Beth, you can always check the written language for the pattern with the flag under the picture. If it is written in US-English, you can follow it as usual. Crochet terminology is different for crocheting in British and American English that's the reason why we advice to check the language. As you can see here, a dc in US-English is a tr in UK-English. Happy crocheting!
09.09.2015 - 09:49
|
||||||||||
Otus#otuscardigan |
||||||||||
|
|
||||||||||
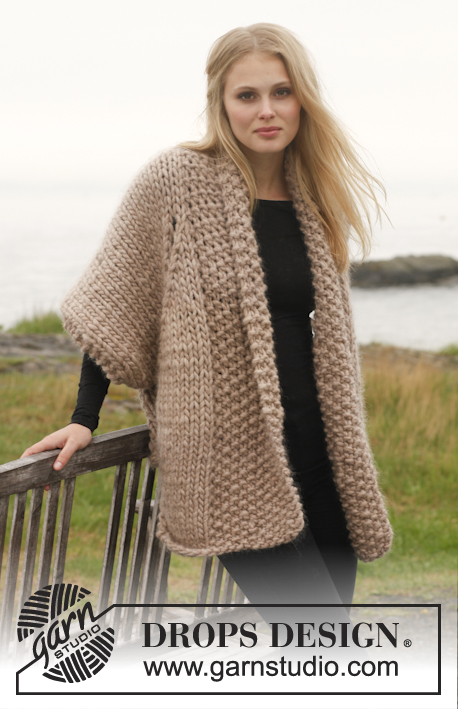
Crochet DROPS jacket with bands in fan pattern in ”Nepal”. Size: S - XXXL.
DROPS 151-26 |
||||||||||
|
CROCHET INFO: At beg of every sc row beg with ch 1, then work 1 sc in first st before continuing with 1 sc in every st (ch does NOT count as 1 st). Finish row with 1 sc in 4th ch from beg of previous row. At beg of every tr row beg with 4 ch in 1st st, then work 1 tr in every st (4 ch = 1st tr). Finish row with 1 tr in first sc from beg of previous row. TEXTURE ROWS: * 1 row tr, 1 row sc *, repeat from *-* until finished measurements - NOTE: Work in every sc/tr from previous row and not between. PATTERN: See diagram A.1 (applies to sleeve) and A.2 (applies to band). ---------------------------------------------------------- JACKET: Ch 139-151-163-179-196-213 on hook size 5 mm / H with Nepal. Work first row as follows: 1 sc in 2nd ch from hook, * 1 sc in each of the 3 next ch, skip 1 ch *, repeat from *-* until 1-1-1-1-2-3 ch remain and finish with 1 sc in each of the last ch = 104-113-122-134-147-160 sc, turn piece. READ CROCHET INFO and work TEXTURE ROWS upwards – see explanation above. REMEMBER THE CROCHET GAUGE! When piece measures approx. 45-46-47-48-49-50 cm / 17¾"-18"-18½"-19"-19¼"-19¾", divide for armholes and finish each part separately as follows: FRONT PIECE: Continue with texture rows back and forth over the outermost 22-24-26-29-32-35 sts in one side of piece (= front piece). When piece measures approx. 62-64-66-68-70-72 cm / 24⅜"-25¼"-26"-26¾"-27½"-28⅜"– finish after 1 row with sc, cut the yarn. Repeat over the outermost 22-24-26-29-32-35 sts in the other side of piece. BACK PIECE: Continue with texture rows back and forth over the 60-65-70-76-83-90 sts on back piece until piece measures approx. 60-62-64-66-68-70 cm / 23⅝"-24⅜"-25¼"-26"-26¾"-27½" – make sure that last row is 1 row with sc. Now work 1 texture row (i.e. 1 row tr + 1 row sc) back and forth over the outermost 22-24-26-29-32-35 sts on shoulder. Cut the yarn and repeat over the outermost 22-24-26-29-32-35 sts in the other side (i.e. do not work over the middle 16-17-18-18-19-20 sts = neckline in the back of neck). Fasten off. SLEEVE: Work 35-37-37-40-40-43 ch on hook size 5 mm / H with Nepal. Work first row as follows: 1 sc in 2nd ch from hook, * 1 sc in each of the 3 next ch, skip 1 ch *, repeat from *-* until 1-3-3-2-2-1 ch remain and finish with 1 sc in each of the last ch = 26-28-28-30-30-32 sc, turn piece. Then work texture rows back and forth. READ THE REST OF SLEEVE BEFORE CONTINUING! AT THE SAME TIME on 5th row (i.e. on third row with tr), insert 1 marker in the middle of piece. Work tr as before until 2 sts remain before marker, work pattern according to diagram A.1 over the next 4 sts, i.e. work as follows: Skip 1 st, 1 tr in next st, ch 2, 1 tr in next st, skip 1 st and continue the rest of row with tr as before. Continue pattern as shown in A.1 (arrow in the middle of A.1 shows marker). AT THE SAME TIME on 4th-4th-4th-4th-3rd-3rd row with tr (piece measures approx. 9-9-9-9-6-6 cm / 3½"-3½"-3½"-3½"-2½"-2½"), inc 1 tr in each side by working 2 tr in second and next to last tr in each side. Repeat inc every other row with tr 6-4-3-3-2-1 more time (= 7-5-4-4-3-2 inc in total in each side) and then on every row with tr 0-3-5-5-7-8 times in total = 40-44-46-48-50-52 sts. When piece measures 49-48-47-45-43-41 cm / 19¼"-19"-18½"-17¾"-17"-16⅛" (shorter measurements in the larger sizes because of wider shoulders), cut the yarn. Work another sleeve the same way. ASSEMBLY: Sew the shoulder seams. Sew sleeve seams tog edge to edge in outer loops of edge sts. Sew sleeves in armhole with neat, little stitches - make sure to avoid a tight seam. BAND: Beg from RS at the bottom on right front piece and work as shown in diagram A.2, i.e. work as follows: ROW 1: 1 sc in first st, ch 5 (= 1 tr + 1 ch), in first tr work 2 tr + ch 2 + 2 tr + ch 2, * skip 1 tr, in next tr work 2 tr + ch 2 + 2 tr + ch 2 *, repeat from *-* along right front piece, along the neckline at the back of neck and down along left front piece. Turn piece. ROW 2: 5 ch (= 1 tr + 1 ch), then work as follows in every ch-space in the middle of every tr-group: 2 tr + ch 2 + 2 tr, ch 2. Repeat 2nd row until a total of 4-4-5-5-5-5 rows have been worked. Work last row as follows: 5 ch (= 1 tr + 1 ch), then work as follows in every ch-space in the middle of every tr-group: 3 tr + ch 2 + 3 tr + ch 2. When row is done, cut the yarn. Fasten all strands. |
||||||||||
Diagram explanations |
||||||||||
|
||||||||||
|
||||||||||
|
||||||||||
Have you finished this pattern?Tag your pictures with #dropspattern #otuscardigan or submit them to the #dropsfan gallery. Do you need help with this pattern?You'll find 4 tutorial videos, a Comments/Questions area and more by visiting the pattern on garnstudio.com. © 1982-2025 DROPS Design A/S. We reserve all rights. This document, including all its sub-sections, has copyrights. Read more about what you can do with our patterns at the bottom of each pattern on our site. |
||||||||||


With over 40 years in knitting and crochet design, DROPS Design offers one of the most extensive collections of free patterns on the internet - translated to 17 languages. As of today we count 314 catalogs and 11822 patterns - 11812 of which are translated into English (US/in).
We work hard to bring you the best knitting and crochet have to offer, inspiration and advice as well as great quality yarns at incredible prices! Would you like to use our patterns for other than personal use? You can read what you are allowed to do in the Copyright text at the bottom of all our patterns. Happy crafting!
Post a comment to pattern DROPS 151-26
We would love to hear what you have to say about this pattern!
If you want to leave a question, please make sure you select the correct category in the form below, to speed up the answering process. Required fields are marked *.