
Popular categories
Looking for a yarn?


Comments / Questions (47)
![]() Marie Louise Christensen wrote:
Marie Louise Christensen wrote:
Jeg kan ikke forstå, hvorfor jeg i kantstykket skal lave en kædemaske og så en kædemaske og en fastmaske? Overgangen bliver ikke usynlig. Hvorfor kan man ikke bare sætte et mærke og så køre videre? Det kan jeg bare gøre, men jeg vil da lige høre jer ad først.
01.11.2017 - 16:40DROPS Design answered:
Hej Marie Louise, ellers vil overgangen automatisk flytte sig fra omgang til omgang og derved blive lidt skæv. Men som du skriver er det jo en smags sag, så du må gerne bare fortsætte rundt hvis du vil det :)
15.11.2017 - 14:07
![]() MC wrote:
MC wrote:
Beste, Een pracht van een bolero waar ik meteen aan begonnen ben, maar..vanaf (Herhaal dit meerderen elke 3-6-10-10 cm 4-2-1-nog 1 keer) loop ik vast. Als er stond: 4-2-1-1 keer, dan zou ik het snappen. Door het woordje -nog- twijfel ik. Ik doe meerderen na elke 6 cm en dat 2x...heb ik dit juist? Graag uw reactie en alvast bedankt. Met vriendelijke groet, MC
09.02.2016 - 14:13DROPS Design answered:
Hoi MC. Het is een fout in de vertaling. Het moet "nog 4-2-1-1 keer" zijn. Het patroon is aangepast. Veel haakplezier verder.
09.02.2016 - 16:30
![]() Pernilla Johansson Wallin wrote:
Pernilla Johansson Wallin wrote:
Älskar mönstret, men saknar storlek 34. Hur ska jag göra för att få den anpassad till min storlek? Tack på förhand
08.02.2016 - 12:56DROPS Design answered:
Hej. Vi har dessvärre inte möjlighet att anpassa mönster, men det kan hända att din återförsäljare kan hjälpa dig med detta. Med vänlig hälsning DROPS Design
26.02.2016 - 09:11
![]() Elizabeth Baker wrote:
Elizabeth Baker wrote:
Size XXL Aftter round two on the edge piece I end up with 15 chain spaces, is this correct?
19.12.2015 - 17:52
![]() Sharon wrote:
Sharon wrote:
I'm having difficulties with the Vivien bolero pattern as my stitch count is very different from that stated on the pattern. To make the second size, L/XL I started with 85 chain to end up with the 73 dc as per pattern. This finishes up as 79 after the increases are made. Following the section "edge piece" I have 79 not 76 dc. After the 38 chain for the armhole I get the 64 dc by decreasing the 73 original worked chain by 9.
15.05.2015 - 17:13
![]() Rosa Bruna Ricciardi wrote:
Rosa Bruna Ricciardi wrote:
Bello anche in cotone,ne ho realizzati 3, 1in cotone.
17.02.2015 - 12:28
![]() STEPH DOS wrote:
STEPH DOS wrote:
Tout d'abord merci pour vos superbes modèles. J'ai commencé ce boléro mais je ne comprends pas comment faire les augmentations (taille s/m). Pouvez-vous m'expliquer comment augmenter pour l'avant dernier rang du graphique A.1. Merci.
06.02.2015 - 09:53DROPS Design answered:
Bonjour Mme Dos et merci. Pour augmenter 1 B de chaque côté, crochetez simplement 2 B dans la 2ème B du début du rang et 2 B dans l'avant dernière B à la fin du rang. Continuez ensuite A.1 comme avant (vous aurez d'abord 3 B de chaque côté, puis 4 B et ainsi de suite). Bon crochet!
06.02.2015 - 11:34
![]() Juliane wrote:
Juliane wrote:
Hallo. Tolles Modell. Ich überlege gerade wie das Randteil beginnen soll: am oberen Ende des Rückenteils (in S) habe ich nach der regelmäßigen Zunahme 75 Maschen? Ist das richtig? Anfangs habe ich mit 65 Maschen begonnen und dann insgesamt 5 Mal 2 Stb pro R zugenommen. Was ist mit "gleichmäßig verteilt 71 fM" gemeint? Muss ich irgendwo 4 Maschen überspringen? Ich hoffe meine Fragen sind verständlich. Viele Grüße
18.08.2014 - 21:07DROPS Design answered:
Liebe Juliane, die Zunahmen haben Sie richtig gemacht. Es ist nicht genau angegeben, wie Sie die 71 fM häkeln sollen, denn Sie enden ja mit irgendeiner R von A.1 und die Reihen von A.1 haben nicht alle die gleiche M-Zahl (wenn Sie alle Stb und Lm zählen). Es geht nun darum, dass Sie in Ihre letzte R von A.1 71 fM häkeln, gleichmäßig verteilt heißt, dass Sie in regelmäßigen Abständen Stb/Lm überspringen, denn Sie haben ja mehr Stb und Lm als 71.
19.08.2014 - 09:49Gina wrote:
Voorpand = Rand
08.08.2014 - 14:16
![]() Edith Hoekstra wrote:
Edith Hoekstra wrote:
Ik mis de beschrijving van het voorpand in dit patroon....
07.08.2014 - 17:53
|
||||||||||||||||
Vivien#vivienbolero |
||||||||||||||||
 |
 |
|||||||||||||||
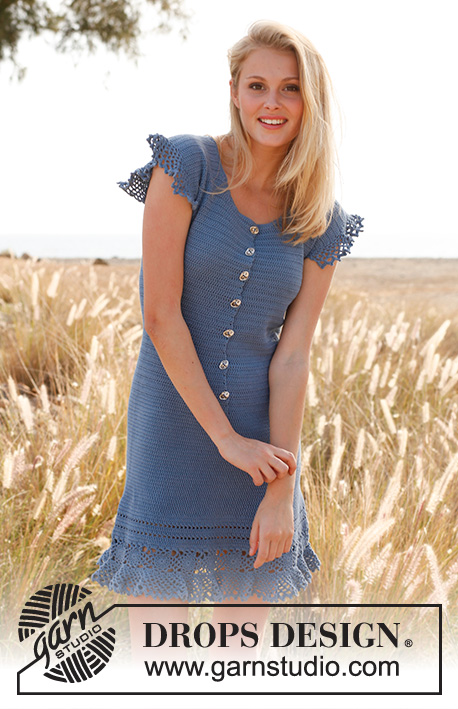
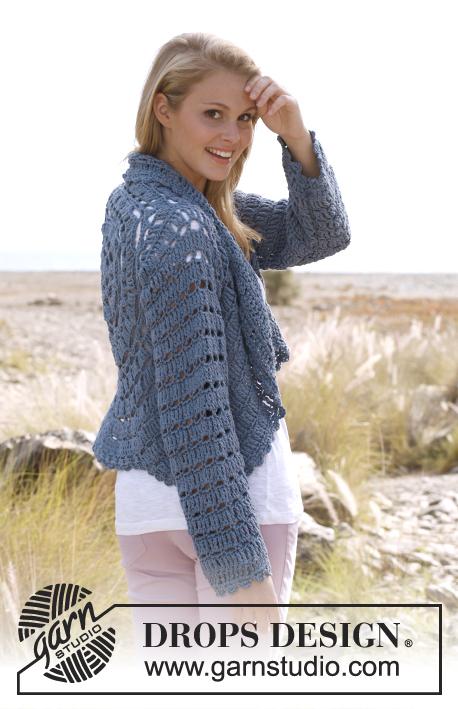
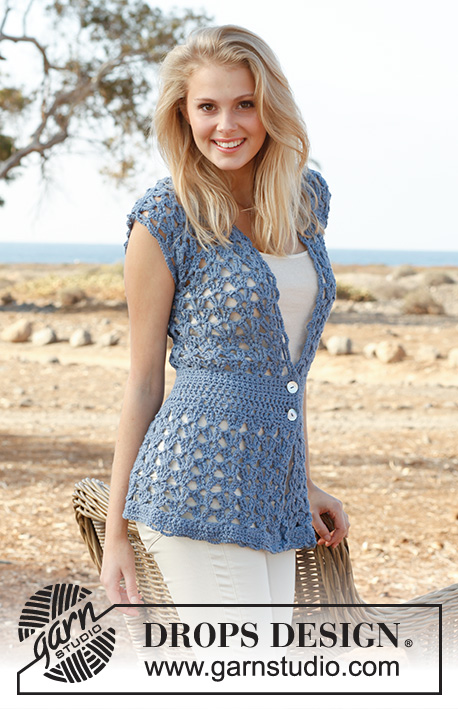
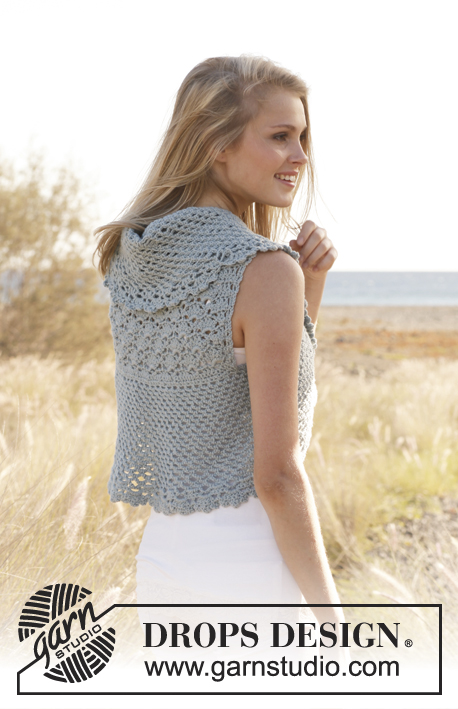
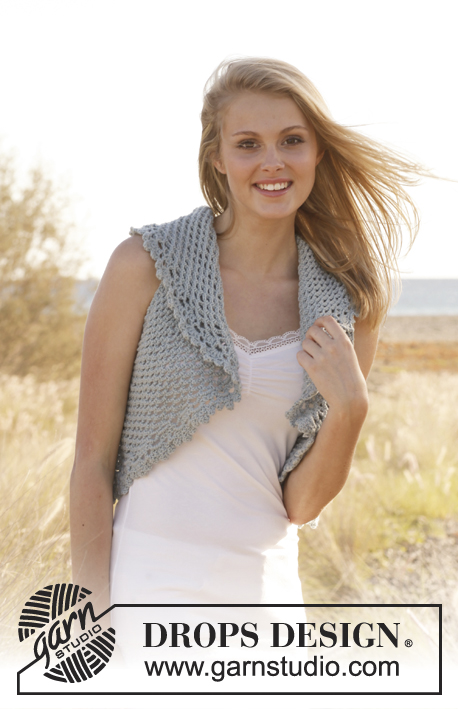
Crochet DROPS bolero in ”Merino Extra Fine”. Size: S - XXXL
DROPS 145-8 |
||||||||||||||||
|
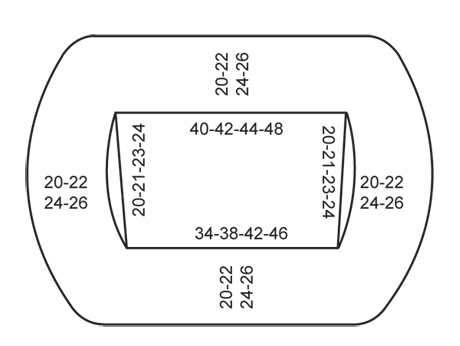
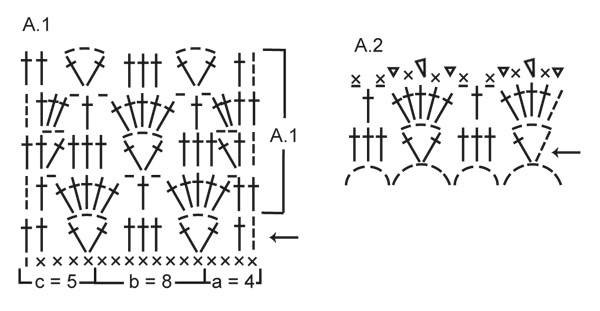
PATTERN: See diagrams A.1 and A.2. INCREASE TIP: Inc 1 dc in each side by working 2 dc in next to last dc in each side. CROCHET INFO: Replace first dc on every row with 3 ch and finish every row with 1 dc in 3rd ch from beg of previous row. -------------------------------------------------------- BACK PIECE: Work 75-84-93-103 ch on hook size 4 mm / G/6 with Merino Extra Fine. Turn and work as follows: 1 sc in 2nd ch from hook, then work 1 sc in each of the next 3-5-7-3 ch, * skip ch 1, work 1 sc in each of the next 6 ch *, repeat from *-* the entire row = 65-73-81-89 sc (first ch = 1 sc). Continue with pattern according to A.1 – beg with row marked with 1 arrow as follows: a over the first 4 sts, b until 5 sts remain, then c. There are now 8-9-10-11 repetitions of pattern on row. Repeat the next 4 rows in diagram until finished measurements. REMEMBER THE CROCHET GAUGE! At the same time when piece measures 4-5-6-7 cm / 1½"-2"-2½"-2¾", inc 1 dc in each side - READ INCREASE TIP. Repeat inc every 3-6-10-10 cm / 1"-2½"-4"-4" 4-2-1-1 more time – work the inc sts only in dc. Continue the pattern until piece measures 20-21-23-24 cm / 8"-8¼"-9"-9½", do not cut the yarn - continue with edge piece. EDGE PIECE: Beg by working 1 row with sc at the top along back piece - work 71-76-79-85 sc evenly, continue with 36-38-41-43 LOOSE ch (= armhole), then work 1 sc in every sc along bottom edge of back piece but skip 8-9-10-12 sc evenly (= 57-64-71-77 sc), continue with 36-38-41-43 LOOSE ch (= armhole), fasten with 1 sl st in first sc at the top of back piece = 200-216-232-248 sts in total, cut the yarn. Then beg all rounds in the middle at the top on back piece. ROUND 1: Beg with 1 sl st in middle sc, then work as follows: * ch 3, skip 1 st, 1 sc in next st *, repeat from *-* around the entire bolero and until mid back again, finish round with 3 ch and 1 sl st in first sl st from beg of round = 100-108-116-124 ch-spaces on round. ROUND 2: Work 1 sl st + 1 sc in first ch-space, * ch 3, 1 sc in next ch-space *, repeat from *-* the entire round, finish with 1 sl st in first sc. Then work as 2nd round until edge measures approx. 5-6-7-8 cm / 2"-2½"-2¾"-3". WORK NEXT ROUND AS FOLLOWS: Work 1 sl st + 1 sc in first ch-space, * ch 4, 1 sc in next ch-space, ch 3, 1 sc in next ch-space *, repeat from *-* the entire round, finish with 1 sl st in first sc. Continue like this with 3 and 4 ch in every ch-space alternately until edge measures approx. 9-10-11-12 cm / 3½"-4"-4½"-4¾". WORK NEXT ROUND AS FOLLOWS: Work 2 sl sts + 1 sc in first ch-space, * ch 4, 1 sc in next ch-space *, repeat from *-* the entire round, finish with 1 sl st in first sc. Continue with 4 ch in every ch-space until edge measures approx. 12-13-15-17 cm / 4¾"-5"-6"-6¾". WORK NEXT ROUND AS FOLLOWS: Work 2 sl sts + 1 sc in first ch-space, * ch 5, 1 sc in next ch-space, ch 4, 1 sc in next ch-space *, repeat from *-* the entire round, finish with 1 sl st in first sc. Continue like this with 4 and 5 ch in every ch-space alternately until edge measures approx. 15-17-19-21 cm / 6"-6¾"-7½"-8¼". WORK NEXT ROUND AS FOLLOWS: Work sl sts until middle of first ch-space (this should be a 5-ch-space) - also see diagram A.2, this round is marker with 1 arrow in diagram: ch 6, 1 dc in same ch-space, * 3 dc in 4-ch-space, 1 dc + 3 ch + 1 dc in next 5-ch-space *, repeat from *-* the entire round, finish with 3 dc in last 4-ch-space and 1 sl st in 3rd ch from beg of round. WORK NEXT TO LAST ROUND AS FOLLOWS: 3 ch + 4 dc in first 3-ch-space, * ch 1, 1 dc in the middle of the 3 dc worked in 4-ch-space from previous round, ch 1, 5 dc in next 3-ch-space *, repeat from *-* the entire round, finish with ch 1, 1 dc in the middle of the last 3 dc, 1 ch and 1 sl st in 3rd ch from beg of round. WORK LAST ROUND AS FOLLOWS: * ch 3, 1 dc in the first ch made, skip first dc, 1 sc in next dc, ch 3, 2 dc in the first ch made, skip 1 dc, 1 sc in next dc, ch 3, 1 dc in the first ch made, skip 1 dc, 1 sc in next ch, skip dc between dc-groups, 1 sc in next ch *, repeat from *-* the entire round, finish with 1 sl st in first ch from beg of round. Fasten off. Edge measures approx. 20-22-24-26 cm / 8"-8¾"-9½"-10¼". EDGE AROUND ARMHOLES: Along the armhole on back piece work as follows: 1 sl st in first dc, * ch 3, 1 sc in next dc *, repeat from *-*, along front piece work as follows: * ch 3, skip 1 st, 1 sc in next st *, repeat from *-*, finish with ch 3 and 1 sl st in first sl st from beg of round. |
||||||||||||||||
Diagram explanations |
||||||||||||||||
|
||||||||||||||||
|
||||||||||||||||
|
||||||||||||||||
Have you finished this pattern?Tag your pictures with #dropspattern #vivienbolero or submit them to the #dropsfan gallery. Do you need help with this pattern?You'll find 5 tutorial videos, a Comments/Questions area and more by visiting the pattern on garnstudio.com. © 1982-2025 DROPS Design A/S. We reserve all rights. This document, including all its sub-sections, has copyrights. Read more about what you can do with our patterns at the bottom of each pattern on our site. |
||||||||||||||||


With over 40 years in knitting and crochet design, DROPS Design offers one of the most extensive collections of free patterns on the internet - translated to 17 languages. As of today we count 314 catalogs and 11822 patterns - 11812 of which are translated into English (US/in).
We work hard to bring you the best knitting and crochet have to offer, inspiration and advice as well as great quality yarns at incredible prices! Would you like to use our patterns for other than personal use? You can read what you are allowed to do in the Copyright text at the bottom of all our patterns. Happy crafting!
Post a comment to pattern DROPS 145-8
We would love to hear what you have to say about this pattern!
If you want to leave a question, please make sure you select the correct category in the form below, to speed up the answering process. Required fields are marked *.