Hayfield Beauty

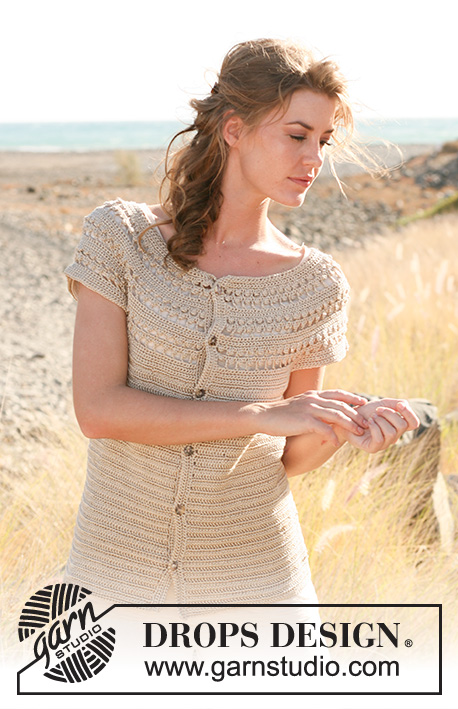
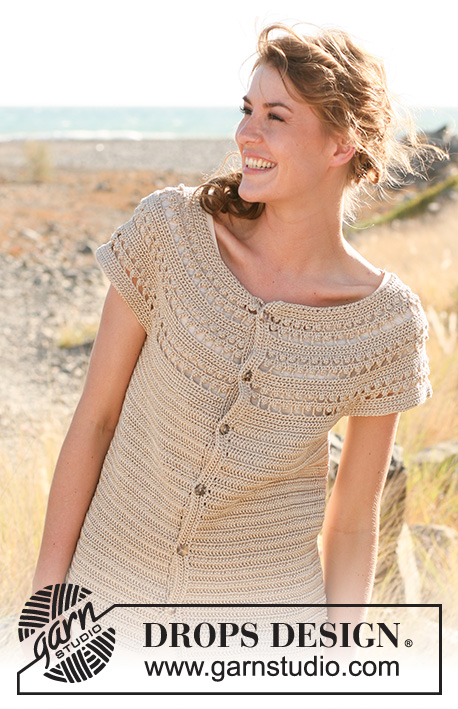
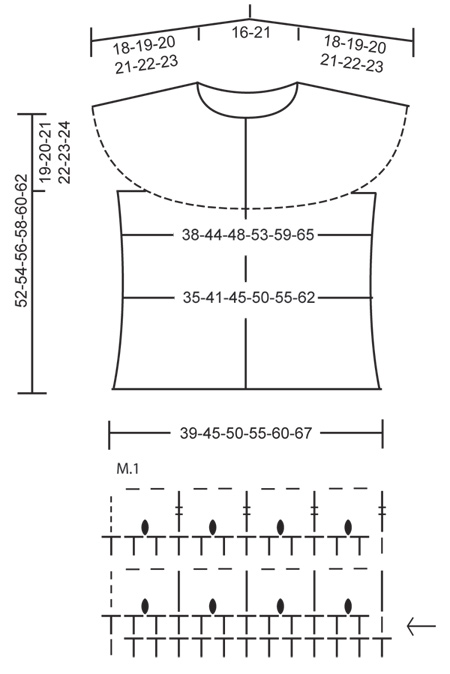
Crochet DROPS short sleeved jacket with lace pattern and round yoke in ”Cotton Viscose”. The piece is worked top down. Size: S - XXXL.

DROPS 130-10
DROPS design: Pattern no N-131
--------------------------------------------------------
Size: S - M - L - XL - XXL - XXXL
Finished measurements:
Bust: 76-88-96-106-118-130 cm / 30"-34½"-37 3/4"-41 3/4"-46½"-51"
Full length: 52-54-56-58-60-62 cm / 20½''-21¼''-22''-22¾''-23 5/8''-24 3/8''

Materials: DROPS COTTON VISCOSE from Garnstudio
Color no 17, gold beige: 400-450-450-500-550-600 g

DROPS CROCHET HOOK size 3.5 mm/E/4 – or size needed to get 22 dc/sc = width 10 cm / 4''.

DROPS MOTHER-OF-PEARL BUTTON w/HOLES, NO 521: 6-6-6-7-7-7 pieces

-------------------------------------------------------

Alternative Yarn – See how to change yarns here
Yarn Groups A to F – Use the same pattern and change the yarn here
Yarn usage using an alternative yarn – Use our yarn converter here

-------------------------------------------------------

DROPS Super Sale

SAVE 30% on 6 cotton favorites!
Valid until 04.12.2024

Pattern instructions

NOTE: This pattern is written in American English. All measurements in charts are in cm. For conversion from inches to cm - click here. There are different terms for crocheting in American and British English. If this pattern includes crochet, click for "crochet terms" here. For this pattern in British English, please click here.
CROCHET INFO:
Replace first sc on every sc row with ch 1 and finish every sc row with 1 sc in ch from beg of previous row.
Replace first dc on every dc row with ch 3 and finish every dc row with 1 dc in 3rd ch from beg of previous row.

INCREASE TIP:
Inc 1 sc by working 2 sc in 1 sc.
Inc 1 dc by working 2 dc in 1 dc.

DECREASE TIP:
Dec 1 dc by working 1 dc but wait with last pull through (= 2 sts on hook), then work next dc but on last pull through, pull thread through all sts on hook = 1 dc dec.

PATTERN:
See explanation below or diagram M.1 - diagram shows pattern seen from RS.
ROW 1: ch 1 (= 1 sc), 1 sc in next st, * ch 4, 1 sl st in 1st ch (1 picot), 1 sc in each of the next 3 sts *, repeat from *-* until 2 sts remain, finish with 1 picot and 1 sc in each of the last 2 sts, turn piece.
ROW 2: ch 5 (= 1 dc + 2 ch), skip 1 sc + 1 picot + 1 sc, work 1 dc in next sc, * ch 2, skip 1 sc + 1 picot + 1 sc, work 1 dc in next sc *, repeat from *-* the rest of the row, turn piece.
ROW 3: ch 1, * work 1 sc + 1 picot + 1 sc in ch space, 1 sc in next dc *, repeat from *-* the rest of the row.
ROW 4: ch 6 (= 1 tr + 2 ch), skip 1 sc + 1 picot + 1 sc, work 1 tr in next sc, * ch 2, skip 1 sc + 1 picot + 1 sc, work 1 tr in next sc *, repeat from *-* the rest of the row.
--------------------------------------------------------

JACKET:
The piece is worked top down. Worked back and forth from mid front.
Ch 132-148-164-172-191-207 (includes 3 ch to turn with) on hook size 3.5 mm/E/4 with Cotton Viscose. Work first row as follows (= RS): 1 dc in 4th ch from hook, * skip ch 1, 1 dc in each of the next 3 ch *, repeat from *-* the rest of the row (in SIZE XXL + XXXL finish with 1 dc in each of the last 2 ch instead of the last 3 ch) = 98-110-122-128-142-154 dc - Read CROCHET INFO!
Work 3 rows sc back and forth while AT THE SAME TIME on 1st row inc 28-31-34-41-42-46 sc evenly - Read INCREASE TIP - and on last row inc 28-31-34-42-42-47 sc evenly = 154-172-190-211-226-247 sc. Then work diagram M.1 (start of row is marked with an arrow in the diagram) or see PATTERN - explanation above.
After M.1, work 1 row sc with 1 sc in every tr and 2 sc in every ch space = 154-172-190-211-226-247 sc.
Continue to work 3 rows sc while AT THE SAME TIME on 2nd row inc 39-42-45-48-51-57 sc evenly = 193-214-235-259-277-304 sc.
Then work M.1 again (start of row is marked with an arrow in the diagram) or see PATTERN - explanation above.
After M.1, work 1 row sc with 1 sc in every tr and 2 sc in every ch space = 193-214-235-259-277-304 sc.
Continue to work 3 rows sc while AT THE SAME TIME on 2nd row inc 27-33-33-39-42-45 sc evenly = 220-247-268-298-319-349 sc.
Then work M.1 again (start of row is marked with an arrow in the diagram) or see PATTERN - explanation above.
After M.1, work 1 row sc with 1 sc in every tr and 2 sc in every ch space = 220-247-268-298-319-349 sc.
Continue to work 3 rows sc while AT THE SAME TIME on 2nd row inc 27-33-33-39-42-45 sc evenly = 247-280-301-337-361-394 sc.
Continue to work back and forth with 1 sc in every sc while AT THE SAME TIME on 1st row inc 28-31-34-34-42-45 sc evenly = 275-311-335-371-403-439 sc.
When piece measures approx. 18-19-20-21-22-23 cm / 7''-7½''-8''-8¼''-8 ¾''-9'', work next row as follows: 36-43-47-53-59-66 dc (i.e. 1 dc in every sc) (= front piece), ch 12 and skip 66-70-74-80-84-88 sc from previous row (= under sleeve), work 71-85-93-105-117-131 dc (= back piece), ch 12 and skip 66-70-74-80-84-88 sc from previous row (= under sleeve) and work 36-43-47-53-59-66 dc (= front piece). Continue to work 1 dc in every dc and 1 dc in every ch under each sleeve = 167-195-211-235-259-287 dc.
Insert a marker in the middle of the 12 ch under the sleeve in each side (= 83-97-105-117-129-143 dc on back piece and 42-49-53-59-65-72 dc on each front piece). Continue back and forth with 1 dc in every dc over all sts. When piece measures 32-34-36-38-40-42 cm / 12½''-13 3/8''-14¼''-15''-15¾''-16½'', dec 7 dc evenly - READ DECREASE TIP! When piece measures 34-36-38-40-42-44 cm / 13 3/8''-14¼''-15''-15¾''-16½''-17¼'' , dec 8 dc evenly = 152-180-196-220-244-272 dc. When piece measures 39-41-43-45-47-49 cm / 15 1/4"-16 1/8"-17"-17 3/4"-18½"-19 1/4", inc 10 dc evenly. When piece measures 41-43-45-47-49-51 cm / 16 1/8''-17''-17 3/4''-18½''-19 1/4''-20'', inc 10-10-12-12-12-12 dc evenly = 172-200-218-242-266-294 dc. When approx. 1 cm / ½'' remains before piece measures 52-54-56-58-60-62 cm / 20½''-21¼''-22''-22¾''-23 5/8''-24 3/8'', work 2 rows with 1 sc in every st, fasten off.

FRONT BANDS:
Work 4 rows sc back and forth along left front piece - work approx. 22 sc per 10 cm / 4'' - make sure that the band is flat and pretty and neither tightens nor widens the front edge.
Repeat along right front piece while AT THE SAME TIME on 2nd row dec for 6-6-6-7-7-7 button holes evenly. Upper button hole should be approx. 2 cm / 3/4'' from neckline and there should be approx. 7 to 8 cm / 2 3/4"-3'' between each button.
1 BUTTON HOLE = ch 2, skip 2 sc, 1 sc in next st. On next row work 1 sc in every sc/ch.

ASSEMBLY:
Sew the buttons on to left front piece.

Diagram

All measurements in charts are in cm.

symbols = ch 1
symbols = 1 sc
symbols = ch 4, 1 sl st in 1st ch (1 picot)
symbols = 1 dc
symbols = 1 tr
symbols = begin here
diagram
Do you have a question? See a list of frequently asked questions (FAQ)

Knitting tension is what determines the final measurements of your work, and is usually measured per 10 x 10 cm. It is provided like so: number of stitches in width x number of rows in height - eg: 19 stitches x 26 rows = 10 x 10 cm.

The knitting tension is very individual; some people knit/crochet loosely while others work tightly. You adjust the knitting tension with the needle size, which is why the suggested needle size only serve as a guide! You need to adjust this (up or down) to ensure that YOUR knitting tension matches the knitting tension provided in the pattern. If you work with a different knitting tension than provided you will have a different yarn consumption, and your work will have different measurements than what the pattern suggests.

The knitting tension also determines which yarns can replace each other. As long as you achieve the same knitting tension you can replace one yarn with another.

See DROPS lesson: How to measure your tension/gauge

See DROPS video: How to make a gauge tension swatch

The required amount of yarn is provided in grams, eg: 450 g. To calculate how many balls you’ll need you first need to know how many grams are in 1 ball (25g, 50g or 100g). This information is available if you click on the individual yarn quality on our pages. Divide the amount required with the amount of each ball. For example, if each ball is 50g (the most common amount), the calculation will be as follows: 450 / 50 = 9 balls.

The important thing when changing from one yarn to another is that the knitting/crochet tension remains the same. This is so that the measurements of the finished piece will be the same as on the sketch provided. It is easier to achieve the same knitting tension using yarns from the same yarn group. It is also possible to work with multiple strands of a thinner yarn to achieve the knitting tension of a thicker one. Please try our yarn converter. We recommend you to always work a test swatch.

Please NOTE: when changing yarn the garment might have a different look and feel to the garment in the photo, due to individual properties and qualities of each yarn.

See DROPS lesson: Can I use a different yarn than the one mentioned in the pattern?

All our yarns are categorised into yarn groups (from A to F) according to thickness and knitting tension – group A contains the thinnest yarns and group F the thickest. This makes it easier for you to find alternative yarns to our patterns, should you wish to switch yarn. All yarns within the same group have a similar knitting tension and can easily replace each other. However, different yarn qualities have different structures and properties which will give the finished work a unique look and feel.

Click here for an overview of the yarns in each yarn group

At the top of all our patterns you’ll find a link to our yarn converter, which is a helpful tool should you wish to use a different yarn than suggested. By filling in the yarn quality you wish to replace, the amount (in your size) and number of strands, the converter will present good alternative yarns with the same knitting tension. Additionally it will tell you how much you’ll require in the new qualities and whether you’ll need to work with multiple strands. Most skeins are 50g (some are 25g or 100g).

If the pattern is worked with multiple colours, every colour will have to be converted separately. Similarly, if the pattern is worked with several strands of different yarns (for example 1 strand Alpaca and 1 strand Kid-Silk) you will have to find alternatives for each, individually.

Click here to see our yarn converter

Since different yarns have different qualities and textures we have chosen to keep the original yarn in our patterns. However, you can easily find options among our available qualities by using our yarn converter, or simply pick a yarn from the same yarn group.

It is possible that some retailers still have discontinued yarns in stock, or that someone has a few skeins at home that they would like to find patterns for.

The yarn converter will provide both alternative yarn as well as required amount in the new quality.

If you think it's hard to decide what size to make, it can be a good idea to measure a garment you own already and like the size of. Then you can pick the size by comparing those measures with the ones available in the pattern's size chart.

You'll find the size chart at the bottom of the pattern.

See DROPS lesson: How to read size chart

The needle size provided in the pattern serves only as a guide, the important thing is to follow the knitting tension. And since knitting tension is very individual, you will have to adjust the needle size to ensure that YOUR tension is the same as in the pattern – maybe you’ll have to adjust 1, or even 2 needle sizes, up or down to achieve the correct tension. For this, we recommend that you work test swatches.

Should you work with a different knitting tension than the one provided, the measurements of the finished garment might deviate from the measurement sketch.

See DROPS lesson: How to measure your tension/gauge

See DROPS video: How to make a gauge tension swatch

Working a garment top-down provides more flexibility and room for personal adjustment. For example it is easier to try the garment on while working, as well as making adjustments to length of yoke and shoulder caps.

The instructions are carefully explaining every step, in the correct order. Diagrams are adjusted to the knitting direction and are worked as usual.

The diagram depicts all rows/rounds, and every stitch seen from the right side. It is read from bottom to top, from right to left. 1 square = 1 stitch.

When working back and forth, every other row is worked from the right side and every other row is worked from the wrong side. When working from the wrong side, the diagram will have to be worked reversed: from left to right, knit stitches are purled, purl stitches are knit etc.

When working in the round every round is worked from the right side and the diagram are worked from right to left on all rounds.

See DROPS lesson: How to read knitting diagrams

The diagram depicts all rows/rounds, and every stitch seen from the right side. It is worked from bottom to top, from right to left.

When working back and forth every other row is worked from the right side: from right to left and every other row is worked from the wrong side: from left to right.

When working in the round, every row in the diagram are worked from the right side, from right to left.

When working a circular diagram you start in the middle and work your way outwards, counter clockwise, row by row.

The rows usually start with a given number of chain stitches (equivalent to the height of the following stitch), this will either be depicted in the diagram or explained in the pattern.

See DROPS lesson: How to read crochet diagrams

Instructions for working several diagrams after each other on the same row/round, will often be written like so: “work A.1, A.2, A.3 a total of 0-0-2-3-4 times". This means you work A.1 once, then A.2 is worked once, and A.3 is repeated (in width) the number of times provided for your size – in this case like so: S = 0 times, M = 0 times, L=2 times, XL= 3 times and XXL = 4 times.

The diagrams are worked as usual: begin with the first row in A.1, then work the first row in A.2 etc.

See DROPS lesson: How to read knitting diagrams

See DROPS lesson: How to read crochet diagrams

The total width of the garment (from wrist-to-wrist) will be larger in the larger sizes, despite the actual sleeves being shorter. The larger sizes have longer sleeve caps and wider shoulders, so there will be a good fit in all sizes.

The measurement sketch/schematic drawing provides information regarding the full length of the garment. If it’s a jumper or a jacket the length is measured from the highest point on the shoulder (usually closest to the neckline), and straight down to the bottom of the garment. It is NOT measured from the tip of shoulder. Similarly, the length of yoke is measured from the highest point on the shoulder and down to where yoke is split into body and sleeves.

See DROPS lesson: How to read a schematic drawing

Diagrams are often repeated on the round or in height. 1 repeat is the diagram the way it appears in the pattern. If it says to work 5 repeats of A.1 in the round, then you work A.1 a total of 5 times after/next to each other in the round. If it says to work 2 repeats of A.1 vertically/in height you work the entire diagram once, then begin again at the start and work the entire diagram one more time.

Chain stitches are slightly narrower than other stitches and to avoid working the cast-on edge too tight, we simply chain more stitches to begin with. The stitch count will be adjusted on the following row to fit the pattern and measurement sketch.

The rib edge is more elastic and will contract slightly compared to, for example, stocking stitch. By increasing before the rib edge, you avoid a visible difference in width between the rib edge and the rest of the body.

It’s very easy to cast off too tightly, and by making yarn overs while casting off (and simultaneously casting these off) you avoid a too tight cast off edge.

See DROPS video: How to bind off with yarn overs (yo)

To achieve an even increase (or decrease) you can increase on, for example: every 3rd and 4th row alternately, like so: work 2 rows and increase on the 3rd row, work 3 rows and increase on the 4th. Repeat this until the increase is complete.

See DROPS lesson: Increase or decrease 1 st on every 3rd and 4th row alternately

Should you prefer to work in the round instead of back and forth, you may of course adjust the pattern. You’ll need to add steeks mid-front (usually 5 stitches), and follow the instructions. When you would normally turn and work from the wrong side, simply work across the steek and continue in the round. At the end you’ll cut the piece open, pick up stitches to work bands, and cover the cut edges.

See DROPS video: How to knit steeks and cut open

Should you prefer to work back and forth instead of in the round, you may of course adjust the pattern so you work the pieces separately and then assemble them at the end. Divide the stitches for the body in 2, add 1 edge stitch in each side (for sewing) and work the front and back pieces separately.

See DROPS lesson: Can I adapt a pattern for circular needles into straight needles?

Pattern repeats can vary slightly in the different sizes, in order to get the correct proportions. If you’re not working the exact same size as the garment in the photo, yours might deviate slightly. This has been carefully developed and adjusted so that the complete impression of the garment is the same in all sizes.

Make sure to follow instructions and diagrams for your size!

If you have found a pattern you like which is available in women’s size it’s not very difficult to convert it to men’s size. The biggest difference will be the length of sleeves and body. Start working on the women size that you think would fit across the chest. The additional length will be worked right before you cast off for the armhole/sleeve cap. If the pattern is worked top-down you can add the length right after the armhole or before the first decrease on sleeve.

Regarding additional yarn amount, this will depend on how much length you add, but it is better with a skein too many than too few.

All yarns will have excess fibres (from production) that might come off as lint or shedding. Brushed yarns (ie hairier yarns) have more of these loose, excess fibres, causing more shedding.

Shedding also depends on what is worn under or over the garment, and whether this pulls at the yarn fibres. It’s therefore not possible to guarantee that there will be no shedding

Below are some tips on how to get the best result when working with hairier yarns:

1. When the garment is finished (before you wash it) shake it vigorously so the looser hairs come off. NOTE: do NOT use a lint roller, brush or any method that pulls at the yarn.

2. Place the garment in a plastic bag and put it in your freezer - the temperature will cause the fibres to become less attached to each other, and excess fibres will come off easier.

3. Leave in the freezer for a few hours before taking it out and shaking it again.

4. Wash the garment according to the instructions on the yarn label.

Pilling is a natural process that happens to even the most exclusive of fibers. It's a natural sign of wear and tear that is hard to avoid, and that is most visible in high friction areas of your garment like a sweater's arms and cuffs.

You can make your garment look as new by removing the pilling, using a fabric comb or a pill/lint remover.

Still can't find the answer you need? Then scroll down and leave your question so one of our experts can try to help you. This will be done normally within 5 to 10 working days.
In the meantime, you can read the questions and answers that others have left to this pattern or join the DROPS Workshop on Facebook to get help from fellow knitters/crocheters!

You might also like...

Post a comment to pattern DROPS 130-10

We would love to hear what you have to say about this pattern!

If you want to leave a question, please make sure you select the correct category in the form below, to speed up the answering process. Required fields are marked *.

Comments / Questions (42)

country flag MOUTHON wrote:

Bonjour, Il n y a aucune explication pour les finitions des manches et tour du cou. Est ce votre choix ou un oubli? Merci

14.08.2022 - 11:31

DROPS Design answered:

Bonjour Mme Mouthon, il n'y a aucune bordure supplémentaire à crocheter dans ce modèle, mais vous pouvez volontiers en faire une si vous le souhaitez. Bon crochet!

15.08.2022 - 08:27

country flag Gerda wrote:

Na het 3de patroondeel M1 en de 4 toeren vasten staat er "ga verder en haak heen en weer met 1v in iedere vast en meerder in de 1ste toer 28-31-...... vasten" maar hoeveel toeren vasten moet men hier nog doen. slechts 1 of tot je het juiste aantal cm hebt?

08.03.2020 - 13:51

DROPS Design answered:

Dag Gerda,

Op dat punt meerder je alleen in de eerste toer van vasten een aantal steken zoals aangegeven in het patroon. De volgende toeren daarna haak je dus 1 vaste in elke vaste tot een hoogte van 18-19-20-21-22-23 cm ((staat in eerste regel van de paragraaf daaronder).

10.03.2020 - 19:57

country flag Dorothy Harrington wrote:

Could I use Lima for this pattern?

29.01.2019 - 21:46

DROPS Design answered:

Dear Mrs Harrington, DROPS Lima belongs to yarn group B our yarn while this top is worked with DROPS Cotton Viscose which was yarn group A - find alternatives by trying our yarn converter and read more about alternatives here. Happy crocheting!

30.01.2019 - 07:35

country flag Susan Starke wrote:

Sehr schöne Jacke für laue Sommerabende.Einfach und schnell gehäkelt.

06.06.2016 - 21:05

country flag Willers wrote:

Thank you for the lovely pattern. I am having difficulty with the M1. Please translate in words. Thanks again.

12.05.2016 - 23:12

DROPS Design answered:

Dear Mrs Willers, start reading diagram from the right towards the left from RS (1st row = with arrow), and from the left towards the right from WS. On 1st row, you will then work: 1 ch (= 1st sc), *1 sc in next st, 1 picot, 1 sc in next 2 sts*, repeat from *-*. On row 2, chain 3 (=1st dc), *ch2, skip 2 sc, 1 dc in next dc*, repeat from *-*. Happy crocheting!

13.05.2016 - 09:11

country flag Elizabeth wrote:

Elizabeth 21.06.2015 kl. 21:15: Zou dit patroon ook met Drops Cotton Merino gehaakt kunnen worden? (Staat niet bij alternatieve garens).

22.06.2015 - 09:30

DROPS Design answered:

Hoi Elizabeth. Nee, Cotton Merino is te dik voor dit model. Probeer eventueel een proeflapje te haken en zien welk naald je nodig hebt voor de juiste stekenverhouding (22 stk/v = 10 cm) en kijk of je de structuur mooi vindt (ik denk dat het te stug wordt).

23.06.2015 - 11:56

country flag Ingrid wrote:

Is het ook mogelijk om langere mouwen aan het vestje te maken? Zo ja, hoe kan ik dat het beste doen?

30.04.2014 - 12:09

DROPS Design answered:

Wij ondersteunen vragen over de patronen zoals onze designafdeling ze heeft gemaakt, maar we helpen niet bij het maken van persoonlijke aanpassingen. Wellicht is er een haak- of breigroep bij u in de buurt met mensen die u hierbij willen helpen.

30.04.2014 - 21:37

country flag Schiller, Birgit wrote:

Ich habe eine Frage zu den Zunahmen. Es fängt bei mir schon nach dem M1 an. Danach habe ich bei Größe S 154 fM und soll nun 39 Maschen gleichmäßig verteilt aufnehmen. Was heißt denn hier gleichmäßig? Wenn ich 154/39 teile komme ich auf 3,94 Maschen... Wie soll ich jede 3,94 Masche zunehmen? Aufrunden auf 4 geht ja auch nicht, dann komme ich ja wieder mit dem Muster nicht hin. Auch weiter unten das selbe Problem.Wie sind denn da nun die Abstände?

22.09.2013 - 22:40

DROPS Design answered:

Liebe Birgit, die Aufnahme ist in einer Reihe mit festen Maschen, daher beeinträchtigt es das Muster nicht. Sie häkeln nachher das Muster einfach über die grössere Maschenzahl. Natürlich können Sie nur nach ganzen Maschen aufnehmen, achten Sie einfach darauf, dass es (schön verteilt) insgesamt 39 M sind.

23.09.2013 - 08:18

country flag Erie wrote:

Dank u wel voor uw antwoord. Helaas is me nog niet duidelijk wat ik dan verkeerd doe. Stekenaantal is precies zoals beschreven. Misschien gelijk na de pas al gaan minderen?

10.06.2013 - 13:13

DROPS Design answered:

Met de juiste stekenverhouding (22 stk/v) per 10 cm zou je op de juiste afmetingen komen. Controleer of de stekenverhouding klopt.

11.06.2013 - 15:16

country flag Erie wrote:

Prachtig patroon, maar ik heb een vraag. De pas heb ik klaar, afmeting klopt. Nu heb ik zo'n 10 cm van de panden gedaan, maar het werk is inmiddels al 7 cm breder geworden en ik ben nog lang niet aan het minderen toe. Ik heb uiteraard niet gemeerderd ;) Wat doe ik verkeerd?

09.06.2013 - 16:01

DROPS Design answered:

Het werk moet niet breder worden. Het aantal stk moet gelijk blijven tot je gaat minderen zoals beschreven.

10.06.2013 - 12:43