
Looking for a yarn?


Comments / Questions (28)
![]() Wendy wrote:
Wendy wrote:
Hello! Beautiful pattern. Would be nice to see a photo of the large placemat alone. It’s difficult to be sure what it would look like.
08.02.2025 - 23:51DROPS Design answered:
Dear Wendy, unfortunately these are the only photos of the pattern that we have available. Since rounds 1-9 of the small mat are the same as those of the large mat the central part will be identical in both mats. Then, you extend it with a few rounds of dc/sc to make the mat larger and you add the lace edge in the last round. Happy crochetting!
10.02.2025 - 00:51
![]() Jeannette Pedersen wrote:
Jeannette Pedersen wrote:
Hejsa den 10. Omgang fatter jeg ikke en brik af HJÆLP
12.05.2024 - 07:54DROPS Design answered:
Hej Jeanette, er det blondekanten du ikke forstår? Det du hækler imellem de to * gentager du omgangen rundt...
14.05.2024 - 11:49
![]() Irene Van Vuure wrote:
Irene Van Vuure wrote:
Goedemiddag, Heeft u voor mij een tip hoe ik de kleine placemet van 20cm groter kan haken?
08.05.2023 - 16:42DROPS Design answered:
Dag Irene,
Een hele eenvoudig manier is door een dikker garen te kiezen, bijvoorbeeld DROPS Muskat (categorie B) of DROPS Paris (categorie C) en ook een bijbehorende dikkere haaknaald.
08.05.2023 - 21:16
![]() Rika wrote:
Rika wrote:
Hi Kann ich den Glitterfaden einfach weglassen? Danke! VG Rika
12.09.2022 - 21:33DROPS Design answered:
Liebe Rika, ja, Glitter bringt nur etwas Glänzen zu der Arbeit, der Faden ist aber zu dünn um die Maschenprobe zu ändern. Viel Spaß beim häkeln!
13.09.2022 - 09:34
![]() Astrid Wappes wrote:
Astrid Wappes wrote:
Gäbe es die Möglichkeit eines Diagrammes?? Bei einem Diagramm kann ich besser "abhäkeln"!
10.10.2021 - 10:37DROPS Design answered:
Liebe Frau Wappes, bei diesem Modell haben wir aber leider nur schriftliche Anleitung. Viel Spaß beim häkeln!
11.10.2021 - 07:37
![]() Meeuwes Linda wrote:
Meeuwes Linda wrote:
Zijn er van de onderleggers ook patronen ,ik kan er dan beter aanuit en voor mij is het makkelijker, hoe kan ik ze bekomen,grtjs Linda
16.05.2020 - 18:35DROPS Design answered:
Dag Linda,
Je kan het patroon gratis afdrukken met de knop afdrukken, die te vinden is onderaan de lijst met materialen. Zowel de kleine als de grote placemat is opgenomen in het patroon. Er zijn helaas geen telpatronen van.
19.05.2020 - 13:33
![]() Mónica Fernandez wrote:
Mónica Fernandez wrote:
Buenas tardes, seria posible tener el diagrama del patrón? Me resultaría más sencillo que seguir las explicaciones.
24.04.2020 - 23:44DROPS Design answered:
Hola Monica. Lamentamos, pero este patrón solo tiene explicaciones en formato texto.
28.04.2020 - 18:03
![]() Hilda Sobh wrote:
Hilda Sobh wrote:
Het is duidelijk voor iemand die bijna geen patroon kan lezen
04.08.2019 - 10:37
![]() Anna wrote:
Anna wrote:
Sto eseguendo la tovaglietta ma non riesco a capire come si fa il 4 giro. È possibile avere delle spiegazioni più precise?
16.05.2019 - 23:30
![]() Uli wrote:
Uli wrote:
Hallo, Eine Frage zu Reihe 4, kl Tischset,da heisst es "jetzt die 4 Dreifach-Stb zusammenhäkeln", ich hab aber erst ein Stäbchen gemacht? Wie soll ich das verstehen? Vielen Dank für ihre Hilfe Grüße
09.05.2019 - 11:44DROPS Design answered:
Liebe Uli, Sie sollen jetzt die 4 Dreifach-Stb zusammenhäkeln, wie es dann erklärt ist, dh: 2 Dreifach-Stb in die selbe Lm jedoch mit dem letzten Durchziehen warten, 1 fM + 1 Lm + 1 fM überspringen, 1 Dreifach-Stb in die nächste Lm, jedoch mit dem letzten Durchziehen warten, danach das letzte Dreifach-Stb in die gleiche Lm und die letzte Schlaufe durch alle M. ziehen. Viel Spaß beim häkeln!
09.05.2019 - 14:05
|
|
My Love#dropsmylove |
|
 |
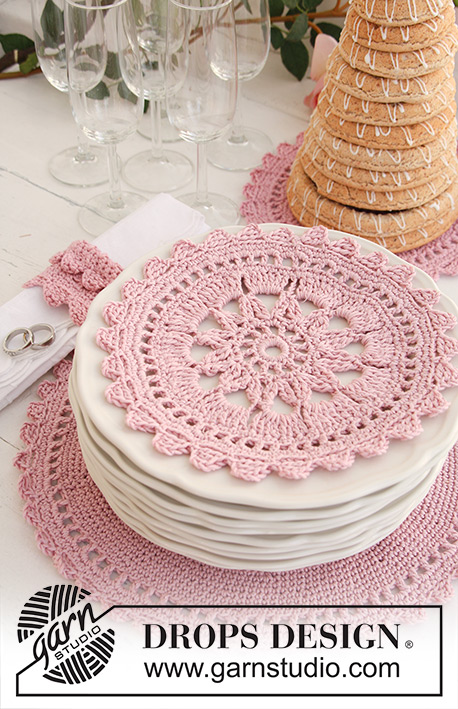 |
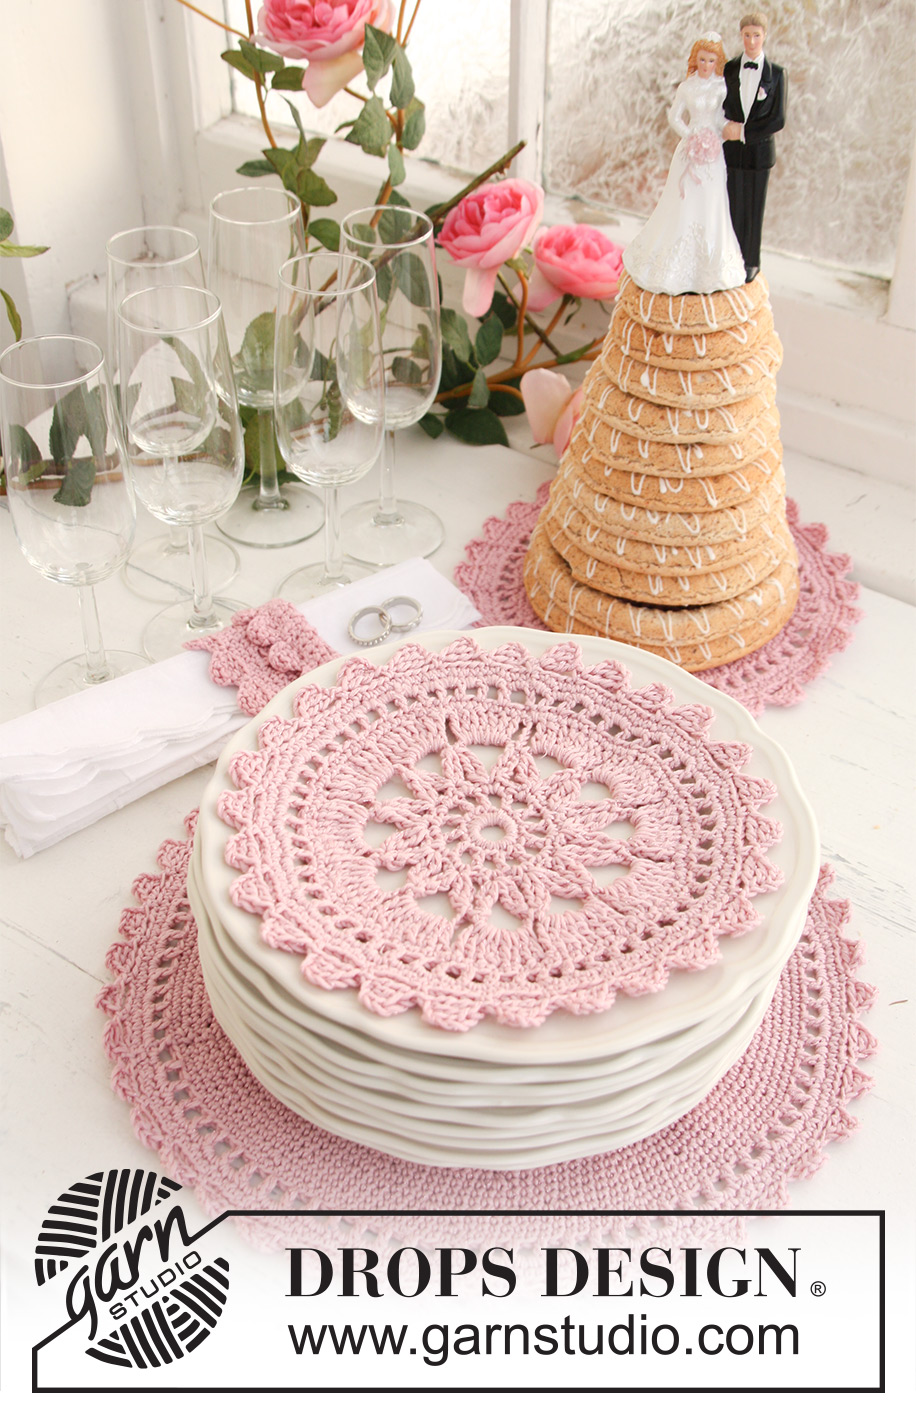
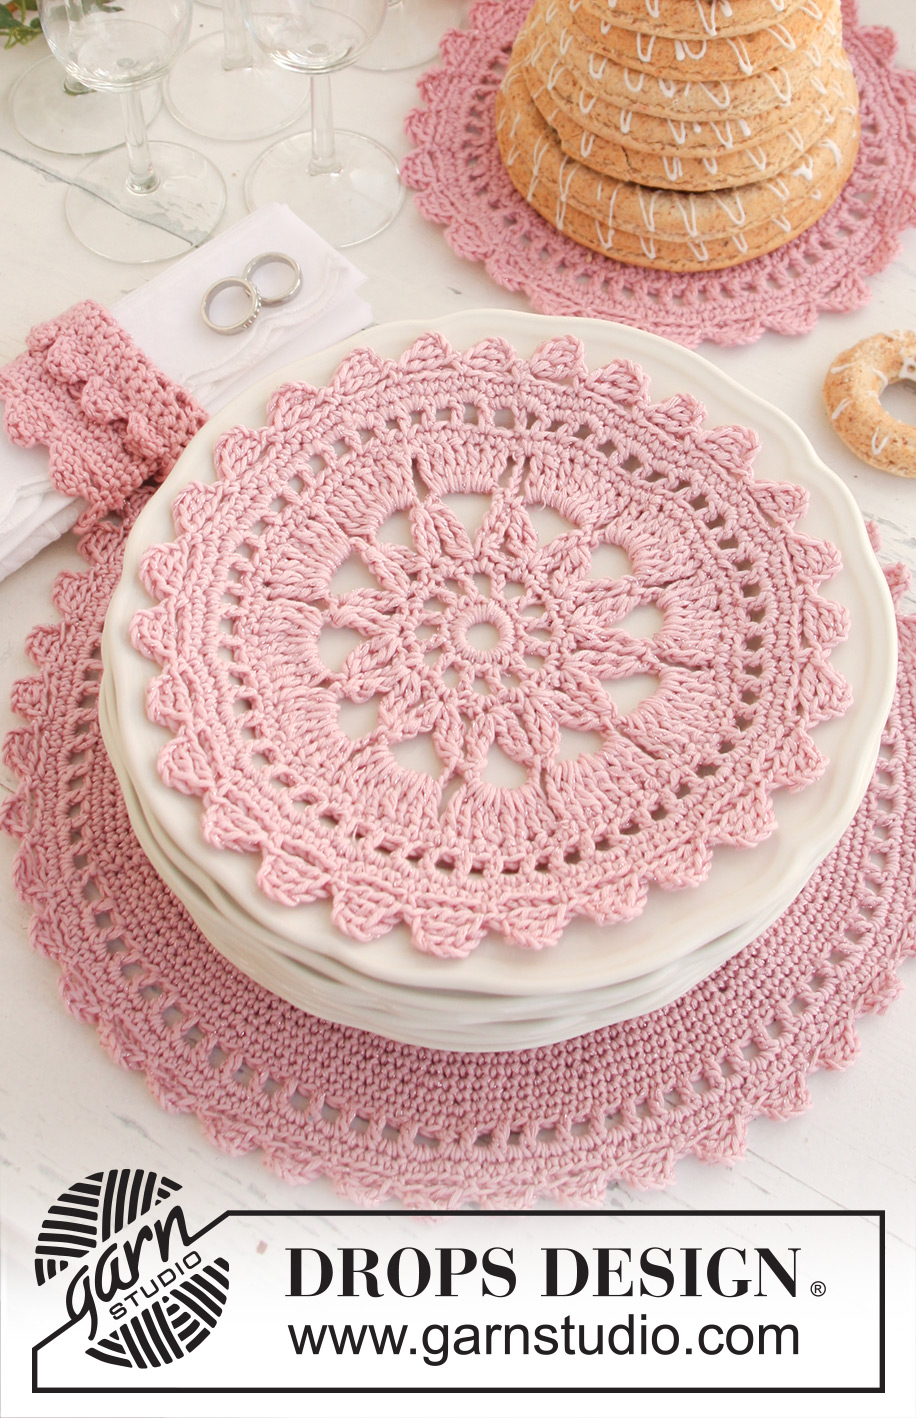
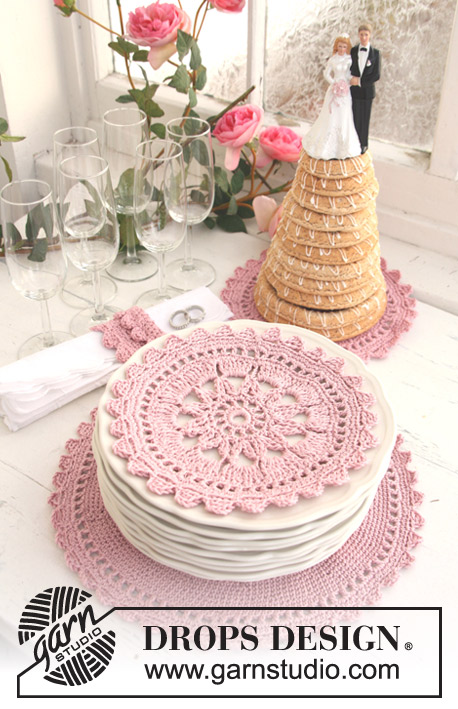
Set consists of: Crochet DROPS place mats and napkin rings in ”Safran” or "DROPS ♥ You #7" and ”Glitter”.
DROPS Extra 0-747 |
|
|
CROCHET INFO 1 (applies to place mats): Replace first sc on sc rounds with 1 ch. Finish every round with 1 sl st in ch from beg of round. CROCHET INFO 2 (applies to napkin ring): Replace first sc at beg of every round with 1 ch. Finish every round with 1 sl st in ch from beg of round. -------------------------------------------------------- -------------------------------------------------------- SMALL PLACE MAT: Ch 8 on hook size 3 mm / C with 1 thread Safran + 2 threads Glitter and form a ring with 1 sl st in first ch. READ CROCHET INFO 1. ROUND 1: Work 24 sc in ch-ring. ROUND 2: ch 5 (= 1 dc + 2 ch), * skip 1 sc, 1 dc in next sc, 2 ch *, repeat from *-* the entire round and finish with 1 sl st in 3rd ch from beg of round = 12 dc with 2 ch between each. ROUND 3: ch 1, continue to crochet as follows in every ch space the entire round: 1 sc + ch 1 + 1 sc + ch 1, finish round with 1 sl st in first ch = 24 sc with 1 ch between each. ROUND 4: 1 sl st in first sc, 1 sl st in first ch, ch 5, 1 tr in same ch, * ch 7, now work 4 dtr tog as follows: Work 2 dtr in same ch but wait with last YO and pull through on both dtr, skip 1 sc + ch 1 + 1 sc, work 1 dtr in next ch but wait with last YO and pull through, then work last dtr in same ch and pull last YO through all 5 sts on hook *, repeat from *-* a total of 11 times, ch 7, work 2 dtr in same ch (but wait with last YO and pull through on both), work 1 sl st in 5th ch from beg of round and pull thread through all 3 sts on hook. ROUND 5: 1 sl st in first ch space, ch 4 (= 1 tr), 7 tr in same ch space, then work 8 tr in every ch space, finish with 1 sl st in 4th ch from beg of round = 12 tr-groups with 8 tr in each. ROUND 6: ch 1, 1 sc in sl st, then work 1 sc in every tr and 1 sc between each tr-group the entire round, finish with 1 sl st in first sc from beg of round = 108 sc. ROUND 7: ch 4 (= 1 dc + 1 ch), skip 1 sc, * 1 dc in next sc, ch 1 (make sure to make ch the same length as 1 sc so that the round does not tighten), skip 1 sc *, repeat from *-* the entire round and finish with 1 sl st in 3rd ch from beg of round = 54 dc with 1 ch between each. ROUND 8: ch 1, then work 2 and 3 sc alternately in every ch the entire round, finish with 1 sl st in ch from beg of round = 135 sc. ROUND 9: Work 1 sc in every sc = 135 sc. ROUND 10 (= lace edge): ch 1, 1 sc in sl st, * ch 5, 1 dc in 2nd ch worked, 1 tr in first ch worked, skip 4 sc, 1 sc in next st *, repeat from *-* the entire round and finish with 1 sl st in sc from beg of round (instead of 1 sc in next st) = 27 loops. Cut and fasten the thread. -------------------------------------------------------- LARGE PLACE MAT: Work as small place mat up to and including 9th round. ROUND 10-12: Work as 9th round = 135 sc. ROUND 13: * Work 1 sc in each of the 8 first sc, 2 sc in next sc *, repeat from *-* the entire round = 150 sc. ROUND 14-15: Work 1 sc in every sc = 150 sc. ROUND 16: * Work 1 sc in each of the first 4 sc, 2 sc in next sc, work 1 sc in each of next 5 sc *, repeat from *-* the entire round = 165 sc. ROUND 17: Work 1 sc in every sc = 165 sc. ROUND 18: * Work 1 sc in each of the first 14 sc, 2 sc in next sc *, repeat from *-* the entire round = 176 sc. ROUND 19: Work 1 sc in every sc = 176 sc. NOTE: Work place mat bigger by repeating round 18 and 19 if desired. But for every repetition of 18th round work 1 sc more between each inc. Make sure that no sts can be divided by 2 before working round 20 (if mat is worked bigger the no of dc and sc given below will not be correct). ROUND 20: Crochet as round 7 = 88 dc with 1 ch between each. ROUND 21: Work as round 8 = 220 sc. ROUND 22: Work 1 sc in every sc = 220 sc. ROUND 23: Work lace edge as on 10th round on small place mat = 44 loops. Cut and fasten the thread. -------------------------------------------------------- NAPKIN RING: Ch 38 on hook size 3 mm / C with 1 thread Safran + 2 threads Glitter and form a ring with 1 sl st in first ch. ROUND 1: ch 1, 1 sc in sl st, 1 sc in next ch, skip ch 1, * 1 sc in each of the next ch 4, skip 1 ch *, repeat from *-* the entire round and finish with 1 sl st in first sc from beg of round = 30 sc. ROUND 2: 1 sc in every sc. ROUND 3: ch 4 (= 1 dc + 1 ch), * skip 1 sc, 1 dc in next sc, ch 1 *, repeat from *-* the entire round and finish with 1 sl st in 3rd ch from beg of round = 15 dc with 1 ch between each. ROUND 4: ch 1, 1 sc in sl st, then work 1 sc in every ch and 1 sc between each dc the entire round, finish with 1 sl st in first sc from beg of round = 30 sc. Then work sc in the round with 1 sc in every st until piece measures 5 cm / 2''. WORK NEXT ROUND AS FOLLOWS: ch 2, * skip 1 sc, 1 sc in next sc, ch 1 *, repeat from *-* the entire round and finish with 1 sl st in first ch from beg of round (= folding edge). WORK NEXT ROUND AS FOLLOWS: ch 1, 1 sc in sl st, then work 1 sc in every ch and 1 sc between every sc the entire round, finish with 1 sl st in first sc from beg of round = 30 sc. Work 2 more rounds with 1 sc in every sc. Fold the upper part of the napkin ring out towards RS in the folding edge and work next round from RS as follows (= lace edge): * ch 5, 1 dc in 2nd ch worked, 1 tr in first ch worked, skip approx. 1½ cm / ½'', 1 sc in next st *, repeat from *-* the entire round and finish with 1 sl st in first sc from beg of round (instead of 1 sc in next st). Cut and fasten the thread. Work another lace edge in the opposite end of the napkin ring. Cut and fasten the thread. |
|
Have you finished this pattern?Tag your pictures with #dropspattern #dropsmylove or submit them to the #dropsfan gallery. Do you need help with this pattern?You'll find 6 tutorial videos, a Comments/Questions area and more by visiting the pattern on garnstudio.com. © 1982-2025 DROPS Design A/S. We reserve all rights. This document, including all its sub-sections, has copyrights. Read more about what you can do with our patterns at the bottom of each pattern on our site. |
|


With over 40 years in knitting and crochet design, DROPS Design offers one of the most extensive collections of free patterns on the internet - translated to 17 languages. As of today we count 314 catalogs and 11822 patterns - 11812 of which are translated into English (US/in).
We work hard to bring you the best knitting and crochet have to offer, inspiration and advice as well as great quality yarns at incredible prices! Would you like to use our patterns for other than personal use? You can read what you are allowed to do in the Copyright text at the bottom of all our patterns. Happy crafting!
Post a comment to pattern DROPS Extra 0-747
We would love to hear what you have to say about this pattern!
If you want to leave a question, please make sure you select the correct category in the form below, to speed up the answering process. Required fields are marked *.