
Looking for a yarn?


Comments / Questions (46)
![]() Lena wrote:
Lena wrote:
Obs: Starta i sidan på den ena delen och virka runt alla sidorna som vänder uppåt, sedan virkas det längs nederkanten - det virkas ca 1 fm i varje m och 2 fm om varje varv men längs nederkanten på bikinin virkas det 46-48-50 fm.
15.06.2025 - 21:43DROPS Design answered:
Hei Lena. Vi skal hjelpe deg så godt vi kan, men hva er spørsmålet ditt og hvilken str. hekler du? mvh DROPS Design
23.06.2025 - 08:14
![]() James Phillips wrote:
James Phillips wrote:
Now chain very loosely 41-51-61 and then turn the piece. Crochet 1 dc in the 4th ch from the hook and then 1 dc in each of the remaining 83-95-107 ch/sc = 85-97-109 dc, turn the piece. this part is very confusing to me. I have the bikini part together with the single crochet and then it is wanting a chain of 41 and double crochet back? Why would there be a chain? Is this where the round starts?
24.04.2025 - 03:10DROPS Design answered:
Dear Mrs Phillips, after you have worked both bikini parts together you work the bottom side, casting on new chain stitches at the end of this row for back piece. You work first 2 rows back and forth for the split on the side = rows are starting on the side; then after these 2 rows, you will join in the round and continue bottom piece in the round. Happy crocheting!
24.04.2025 - 08:58
![]() Anonym wrote:
Anonym wrote:
Kan nån snälla förklara för mig vad detta betyder. "det virkas ca 1 fm i varje m och 2 fm om varje varv men längs nederkanten på bikinin virkas det 46-48-50 fm." Hur jag än gör blir det inte 48 fm i nederkanten och jag fattar allmänt inte hur jag ska göra med resten heller.
19.04.2024 - 17:40DROPS Design answered:
Hei. Du skal nå hekle rundt begge cupene. Du hekler ca 1 fastmaske i 1 fastmaske og der det er rader hekler du 2 fastmasker (rundt "kantmasken"), men på nederkanten av cupene må du tilpasse slik at det blir 48 fastmasker, Husk å starte i siden på den ene cupen (delen). mvh DROPS Design
22.04.2024 - 13:17
![]() Linda wrote:
Linda wrote:
Skjønner ikke helt hvordan jeg skal hekle speilvendt?
24.04.2022 - 20:50DROPS Design answered:
Hej Linda, de første rækker hækles som 1.del, og så hækler du hjørnet i den anden side af arbejdet og så videre :)
27.04.2022 - 14:15
![]() Grizelda wrote:
Grizelda wrote:
Bonjour, n'y a t'il pas une erreur à l'assemblage ? Il y a écrit "46-48-50 ms le long du bord inférieur, puis faire souplement 45-51-61 ml, et tourner. Faire 1B dans la 4ème ml à partir du crochet puis, 1 B dans chacune des 83-95-107 ml/ms suiv = 85-97-109 B ; tourner". Pour ma part je n'obtiens pas 85 B au final pour la première taille. J'en ai plus. Jusqu'ici 46+45= 91 on enlève les 4 ml de la première bride on n'a pas 83 mailles restantes... Merci pour votre réponse.
08.09.2019 - 10:21DROPS Design answered:
Bonjour Grizelda, vous crochetez 1 bride dans la 4ème ml à partir du crochet (= 2 brides), puis 1 bride dans chacune des 37 ml suivantes (41 ml - les 4 premières = 37 ml) et 1 bride dans chacune des 46 brides = 2+37+46= 85 brides (y compris les 3 ml pour tourner). Bon crochet!
09.09.2019 - 08:59
![]() Cristina wrote:
Cristina wrote:
He llegado a empezar la parte de abajo del top y no me cuadran las 41 cadenetas. ¿ No habría qué hacer otras tantas al otro lado?. Si no, sólo sale una parte del contorno. Gracias
16.08.2018 - 12:06DROPS Design answered:
Hola Cristina. 41 puntos de cadeneta son en la parte de la espalda + 46 puntos bajos en la parte de abajo del top para el delantero. Para la talla S la primera fila tiene 85 puntos bajos.
16.08.2018 - 19:15
![]() Inge wrote:
Inge wrote:
"Tegelijkertijd 1 stk meerderen aan de ene kant van het werk (dus langs middenvoor) in elke 2e toer totaal 3 keer = 28-30-33 stk – LET OP: 1 stk meerderen door 1 extra stk in het eerste stk in het midden van het werk haken." Ik snap niet waar ik moet meerderen. Eerst staat er langs middenvoor, maar daarna in het midden van het werk haken. Als ik de 25 stokjes haak, meerder ik dan aan het begin of in het midden van die 25 stokjes?
01.07.2018 - 22:06DROPS Design answered:
Dag Inge, Je meerdert 1 steek door 1 stokje extra te haken in het buitenste stokje van de vorige toer aan de kant van midden voor. (Heb de omschrijving ietsje aangepast, zodat het wat duidelijker is :))
05.07.2018 - 15:49
![]() Jenny Wiberg wrote:
Jenny Wiberg wrote:
Hej, förstår inte. Jag tolkar mönstret som att man skall vända och virka fram och tillbaka de första raderna under livet och på varv Men då blir det en öppning i ena sidan. Är det det ni menar med knappsprund, eller var sitter det? Syns inte på någon bild. Tacksam för förkaring.Mvh Jenny
03.06.2018 - 14:34DROPS Design answered:
Hej Jenny, Vi beskriver varje varv fram och tillbaka tills det står: Virka vidare på samma sätt men nu virkas arb runt. Ja knappsprundet virkas i sidan. Lycka till!
04.06.2018 - 09:19
![]() María wrote:
María wrote:
Acabo de unir las dos copas y he terminado la primera fila de puntos altos (después de la cadeneta de 41 puntos). Me gustaría saber si el contorno q forma esta fila con las copas tiene q cerrar por completo, porque me faltan 5cm más o menos para que cierre completamente. Muchas gracias
29.07.2017 - 23:41DROPS Design answered:
Hola María, sí, debería cerrar por completo, tal y como se ve en la foto. Esos cm que te quedan puede deberse a una diferencia en la tensión del tejido, por lo que quizás debas añadir más puntos de cadeneta a esa primera fila.
30.07.2017 - 12:32Deborah wrote:
What is considered mid front for the increase stitch on the bikini top?
04.06.2017 - 23:24DROPS Design answered:
Dear Deborah, mid front is the place where the two cups will be joinned together, in the middle of the front of top. Happy crocheting!
05.06.2017 - 11:07
|
|||||||||||||||||||
DROPS 95-6 |
|||||||||||||||||||
 |
 |
||||||||||||||||||
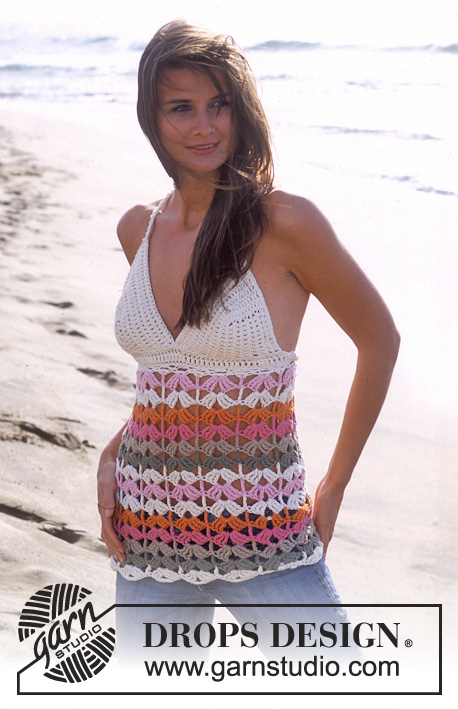
DROPS Crochet top with stripes in Paris
DROPS 95-6 |
|||||||||||||||||||
|
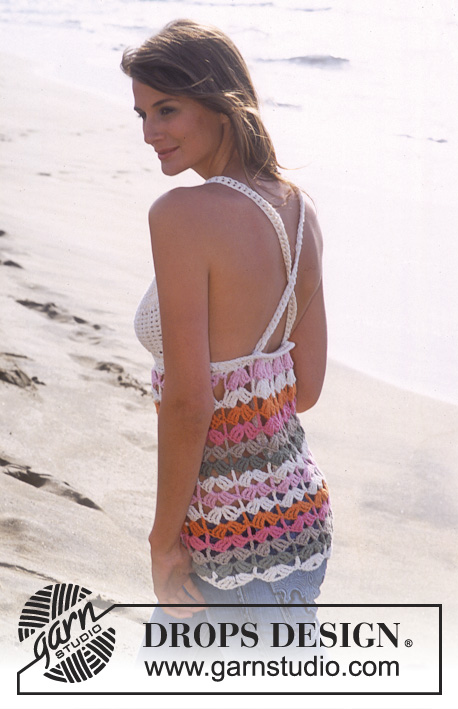
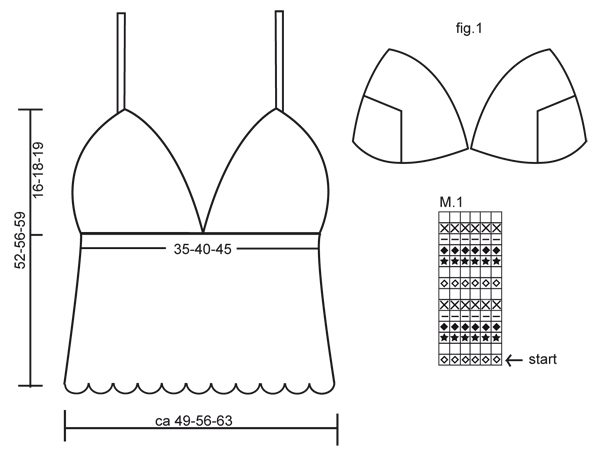
Crochet Gauge: width of 14 dc x 8 rows = 10 x 10 cm / 4" x 4". Note: Because of different crochet techniques used by the individual, the gauge may vary, so you might have to drop/go up a hook size to obtain the correct gauge. Crochet info: At the beginning of each row replace the 1st dc with ch 3, and at the beginning of each row with tr replace the 1st tr with 4 ch. Finish each row as follows: Crochet 1 dc/tr in the last ch from beginning of the previous row. Stripes: See diagram M.1 – 1 row in diagram represents 1 crochet row. Bikini top: One side: With off white loosely ch 12-13-14 (includes 3 ch to turn with). 1st row: 1 dc in the 4th ch from the hook, 1 dc in each of the next 8-9-10 ch = 10-11-12 dc, turn the piece. Read Crochet info and crochet 5-6-7 rows with 1 dc in each dc = 6-7-8 rows in total. Next row: Crochet 10-11-12 dc (i.e. 1 dc in each dc from previous row), crochet 4 dc in the corner and 11-12-14 dc along the other side of the square = 25-27-30 dc in total. Turn the piece and crochet 6 rows with 1 dc in each dc from previous row, at the same time inc 1 dc at one side of piece (mid front) on every other row a total of 3 times = 28-30-33 dc. Note! Inc 1 dc by crocheting an extra dc in the outermost dc towards mid front. After the last row the piece measures approx 16-18-19 cm / 6¼"-7"-7½". Other side: Crochet as above, but mirrored. Assembly: Place the 2 bikini pieces as shown in chart 1. Crochet 1 row of sc round the bikini-top to make an even edge holding the two bikini pieces together. Note! Begin at the side of one piece, crochet all upper edges and finish with the lower edge – crochet approx 1 sc in each stitch and 2 sc in each row, and crochet 46-48-50 sc along the lower edge. Now chain very loosely 41-51-61 and then turn the piece. Crochet 1 dc in the 4th ch from the hook and then 1 dc in each of the remaining 83-95-107 ch/sc = 85-97-109 dc, turn the piece. Next row: ch 1, 1 sc in first dc, *3 ch, 1 dc in the first of the 3 ch just crochet, skip 2 sts, 1 sc in next st*, repeat from *-* until the end of the row = 28-32-36 ch-spaces. Now crochet as follows, at the same time making stripes after M.1: Crochet sl sts to the top of the first ch-space, 4 ch (= 1 tr), *3 tr, ch 3, 3 tr (= 1 tr-group) at the top of next ch-space, 1 tr at the top of the next ch-space*, repeat from *-* and finish with 3 tr, ch 3, 3tr in the last ch-space and 1 tr in the last sc, turn the piece = 14-16-18 tr-groups. Next row: ch 4, *3 tr, ch 3, 3 tr in the ch space in the tr-group, 1 tr in the tr between the tr-groups*, repeat from *-* and finish with 1 tr-group in the last ch space and 1 tr in the 4th ch from beginning of previous row. Turn the piece and crochet next row in the same way. Now continue like this, but crochet round, i.e. continue the pattern with dc-groups in the ch spaces and 1 tr in the tr between the dc-groups, but skip the last tr on row so that the pattern continues round the piece. When piece measures approx 36-38-40 cm / 14¼"-15"-15¾"(measured from the bottom of the bikini top), fasten off Note! Please note that because of the pattern, the lower edge will automatically become wavy - see measurement chart. Button split at side: Crochet a row of sc along the split at the side, starting on the back piece. Turn the piece and crochet a row of sc along the split on the front piece, at the same time making 2-3 buttonhole loops as follows: 1 sc, ch 4, skip 2 sc and 1 sc in next st – place the first loop approx 1 cm / ⅜" from the top. Shoulder straps: Loosely ch 70-75-80 using off-white and attach with a sl st at the top of left bikini top, ch 3 and attach with a sl st 3 sts from the top at the side. Now crochet 1 dc in each of the 70-75-80 ch, cut the thread. Repeat on right bikini top. Attach straps to back piece (crossed) or tie behind the neck. |
|||||||||||||||||||
Diagram explanations |
|||||||||||||||||||
|
|||||||||||||||||||
|
|||||||||||||||||||
Have you finished this pattern?Tag your pictures with #dropspattern or submit them to the #dropsfan gallery. Do you need help with this pattern?You'll find 6 tutorial videos, a Comments/Questions area and more by visiting the pattern on garnstudio.com. © 1982-2025 DROPS Design A/S. We reserve all rights. This document, including all its sub-sections, has copyrights. Read more about what you can do with our patterns at the bottom of each pattern on our site. |
|||||||||||||||||||


With over 40 years in knitting and crochet design, DROPS Design offers one of the most extensive collections of free patterns on the internet - translated to 17 languages. As of today we count 314 catalogs and 11822 patterns - 11812 of which are translated into English (US/in).
We work hard to bring you the best knitting and crochet have to offer, inspiration and advice as well as great quality yarns at incredible prices! Would you like to use our patterns for other than personal use? You can read what you are allowed to do in the Copyright text at the bottom of all our patterns. Happy crafting!
Post a comment to pattern DROPS 95-6
We would love to hear what you have to say about this pattern!
If you want to leave a question, please make sure you select the correct category in the form below, to speed up the answering process. Required fields are marked *.