
Looking for a yarn?


Comments / Questions (58)
![]() Rodriguez wrote:
Rodriguez wrote:
C est la partie qui dit Diminuer1 m endroit dans toutes les sections endroits Est-ce que ça veut dire que je tricote la 1 ère m endroit normale, 2+3 ensemble et 4 normale??
27.01.2025 - 18:02DROPS Design answered:
Bonjour Mme Rodriguez, vous tricotez d'abord en côtes 4 m endroit, 3 m envers; vous devez ensuite diminuer 1 maille endroit, tricotez ce tour ainsi: *2 m ens à l'endroit, 2 m endroit, 3 m envers*, répétez de *à* tout le tour = vous obtenez des côtes 3 m endroit, 3 mailles envers. Continuez ainsi jusqu'à la hauteur indiquée. Bon tricot!
28.01.2025 - 08:59
![]() Rodriguez wrote:
Rodriguez wrote:
Bonjour Serait il possible de réaliser une vidéo pour expliquer ce magnifique châle ou d obtenir le diagramme?
27.01.2025 - 17:25DROPS Design answered:
Bonjour Mme Rodriguez, nous ne réalisons pas de vidéo complète pour des modèles de ce type car ce serait trop long et trop fastidieux; Vous trouverez une liste de vidéos/leçons listées en haut de page sous les onglets du même nom, et, si vous avez des questions sur la réalisation de ce modèle, merci de bien vouloir poser votre question dans cet espace. Bon tricot!
28.01.2025 - 08:55
![]() Rodriguez Nathalie wrote:
Rodriguez Nathalie wrote:
Bonjour Je débute au tricot et je ne comprends pas très bien comment faire ce splendide châle Pouvez vous m expliquer les rangs 1 par un ou il y a des modifications ? Combien de pelotes faut-il
27.01.2025 - 12:43DROPS Design answered:
Bonjour Mme Rodriguez, nous ne sommes pas en mesure de pouvoir détailler rang après rang ce qu'il faut faire, mais indiquez-nous la partie qui vous pose problème pour que nous puissions essayer de vous aider. Merci pour votre compréhension. La quantité nécessaire pour chaque taille est indiquée, au poids, sous l'onglet "Explications" en haut de page, utilisez le convertisseur pour les qualités épuisées et voir les alternatives/nouvelles quantités correspondantes. Bon tricot!
27.01.2025 - 17:36
![]() Rita wrote:
Rita wrote:
Pattern is difficult to decipher.
02.12.2024 - 18:33
![]() Ingela Ljungkvist wrote:
Ingela Ljungkvist wrote:
Hej! När jag ska göra ökningar & minskningar så får jag bara det till 120 m, vet inte vad jag hör för fel, vände på stickningen när jag började på slätstickningen , vet inte om det blir som mönstret men ville ha rätsidan fram
19.11.2024 - 12:43DROPS Design answered:
Hej Ingela. Vilken storlek gör du? Mvh DROPS Design
19.11.2024 - 14:16
![]() Francis wrote:
Francis wrote:
Prachtige poncho ! jammer dat het zo doorzichtig is. als ik besluit om met naald 7 te breien, hoe moet ik dan het brei patroon aanpassen? groetjes.
02.03.2021 - 04:46DROPS Design answered:
Dag Francis,
Helaas is het voor ons niet mogelijk om patronen naar persoonlijke wensen aan te passen. Wanneer je een proeflapje maakt met naald 7 kun je op basis van de stekenverhouding het aantal steken uitrekenen.
09.03.2021 - 11:12
![]() Chhavi Methi wrote:
Chhavi Methi wrote:
Thank you fir responding to my earlier question. My piece is coming our beautiful. There was another question on the decrease aspect. Are we decreasing only on the marker at the start to f the round and alternately before and after? Wont this tilt the piece to one side? Thank you in advance
10.02.2021 - 03:06DROPS Design answered:
Dear Mrs Methi, the decreases on the sides (as the increases at the shoulders) are worked alternately before/after the marker, this means you first decrease before the markers, then next decrease will be worke after the markers (= there are 2 markers to increase/decrease at, you increase 2 sts on each shoulder/decrease 2 sts on each side). Happy knitting!
10.02.2021 - 07:14
![]() Chhavi Methi wrote:
Chhavi Methi wrote:
Hi Just need to know a couple of things, We are increasing for shoulder, on the left side of the market and the right side ? So at every marker we are increasing two stitches? We are increasing 8 stitches every shoulder row increase? And only on either side of middle stitches on the front and cross back we increasing 2 stitches? And total of 4 stitches ever front and back increases? So at one time we are increasing 12 rows?? Thanks
08.02.2021 - 14:11DROPS Design answered:
Dear Mrs Methi, on the shoulders you will increase alternately after and before the marker, this means 1 st increased at each marker on shoulder, first time you will increase after the marker, next time after the marker (= 2 sts inc per round) = 2 sts increased on every other round a total of 3 times. And you will increase 2 sts on mid front + 2 sts on mid back on every 4th round. You will first increase 6 sts (mid front/back + shoulder), then 2 rounds after you increase 2 sts (shoulders), then 2 rounds after you increase 6 sts and then only 4 sts on every 4th round (until you have increased a total of 21-21-23-24 times on mid front/mid back). Happy knitting!
08.02.2021 - 15:27
![]() Josée Potvin wrote:
Josée Potvin wrote:
Bonjour Myriam! Je suis rendue complètement à la fin du poncho, je bloque sur la directive suivante: ''pour que les pointes ne roulent pas, tricoter 2 m dans chacune des 2 m du milieu et rab ces 2 m. ...'' Est-ce qu'on fait cela pendant qu'on est en train de rabattre toutes les mailles ou bien après? J'ai besoin d'un peu plus de précisions sur cette étape. Merci beaucoup! En passant, le projet est magnifique!
27.12.2020 - 01:12DROPS Design answered:
Bonjour Mme Potvin, vous allez tricoter 2 fois les 2 mailles centrales au moment de les rabattre, ainsi la pointe sera plus marquée. Dans cette vidéo, nous montrons le même principe, mais en faisant des jetés au lieu de tricoter 2 fois la même maille. Bon tricot!
04.01.2021 - 09:25
![]() Sandra Schniederjann wrote:
Sandra Schniederjann wrote:
Wird der Poncho am Anfang beim Kragen als Runde geschlossen?
13.10.2020 - 13:38DROPS Design answered:
Liebe Frau Schniederjann, der Poncho wird von oben nach unten in Runden gestrickt, dh vom Kragen schon. Viel Spaß beim stricken!
13.10.2020 - 16:10
|
|
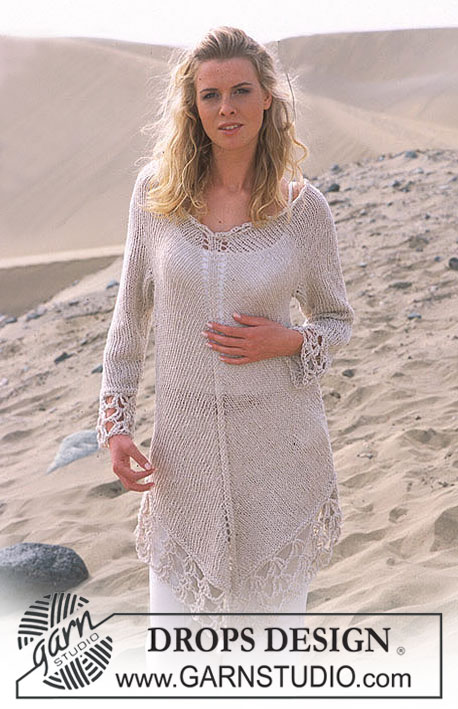
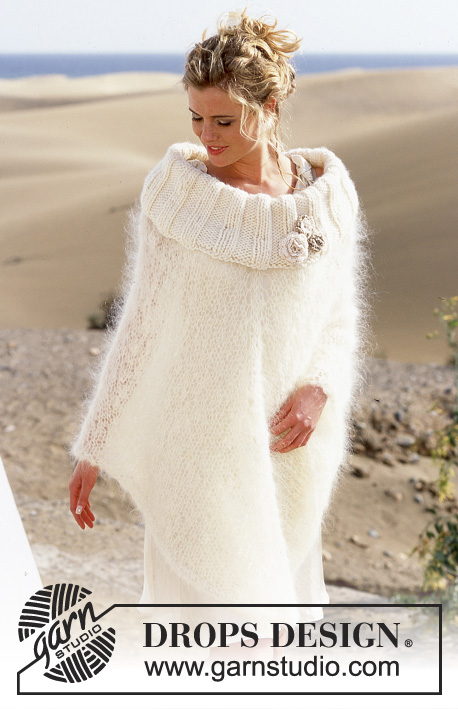
Beach Wedding |
|
 |
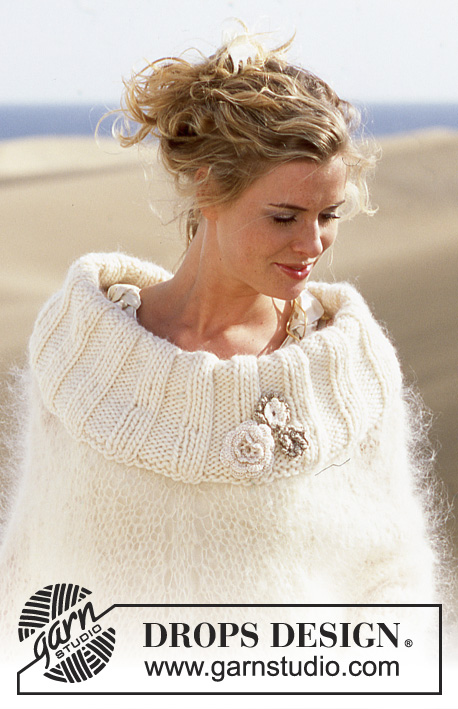 |
DROPS Poncho in Vienna or Melody and Snow, with crocheted flowers in Cotton Viscose
DROPS 89-25 |
|
|
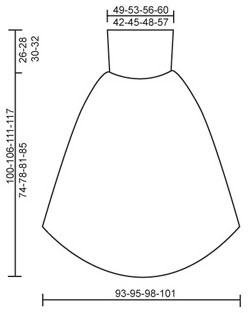
Gauge: Snow: 10 sts x 14 rows on smaller needles in stockinette st = 10 x 10 cm Vienna / Melody: 8 sts x 10 rows on larger needles in stockinette st = 10 x 10 cm Rib: * K 4, P 3 *, repeat * - *. Increasing tips (for front and back): Inc by making a yo at each side of the center 4 sts (in Size XL/XXL increase at each side of the center 3 sts) at center front and center back. Poncho: The poncho is knit from neck down. Loosely cast on 98-105-112-119 sts on smaller circular needles with Snow; join and place a marker at the join. P 1 row and then knit rib – see instructions above. When the piece measures 13-14-15-16 cm dec all K 4 to K 3 = 84-90-96-102 sts. Continue until piece measures 26-28-30-32 cm, then K 1 row, P 1 row. . Change to larger circular needles and Vienna or Melody and knit stockinette st, decreasing to 68-72-76-82 sts on the 1st row. On the next row put 4 markers in work as follows: * 1 marker (= shoulder), 17-18-19-20 sts, 1 marker (= center front or back) – in Size XL/XXL put the marker in the 21st st, 17-18-19-20 sts *, repeat * - *. Measure the work from here. Read entire next section before knitting: Inc center front and center back: Continue in stockinette st, and inc every 3 rows – see Increasing tips – a total of 21-22-23-24 times. Shoulder inc: Inc 1 st for each shoulder (alternately before and after the marker) every other row a total of 3 times. Side dec: When the piece measures 9-7-6-5 cm dec 1 st at each side (alternately before and after the marker) every 9-7-6-5 cm a total of 5-7-9-11 times. After all incs and decs are complete there are 148-152-156-162 sts. The poncho measures approx. 59-62-65-68 cm from neck and down along shoulders, and approx. 74-78-81-85 cm from neck and down center front. P 1 row (right side) and then bind off. So that the points will not roll, K 2 sts in each of the 2 sts at the center (in Size XL knit 2 sts in each st at each side of the center st) and bind off both sts. Crocheted flowers: Make 3 flowers for decoration on poncho. Large blossom: Ch 4 with natural Cotton Viscose and join into a ring with 1 sl st. 1st row: 1 sc in ring, * ch 2, 1 sc in ring *, repeat from * - * a total of 7 times and finish with ch 2 and 1 sl st in 1st sc at start of row = 8 ch-loops. 2nd row: ch 1, crochet as follows in each ch-loop: * 1 sc, 2 dc, 1 sc *, and finish with 1 sl st in first sc at start of row. Turn piece – blossom is completed from back side. 3rd row: ch 1, * 1 sc in sc from 1st row (crochet on back side of petal around sts from previous row, pull yarn tight), ch 3 *, repeat * - * a total of 8 times and finish with 1 sl st in 1st sc at start of row. 4th row: ch 1, crochet as follows in each ch-loop: * 1 sc, 4 dc, 1 sc *, and finish with 1 sl st in 1st sc at start of row. 5th row: ch 1, * 1 sc in sc from 3rd row (crochet on back side of the 2 petals around sts from previous row, pull yarn tight), ch 4 *, repeat * - * a total of 8 times and finish with 1 sl st in 1st sc at start of row. 6th row: ch 1, crochet as follows in each ch-loop: * 1 sc, 6 dc, 1 sc *, and finish with 1 sl st in 1st sc at start of row. Cut yarn and fasten. Medium blossom: Crochet a small blossom in natural Cotton Viscose as follows: Ch 4 and join into a ring with 1 sl st. 1st row: 1 sc in ring, * ch 5, 1 sc in ring *, repeat * - * a total of 15 times (the loops will fit tightly in the ring) and finish with ch 5 and 1 sl st in 1st sc at start of row = 16 ch-loops. Cut yarn and fasten. Then crochet a larger blossom in light beige Cotton Viscose as follows: Ch 5 and join into a ring with 1 sl st. 1st row: 1 sc in ring, * ch 10, 1 sc in ring *, repeat * - * a total of 19 times (the loops will fit tightly in the ring) and finish with ch 10 and 1 sl st in 1st sc at start of row = 20 ch-loops. Cut yarn and fasten. Lay the smaller natural blossom on the light beige blossom and sew together. Small blossom: Crochet the same as the larger blossom in the Medium blossom instructions. Sew flowers on the collar – see photo for placement. |
|
|
|
Have you finished this pattern?Tag your pictures with #dropspattern or submit them to the #dropsfan gallery. Do you need help with this pattern?You'll find 17 tutorial videos, a Comments/Questions area and more by visiting the pattern on garnstudio.com. © 1982-2025 DROPS Design A/S. We reserve all rights. This document, including all its sub-sections, has copyrights. Read more about what you can do with our patterns at the bottom of each pattern on our site. |
|


With over 40 years in knitting and crochet design, DROPS Design offers one of the most extensive collections of free patterns on the internet - translated to 17 languages. As of today we count 314 catalogs and 11822 patterns - 11812 of which are translated into English (US/in).
We work hard to bring you the best knitting and crochet have to offer, inspiration and advice as well as great quality yarns at incredible prices! Would you like to use our patterns for other than personal use? You can read what you are allowed to do in the Copyright text at the bottom of all our patterns. Happy crafting!
Post a comment to pattern DROPS 89-25
We would love to hear what you have to say about this pattern!
If you want to leave a question, please make sure you select the correct category in the form below, to speed up the answering process. Required fields are marked *.