
Popular categories
Looking for a yarn?


Comments / Questions (11)
![]() Monika wrote:
Monika wrote:
Hallo liebes Team, schade, dass die Anleitung so schlecht übersetzt wurde. An manchen Stellen muss man raten, was das bedeutet. Gar nicht nach Art von Drops Design. Herzliche Grüße und danke für die vielen tollen Anleitungen Monika
24.07.2024 - 07:08DROPS Design answered:
Liebe Monika, die Anleitung ist schon recht alt und entspricht (noch) nicht dem aktuellen Standard. Danke für Ihren Hinweis, die Anleitung wird in Kürze sprachlich überarbeitet! Trotzdem gutes Gelingen! :-)
26.07.2024 - 12:23
![]() Fernande wrote:
Fernande wrote:
88-26 -Je suis rendue au Col de ce chandail... J'ai relevé les mailles en attente..... et là ...oh.la.la... les explications ne me suffisent pas... pouvez-vous m'aider.... merci .. je suis à mon 1er pull......
07.11.2019 - 20:56DROPS Design answered:
Bonjour Fernande, reprenez les mailles de la fin de l'empiècement et relevez des mailles dans celles de l'encolure (les 6-8 mises en attente + les 4 m diminuées de chaque côté = 14-18 m au total), vous devez maintenant avoir environ 40-48 m au total. Tricotez maintenant en rond en jersey pendant 3 tours, en même temps, au 1er rang, ajuster le nombre de mailles (en diminuant ou augmentant) à 40-41-45-46 m. Rabattez toutes les mailles avec 1 jeté toutes les 5 m (pas envers, correction faite) comme dans cette vidéo. Bon tricot!
08.11.2019 - 08:55
![]() Cova wrote:
Cova wrote:
Muchas gracias por las aclaraciones. Entiendo entonces que trabajo ida y vuelta por separado cada parte del delantero (raglan y disminuciones) osea los puntos que quedan repartidos en dos grupos al dejar 6 en un gancho auxiliar. ¿Es así?
13.04.2016 - 12:21DROPS Design answered:
Hola Cova. Cuando empiezas con el raglán tienes todas las partes del jersey en la misma aguja. Ahora los 6 pts centrales quedan apartados en un gancho aux y vas a trabajar de ida y vta en los pts restantes (es decir la parte del delantero, la manga, la espalda, la otra manga y la otra parte del delantero)
13.04.2016 - 12:43
![]() Cova wrote:
Cova wrote:
Buenos días, vuelvo a atascarme ;-( He acabado con el RAGLA, tengo 48 puntos en la aguja circular. ¿Cómo sigo el ESCOTE? ¿dejo 6 puntos de los 48 o de 24 en espera? ¿dónde hago las disminuciones de la segunda fila 4 veces?. Gracias de antemano, saludos.
11.04.2016 - 12:45DROPS Design answered:
Hola Cova, las dism se trabajan en el centro del delantero a cada lado del escote y disminuyendo 1 pt cada 2ª fila un total de 4 vcs
13.04.2016 - 09:14
![]() Cova wrote:
Cova wrote:
Vuelvo a atascarme. Ya he completado el RAGLAN pero no entiendo cómo seguir con las instrucciones de ESCOTE. Tengo 48 puntos en la aguja circular. ¿Dejo 6 en espera de los 48? ¿o de 24 si cuento separar escote y espalda? en fin, gracias de nuevo por vuestra ayuda...Saludos
11.04.2016 - 11:56DROPS Design answered:
Hola Cova, de la parte delantera pasamos los 6 pts centrales a un gancho aux. A partir de aquí trabajamos de ida y vta y NO en redondo. Continuamos con las dism del raglán y al mismo tiempo disminuímos a cada lado del escote según el patrón. Ten en cuenta que ya tenemos separados con MP las diferentes partes: delantero, espalda...
13.04.2016 - 09:12
![]() Cova wrote:
Cova wrote:
Muchas gracias por la respuesta, creo que ya lo entiendo. Es mi primer jersey con raglan!
03.04.2016 - 12:37
![]() Cova wrote:
Cova wrote:
Buenos días. He acabado de tejer el cuerpo en aguja circular, también he tejido las mangas por separado en circular. No se bien cómo unir las mangas al cuerpo y continuar con el raglan. El video de la union que hay en el patrón no usa una pieza de cuerpo y espalda cerrada en circular como yo he hecho. Gracias!!!!
01.04.2016 - 12:03DROPS Design answered:
Hola Cova. Antes de unir todas las partes en ag circular tienes que cerrar los pts para la sisa tanto en el cuerpo como en las mangas (ver el patrón). Después trabajamos el delantero hasta donde se ha cerrado para la sisa, continuamos trabajando los pts de una manga con la misma ag circular que el delantero, después seguimos con los pts de la espalda y al final trabajamos los pts de la otra manga. De este modo tenemos todos los pts de la prenda en una ag circular. Ahora continuamos la labor según el patrón
02.04.2016 - 17:14
![]() DROPS Design wrote:
DROPS Design wrote:
Med raglan er det veldig viktig at strikkfasheten innholdes. Har du riktig strikkfashet?
25.11.2010 - 13:29
![]() Maria wrote:
Maria wrote:
Kan det passe at ærme skal være så smal?
22.11.2010 - 14:32
![]() Drops Design wrote:
Drops Design wrote:
En raglanfelling strikkes ved at bolen og ermene settes sammen på samme rundp der ermhullet begynner. Videre strikkes det rundt og det felles m på hver side av alle overgangene mellom ermer og bol - dvs 8 fellinger pr omg. Dette vil stå nøye forklart på oppskrifter med raglanfelling - da er det bare å følge oppskriften!
31.08.2007 - 13:33
|
|
DROPS 88-26 |
|
|
|
|
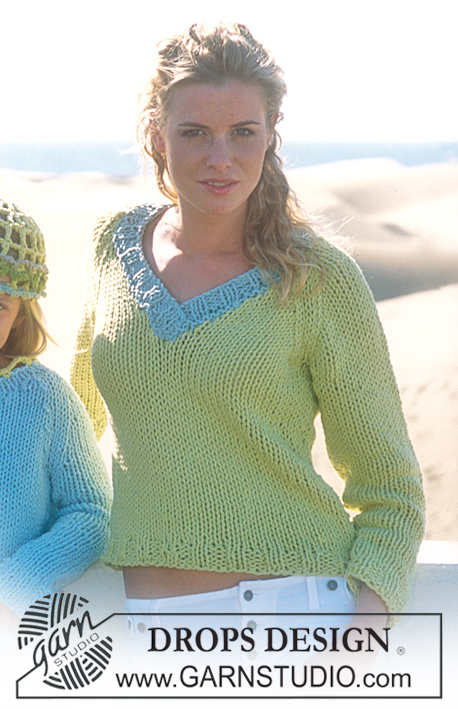
Children’s knitted jumper with raglan and crochet hat in "Ice"
DROPS 88-26 |
|
|
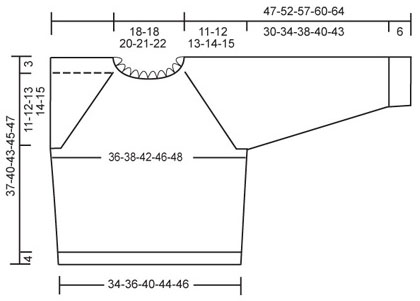
Knitting tension: Remember needle size is only a guide. 10 stitches x 14 rows with needle size 9 mm and stocking stitch = 10 x 10 cm. Rib: * K4, P4 *, repeat from *-*. Decrease tip (for raglan): All decreases are worked from the right side! Decrease as follows in transition between sleeves and body (start 3 stitches before marker thread): K2 together, K2 (marker thread sits in middle of these 2 stitches), slip 1 stitch as if to knit, K1, pass slipped stitch over. Knitting tip: If your knitting tension is not correct in height and you work too tightly, the decreases for raglan will be too short and the armhole too small. You can adjust by working 1 extra round without decreases regularly between decreases. --------------------------------------------------------- Body: Loosely cast on 64-72-80-88-96 stitches with circular needle size 8 mm and ice blue Ice and knit 1 round. Then work rib until piece measures 4 cm. Insert 1 marker thread in each side. Change to circular needle size 9 mm and continue with stocking stitch at the same time as you adjust the number of stitches to 68-72-80-88-92 stitches on first round after rib. Remember the knitting tension! When piece measures 16 cm increase 1 stitch on each side of marker threads in each side = 72-76-84-92-96 stitches. When piece measures 23-25-27-28-29 cm cast off 6 stitches in each side for armholes (i.e. 3 stitches on each side of marker threads) = 30-32-36-40-42 stitches left on front and back pieces. Lay piece to one side and work sleeves. Sleeve: Loosely cast on 16-16-16-24-24 stitches with double pointed needles size 8 mm and ice blue Ice and knit 1 round. Then work rib until piece measures 6 cm. Change to double pointed needles size 9 mm and continue with stocking stitch at the same time as the number of stitches is adjusted to 16-18-20-24-24 stitches on first round after rib. When piece measures 10 cm increase 2 stitches mid under sleeve every 8-8.5-10-16-12 cm a total of 4-4-4-3-4 times = 24-26-28-30-32 stitches. When sleeve measures 36-40-44-46-49 cm cast off 6 stitches mid under sleeve = 18-20-22-24-26 stitches. Lay piece to one side and work 1 more sleeve. Yoke: Place sleeves on same circular needle as body where you cast off stitches for armholes = 96-104-116-128-136 stitches. Insert 1 marker thread in all transitions between body and sleeves (= 4 marker threads). Work 0-0-1-1-0 round before starting to decrease. Read the next 2 paragraphs before continuing. Raglan decreases: Read Knitting tip! Decrease 1 stitch on each side of all marker threads (= 8 decreases). Decrease every 4th round - see Decrease tip: 1 stitch 3-3-2-2-2 times and then every 2nd round: 1 stitch 3-4-6-7-8 times. Neckline: At the same time, when piece measures 29-32-34-36-38 cm place the middle 6-6-6-8-8 stitches on 1 thread for neck, then decrease towards neck every 2nd row: 1 stitch 4 times. After all the decreases to raglan and neck there are 34-34-38-40-40 stitches left on needle. Neck: Knit up 14 to 18 stitches (incl. stitches from thread) in the front of neck with ice blue Ice and place all stitches on double pointed needles size 8 mm = approx. 48 to 58 stitches. Work 3 rounds stocking stitch at the same time as the number of stitches is adjusted to 40-40-41-45-46 stitches on first round. Cast off – so the cast-off edge is not tight, you can make 1 yarn over after approx. every 5th stitch at the same time as you cast off (cast off the yarn overs as well). Assembly: Sew openings under sleeves. Crochet edge: Work with hook size 6 mm and apple green Ice around neckline as follows: 1 double crochet in first stitch, * 5 chain stitches, skip 2 stitches, 1 double crochet in next stitch *, repeat from *-* and finish with 5 chain stitches and 1 slip stitch in first stitch at beginning of round. HAT: Sizes: 5/8 (9/14) years Materials: Ice 50 g colour no 15, apple green a left-over of following colours: no 04, beige, no 11 green and no 16, mint. DROPS Crochet hook size 6 mm. --------------------------------------------------------- Crochet 8 chain stitches with hook size 6 mm and apple green and form them into a ring with 1 slip stitch. Round 1: 6 chain stitches (= 1 double treble crochet + 2 chain stitches) * 1 double treble crochet around ring, 2 chain stitches *, repeat from *-* a total of 7 (8) times and finish with 1 slip stitch in the 4th chain stitch at beginning of round = 8 (9) chain-spaces. Round 2: 6 chain stitches (= 1 double treble crochet + 2 chain stitches), in each double treble crochet work: * 1 double treble crochet, 2 chain stitches, 1 double treble crochet, 2 chain stitches *, and finish with 1 double treble crochet in last slip stitch from the previous round, 2 chain stitches and 1 slip stitch in the 4th chain stitch at beginning of round = 8 (9) double treble crochet-groups. Rounds 3-4 (3-5): 6 chain stitches (= 1 double treble crochet + 2 chain stitches), in each double treble crochet work: * 1 double treble crochet, 2 chain stitches *, and finish with 1 slip stitch in the 4th chain stitch at beginning of round = 16 (18) double treble crochets. Round 5 (6): 1 chain stitch, 1 double crochet in the first treble crochet, * 4 chain stitches, 1 double crochet in the next treble crochet *, repeat from *-* and finish with 4 chain stitches and 1 slip stitch in the first chain stitch at beginning of round. Cut and fasten threads. Edges: Border-1: Work with mint in the chain-spaces on row 5 (6) as follows: * 1 double crochet around the chain-space, 4 chain stitches *, repeat from *-* and finish with 1 slip stitch in the first double crochet at beginning of round. Border-2: Work with beige in chain-spaces on row 4 (5) as follows: * 1 double crochet around chain-space, 4 chain stitches *, repeat from *-* and finish with 1 slip stitch in the first double crochet at beginning of round. Border-3: Work with green in the chain-spaces on the same row as Border-2 as follows: * 1 double crochet around chain-space, 4 chain stitches, 1 double treble crochet in the first of the 4 chain stitches *, repeat from *-* and finish with 1 slip stitch in the first double crochet at beginning of round. |
|
|
|
Have you finished this pattern?Tag your pictures with #dropspattern or submit them to the #dropsfan gallery. Do you need help with this pattern?You'll find 32 tutorial videos, a Comments/Questions area and more by visiting the pattern on garnstudio.com. © 1982-2025 DROPS Design A/S. We reserve all rights. This document, including all its sub-sections, has copyrights. Read more about what you can do with our patterns at the bottom of each pattern on our site. |


With over 40 years in knitting and crochet design, DROPS Design offers one of the most extensive collections of free patterns on the internet - translated to 17 languages. As of today we count 314 catalogues and 11822 patterns translated into English (UK/cm).
We work hard to bring you the best knitting and crochet have to offer, inspiration and advice as well as great quality yarns at incredible prices! Would you like to use our patterns for other than personal use? You can read what you are allowed to do in the Copyright text at the bottom of all our patterns. Happy crafting!
Post a comment to pattern DROPS 88-26
We would love to hear what you have to say about this pattern!
If you want to leave a question, please make sure you select the correct category in the form below, to speed up the answering process. Required fields are marked *.