
Popular categories
Looking for a yarn?


Comments / Questions (23)
![]() Kirsten wrote:
Kirsten wrote:
Hejsa. Jeg forstår ikke, hvordan man laver strikkeprøven når der både skal strikkes retstrik og hulmønster. Skal jeg så lave fx 5 masker retstrik efterfulgt af en rapport fra A1 og så afslutte med 5 retmasker igen? På forhånd hak for hjælpen.
15.04.2025 - 17:10DROPS Design answered:
Hei Kirsten. Diagrammene innholder både hullmønster og glattstrikk (sett fra retten). Så strikk f.eks etter A.5 B 2-3 ganger i bredden og 2-3 ganger i høyden. mvh DROPS Design
28.04.2025 - 10:43
![]() Natasha wrote:
Natasha wrote:
After knitting A.1 and A.4 till the size I need, should I knit only the last line of the pattern (to increase in length) or should I repeat the whole of the pattern A.1 and A.4? Also in the sleeves and back should I repeat the whole pattern A.5 (without the increases) or just the last line of A.5?
23.11.2024 - 13:44DROPS Design answered:
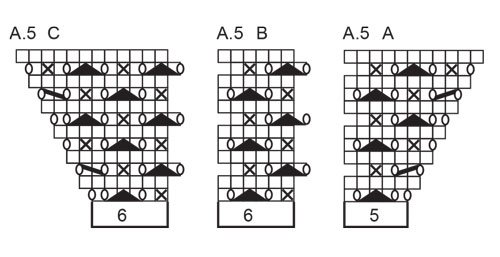
Dear Natasha, if you have knitted the charts A.1 and A.4 1 time vertically, you can simply work the last 4 rows but without the last yarn over (so that the number of stitches remains the same, while the lace pattern is maintained). For A.5, after finishing the increases, you can simply work A.5b (which is the same pattern as A.5a and A.5c, but without the increases). Happy knitting!
24.11.2024 - 22:34
![]() Anne Johnsen wrote:
Anne Johnsen wrote:
Hei, jeg har strikket A1 og A4 1 gang og har nå 189 masker slik som nevnt i oppskriften. Jeg forstår ikke hvordan jeg skal fortsette med mønsteret uten å øke den og hvilken pinne av mønsteret jeg skal begynne med?! Dette er veldig uklart i beskrivelsen. Kunne dere forklare mer nøyaktig hvordan en strikker videre og hvilken diagram skal en følge. På forhånd takk!
29.08.2024 - 22:54DROPS Design answered:
Hej Anne, du fortsætter med det samme mønster, men undlader det sidste omslag mod raglanovergangen til arbejdet måler 18 cm :)
03.09.2024 - 14:45
![]() Esther wrote:
Esther wrote:
Hi Do I knit the 5 cast on stitches on the body in stocking stitch or incorporate into the chart pattern? It doesn’t say in the body instructions . Although it does say in the sleeves to leave the 5 stitches as stocking stitch. Thanks in advance for your help!
05.04.2024 - 15:02DROPS Design answered:
Dear Esther, the 5 cast on stitches are incorporated into the chart pattern of the body. Happy knitting!
07.04.2024 - 23:56
![]() Maria W wrote:
Maria W wrote:
Samma fråga som Flavia(1a kommentaren), men förstår inte ert svar. När har man stickat A1&A4 en gång på höjden? Jag stickar stl XL, är det efter 32 varv där ett streck går för stl L-XL? Eller ska man sticka hela diagrammet?\r\n Men då fortsätter ju ökningarna, som det står i texten att man inte ska fortsätta med. Otroligt svårt att förstå.
14.10.2023 - 20:11DROPS Design answered:
Hei Maria. I str. XL avslutter du økninger der du ser streken i diagrammet. Når du har strikket A.1 og A.4 1 gang i høyden (32 rader av A.1 og A.4) skal du ha økt 16 ganger og ha 225 masker på pinnen. Strikk videre uten økninger til arbeidet måler 23 cm fra merket i halsen. Om strikkefastheten stemmer måler arbeidet ditt ca 22 cm når A.1 og A.4 er strikket 1 gang i høyden, og da strikkes det ca 1 cm uten økninger. mvh DROPS Design
23.10.2023 - 11:53
![]() Alena wrote:
Alena wrote:
V části RUKÁVY jsou chybně uvedeny počty ok: Odložených 35-37-38-40-40-42 ok převedeme z pomocné jehlice na ponožkové/ kruhové jehlice č.8 a navíc k nim nabereme po 1 oku z 4-6-8-8-10-10 ok nahozených v podpaží = 39-43-46-48-50-52 ok. správně má být: pro velikost S: 41 odložených ok + 5 ok z podpaží = celkem 46 ok.
23.12.2022 - 13:52DROPS Design answered:
Dobrý den Aleno, děkujeme za upozornění, opraveno. Ať se daří!
24.12.2022 - 13:42
![]() Alena wrote:
Alena wrote:
Dobrý den, prosím o radu: po dokončení sedla rozdělíme práci na trup, rukávy a zároveň přidáme 2x 5 ok pro podpaží. moje otázka - kdy začít plést tato přidaná oka? začít je plést v rámci trupu a rozšířit jej o ně? (trup by pak měl 127, nikoliv v návodu uvedených 117 ok.) následně je pak z okrajů nabrat i k doplnění spodní strany rukávů? (rukávy by pak měly v návodu uvedených 46 ok.) děkuji, alena
23.12.2022 - 13:51
![]() Atiya Gul wrote:
Atiya Gul wrote:
Can you plz show any video of this patern...
21.10.2022 - 07:26
![]() Bindy P wrote:
Bindy P wrote:
I am knitting drops pattern # 226-30 . I’ve competed the neck and I’m now starting the yoke. After knitting the first row I have the 8 increased stitches leftover at the end of the row. What am I doing wrong? Please HELP!
13.09.2022 - 21:57DROPS Design answered:
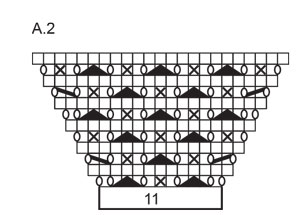
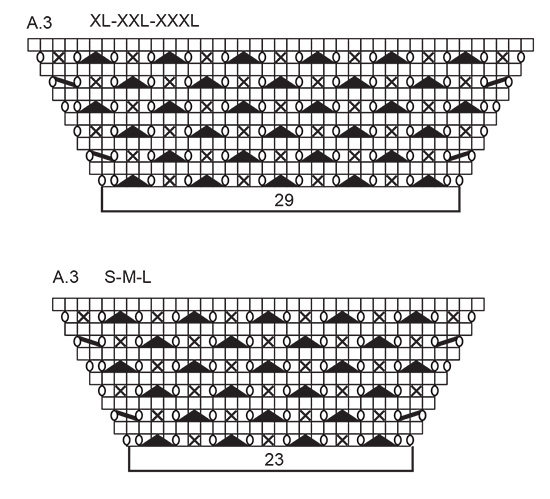
Hi Bindy, You do not say which size you are working, so we will take size S as the example. On the first row you have 5 band sts, A.1 (11 sts), 2 sts in stocking st, A.2 (11 sts), 2 sts in stocking stitch, A.3 (23 sts), 2 sts in stocking st, A.2 (11 sts), 2 sts in stocking st, A.4 (11 sts)and 5 band sts. 5+11+2+11+2+23+2+11+2+11+5 =85 sts, which is the number you have after increasing on the neck. Hope this helps and happy knitting!
14.09.2022 - 07:05
![]() Claudia wrote:
Claudia wrote:
Was mache ich falsch? Wenn ich in der Passe A1 stricke ende ich mit einer rechten Masche. Anschließend kommen die 2 rechten Raglanmaschen. Das ergibt im Bild 3rechte Maschen, aber nur an der einen Stelle.
24.08.2022 - 21:59DROPS Design answered:
Liebe Claudia, das Diagram A.1 sieht spiegelverkehr aus, unser Design Team wird das mal prüfen und korrigieren. Danke für den Hinweis. Viel Spaß beim stricken!
25.08.2022 - 09:32
|
|||||||||||||||||||
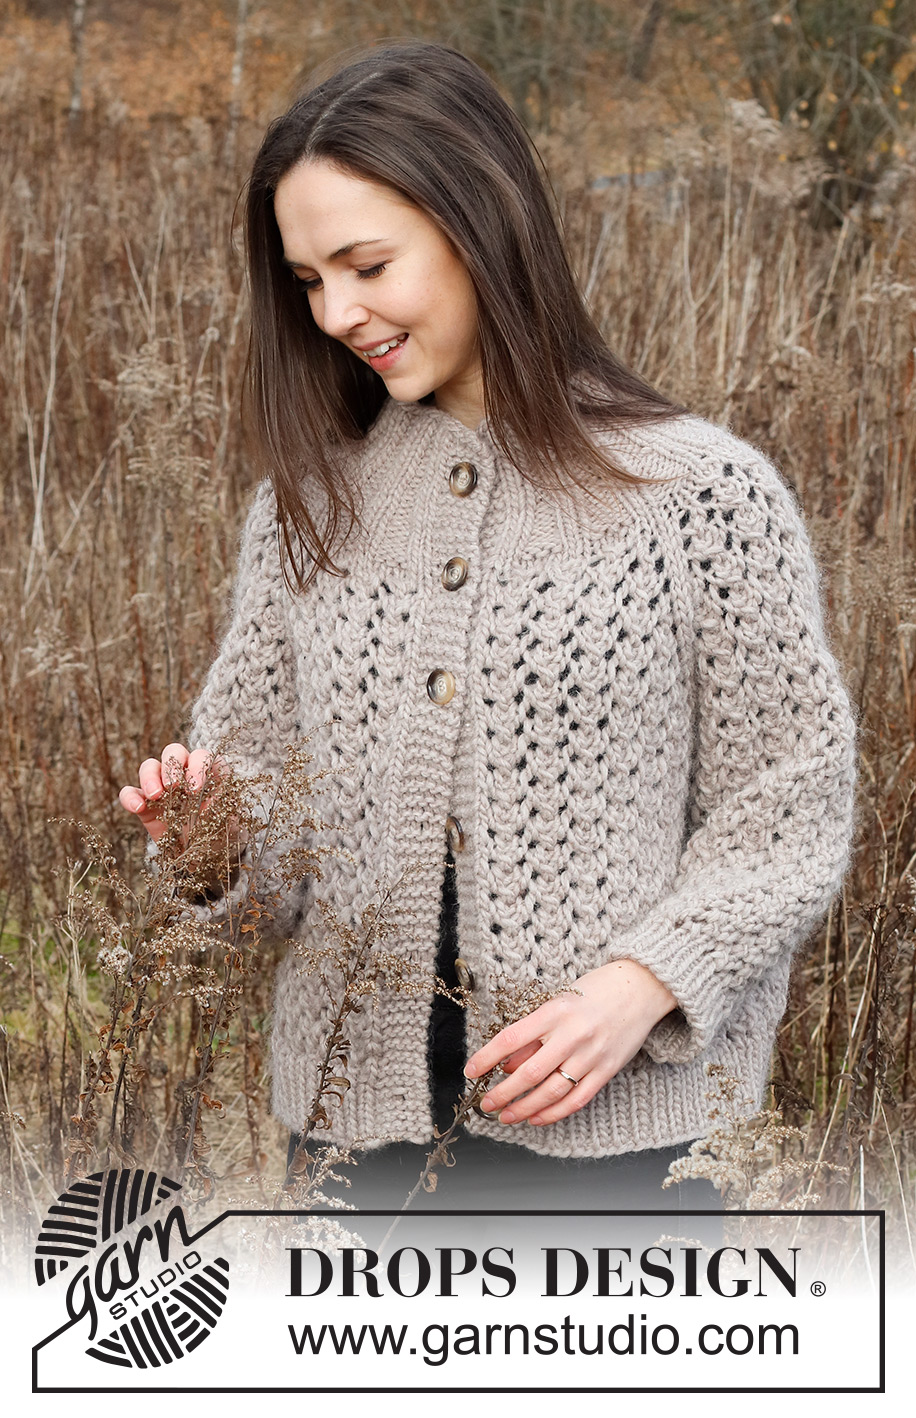
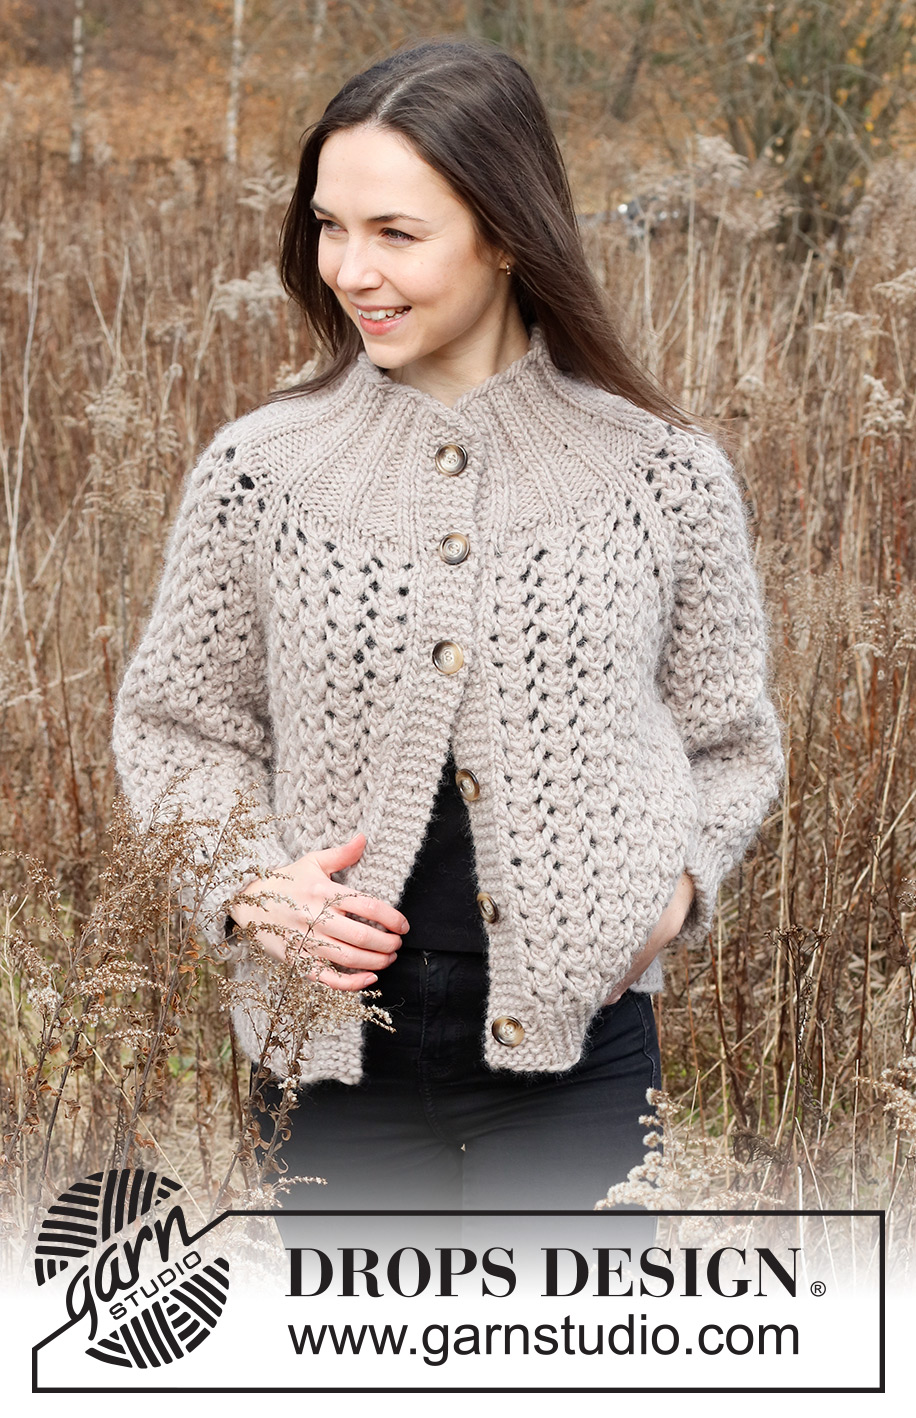
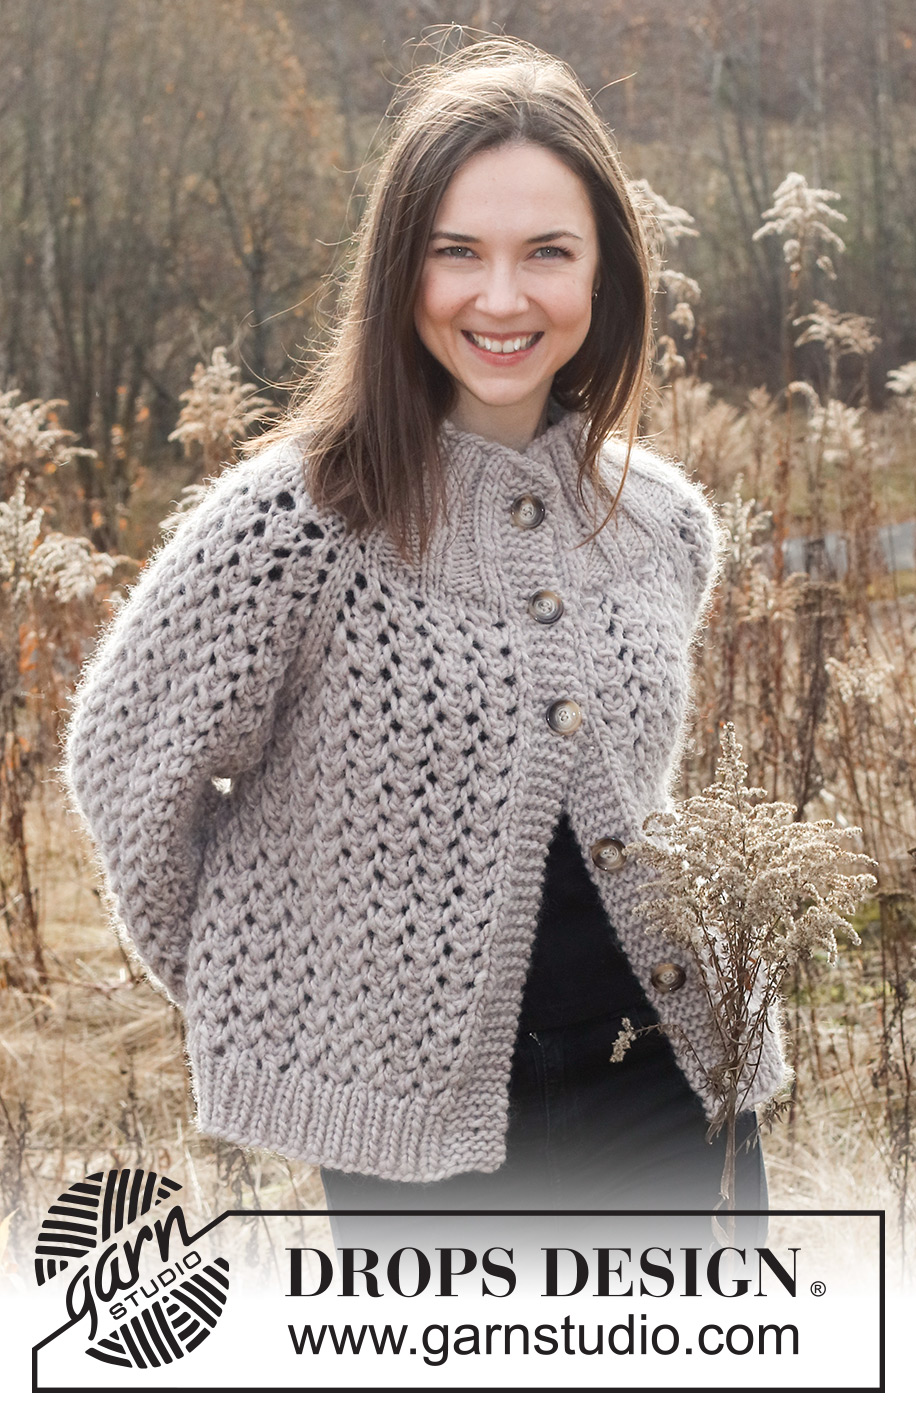
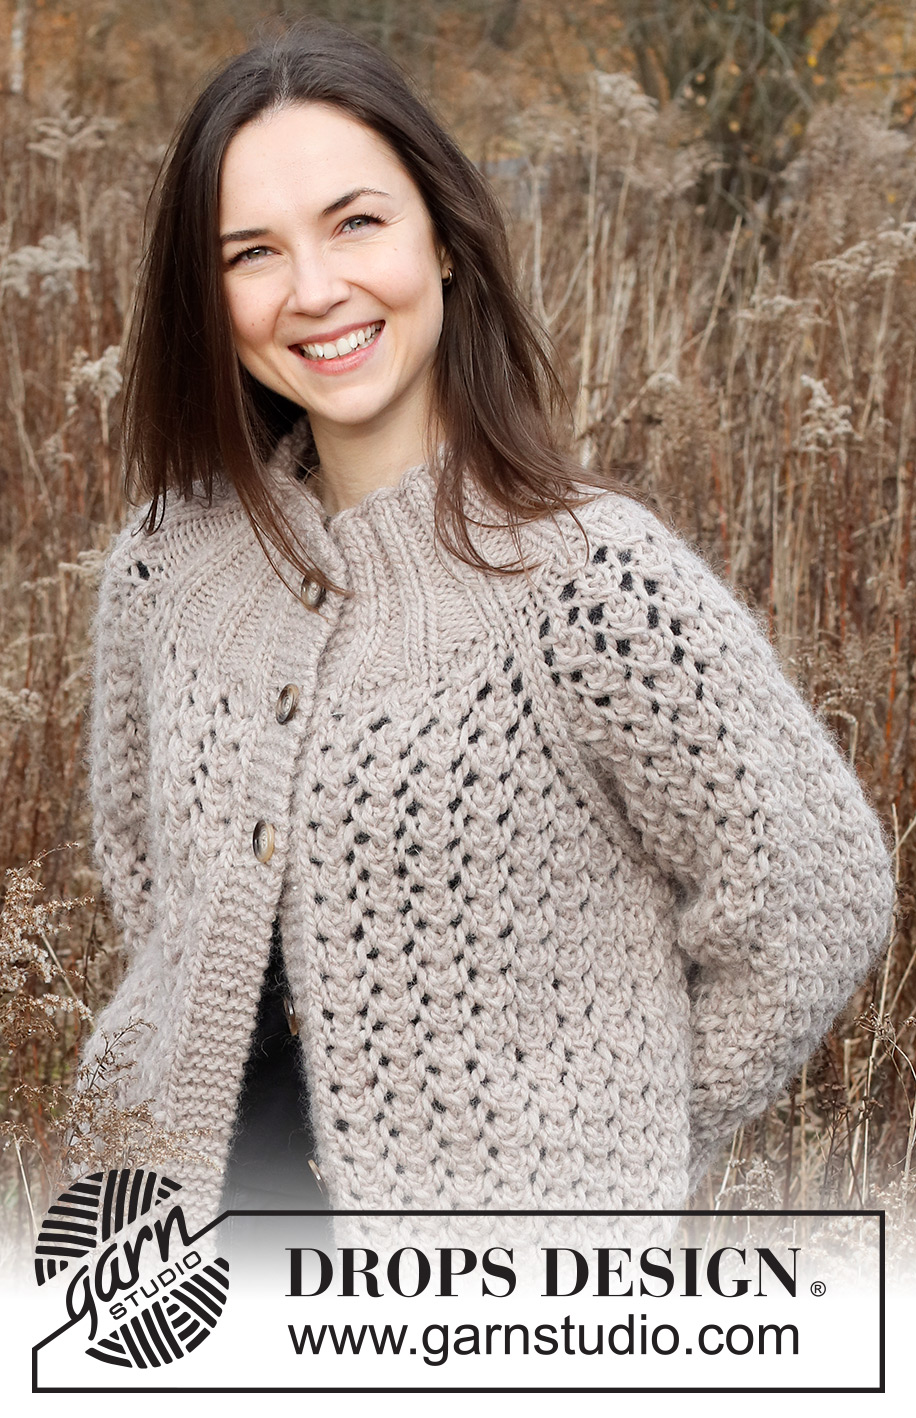
Rocky Shores#rockyshoresjacket |
|||||||||||||||||||
 |
 |
||||||||||||||||||
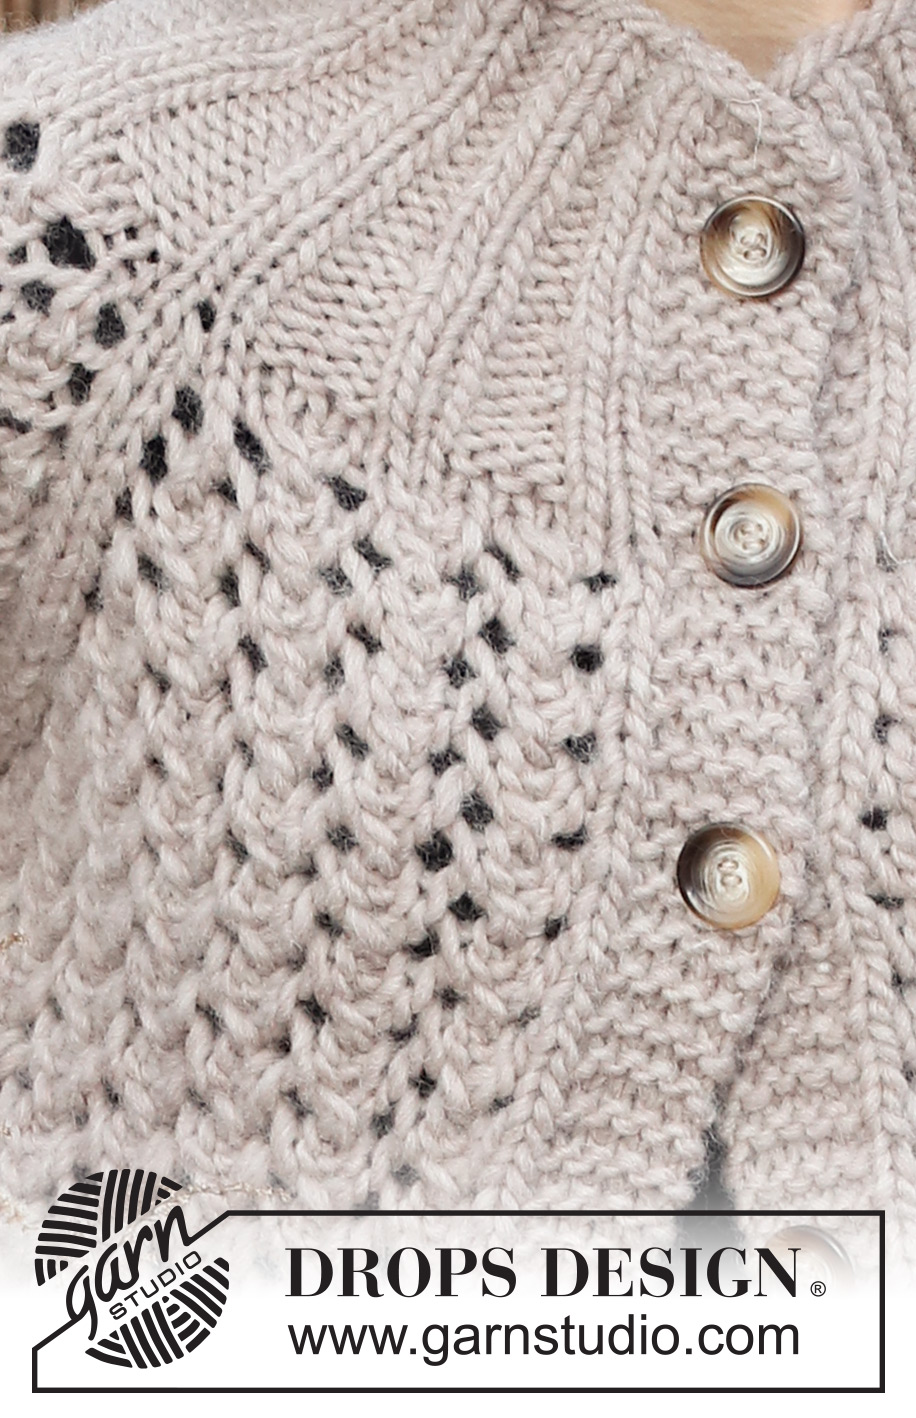
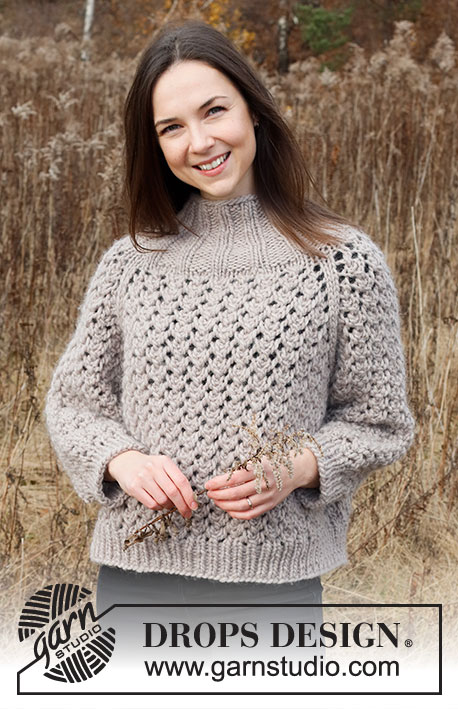
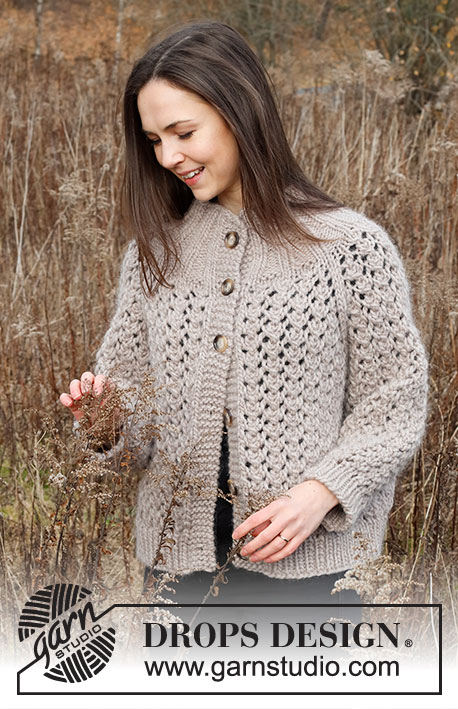
Knitted jacket in DROPS Snow or DROPS Wish. The piece is worked top down with raglan and lace pattern. Sizes S - XXXL.
DROPS 226-30 |
|||||||||||||||||||
|
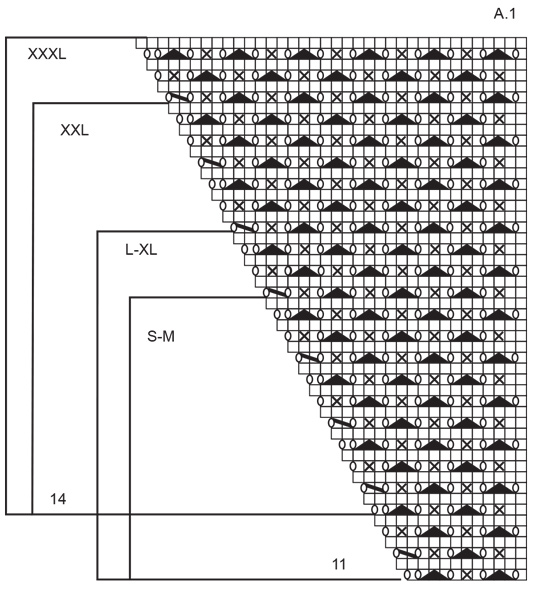
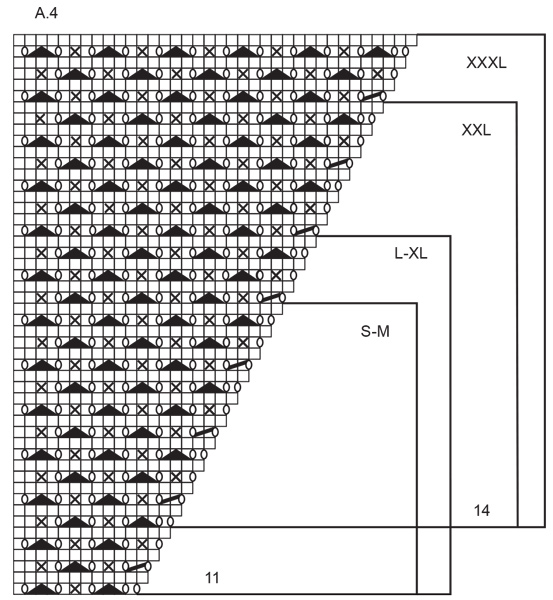
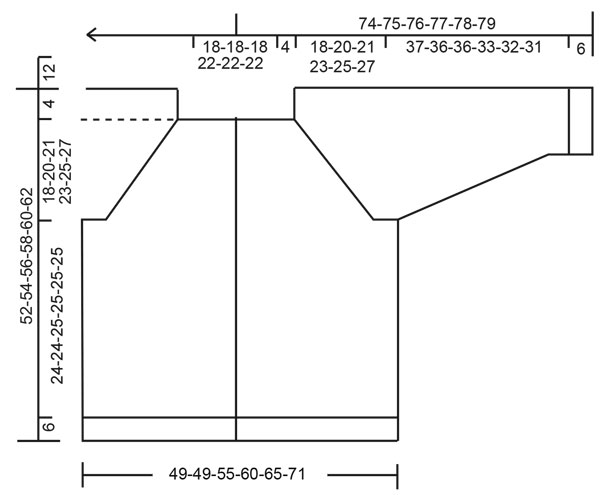
------------------------------------------------------- EXPLANATIONS FOR THE PATTERN: ------------------------------------------------------- RIDGE/GARTER STITCH (worked back and forth): Knit all rows. 1 ridge = knit 2 rows. PATTERN: See diagrams A.1 to A.5. Find your size in diagrams A.1 and A.4 and the right size in A.3. The diagrams show all rows in the pattern from the right side. BUTTONHOLES (top down): Work buttonholes on the right band (when the garment is worn). 1 buttonhole = work from the right side until there are 3 stitches left on the row, make 1 yarn over, knit 2 together and knit 1. On the next row (wrong side), knit the yarn over to leave a hole. The first buttonhole is worked when the rib on the neck measures approx. 4 cm. Then work the other 5-5-5-6-6-6 buttonholes with approx. 9 cm between each one. INCREASE TIP (evenly spaced): To work out how to increase evenly, count the total number of stitches on the needle (e.g. 117 stitches) minus bands (e.g. 10 stitches) and divide the remaining stitches by the number of increases to be made (e.g. 8) = 13.3. In this example, increase by making 1 yarn over after approx. each 13th stitch. Do not increase on bands. On the next row work the yarn overs twisted to avoid holes. DECREASE TIP (for sleeves): Decrease 1 stitch on either side of the marker-stitch as follows: Work until there are 3 stitches left before the marker-stitch, knit 2 together, knit 3 (marker-stitch is the middle stitch), slip 1 stitch as if to knit, knit 1 and pass the slipped stitch over the knitted stitch (2 stitches decreased). CASTING-OFF TIP: To avoid the cast-off edge being tight you can cast off with a larger size needle. If the edge is still tight, make 1 yarn over after approx. each 8th stitch at the same time as casting off; the yarn overs are cast off as normal stitches. ------------------------------------------------------- START THE PIECE HERE: ------------------------------------------------------- JACKET – SHORT OVERVIEW OF THE PIECE. The neck and yoke and body are worked back and forth with circular needle, from mid front and top down. The sleeves are worked in the round with double pointed needles/short circular needle, top down. NECK: Cast on 68-68-68-76-76-76 stitches (including 5 band stitches on each side towards mid-front) with circular needle size 7 mm and DROPS Snow or DROPS Wish. Purl 1 row from the wrong side. Then work as follows from the right side: 5 band stitches in GARTER STITCH – read description above, * knit 2, purl 2 *, work from *-* until there are 7 stitches left, knit 2 and finish with 5 band stitches in garter stitch. Continue this rib for 4 cm, then work the first BUTTONHOLE – read description above. Continue working until the rib measures 8 cm. On the next row from the right side increase 1 stitch in each purled section by making 1 yarn over at the end of each purled section; on the next row work the yarn overs twisted to avoid holes = 82-82-82-92-92-92 stitches. Continue the new rib (knit 2, purl 3) for 4 cm. The rib is now 12 cm, finish after a row from the right side. Change to circular needle size 8 mm, purl 1 row from the wrong side where you increases 3-3-3-5-5-5 stitches evenly spaced – read INCREASE TIP = 85-85-85-97-97-97 stitches. Knit 1 row from the right side and purl 1 row from the wrong side (the bands are continued in garter stitch). Insert 1 marker at the beginning of the row. THE PIECE IS NOW MEASURED FROM HERE! YOKE: The first row is worked as follows from the right side: 5 band stitches in garter stitch, A.1 (= 11-11-11-14-14-14 stitches) (= 16-16-16-19-19-19 stitches on the front piece), work 2 stitches in stocking stitch (= raglan-line), A.2 (= 11 stitches on the sleeve), work 2 stitches in stocking stitch (= raglan-line), A.3 (= 23-23-23-29-29-29 stitches on the back piece), work 2 stitches in stocking stitch (= raglan-line), A.2 (= sleeve), work 2 stitches in stocking stitch (= raglan-line), A.4 (= 11-11-11-14-14-14 stitches) and 5 band stitches in garter stitch (= 16-16-16-19-19-19 stitches on the front piece). You have increased 8 stitches; these increases are drawn into A.1 - A.4. When A.2 and A.3 have been worked 1 time in height, continue as follows (continue with A.1 and A.4 on front pieces as before): BACK PIECE: Work A.5A over the first 5-5-5-5-5-5 stitches, A.5B over the next 24-24-24-30-30-30 stitches (= 4-4-4-5-5-5 repeats of 6 stitches), finish with A.5C over the last 6-6-6-6-6-6 stitches. SLEEVES: Work A.5A over the first 5-5-5-5-5-5 stitches, A.5B over the next 12-12-12-12-12-12 stitches (= 2 repeats of 6 stitches), finish with A.5C over the last 6-6-6-6-6-6 stitches. Each time A.5 is worked 1 time in height, there is room for 2 more repeats of A.5B between A.5 A and A.5 C. When A.1 and A.4 have been worked 1 time in height there are 189-189-213-225-249-273 stitches on the needle and you have increased 13-13-16-16-19-22 times. REMEMBER THE KNITTING TENSION! Continue working without further increases (working pattern as before) until the piece measures 18-20-21-23-25-27 cm from the marker on the neck. Now divide the piece for the body and sleeves and finish each piece separately. The next row is worked as follows from the right side: Work 29-29-32-35-38-41 stitches as before (= front piece), place the next 41-41-47-47-53-59 stitches on 1 thread for the sleeve, cast on 5 new stitches (= in side under sleeve), work 49-49-55-61-67-73 stitches as before (= back piece), place the next 41-41-47-47-53-59 stitches on 1 thread for the sleeve, cast on 5 new stitches (= in side under sleeve), work the remaining 29-29-32-35-38-41 stitches as before (= front piece). THE PIECE IS NOW MEASURED FROM HERE! BODY: = 117-117-129-141-153-165 stitches. Continue the pattern with 5 band stitches in garter stitch on each side (first row from the wrong side). When the piece measures 24-24-25-25-25-25 cm knit 1 row from the right side where you increase 8 stitches evenly spaced – read INCREASE TIP = 125-125-137-149-161-173 stitches. Change to circular needle size 7 mm. The next row is worked as follows from the wrong side: 5 band stitches in garter stitch, * purl 1, knit 1 *, work from *-* until there are 6 stitches left, purl 1 and 5 band stitches in garter stitch. Continue this rib for 6 cm. Loosely cast off with garter stitch over garter stitch, knit over knit and purl over purl – read CASTING-OFF TIP. The jacket measures approx. 52-54-56-58-60-62 cm from the shoulder down. SLEEVES: Place the 41-41-47-47-53-59 stitches from the thread on the one side of the piece on double pointed needles/short circular needle size 8 mm and knit up 1 stitch in each of the 5 stitches cast on under the sleeve = 46-46-52-52-58-64 stitches. Insert a marker in the middle of the 5 stitches under the sleeve and start the round here. Continue the pattern in the round, but without further increases – make sure the pattern matches the stitches on the yoke – NOTE! The stitches which do not fit into the pattern under the sleeve are worked in stocking stitch. When the sleeve measures 4 cm, decrease 1 stitch on each side of the marker-stitch – read DECREASE TIP. Decrease like this every 5½-5½-4½-4-3-2½ cm a total of 6-6-7-7-8-10 times = 34-34-38-38-42-44 stitches. Continue working until the sleeve measures 37-36-36-33-32-31 cm from the division (or to desired length; there is approx. 6 cm left to finished length). Change to double pointed needles size 7 mm and work rib (knit 1, purl 1) for 6 cm. Loosely cast off with knit over knit and purl over purl. The sleeve measures approx. 43-42-42-39-38-37 cm from the division. Work the other sleeve in the same way. ASSEMBLY: Sew the buttons onto the left band. |
|||||||||||||||||||
Diagram explanations |
|||||||||||||||||||
|
|||||||||||||||||||
|
|||||||||||||||||||
|
|||||||||||||||||||
|
|||||||||||||||||||
|
|||||||||||||||||||
|
|||||||||||||||||||
|
|||||||||||||||||||
Have you finished this pattern?Tag your pictures with #dropspattern #rockyshoresjacket or submit them to the #dropsfan gallery. Do you need help with this pattern?You'll find 29 tutorial videos, a Comments/Questions area and more by visiting the pattern on garnstudio.com. © 1982-2025 DROPS Design A/S. We reserve all rights. This document, including all its sub-sections, has copyrights. Read more about what you can do with our patterns at the bottom of each pattern on our site. |
|||||||||||||||||||


With over 40 years in knitting and crochet design, DROPS Design offers one of the most extensive collections of free patterns on the internet - translated to 17 languages. As of today we count 314 catalogues and 11822 patterns translated into English (UK/cm).
We work hard to bring you the best knitting and crochet have to offer, inspiration and advice as well as great quality yarns at incredible prices! Would you like to use our patterns for other than personal use? You can read what you are allowed to do in the Copyright text at the bottom of all our patterns. Happy crafting!
Post a comment to pattern DROPS 226-30
We would love to hear what you have to say about this pattern!
If you want to leave a question, please make sure you select the correct category in the form below, to speed up the answering process. Required fields are marked *.