DROPS Snow
DROPS Snow
100% Wool
from 2.00 £ /50g
Get the yarn to make this pattern from 24.00£.

The yarn cost is calculated from the pattern’s smallest size and the yarn’s cheapest product type. Looking for an even better price? You might find it on the DROPS Deals!

DROPS SS24

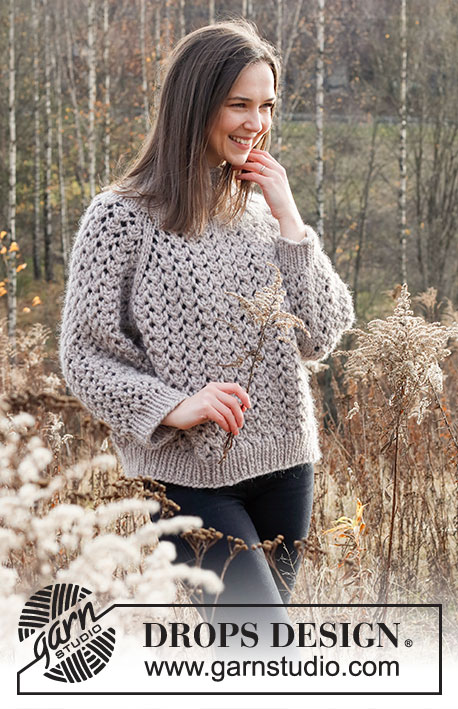
Rocky Shores Sweater

Knitted jumper in DROPS Snow or DROPS Wish. The piece is worked top down with raglan and lace pattern. Sizes S - XXXL.

DROPS 226-29
DROPS Design: Pattern no ee-727
Yarn group E or C + C
-------------------------------------------------------

SIZES:
S - M - L - XL - XXL - XXXL

MATERIALS:
DROPS SNOW from Garnstudio (belongs to yarn group E)
600-650-700-800-850-950 g colour 47, light beige

Or use:
DROPS WISH from Garnstudio (belongs to yarn group E)
450-450-500-600-650-750 g colour 05, beige

NEEDLES:
DROPS CIRCULAR NEEDLE SIZE 8 MM: Length 40 cm and 60 - 80 cm for stocking stitch.
DROPS CIRCULAR NEEDLE SIZE 7 MM: Length 40 cm and 80 cm for rib.
DROPS DOUBLE POINTED NEEDLES SIZE 8 MM.
DROPS DOUBLE POINTED NEEDLES SIZE 7 MM.
The technique MAGIC LOOP can be used – you then only need circular needle of 80 cm in each size.

KNITTING TENSION:
11 stitches in width and 15 rows in height with stocking stitch and lace pattern = 10 x 10 cm.
NOTE: Needle size is only a guide. If you get too many stitches on 10 cm, change to a larger needle size. If you get too few stitches on 10 cm, change to a smaller needle size.

-------------------------------------------------------

Alternative Yarn – See how to change yarns here
Yarn Groups A to F – Use the same pattern and change the yarn here
Yarn usage using an alternative yarn – Use our yarn converter here

-------------------------------------------------------

DROPS Snow
DROPS Snow
100% Wool
from 2.00 £ /50g
Get the yarn to make this pattern from 24.00£.

The yarn cost is calculated from the pattern’s smallest size and the yarn’s cheapest product type. Looking for an even better price? You might find it on the DROPS Deals!

Pattern instructions

NOTE: This pattern is written in British English. All measurements in charts are in cm. For conversion from cm to inches - click here. There are different terms for crocheting in British and American English. If this pattern includes crochet, click for "crochet terms" here. For this pattern in American English, please click here.
-------------------------------------------------------

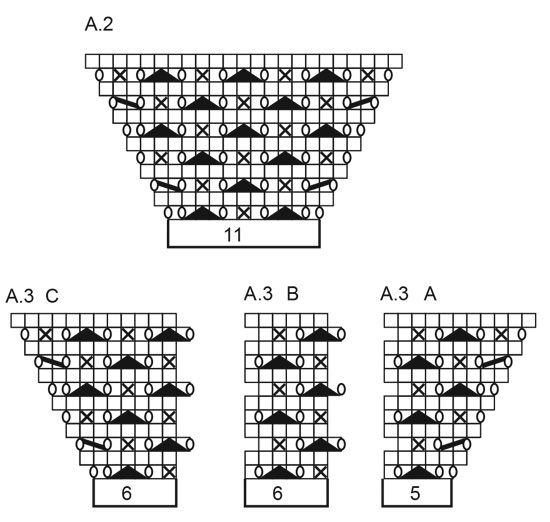
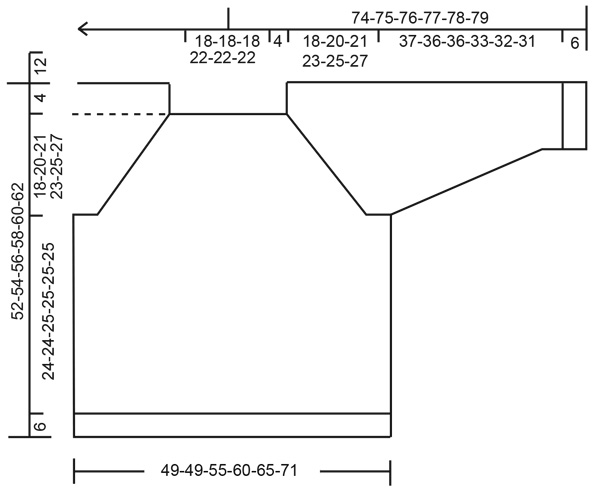
EXPLANATIONS FOR THE PATTERN:

-------------------------------------------------------

PATTERN:
See diagrams A.1 to A.3. Choose diagram appropriate to your size in diagram A.1

INCREASE TIP (evenly spaced):
To work out how to increase evenly, count the total number of stitches on the needle (e.g. 108 stitches) and divide by the number of increases to be made (e.g. 8) = 13.5. 
In this example, increase by making 1 yarn over after alternately each 13th and 14th stitch. On the next round work the yarn overs twisted to avoid holes.

DECREASE TIP (for sleeves): 
Decrease 1 stitch on either side of the marker-stitch as follows: Work until there are 3 stitches left before the marker-stitch, knit 2 together, knit 3 (marker-stitch is the middle stitch), slip 1 stitch as if to knit, knit 1 and pass the slipped stitch over the knitted stitch (2 stitches decreased).

CASTING-OFF TIP:
To avoid the cast-off edge being tight you can cast off with a larger size needle. If the edge is still tight, make 1 yarn over after approx. each 8th stitch at the same time as casting off; the yarn overs are cast off as normal stitches.

-------------------------------------------------------

START THE PIECE HERE:

-------------------------------------------------------

JUMPER – SHORT OVERVIEW OF THE PIECE.
The neck and yoke and body are worked in the round with circular needle, top down. The beginning of the round is in the transition between the left shoulder and the back piece. The sleeves are worked in the round with double pointed needles/short circular needle, top down.

NECK:
Cast on 60-60-60-68-68-68 stitches with circular needle size 7 mm and DROPS Snow or DROPS Wish. Knit 1 round. Then work rib in the round (knit 2, purl 2) for 8 cm. Now increase 1 stitch in each purled section by making 1 yarn over at the end of each purled section; on the next round work the yarn overs twisted to avoid holes = 75-75-75-85-85-85 stitches. Continue the new rib (knit 2, purl 3) for 4 cm. The rib is now 12 cm. Change to circular needle size 8 mm and knit 1 round where you increase 1-1-1-3-3-3 stitches evenly spaced = 76-76-76-88-88-88 stitches. Knit 2 rounds. Insert 1 marker in the middle of the round (= mid-front). THE PIECE IS NOW MEASURED FROM HERE!

YOKE:
The first round is worked as follows: A.1 (= 23-23-23-29-29-29 stitches on the back piece), work 2 stitches in stocking stitch (= raglan-line), A.2 (= 11 stitches on the sleeve), work 2 stitches in stocking stitch (= raglan-line), A.1 (= 23-23-23-29-29-29 stitches on the front piece), work 2 stitches in stocking stitch (= raglan-line), A.2 (= sleeve), work 2 stitches in stocking stitch (= raglan-line). You have increased 8 stitches; these increases are drawn into A.1 and A.2. When A.1 and A.2 have been completed in height, continue as follows:

BACK AND FRONT PIECES:
Work A.3A over the first 5-5-5-5-5-5 stitches, A.3B over the next 24-24-24-30-30-30 stitches (= 4-4-4-5-5-5 repeats of 6 stitches), finish with A.3C over the last 6-6-6-6-6-6 stitches.
SLEEVES:
Work A.3A over the first 5-5-5-5-5-5 stitches, A.3B over the next 12-12-12-12-12-12 stitches (= 2 repeats of 6 stitches), finish with A.3C over the last 6-6-6-6-6-6 stitches.

Each time A.3 is worked 1 time in height, there is room for 2 more repeats of A.3B between A.3A and A.3C.

Continue with A.3 until you have increased a total of 13-13-16-16-19-22 times. There are 180-180-204-216-240-264 stitches. REMEMBER THE KNITTING TENSION!
Continue working without further increases (continue pattern as shown in A.3B) until the piece measures 18-20-21-23-25-27 cm from the marker on the neck. Now divide the piece for the body and sleeves and finish each piece separately.
Work the next round as follows:
Work 49-49-55-61-67-73 stitches as before (= back piece), place the next 41-41-47-47-53-59 stitches on 1 thread for the sleeve, cast on 5 new stitches (= in side under sleeve), work 49-49-55-61-67-73 stitches as before (= front piece), place the next 41-41-47-47-53-59 stitches on 1 thread for the sleeve, cast on 5 new stitches (= in side under sleeve). THE PIECE IS NOW MEASURED FROM HERE!

BODY:
= 108-108-120-132-144-156 stitches. Continue the pattern as before. When the piece measures 24-24-25-25-25-25 cm knit 1 round where you increase 8 stitches evenly spaced – remember INCREASE TIP = 116-116-128-140-152-164 stitches. Change to circular needle size 7 mm and work rib (knit 1, purl 1) for 6 cm. Loosely cast off with knit over knit and purl over purl – read CASTING-OFF TIP. The jumper measures 52-54-56-58-60-62 cm from the shoulder down.

SLEEVES:
Place the 41-41-47-47-53-59 stitches from the thread on the one side of the piece on double pointed needles/short circular needle size 8 mm and knit up 1 stitch in each of the 5 stitches cast on under the sleeve = 46-46-52-52-58-64 stitches. Insert a marker in the middle of the 5 stitches under the sleeve and start the round here.
Continue the pattern in the round, but without further increases – make sure the pattern matches the stitches on the yoke – NOTE! The stitches which do not fit into the pattern under the sleeve are worked in stocking stitch. When the sleeve measures 4 cm, decrease 1 stitch on each side of the marker-stitch – read DECREASE TIP. Decrease like this every 5½-5½-4½-4-3-2½ cm a total of 6-6-7-7-8-10 times = 34-34-38-38-42-44 stitches. Continue working until the sleeve measures 37-36-36-33-32-31 cm from the division (or to desired length; there is approx. 6 cm left to finished length). Change to double pointed needles size 7 mm and work rib (knit 1, purl 1) for 6 cm. Loosely cast off with knit over knit and purl over purl. The sleeve measures approx. 43-42-42-39-38-37 cm from the division. Work the other sleeve in the same way.

This pattern has been corrected.

Updated online: 11.11.2021
New diagramms.

Diagram

symbols = knit
symbols = purl
symbols = slip 1 stitch as if to knit, knit 2 together and pass the slipped stitch over the knitted together stitches
symbols = knit 2 together
symbols = slip 1 stitch as if to knit, knit 1 and pass the slipped stitch over the knitted stitch
symbols = between 2 stitches make 1 yarn over
diagram
diagram
diagram

Each of our patterns has specific tutorial videos to help you.

Do you have a question? See a list of frequently asked questions (FAQ)

Knitting tension is what determines the final measurements of your work, and is usually measured per 10 x 10 cm. It is provided like so: number of stitches in width x number of rows in height - eg: 19 stitches x 26 rows = 10 x 10 cm.

The knitting tension is very individual; some people knit/crochet loosely while others work tightly. You adjust the knitting tension with the needle size, which is why the suggested needle size is only meant as a guide! You need to adjust this (up or down) to ensure that YOUR knitting tension matches the knitting tension provided in the pattern. If you work with a different knitting tension than provided you will have a different yarn consumption, and your work will have different measurements than what the pattern suggests.

The knitting tension also determines which yarns can replace each other. As long as you achieve the same knitting tension you can replace one yarn with another.

See DROPS lesson: How to measure your tension/gauge

See DROPS video: How to make a gauge tension swatch

The required amount of yarn is provided in grams, eg: 450 g. To calculate how many balls you’ll need you first need to know how many grams are in 1 ball (25g, 50g or 100g). This information is available if you click on the individual yarn quality on our pages. Divide the amount required with the amount of each ball. For example, if each ball is 50g (the most common amount), the calculation will be as follows: 450 / 50 = 9 balls.

The important thing when changing from one yarn to another is that the knitting/crochet tension remains the same. This is so that the measurements of the finished piece will be the same as on the sketch provided. It is easier to achieve the same knitting tension using yarns from the same yarn group. It is also possible to work with multiple strands of a thinner yarn to achieve the knitting tension of a thicker one. Please try our yarn converter. We recommend you to always work a test swatch.

Please NOTE: when changing yarn the garment might have a different look and feel to the garment in the photo, due to individual properties and qualities of each yarn.

See DROPS lesson: Can I use a different yarn than the one mentioned in the pattern?

All our yarns are categorised into yarn groups (from A to F) according to thickness and knitting tension – group A contains the thinnest yarns and group F the thickest. This makes it easier for you to find alternative yarns to our patterns, should you wish to switch yarn. All yarns within the same group have a similar knitting tension and can easily replace each other. However, different yarn qualities have different structures and properties which will give the finished work a unique look and feel.

Click here for an overview of the yarns in each yarn group

At the top of all our patterns you’ll find a link to our yarn calculator, which is a helpful tool should you wish to use a different yarn than suggested. By filling in the yarn quality you wish to replace, the amount (in your size) and number of strands, the calculator will present good alternative yarns with the same knitting tension. Additionally it will tell you how much you’ll require in the new qualities and whether you’ll need to work with multiple strands. Most skeins are 50g (some are 25g or 100g).

If the pattern is worked with multiple colours, every colour will have to be calculated separately. Similarly, if the pattern is worked with several strands of different yarns (for example 1 strand Alpaca and 1 strand Kid-Silk) you will have to find alternatives for each, individually.

Click here to see our yarn calculator

Since different yarns have different qualities and textures we have chosen to keep the original yarn in our patterns. However, you can easily find options among our available qualities by using our yarn calculator, or simply pick a yarn from the same yarn group.

It is possible that some retailers still have discontinued yarns in stock, or that someone has a few skeins at home that they would like to find patterns for.

The yarn calculator will provide both alternative yarn as well as required amount in the new quality.

If you think it's hard to decide what size to make, it can be a good idea to measure a garment you own already and like the size of. Then you can pick the size by comparing those measures with the ones available in the pattern's size chart.

You'll find the size chart at the bottom of the pattern.

See DROPS lesson: How to read size chart

The needle size provided in the pattern serves only as a guide, the important thing is to follow the knitting tension. And since knitting tension is very individual, you will have to adjust the needle size to ensure that YOUR tension is the same as in the pattern – maybe you’ll have to adjust 1, or even 2 needle sizes, up or down to achieve the correct tension. For this, we recommend that you work test swatches.

Should you work with a different knitting tension than the one provided, the measurements of the finished garment might deviate from the measurement sketch.

See DROPS lesson: How to measure your tension/gauge

See DROPS video: How to make a tension/gauge swatch

Working a garment top-down provides more flexibility and room for personal adjustment. For example it is easier to try the garment on while working, as well as making adjustments to length of yoke and shoulder caps.

The instructions are carefully explaining every step, in the correct order. Diagrams are adjusted to the knitting direction and are worked as usual.

The diagram depicts all rows/rounds, and every stitch seen from the right side. It is read from bottom to top, from right to left. 1 square = 1 stitch.

When working back and forth, every other row is worked from the right side and every other row is worked from the wrong side. When working from the wrong side, the diagram will have to be worked reversed: from left to right, knit stitches are purled, purl stitches are knit etc.

When working in the round every round is worked from the right side and the diagram are worked from right to left on all rounds.

See DROPS lesson: How to read knitting diagrams

The diagram depicts all rows/rounds, and every stitch seen from the right side. It is worked from bottom to top, from right to left.

When working back and forth every other row is worked from the right side: from right to left and every other row is worked from the wrong side: from left to right.

When working in the round, every row in the diagram are worked from the right side, from right to left.

When working a circular diagram you start in the middle and work your way outwards, counter clockwise, row by row.

The rows usually start with a given number of chain stitches (equivalent to the height of the following stitch), this will either be depicted in the diagram or explained in the pattern.

See DROPS lesson: How to read crochet diagrams

Instructions for working several diagrams after each other on the same row/round, will often be written like so: “work A.1, A.2, A.3 a total of 0-0-2-3-4 times". This means you work A.1 once, then A.2 is worked once, and A.3 is repeated (in width) the number of times provided for your size – in this case like so: S = 0 times, M = 0 times, L=2 times, XL= 3 times and XXL = 4 times.

The diagrams are worked as usual: begin with the first row in A.1, then work the first row in A.2 etc.

See DROPS lesson: How to read knitting diagrams

See DROPS lesson: How to read crochet diagrams

The total width of the garment (from wrist-to-wrist) will be larger in the larger sizes, despite the actual sleeves being shorter. The larger sizes have longer sleeve caps and wider shoulders, so there will be a good fit in all sizes.

The measurement sketch/schematic drawing provides information regarding the full length of the garment. If it’s a jumper or a jacket the length is measured from the highest point on the shoulder closest to the neckline, and straight down to the bottom of the garment. It is NOT measured from the tip of shoulder. Similarly, the length of yoke is measured from the highest point on the shoulder and down to where yoke is split into body and sleeves.

On a jacket measures are never taken along bands, unless specifically stated. Always measure inside band stitches when measuring the length.

See DROPS lesson: How to read a schematic drawing

Diagrams are often repeated on the round or in height. 1 repeat is the diagram the way it appears in the pattern. If it says to work 5 repeats of A.1 in the round, then you work A.1 a total of 5 times after/next to each other in the round. If it says to work 2 repeats of A.1 vertically/in height you work the entire diagram once, then begin again at the start and work the entire diagram one more time.

Chain stitches are slightly narrower than other stitches and to avoid working the cast-on edge too tight, we simply chain more stitches to begin with. The stitch count will be adjusted on the following row to fit the pattern and measurement sketch.

The rib edge is more elastic and will contract slightly compared to, for example, stocking stitch. By increasing before the rib edge, you avoid a visible difference in width between the rib edge and the rest of the body.

It’s very easy to cast off too tightly, and by making yarn overs while casting off (and simultaneously casting these off) you avoid a too tight cast off edge.

See DROPS video: How to bind off with yarn overs (yo)

To achieve an even increase (or decrease) you can increase on, for example: every 3rd and 4th row alternately, like so: work 2 rows and increase on the 3rd row, work 3 rows and increase on the 4th. Repeat this until the increase is complete.

See DROPS lesson: Increase or decrease 1 st on every 3rd and 4th row alternately

Should you prefer to work in the round instead of back and forth, you may of course adjust the pattern. You’ll need to add steeks mid-front (usually 5 stitches), and follow the instructions. When you would normally turn and work from the wrong side, simply work across the steek and continue in the round. At the end you’ll cut the piece open, pick up stitches to work bands, and cover the cut edges.

See DROPS video: How to knit steeks and cut open

Should you prefer to work back and forth instead of in the round, you may of course adjust the pattern so you work the pieces separately and then assemble them at the end. Divide the stitches for the body in 2, add 1 edge stitch in each side (for sewing) and work the front and back pieces separately.

See DROPS lesson: Can I adapt a pattern for circular needles into straight needles?

Pattern repeats can vary slightly in the different sizes, in order to get the correct proportions. If you’re not working the exact same size as the garment in the photo, yours might deviate slightly. This has been carefully developed and adjusted so that the complete impression of the garment is the same in all sizes.

Make sure to follow instructions and diagrams for your size!

If you have found a pattern you like which is available in women’s size it’s not very difficult to convert it to men’s size. The biggest difference will be the length of sleeves and body. Start working on the women size that you think would fit across the chest. The additional length will be worked right before you cast off for the armhole/sleeve cap. If the pattern is worked top-down you can add the length right after the armhole or before the first decrease on sleeve.

Regarding additional yarn amount, this will depend on how much length you add, but it is better with a skein too many than too few.

All yarns will have excess fibres (from production) that might come off as lint or shedding. Brushed yarns (ie hairier yarns) have more of these loose, excess fibres, causing more shedding.

Shedding also depends on what is worn under or over the garment, and whether this pulls at the yarn fibres. It’s therefore not possible to guarantee that there will be no shedding

Below are some tips on how to get the best result when working with hairier yarns:

1. When the garment is finished (before you wash it) shake it vigorously so the looser hairs come off. NOTE: do NOT use a lint roller, brush or any method that pulls at the yarn.

2. Place the garment in a plastic bag and put it in your freezer - the temperature will cause the fibres to become less attached to each other, and excess fibres will come off easier.

3. Leave in the freezer for a few hours before taking it out and shaking it again.

4. Wash the garment according to the instructions on the yarn label.

Pilling is a natural process that happens to even the most exclusive of fibers. It's a natural sign of wear and tear that is hard to avoid, and that is most visible in high friction areas of your garment like a sweater's arms and cuffs.

You can make your garment look as new by removing the pilling, using a fabric comb or a pill/lint remover.

Still can't find the answer you need? Then scroll down and leave your question so one of our experts can try to help you. This will be done normally within 5 to 10 working days.
In the meantime, you can read the questions and answers that others have left to this pattern or join the DROPS Workshop on Facebook to get help from fellow knitters/crocheters!

You might also like...

Post a comment to pattern DROPS 226-29

We would love to hear what you have to say about this pattern!

If you want to leave a question, please make sure you select the correct category in the form below, to speed up the answering process. Required fields are marked *.

Comments / Questions (14)

country flag Tove Morskogen wrote:

Hei.Jeg finner ikke rettelsen til mønstret.Har prøvd å strikke,men mønstret går ikke opp.Er det mulig å få tilsendt riktig mønster? Mvh.Tove Morskogen

15.03.2024 - 11:25

DROPS Design answered:

Hej Tove, jo det er de nye diagrammer som ligger her på nettet :)

19.03.2024 - 11:01

country flag Monique wrote:

Hallo,ich soll für Grösse M A3 13 mal in der Höhe stricken bevor ich die Ärmel abteile? Das ist doch viel zu oft?

21.12.2023 - 20:16

DROPS Design answered:

Liebe Monique, in M muss man 13 Mal in der Höhe zunehmen, dh 13 Mal in jeder 2. Runde = 26 Runden mit 8 Zunahmen in jeder 2. Runde: 76 Maschen + (13 Mal 8 Zunahmen) = 180 Maschen. Viel Spaß beim stricken!

22.12.2023 - 08:30

country flag Jeanine HO-YOU- FAT wrote:

Sur le modèle 195-36 Je ne comprends pas la marche à suivre au niveau des diagrammes. Pouvez vous m éclairer ?

03.12.2022 - 21:39

DROPS Design answered:

Bonjour Mme Ho-You-Fat, parlez-vous de ce châle? Peut-être que cette leçon est alors celle qu'il vous faut pour comprendre comment lire les diagrammes; n'hésitez pas à préciser votre question en la posant bien dans la rubrique de ce modèle. Bon tricot!

06.12.2022 - 09:04

country flag Heiða wrote:

Hæ hæ ég er alls ekki að skilja hvað eg á að gera þegar ég er búin með útaukningu og kominn með 180 lykkjur og er í munstri 3a sem sagt hvaða línur af munstrinu á eg að nota fyrir restina af peysunni þannig að ég auki ekki endalaust út kv Heiða

28.11.2022 - 01:44

DROPS Design answered:

Blessuð Heiða. Þú prjónar án útaukningar (heldur áfram með með mynstur eins og A.3B). Gangi þér vel.

06.01.2023 - 10:25

country flag Ann wrote:

Hej. Med hänvisning till denna del i beskrivningen (ÄRM): "Sticka utan ökningar (fortsätt med mönster som förut) till arbetet mäter 18-20-21-23-25-27 cm från markören mitt fram. " Jag är nybörjare inom stickning och förstår inte riktigt hur jag ska sticka mönstret utan ökningar då ökningar är intecknade i mönstret. Tacksam för hjälp.

13.07.2022 - 10:06

DROPS Design answered:

Hej Ann. Du fortsätter då mönstret som du stickat tidigare, men utan ökningar, dvs utan de yttersta delarna av diagrammet. Se bara till att mönstret passar ihop med det du stickat innan. Mvh DROPS Design

13.07.2022 - 13:37

country flag Simone wrote:

Hi there, Thank you so much for providing all those beautiful patterns. If the pattern says: 11 stitches in width and 15 rows in height with stocking stitch and lace pattern = 10 x 10 cm. How do I know how many rows of stocking Stich I need and how many of the lace pattern? Thank you for your help, Simone

01.02.2022 - 09:39

DROPS Design answered:

Dear Simone, if your swatch is correct in stocking stitch, then it should be correct also in the lace pattern - just make sure to keep same tension. Happy knitting!

01.02.2022 - 11:43

country flag Nono wrote:

Bonjour, Merci de votre réponse rapide qui m'a permis de retomber correctement sur les diagrammes précédents. Néanmoins j'ai dû défaire mon ouvrage car je me trouvais avec beaucoup plus de 108 mailles une fois arrivée au dos/devant. certainement parce que j'ai continué avec des augmentations une fois les 13 augmentations faites. Alors qu'entendez-vous par "continuer sans augmenter" ?merci beaucoup.

14.01.2022 - 16:11

DROPS Design answered:

Bonjour Nono, lorsque les augmentations du raglan sont terminées, vous tricotez simplement le point fantaisie sans augmenter, autrement dit, à partir de la dernière augmentation faite, tricotez le point ajouré en hauteur comme avant (si besoin, tricotez en jersey les mailles qui ne peuvent pas se tricoter dans le point fantaisie). Bon tricot!

14.01.2022 - 16:51

country flag Liisa wrote:

Hei! Monellako silmukalla työ kannattaa aloittaa, jos jättää korkean kauluksen tekemättä ja aloittaa suoraan pääntiestä?

11.01.2022 - 23:19

DROPS Design answered:

Hei, aloittaisin luomalla 76-76-76-88-88-88 silmukkaa (katso oman koosi luku). Neulo ainakin muutama kerros esim. ainaoikeaa ennen kuin aloitat mallineuleen.

20.01.2022 - 17:35

country flag Nono wrote:

Bonjour, Une fois mes 180 mailles je peine à retomber sur les diagrammes précédents. La faute aux 5 mailles montées sous les bras qui décalent tout? Vous dites de tricoter en jersey les mailles qui ne peuvent s'inclure dans les diagrammes mais cela veut dire qu'il y aura tout une bande de jersey sur les cotés du pull?Dans l'attente de votre réponse pour continuer mon ouvrage.merci

11.01.2022 - 19:42

DROPS Design answered:

Bonjour Nono, vous devez tomber juste, les augmentations sont calculées de telle sorte que le motif tombera juste sous les manches: les 2 dernières mailles du dos/devant se tricotent avec la 1ère des 5 mailles, puis 1 jeté,1 m end, 1 m env, 1 m end, 1 jeté, et la dernière de ces 5 mailles se tricote avec les 2 premières mailles du devant/dos, ainsi, le motif continue sans s'arrêter. Bon tricot!

12.01.2022 - 07:15

country flag Marie wrote:

Je fais la taille M, quand j'ai mes 180 mailles sur l'aiguille et que je veux continuer sans augmenter, je prends quel diagramme?

11.12.2021 - 22:19

DROPS Design answered:

Bonjour Marie, vous continuez votre point fantaisie comme avant, en alternant les double-diminutions + les 2 jetés et la maille envers, exactement comme vous avez fait auparavant. Tricotez en jersey si besoin les mailles que vous ne pouvez pas tricoter dans le point fantaisie. Bon tricot!

13.12.2021 - 09:23