
Popular categories
Looking for a yarn?


Comments / Questions (12)
![]() Josephine wrote:
Josephine wrote:
Hallo, gibt es eine Videoanleitung wie man diese Noppe strickt? Wenn ich es so versuche wie im Text beschrieben, sieht sie bei mir nicht aus wie auf dem Bild. Danke.
14.07.2024 - 09:12DROPS Design answered:
Liebe Josephine, in diesem Video zeigen wir, wie man eine Noppe über 5 Maschen strickt, so können Sie auch stricken, aber mit nur 3 Maschen (nur 2 Maschen zunehmen), hier wird die Masche abwechslungswise rechts, links und rechts gestrickt (so 3 Mal) anstatt Umschlag wie im Video. Viel Spaß beim Stricken!
29.07.2024 - 10:05
![]() Lydia wrote:
Lydia wrote:
In the front piece when it says 'AT THE SAME TIME on next row from right side decrease 1 stitch in each side for armholes', which bit is it meant to be at the same time as? I'm a bit stuck on this section
30.05.2023 - 20:53DROPS Design answered:
Dear Lydia, you continue working with. 3 stitches in garter stitch on each side and with pattern as before, while you will decrease stitches on each side for the armhole. Happy knitting!
31.05.2023 - 08:17
![]() Cathie Castaneda wrote:
Cathie Castaneda wrote:
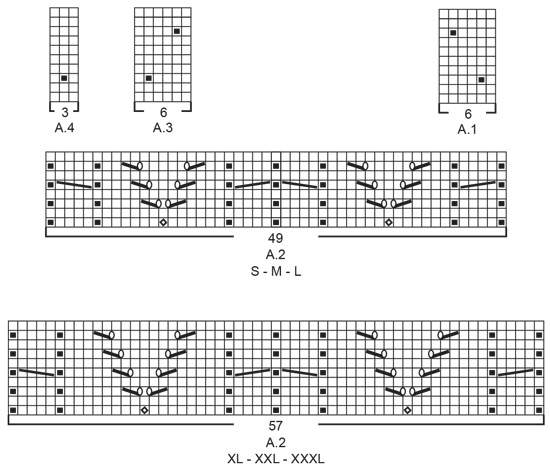
Hello! I have a question on Doves Bay Top, #221-10 concerning the stitch charts. Charts A.1 & A.3 have 10 rows and chart A.2 sizes , S-M-L , has 8 rows. Should they have the same number of rows? A.2 sizes XL-XXL-XXXL has 10 rows too. It seems like the pattern repeat won’t look right if the number of rows in the chart are different. Help!
04.04.2023 - 19:45DROPS Design answered:
Dear Cathie, the central pattern and the side patterns are independent from each other. So it doesn't matter if there is a difference in the amount of rows in a repeat of the different charts. The cables are longer in the larger sizes, which is why there are more rows in it. Happy knitting!
06.04.2023 - 23:37
![]() Ursula wrote:
Ursula wrote:
Hola! Yo tampoco entiendo la parte de los "pliegues". No sé si será un tema de la traducción... Podrías compartir el link donde lo explican, gracias!
23.09.2022 - 17:43DROPS Design answered:
Hola Ursula, los pliegues se encuentran explicados antes de comenzar con el patrón, en el apartado PUNTO MUSGO (de ida y vuelta). Un pliegue son 2 filas trabajadas de derecho. Por lo tanto, si se trabajan 4 pliegues sobre los puntos más externos, se trabajan 4 filas de derecho sobre estos puntos.
25.09.2022 - 20:42
![]() Amanda wrote:
Amanda wrote:
A que se refiere con trabajar los pliegues? Como debo trabajar el tejido?
15.09.2022 - 00:37DROPS Design answered:
Hola Amanda, en el apartado PUNTO MUSGO (de ida y vuelta) te indican que 1 pliegue en vertical = 2 filas de derecho. Por lo tanto, 2 filas de derecho forman un pliegue.
15.09.2022 - 23:15
![]() Julia wrote:
Julia wrote:
Hi, I am slightly confused how to properly do the “ridge” portion of the pattern . Do I just knit the right and wrong side for 6 stitches?
05.05.2022 - 15:53DROPS Design answered:
Dear Julia, yes, you knit both in the right side and in the wrong side over the 6 edge stitches. Happy knitting!
05.05.2022 - 21:48
![]() Silvia wrote:
Silvia wrote:
Ciao! Cosa si intende per "lavorare due coste sulle 7 maglie più esterne"? Sono coste come il bordo? E in questo caso, per quanti centimetri?
03.05.2022 - 23:36DROPS Design answered:
Buongiorno Silvia, per la lavorazione a coste si intende la lavorazione a maglia legaccio, come indicato all'inizio delle spiegazioni del modello. Buon lavoro!
04.05.2022 - 16:10
![]() Cassia Funghi Alberto Soares wrote:
Cassia Funghi Alberto Soares wrote:
Parabéns pelo trabalho maravilhoso! Você consegue executar a peça com facilidade seguindo as instruções. Isto é fabuloso! Grata.
17.10.2021 - 18:04
![]() Katherine Yates wrote:
Katherine Yates wrote:
Hola, creo que se han equivocado en el numero de palillos a ocupar, en la lista de materiales. Muchas gracias
02.10.2021 - 16:14DROPS Design answered:
Hola Katherine, sí, se trata de una errata, ahora mismo la corregimos. Gracias.
03.10.2021 - 22:46
![]() Hedwig Lanzerath wrote:
Hedwig Lanzerath wrote:
Lovely pattern. Can't wait to knit it.
29.03.2021 - 16:49
|
|||||||||||||||||||||||||
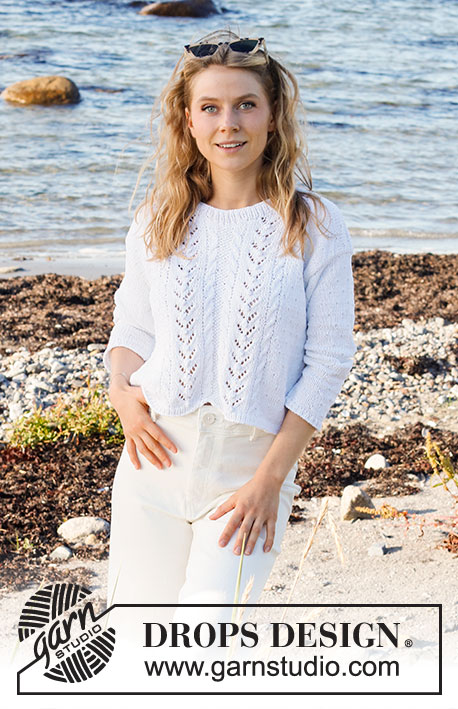
Doves Bay Top#dovesbaytop |
|||||||||||||||||||||||||
 |
 |
||||||||||||||||||||||||
Knitted top in DROPS Cotton Light. Piece knitted with lace pattern and cables. Size: S - XXXL
DROPS 221-10 |
|||||||||||||||||||||||||
|
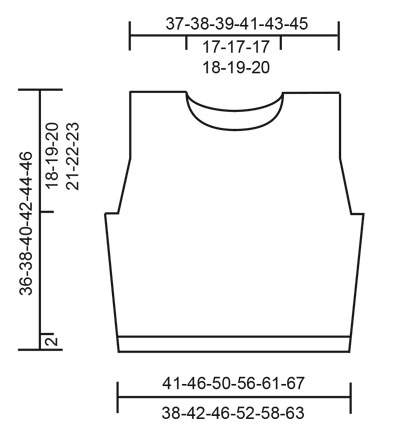
------------------------------------------------------- EXPLANATION FOR THE PATTERN: ------------------------------------------------------- GARTER STITCH (back and forth): Knit all rows. 1 ridge vertically = knit 2 rows. PATTERN: See diagrams A.1 to A.4. Choose diagram for your size (applies to A.2). Diagrams show all rows in pattern seen from the right side. INCREASE TIP: Increase inside 1 edge stitch in garter stitch. All increases are done from the right side. Increase 1 stitch by making 1 yarn over, on next row work yarn over twisted to avoid holes. Work the new stitches in A.1, A.3, A.4 as far as you can out towards each side - work stitches that do not fit the pattern in stocking stitch. DECREASE TIP (applies to armholes): Decrease inside 3 edge stitches in garter stitch. All decreases are done from the right side! DECREASE AS FOLLOWS AFTER 3 EDGE STITCHES IN GARTER STITCH: Slip 1 stitch knitwise, knit 1, pass slipped stitch over stitch worked. DECREASE AS FOLLOWS BEFORE 3 EDGE STITCHES IN GARTER STITCH: Work until 2 stitches remain before the 3 edge stitches, knit these 2 together. CAST-OFF TIP: To avoid a tight cast-off edge you may use a larger needle size. If this also is too tight, work a 1 yarn over after approx. every 6th stitch while casting off (cast off yarn overs as regular stitches). ------------------------------------------------------- START THE PIECE HERE: ------------------------------------------------------- TOP - SHORT OVERVIEW OF THE PIECE: Work front and back piece back and forth on circular needle separately. Sew piece together on the shoulders and in the sides. Work a neck edge in rib at the end. FRONT PIECE: Cast on 91-101-109-117-129-141 stitches (including 1 edge stitch in each side) on circular needle size 3 mm with Cotton Light. NOTE: More stitches are cast on on front piece than on back piece because the front piece will contract due to cables. Purl 1 row (= wrong side). Work next row as follows from right side: 1 edge stitch in GARTER STITCH – read explanation above, * knit 1, purl 1 *, work from *-* until 2 stitches remain, knit 1, and finish with 1 edge stitch in garter stitch. Continue rib back and forth for 2 cm – finish after a row from wrong side. Switch to circular needle size 4 mm. Work 2 rows in stocking stitch with 1 edge stitch in garter stitch in each side. Then work as follows (1st row = right side): 1 edge stitch in garter stitch, work 2-1-5-5-5-5 stitches in stocking stitch, work A.1 over the next 18-24-24-24-30-36 stitches (= 3-4-4-4-5-6 repetitions of 6 stitches), work A.2 (= 49-49-49-57-57-57 stitches), work A.3 over the next 18-24-24-24-30-36 stitches (= 3-4-4-4-5-6 repetitions of 6 stitches), work 2-1-5-5-5-5 stitches in stocking stitch, and finish with 1 edge stitch in garter stitch. Continue pattern back and forth like this. REMEMBER THE KNITTING TENSION! When piece measures 4-4-4-5-5-5 cm, increase 1 stitch in each side – read INCREASE TIP. Increase like this every 3½-4-4-4½-4½-4½ cm 4 times in total in each side = 99-109-117-125-137-149 stitches. When piece measures 17-18-19-20-21-22 cm, work 2 ridges over the outermost 6-6-7-9-11-13 stitches in each side (work first row from right side and the other stitches as before). After the 2 ridges cast off 3-3-4-6-8-10 stitches at the beginning of the next 2 rows for armhole = 93-103-109-113-121-129 stitches remain. Continue pattern back and forth as before with 3 edge stitches in garter stitch in each side towards armholes. AT THE SAME TIME on next row from right side decrease 1 stitch in each side for armholes - read DECREAE TIP. Decrease for armholes like this on every other row (i.e. every row from right side) 3-7-9-10-12-14 times in total in each side = 87-89-91-93-97-101 stitches. When piece measures 30-32-33-35-36-38 cm, decrease 4 stitches mid front by knitting the 2 cables mid front together 2 by 2 = 83-85-87-89-93-97 stitches. Then slip the middle 15-15-15-17-19-21 stitches on a stitch holder for neck and finish each shoulder separately. Continue as before and cast off for neck at the beginning of every row from neck as follows: Cast off 3 stitches 1 time, 2 stitches 2 times, and 1 stitch 3 times = 24-25-26-26-27-28 stitches remain on shoulder. Work until 2 rows remain before piece measures 36-38-40-42-44-46 cm. Knit 1 row from right side while decreasing 3-3-3-1-1-1 stitches evenly over cable towards the neck = 21-22-23-25-26-27 stitches remain on needle. Knit 1 row from wrong side. Cast off knitting from right side. Work the other shoulder the same way. Front piece measures approx. 36-38-40-42-44-46 cm from shoulder and down. BACK PIECE: Cast on 81-91-99-111-123-135 stitches (including 1 edge stitch in each side) on circular needle size 3 mm with Cotton Light. Purl 1 row (= wrong side). Work next row as follows from right side: 1 edge stitch in garter stitch, * knit 1, purl 1 *, repeat from *-* until 2 stitches remain on needle, knit 1, and finish with 1 edge stitch in garter stitch. Continue rib back and forth for 2 cm – finish after a row from wrong side. Switch to circular needle size 4 mm. Work 2 rows in stocking stitch with 1 edge stitch in garter stitch in each side. Then work as follows (1st row = right side): 1 edge stitch in garter stitch, work 2-1-5-5-5-5 stitches in stocking stitch, work A.1 until 6-5-9-9-9-9 stitches remain on row (= 12-14-14-16-18-20 repetitions of 6 stitches), work A.4 (= 3 stitches) and finish with 2-1-5-5-5-5 stitches in stocking stitch, and finish with 1 edge stitch in garter stitch. Continue pattern back and forth like this. When piece measures 4-4-4-5-5-5 cm, increase 1 stitch in each side – read INCREASE TIP. Increase like this every 3½-4-4-4½-4½-4½ cm 4 times in total in each side = 89-99-107-119-131-143 stitches. When piece measures 17-18-19-20-21-22 cm, work 2 ridges over the outermost 6-6-7-9-11-13 stitches in each side (work first row from right side and the other stitches as before). After the 2 ridges cast off 3-3-4-6-8-10 stitches at the beginning of the next 2 rows for armhole = 83-93-99-107-115-123 stitches remain. Continue pattern back and forth as before with 3 edge stitches in garter stitch in each side towards armholes. AT THE SAME TIME on next row from right side decrease 1 stitch in each side for armholes - read DECREASE TIP. Decrease for armholes like this on every other row 3-7-9-10-12-14 times in total in each side = 77-79-81-87-91-95 stitches. When piece measures 34-36-38-40-42-44 cm, cast off the middle 31-31-31-33-35-37 stitches for neck and finish each shoulder separately. Then work as before and cast off 2 stitches on next row from the neck = 21-22-23-25-26-27 stitches remain on shoulder. Work until 2 rows remain before piece measures 36-38-40-42-44-46 cm. Knit 1 row from right side and knit 1 row from wrong side. Cast off knitting from right side. Work the other shoulder the same way. Back piece measures approx. 36-38-40-42-44-46 cm from shoulder and down. ASSEMBLY: Sew shoulder seams inside cast-off edge. Sew side seams inside 1 edge stitch in garter stitch. NECK EDGE: Begin by one shoulder and pick up from right side approx. 84 to 100 stitches around the neck (including stitches on stitch holders at the front) on circular needle size 3 mm with Cotton Light. Work rib in the round = knit 1/purl 1 for 2 cm. Cast off with knit over knit and purl over purl - read CAST-OFF TIP. |
|||||||||||||||||||||||||
Diagram explanations |
|||||||||||||||||||||||||
|
|||||||||||||||||||||||||
|
|||||||||||||||||||||||||
|
|||||||||||||||||||||||||
Have you finished this pattern?Tag your pictures with #dropspattern #dovesbaytop or submit them to the #dropsfan gallery. Do you need help with this pattern?You'll find 29 tutorial videos, a Comments/Questions area and more by visiting the pattern on garnstudio.com. © 1982-2025 DROPS Design A/S. We reserve all rights. This document, including all its sub-sections, has copyrights. Read more about what you can do with our patterns at the bottom of each pattern on our site. |
|||||||||||||||||||||||||


With over 40 years in knitting and crochet design, DROPS Design offers one of the most extensive collections of free patterns on the internet - translated to 17 languages. As of today we count 314 catalogues and 11822 patterns translated into English (UK/cm).
We work hard to bring you the best knitting and crochet have to offer, inspiration and advice as well as great quality yarns at incredible prices! Would you like to use our patterns for other than personal use? You can read what you are allowed to do in the Copyright text at the bottom of all our patterns. Happy crafting!
Post a comment to pattern DROPS 221-10
We would love to hear what you have to say about this pattern!
If you want to leave a question, please make sure you select the correct category in the form below, to speed up the answering process. Required fields are marked *.