
Popular categories
Looking for a yarn?


Comments / Questions (23)
![]() Tonya Tzianakaki wrote:
Tonya Tzianakaki wrote:
Do you have this in written form? I struggle with reading graphs. Cant determine how many rows from bottom to top, where I repeat and change to rounds. Thank you so much. 😊
21.04.2024 - 22:13DROPS Design answered:
Dear Tonya, we are sorry, but we don't have this pattern written out, not only because our patterns are available in many languages, but also, because we believe that with diagrams you can see the "whole picture", in other words, not only the very next stitch, but also how rows and stitches relate to each other.
![]() Kris Meys wrote:
Kris Meys wrote:
Mooi kleedje, ga ik nu maken!!
29.03.2023 - 14:20
![]() Lizzy wrote:
Lizzy wrote:
Sigh. I need to know if there is any way i can drop 10 Treble stitches from each side. Although I did the swatch and am using 3.0 mm hook (v recommended 4.0) i realized after 4 rows beyond the join / vent it now is 12 mm too wide on front and on back. Now when I measure 17 TR stitches on the dress it is 12 mm not 10 mm so the width apparently was growing 2 mm every 17. I know this is my issue not the pattern but am unsure even if i start again if it will work.
15.01.2023 - 14:32DROPS Design answered:
Dear Lizzy, try to keep the correct tension in width to ensure the correct width while working - but also make sure you are following appropriate English pattern - you should have double crochets (US-English) or treble crochets (UK-English). Happy crocheting!
16.01.2023 - 09:27
![]() Elizabeth Hahn wrote:
Elizabeth Hahn wrote:
I want to make sure 'then work round together with a slip stitch in 3rd chain stitch at the beginning of round, work chain stitches in A.2, turn piece and work back from wrong side. Continue piece in the round, but turn piece for every round to work from both right side and wrong side. ' Only means I attach the front to the back on one side. not both and work all the way around ( it keeps saying this is a comment so i resent as a question)
14.01.2023 - 14:51DROPS Design answered:
Dear Elizabeth, you join the beginning of the round (of the front) to the end of the back and work all the round. When you reach the end of the round, turn the piece and work the next round on the wrong side. This is necessary so that the texture of the front and back, which had been worked back and forth, matches the body worked in the round. Happy crocheting!
15.01.2023 - 12:30
![]() Lizzy wrote:
Lizzy wrote:
I want to make sure 'then work round together with a slip stitch in 3rd chain stitch at the beginning of round, work chain stitches in A.2, turn piece and work back from wrong side. Continue piece in the round, but turn piece for every round to work from both right side and wrong side. ' Only means I attach the front to the back on one side. not both and work all the way around
14.01.2023 - 14:50DROPS Design answered:
Dear Lizzy, you join the beginning of the round (of the front) to the end of the back and work all the round. When you reach the end of the round, turn the piece and work the next round on the wrong side. This is necessary so that the texture of the front and back, which had been worked back and forth, matches the body worked in the round. Happy crocheting!
15.01.2023 - 12:30
![]() Lizzy wrote:
Lizzy wrote:
I want to make sure 'then work round together with a slip stitch in 3rd chain stitch at the beginning of round, work chain stitches in A.2, turn piece and work back from wrong side. Continue piece in the round, but turn piece for every round to work from both right side and wrong side. ' Only means I attach the front to the back on one side. not both and work all the way around
14.01.2023 - 14:49
![]() Lizzy wrote:
Lizzy wrote:
I am starting Open Country Drops Dress. It is treble crochet. The swatch says 17 treble crochet stitches wide and 9 rows vertically will be 10 x 10 cm or 4 x 4. My first swatch was with 4.0 and way to long. I moved to 3.0 and still the treble crochet stitch are too tall. I am unsure how you can have one treble crochet stitch only 1.1 CM high? What am i missing ?
13.01.2023 - 13:26DROPS Design answered:
Dear Lizzy, make sure you are reading the appropriate English pattern because UK- and US-crochet terminology are different, so that 1 treble crochet in UK-English is 1 double crochet in US-English - this might help. Happy crocheting!
13.01.2023 - 15:19
![]() Tereza wrote:
Tereza wrote:
Moc hezké šaty.
10.05.2021 - 13:36
![]() Marianne Skoú wrote:
Marianne Skoú wrote:
Jeg forstår ikke at læse måleskitsen. 😢
28.04.2021 - 23:16DROPS Design answered:
Hej Marianne. Kanske detta kan vara till hjälp. Mvh DROPS Design
29.04.2021 - 13:46
![]() Marianne Skoú wrote:
Marianne Skoú wrote:
Hvor finder jeg en str. guide, hofte, bryst osv. ?? 🤔
27.04.2021 - 12:01DROPS Design answered:
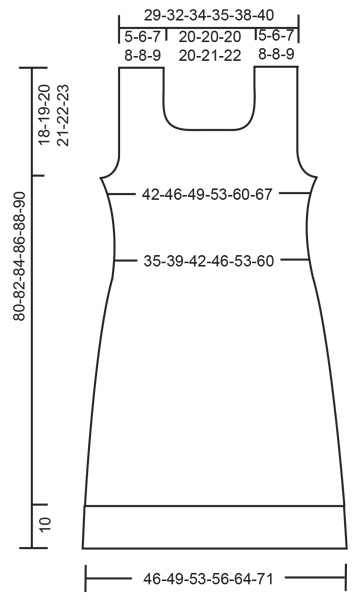
Hej Marianne, Du finder kjolens mål i de forskellige størrelser i måleskitsen, som ligger nederst i opskriften. God fornøjelse!
28.04.2021 - 13:27
|
||||||||||||||||||||||
Open Country#opencountrydress |
||||||||||||||||||||||
 |
 |
|||||||||||||||||||||
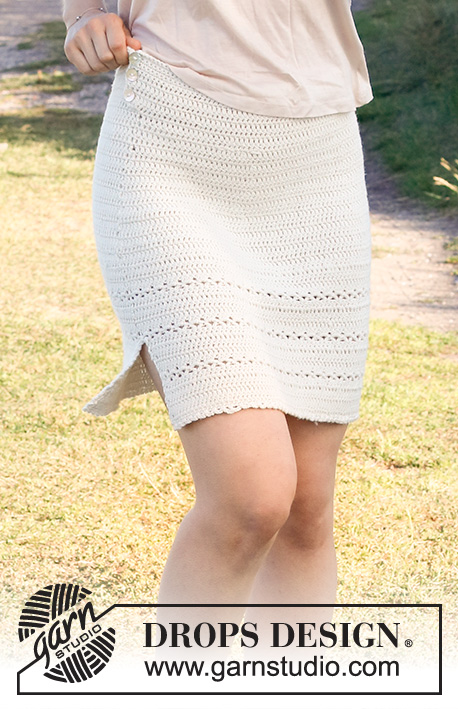
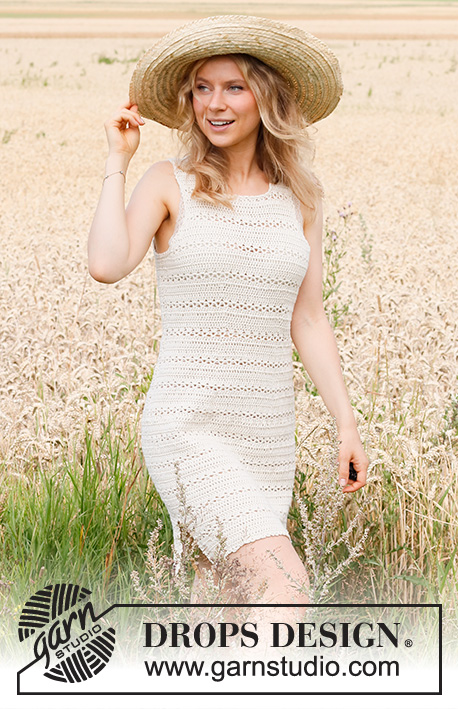
Crocheted dress with textured pattern in DROPS Cotton Merino. Size: S - XXXL
DROPS 220-5 |
||||||||||||||||||||||
|
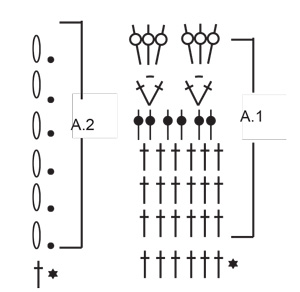
------------------------------------------------------- EXPLANATION FOR THE PATTERN: ------------------------------------------------------- PATTERN: See diagrams A.1 and A.2. A.2 shows how round begins/ends when working in the round. CROCHET INFO - applies when working back and forth: At beginning of every row with double crochet begin with 1 chain stitch(this does not replace first double crochet). At beginning of every row with treble crochet begin with 3 chain stitches (these do not replace first treble crochet). Finish row with 1 treble crochet in 3rd chain stitch, this treble crochet is worked so that the pattern is the same in each side and is skipped on next row. CROCHET TIP FOR CHAIN STITCH: If you work at the end of crochet hook the chain stitch will often be too tight. 1 chain stitch should be just as long as 1 double crochet/treble crochet is wide. DECREASE TIP-1: Decrease 1 treble crochet by working 2 treble crochets together as follows: Work 1 treble crochet in first stitch, but wait with last yarn over and pull through (= 2 loops on hook), work 1 treble crochet in next treble crochet, on last pull through pull yarn through all 3 loops on hook (= 1 treble crochet decreased). DECREASE TIP-2 (for decrease for arm holes): Always decrease by crocheting 2 and 2 treble crochets together - remember DECREASE TIP-1. Due to this on 5th and 6th row in A.1; crochet 1 treble crochet in each treble crochet from round below over the stitches which don’t fit in a whole repeat of A.1 (1 report A.1 = 3 stitches in width). DECREASE/INCREASE TIP (evenly): To calculate how to decrease/increase evenly, use the total number of stitches (e.g. 156 stitches) and divide stitches by number of decreases/increases to be done (e.g. 6) = 26. In this example work approx. every 25th and 26th stitch together. When increasing work in this example 2 stitches in every 26th stitch. ------------------------------------------------------- START THE PIECE HERE: ------------------------------------------------------- DRESS - SHORT OVERVIEW OF THE PIECE: There is a 10 cm vent at the bottom of dress, first work piece back and forth in 2 parts until vent is done, then work piece in the round but turn on every round and work back and forth on round to make the texture the same all the way. When piece is divided at the armhole, work back and forth again. Finally crochet a decorative edge around the neck and armholes. FRONT PIECE: Work 78-84-90-96-108-120 chain stitches - read CROCHET TIP FOR CHAIN STITCH, with Cotton Merino on hook size 4 mm. Turn and work as follows: Work 1 chain stitch, work 1 double crochet in 2nd chain stitch from hook, then work 1 double crochet in every chain stitch - READ CROCHET INFO! = 78-84-90-96-108-120 double crochets. Turn and work 1 treble crochet in every double crochet. Then work according to diagram A.1 REMEMBER THE CROCHET TENSION! After approx. 10 cm place piece aside and work back piece, adjust so that last row worked is 2nd, 4th or 6th row in diagram, this is important to get the pattern correct from the right side when working in the round. BACK PIECE: Work 78-84-90-96-108-120 chain stitches with Cotton Merino on hook size 4 mm. Turn and work as follows: Work 1 chain stitch, work 1 double crochet in 2nd chain stitch from hook, then work 1 double crochet in every chain stitch = 78-84-90-96-108-120 double crochets. Turn and work 1 treble crochet in every double crochet. Then work according to diagram A.1. Continue until piece measures 10 cm - finish on the same row as on front piece. DRESS after vent: Continue the pattern – first work stitches from right side over front piece, then work stitches from right side over back piece, then work round together with a slip stitch in 3rd chain stitch at the beginning of round, work chain stitches in A.2, turn piece and work back from wrong side. Continue piece in the round, but turn piece for every round to work from both right side and wrong side. This is done so that the pattern is the same on the entire garment. Insert 1 marker thread in transitions between front and back piece = sides. Continue like this back and forth with pattern according to diagram A.1 and A.2 = 156-168-180-192-216-240 stitches on round (A.2 is not counted in number of stitches). When piece measures approx. 30-31-32-33-34-35 cm – adjust so that next round is round 1, 2 or 3 in diagram, decrease 6 treble crochets evenly– read DECREASE TIP-1 and DECREASE/INCREASE TIP. Decrease like this every time 1st, 2nd and 3rd round are worked, decrease 6 times in total = 120-132-144-156-180-204 stitches. Continue until piece measures 48-49-50-51-52-53 cm - adjust so next round is 1st, 2nd or 3rd round in A.1. Now increase 6 treble crochets evenly on round by working 2 treble crochets in 1 treble crochet. Increase like this every time 1st and 3rd round are worked, increase 4 times in total - remember DECREASE/INCREASE TIP = 144-156-168-180-204-228 stitches Continue the pattern like this. When piece measures 62-63-64-65-66-67 cm, divide the piece for front and back piece at the armholes, adjust so that next round is 1st, 2nd or 3rd round. FRONT PIECE: Work slip stitches over the first 4-5-4-5-6-7 stitches, then work until 4-5-4-5-6-7 treble crochets remain before marker thread in the other side, turn piece. On next row start decrease for arm holes - read DECREASE TIP-2. Work the 4 outermost stitches in each side together 2 and 2. Repeat decrease on every row 0-0-1-1-2-3 more times. On next row work the 2 outermost stitches together, repeat decrease on every row 4-4-4-5-6-7 more times. After all decreases are done, 50-54-58-60-64-68 stitches remain on row. When piece measures 70-71-73-74-76-77 cm, finish each shoulder separately - adjust so that the next row is worked from right side. Now finish piece with 1 treble crochet in every treble crochet, pattern A.1 is no longer worked. SHOULDER: Continue with treble crochets over the first 15-17-19-20-21-22 stitches from right side, turn and work the first 4 stitches together 2 by 2 for neck, then work the rest of row. Turn and work until 4 stitches remain before neck, work these together 2 by 2, turn. On next row work the first 2 stitches together, then work the rest of row. Turn and work until 2 stitches remain, work these together. Turn, work the first 2 stitches together, work the rest of row = 8-10-12-13-14-15 treble crochets remain on shoulder. Continue until piece measures 80-82-84-86-88-90 cm, fasten off. Work the other shoulder the same way but reversed. I.e.: Begin from right side, decreases for neck are done at the end of rows from wrong side and at the beginning of row from right side. BACK PIECE: Work as front piece. ASSEMBLY: Sew shoulder seams edge to edge to avoid a chunky seam. DECORATING EDGE: Work a decorating edge around the neck, each armhole and at the bottom of body - as well as up and down each vent. Work decorative edge on hook size 4 mm with Cotton Merino as follows: 1 double crochet, * 3 chain stitches, 1 treble crochet in 3rd chain stitch from hook, skip approx. 1 cm and work 1 double crochet *. Work from *-* and finish with 1 slip stitch in first double crochet from beginning of round. |
||||||||||||||||||||||
Diagram explanations |
||||||||||||||||||||||
|
||||||||||||||||||||||
 |
||||||||||||||||||||||
 |
||||||||||||||||||||||
Have you finished this pattern?Tag your pictures with #dropspattern #opencountrydress or submit them to the #dropsfan gallery. Do you need help with this pattern?You'll find 12 tutorial videos, a Comments/Questions area and more by visiting the pattern on garnstudio.com. © 1982-2026 DROPS Design A/S. We reserve all rights. This document, including all its sub-sections, has copyrights. Read more about what you can do with our patterns at the bottom of each pattern on our site. |
||||||||||||||||||||||


With over 40 years in knitting and crochet design, DROPS Design offers one of the most extensive collections of free patterns on the internet - translated to 17 languages. As of today we count 324 catalogues and 12252 patterns translated into English (UK/cm).
We work hard to bring you the best knitting and crochet have to offer, inspiration and advice as well as great quality yarns at incredible prices! Would you like to use our patterns for other than personal use? You can read what you are allowed to do in the Copyright text at the bottom of all our patterns. Happy crafting!
Post a comment to pattern DROPS 220-5
We would love to hear what you have to say about this pattern!
If you want to leave a question, please make sure you select the correct category in the form below, to speed up the answering process. Required fields are marked *.