
Looking for a yarn?


Comments / Questions (71)
![]() Alma wrote:
Alma wrote:
Buona sera quando sulla spiegazione dice dopo aver terminato i diagrammi A2 A3 per il bordo del collo continuare con diritto su dritto e rovescio sul rovescio ma così io non mi ritrovo con la lavorazione delle dodici maglie avviate perché rispettando lo schema A3 il bordo viene un dritto e un rovescio il bordo davanti due dritti ed un rovescio scusate se mi sono dilungata spero di essermi spiegata
06.07.2022 - 20:57DROPS Design answered:
Buongiorno Alma, i diagrammi A.2 e A.3 sono identici tranne la prima riga, e dopo aver lavorato i diagrammi deve procedere lavorando le maglie come si presentano, quindi continuerà il motivo dei diagrammi. Buon lavoro!
08.07.2022 - 17:45
![]() Alma wrote:
Alma wrote:
Credo di aver capito ora vorrei sapere se nel contare le sei maglie con successiva diminuzione va calcolata nelle sei anche la maglia di vivagno grazie
29.06.2022 - 19:38DROPS Design answered:
Buonasera Alma, deve contare le maglie dall'inizio del ferro. Buon lavoro!
30.06.2022 - 20:02
![]() Alma wrote:
Alma wrote:
Buongiorno chiedo scusa ma lavorando il davanti in piano perciò con ferri di andata e ritorno mi ritrovo necessariamente a lavorare il rovescio del lavoro ed in quel caso come dovrò fare se poi la lavorazione del davanti risulterà di resa da come in tondo veniva lavorato diversamente grazie
29.06.2022 - 15:37DROPS Design answered:
Buonasera Alma, quando mette in sospeso le maglie del dietro, deve tagliare il filo e riprendere la lavorazione sul davanti, ma dal diritto del lavoro. Buon lavoro!
29.06.2022 - 19:59
![]() Alma wrote:
Alma wrote:
In sostanza il rovescio del lavoro come dovrò lavorarlo come si presentano le maglie ma così facendo sul davanti si presenterà sbagliato grazie
28.06.2022 - 20:59DROPS Design answered:
Buongiorno Alma, il davanti inizia sul diritto del lavoro. Buon lavoro!
29.06.2022 - 12:18
![]() Alma wrote:
Alma wrote:
Buonasera questa è la terza volta che provo a realizzare questa canotta il mio problema è questo una volta intrecciate le maglie dell'inizio scaldo e messo in sospensione le maglie del dietro ho iniziato il davanti dovendo lavorare in piano con ferri di andata e ferri di ritorno mi ritrovo a dover lavorare il rovescio del lavoro ma non so se è giusto così perché sulla parte del davanti le maglie risulteranno sbagliate non so se mi sono spiegata
28.06.2022 - 20:26DROPS Design answered:
Buongiorno Alma, deve semplicemente tagliare il filo e iniziare a lavorare il davanti dal diritto del lavoro come indicato nelle spiegazioni. Buon lavoro!
29.06.2022 - 12:18
![]() Gabriela wrote:
Gabriela wrote:
Buona sera. Volevo chiedere come faccio a sapere qual è la mia taglia? A me piace vestire un po’ larga ma non so mai quale sarebbe la taglia che devo seguire. Grazie
13.06.2022 - 21:02DROPS Design answered:
Buonasera Gabriela, in fondo alla pagina può trovare lo schema con le misure: le confronti con un capo simile che possiede per scegliere la taglia. Buon lavoro!
15.06.2022 - 21:36
![]() Anette wrote:
Anette wrote:
Hallo, die Anleitung ist echt super. Finde ich super, dass hier auch gleich alle Größen mit der Skizze und auch in der Anleitung mit angegeben sind. Die 2 Fragen, die ich hatte, standen auch schon bei den Kommentaren, somit hat alles wunderbar geklappt. Vielen Dank und liebe Grüße
07.06.2022 - 00:10
![]() Ada wrote:
Ada wrote:
Buongiorno, ho iniziato il davanti del modello ma non riesco a capire come si esegue la costa maglia /legaccio. Grazie mille
29.04.2022 - 17:06DROPS Design answered:
Buongiorno Ada, deve lavorare sempre a diritto. Buon lavoro!
29.04.2022 - 17:27
![]() Maria wrote:
Maria wrote:
Ma una volta tagliato il filo, come faccio a lavorare le successive 51 maglie del dietro? Da dove lo prendo il filo? Lavorare in pieno significa lavorare suo Ferri dritti?
31.03.2022 - 21:45DROPS Design answered:
Buongiorno Maria, deve ricominciard con un nuovo filo. Lavorare in piano significa lavorare in ferri di andata e ritorno. Buon lavoro!
05.04.2022 - 08:23
![]() Karen wrote:
Karen wrote:
Why don't your patterns have what an XS in this pattern might be 32 34? extra give
09.07.2021 - 01:14DROPS Design answered:
Dear Karen, you can find the measurements of teh finished piece on the schematic drawing at the bottom of the page. We suggest that you take a similar piece that fits, and compare the measurements. Happy Stitching!
09.07.2021 - 02:34
|
|||||||||||||
Pink Shell#pinkshelltop |
|||||||||||||
 |
 |
||||||||||||
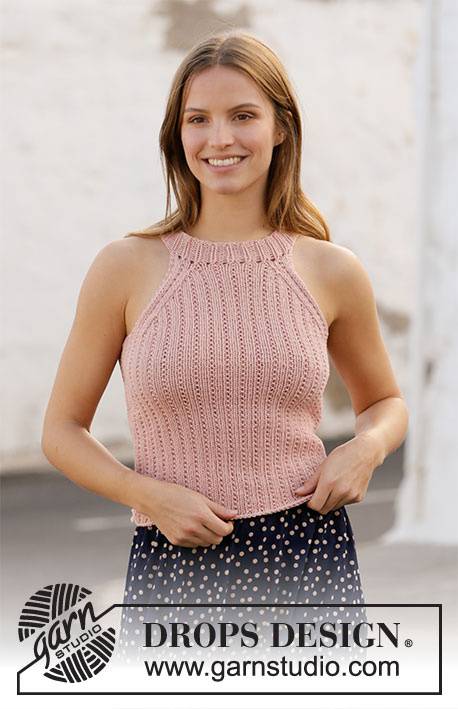
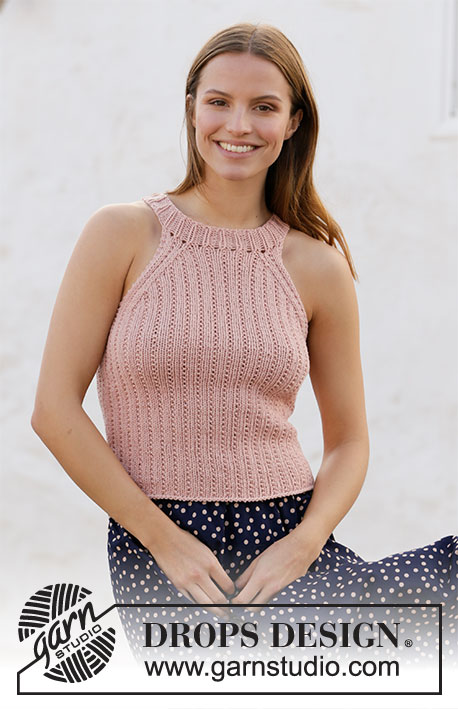
Knitted top in DROPS Paris. Piece is knitted with textured pattern. Size XS–XXL.
DROPS 211-10 |
|||||||||||||
|
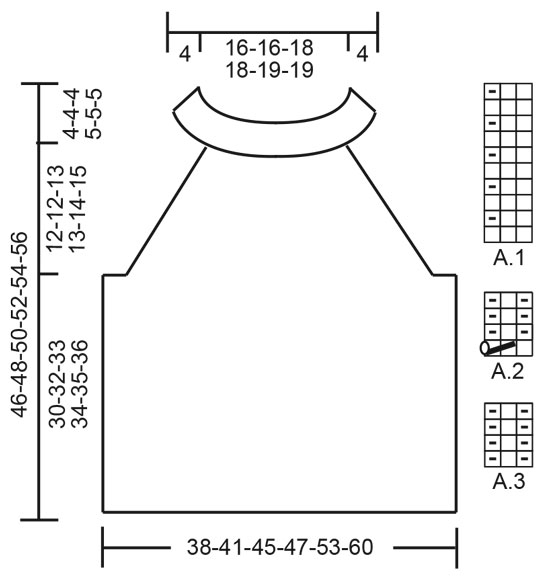
---------------------------------------------------------- EXPLANATION FOR THE PATTERN: ---------------------------------------------------------- GARTER STITCH (back and forth): Knit all rows. 1 ridge vertically = knit 2 rows. PATTERN: See diagrams A.1 to A.3. Diagrams show all rows in pattern seen from the right side. DECREASE TIP: All decreases are done from the right side: Decrease 1 stitch in each side as follows: Work the first 6 stitches, slip 1 stitch knitwise, knit 1, pass slipped stitch over stitch worked (= 1 stitch decreased), work until 8 stitches remain on needle, knit 2 together (= 1 stitch decreased), work the remaining stitches on needle. Decrease 2 stitches in each side as follows: Work the first 6 stitches, slip 1 stitch knitwise, knit 2 together, pass slipped stitch over stitches worked together (= 2 stitches decreased), work until 9 stitches remain, knit 3 together (= 2 stitches decreased), work the remaining stitches on needle. ---------------------------------------------------------- START THE PIECE HERE: ---------------------------------------------------------- TOP - SHORT OVERVIEW OF THE PIECE: Top is worked in the round on circular needle up to armhole. Cast off stitch in each side for armholes and then work front and back piece separately. Finish working the neck edge in the round on circular needle. BODY: Cast on 120-132-144-150-168-192 stitches on circular needle size 5.5 mm with Paris. Knit 1 round. Insert a marker thread at beginning of round and 1 marker thread after 60-66-72-75-84-96 stitches (= in the sides). Move the marker threads upwards when working. Work A.1 in the round on round. REMEMBER THE KNITTING TENSION! Continue like this until piece measures 30-32-33-34-35-36 cm – adjust so that next round worked is a round with (knit 2 + 1 purl stitch). Now work next round as follows: Cast off the first 4-4-7-7-7-10 stitches, work pattern as before over the next 51-57-60-60-69-78 stitches, cast off the next 9-9-12-15-15-18 stitches (i.e. 5-5-5-8-8-8 stitches before marker thread and 4-4-7-7-7-10 stitches after marker thread), work pattern over the next 51-57-60-60-69-78 stitches, cast off the last 5-5-5-8-8-8 stitches. Cut the yarn. Then work front and back piece back and forth separately. FRONT PIECE: = 51-57-60-60-69-78 stitches. Begin from right side and work pattern as follows: 1 edge stitch in GARTER STITCH – read explanation above, work pattern as before until 1 stitch remain, 1 edge stitch in garter stitch. AT THE SAME TIME on first row begin decrease in each side -read DECREASE TIP. Decrease 1 stitch in each side every 4th row 4-1-2-3-2-1 times, then every other row 4-10-9-8-10-12 times and finally decrease 2 stitches in each side every other row 2-2-2-2-3-4 times (= 12-15-15-15-18-21 stitches decreased in each side) = 27-27-30-30-33-36 stitches. Slip stitches on a stitch holder and work back piece. BACK PIECE: = 51-57-60-60-69-78 stitches. Work as on front piece. When back piece is done, work the neck edge. NECK EDGE: Switch to circular size 4.5 mm. Knit from right side over the 27-27-30-30-33-36 stitches on back piece, cast on 12-12-12-15-15-15 new stitches on needle (= strap), knit from right side over the 27-27-30-30-33-36 stitches on front piece (slip stitches back on needle before they are worked), cast on 12-12-12-15-15-15 new stitches on needle = 78-78-84-90-96-102 stitches. Now work pattern as follows: * Work A.2 over the first 27-27-30-30-33-36 stitches, work A.3 over the next 12-12-12-15-15-15 stitches *, work from *-* 1 more time on round. When diagrams are done vertically, continue with knit over knit and purl over purl until rib measures 4 cm from where stitches were cast on for strap. Cast off stitches with knit over knit and purl over purl. |
|||||||||||||
Diagram explanations |
|||||||||||||
|
|||||||||||||
 |
|||||||||||||
Have you finished this pattern?Tag your pictures with #dropspattern #pinkshelltop or submit them to the #dropsfan gallery. Do you need help with this pattern?You'll find 25 tutorial videos, a Comments/Questions area and more by visiting the pattern on garnstudio.com. © 1982-2025 DROPS Design A/S. We reserve all rights. This document, including all its sub-sections, has copyrights. Read more about what you can do with our patterns at the bottom of each pattern on our site. |
|||||||||||||


With over 40 years in knitting and crochet design, DROPS Design offers one of the most extensive collections of free patterns on the internet - translated to 17 languages. As of today we count 320 catalogues and 12094 patterns translated into English (UK/cm). 12094
We work hard to bring you the best knitting and crochet have to offer, inspiration and advice as well as great quality yarns at incredible prices! Would you like to use our patterns for other than personal use? You can read what you are allowed to do in the Copyright text at the bottom of all our patterns. Happy crafting!
Post a comment to pattern DROPS 211-10
We would love to hear what you have to say about this pattern!
If you want to leave a question, please make sure you select the correct category in the form below, to speed up the answering process. Required fields are marked *.