
Popular categories
Looking for a yarn?


Comments / Questions (188)
![]() Kathy Lambert wrote:
Kathy Lambert wrote:
Thank you for your "answer" to my question, but it was not directed to my question at all. The problem is that the symbols on the chart - and their explanations - do not match the instructions in the pattern. One has circles, the other has diamonds. Are those the same thing?? And does one follow the chart right to left or left to right?? Please try again.
14.04.2020 - 18:29
![]() Vanina wrote:
Vanina wrote:
He comenzado y destejido este patrón varias veces, me resulta muy difícil seguir las indicaciones para el canesú. No comprendo el rol de los rombos/diamantes en blanco/negro. Mucho agradeceré modifiquen esa parte del patrón de modo que resulte más claro para seguir.
10.04.2020 - 21:09DROPS Design answered:
Hola Vanina. Los rombos en el diagrama muestran por qué lado tienes que trabajar la fila/vuelta. Rombo blanco por el lado derecho, rombo negro por el lado revés. Todas las abreviaturas las tienes antes del diagrama.
12.04.2020 - 18:29
![]() Kathy Lambert wrote:
Kathy Lambert wrote:
I am having a very hard time trying to figure out the chart in Drops Mountain Moraine (210-4) the icons and figures in the explanation for the diagram do not match at all what is on the instructions! Frustrating! There are blank diamonds on diagram with no explanations, also dark diamonds. The squares have dots, but in the explanation they are all small diamonds. Also it says to knit left to right, but I have always read the chart right to left. I have looked through all of the info online.HELP
10.04.2020 - 04:59DROPS Design answered:
Dear Mrs Lambert, you will find all symbols under the diagram keys: the blank diamonds= work from right side (= RS row), the black diamonds = work from wrong side (= WS row). The black dot in the squares are the 4th symbol from the diagram key. YOu will find how to read knitting diagrams here. Happy knitting!
14.04.2020 - 10:15
![]() Joy Dewhurst wrote:
Joy Dewhurst wrote:
Can this pattern be knitted from bottom upwards?
06.04.2020 - 06:29DROPS Design answered:
Dear Mrs Dewhurst, this might probably but the whole pattern should have to be completely re-written to shape armholes, it might be much easier to follow the pattern as it is explained. Look at the different videos and lessons linked at the bottom of the pattern, you might find further assistance. Happy knitting!
09.04.2020 - 14:09
![]() Ruth wrote:
Ruth wrote:
Jeg strikker str. L. udtagninger 8x10 + startmasker 60, det giver 140 masker. Opskriften siger 156. Hvis jeg tager ud 2 gange til, bliver skuldrene for lange og vesten for bred. Kan jeg strikke videre efter str. S?
30.03.2020 - 09:50DROPS Design answered:
Hej Ruth, det kommer an på din strikkefasthed. Ja du kan strikke efter en S, men sørg for at målene får de samme mål som i skitsen nederst i opskriften, så vesten kommer til at passe. :)
14.04.2020 - 15:55
![]() Sylvaine wrote:
Sylvaine wrote:
J'ai trouvé mon erreur : la 1ere phrase manque de clarté
28.03.2020 - 18:32
![]() Sylvaine wrote:
Sylvaine wrote:
Bonjour, Il semble qu'il manque 2 mailles avant les côtes anglaises en taille M. Vous disiez 10 diminutifs, soit 56 mailles Or 2+6+2+12+2+12+2+12+2+6=58 mailles ! Trop de diminutions ou il faut que 4 mailles pour le 2eme demi-dos ? Merci pour la réponse
28.03.2020 - 18:01DROPS Design answered:
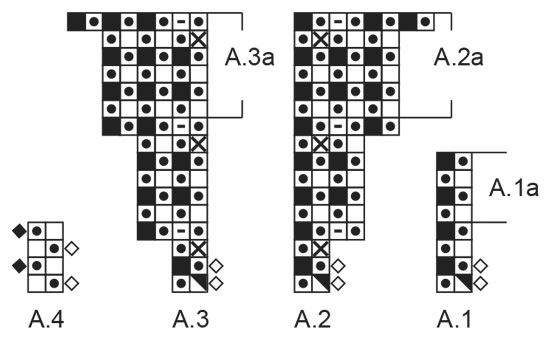
Bonjour Sylvaine, vous avez 2 mailles en trop :) Vous devez tricoter ainsi: 6 m de A.1 + 2 m de A.2 + 12 m de A.1 + 2 m de A.3 + 12 m de A.1 + 2 m de A.2 + 12 m de A.1 + 2 m de A.3 + 6 m de A.1 = 6+2+12+2+12+2+12+2+6=56 m. Bon tricot!
30.03.2020 - 09:45
![]() Bente wrote:
Bente wrote:
For mig lykkedes det først i 3. forsøg! For at få udtagningerne til at lægge sig i den rigtige retning, fordeles de 8 masker, man i alt tager ud på hver 6.omgang således: 2 masker på det første halve bagstykke, 4 masker på forstykket og 2 masker på det sidste halve bagstykke. På den måde bliver der ved at være 12 masker på hver skulder. Ved ikke om det hjælper, det er lidt svært at forklare ordentligt. Vh Bente
22.03.2020 - 22:23
![]() Gurli wrote:
Gurli wrote:
Kan det ikke lade sig gøre at få en opskrift der er bedre en den eksisterende. Jeg vil rigtig gerne igang da garnet er købt for 14 dage siden
22.03.2020 - 14:04
![]() Ruth wrote:
Ruth wrote:
Flot model, men meget kompliceret/ufuldstændig forklaring på bærestykket. Har prøvet at tælle mig frem til udtagningerne, men er åbenbart ikke snedig nok. De lægger sig alle fra højre mod venstre (i strikkeretningen) og mønsteret bliver skævt. Gode råd vil blive værdsat. Så kan det måske lykkes i tredie forsøg !!! Venlig hilsen
21.03.2020 - 17:00
|
||||||||||||||||||||||||||||
Mountain Moraine#mountainmorainevest |
||||||||||||||||||||||||||||
 |
 |
|||||||||||||||||||||||||||
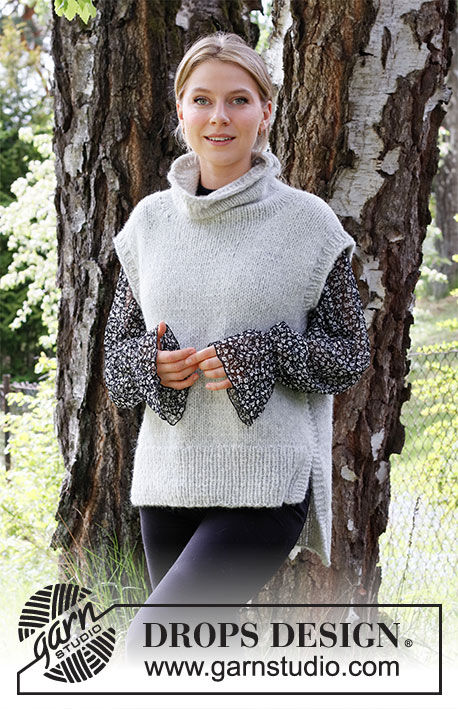
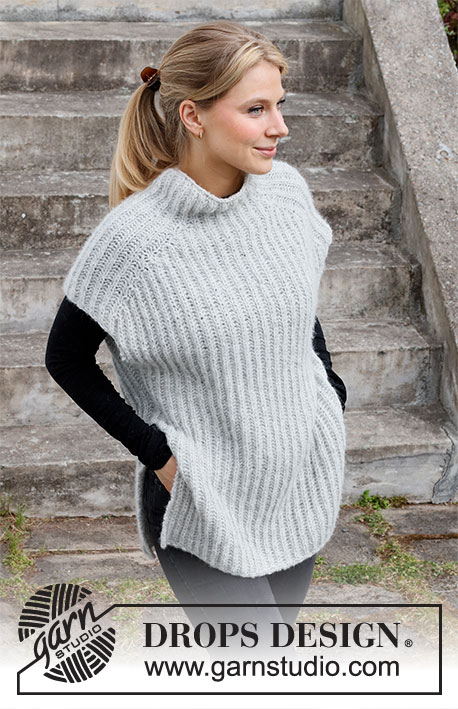
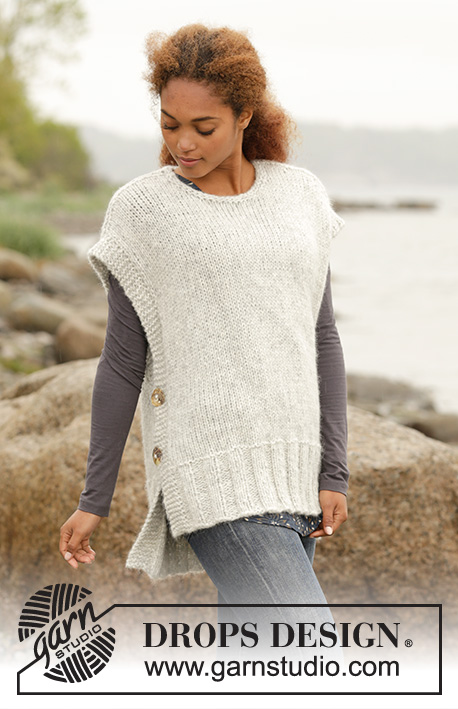
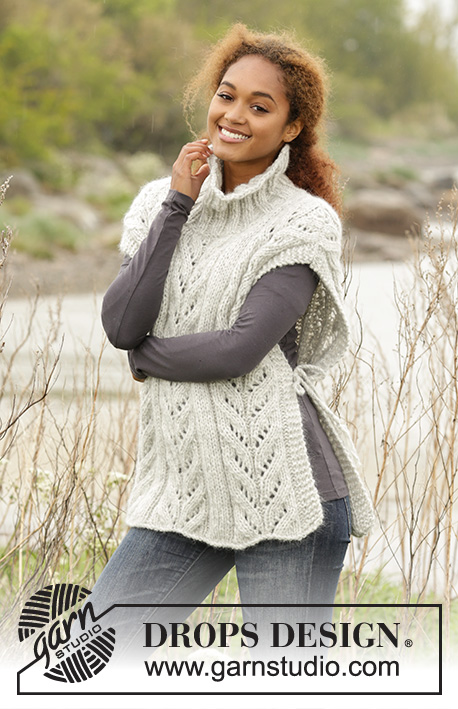
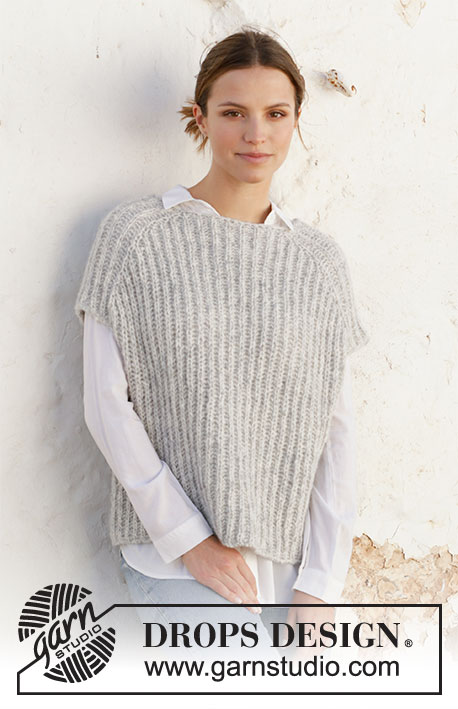
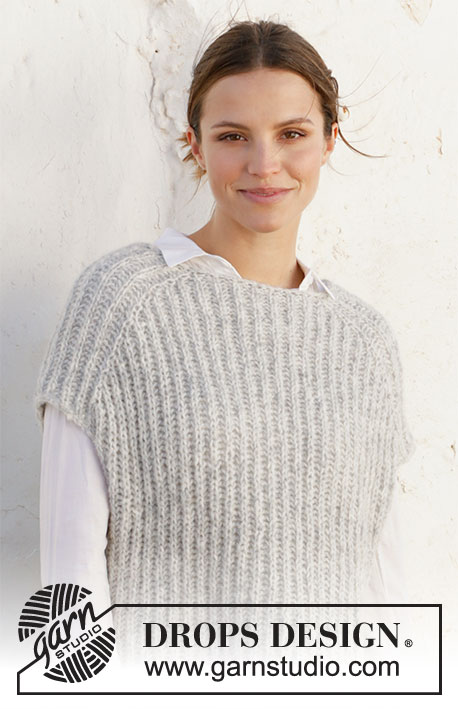
Knitted vest / slipover in DROPS Air. The piece is worked top down with English rib. Sizes XS - XXL.
DROPS 210-4 |
||||||||||||||||||||||||||||
|
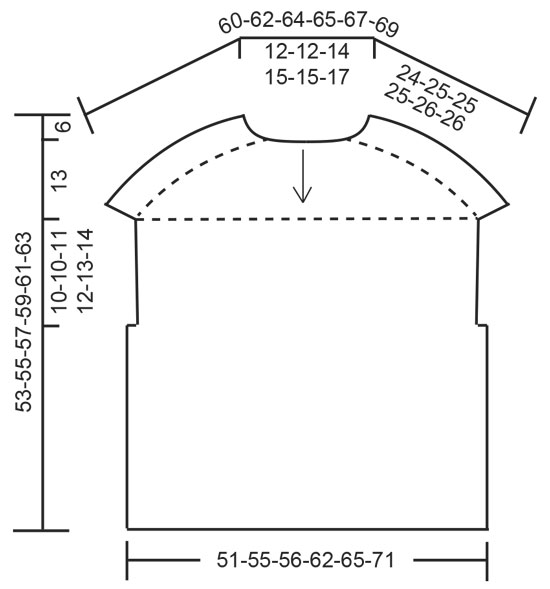
------------------------------------------------------- EXPLANATIONS FOR THE PATTERN: ------------------------------------------------------- RIDGE/GARTER STITCH (worked back and forth): Knit all rows. 1 ridge in height = Knit 2 rows. PATTERN: See diagrams A.1 to A.4 (worked with English rib). DECREASE TIP (evenly spaced): To work out how to decrease evenly, count the total number of stitches on needle (e.g. 62 stitches) and divide by number of decreases to be made (e.g. 10) = 6.2. In this example decrease by purling each 5th and 6th stitch together. ------------------------------------------------------- START THE PIECE HERE: ------------------------------------------------------- VEST – SHORT OVERVIEW OF THE PIECE: The neck and yoke are worked in the round with circular needle from mid back, top down. Stiches are increased for the shoulders before the piece is divided and the front and pieces worked separately as far as the bottom of the armholes. The pieces are rejoined and the body continued in the round. NECK: Cast on 62-62-66-70-70-74 stitches with circular needle size 6 mm and Air. Purl 1 round, purl 1 more round and decrease 10 stitches evenly spaced – read DECREASE TIP = 52-52-56-60-60-64 stitches. Purl 1 round. Change to circular needle size 7 mm. YOKE: Work pattern as follows: A.1 (= 2 stitches) over the first 6-6-6-8-8-8 stitches (= half back piece), A.2 (= 2 stitches), A.1 over 12 stitches, A.3 (= 2 stitches = shoulder), A.1 over 10-10-12-14-14-16 stitches (= front piece), A.2 over 2 stitches, A.1 over 12 stitches, A.3 over 2 stitches (= shoulder) and A.1 over the last 4-4-6-6-6-8 stitches (= half back piece). REMEMBER THE KNITTING TENSION! When A.1 has been completed 1 time in height, repeat A.1a onwards. When A.2 and A.3 have been completed 1 time in height, repeat A.2a and A.3a onwards; i.e. continue to increase every 6th round, the increased stitches are worked in English rib. When A.2a and A.3a have been worked a total of 8-9-9-10-11-12 times in height there are 132-140-144-156-164-176 stitches on the needle. Work A.1a over all stitches until the piece measures 24-25-25-25-26-26 cm at the longest point (i.e. measured along the shoulder); adjust so the next round is purled. Now divide the piece for front and back pieces and the shoulder stitches are cast off as follows: Work 26-28-28-32-34-36 stitches in English rib, 1 stitch in GARTER STITCH – read description above (= half back piece), cast off the next 13 stitches (yarn overs are cast off as separate stitches), 1 stitch in garter stitch, work 51-55-57-63-67-73 stitches in English rib, 1 stitch in garter stitch (= front piece), cast off the next 13 stitches (yarn overs are cast off as separate stitches), work 1 stitch in garter stitch and English rib over the last 25-27-29-31-33-37 stitches. Cut the strand. Now continue the armholes and back piece, working back and forth. Allow the other stitches to remain on the needle. BACK PIECE: = 53-57-59-65-69-75 stitches. Work as follows from the right side: 1 stitch in garter stitch, A.4 (= 2 stitches) until there is 1 stitch left (i.e. the English rib pattern starts and ends with 1 purled English rib stitch) and finish with 1 stitch in garter stitch. Continue this pattern back and forth for 10-10-11-12-13-14 cm, measured along the garter stitch; make sure the last row is from the wrong side. Allow the stitches to remain on the needle and work the front piece. FRONT PIECE: Work the 53-57-59-65-69-75 stitches on the front piece in the same way as the back piece. BODY: Work A.1a over the front piece (i.e. the garter stitches on each side become knitted English rib stitches), cast on 3 stitches, work A.1a over the back piece and cast on 3 stitches at the end of the row = 112-120-124-136-144-156 stitches. Now work A.1a in the round over all the stitches. On the first round work the 3 cast-on stitches under each sleeve without yarn overs. When the piece measures 47-49-51-53-55-57 cm (measured from the neck) cast off with knit; yarn overs are cast off as separate stitches (to avoid the cast-off edge being tight). |
||||||||||||||||||||||||||||
Diagram explanations |
||||||||||||||||||||||||||||
|
||||||||||||||||||||||||||||
 |
||||||||||||||||||||||||||||
 |
||||||||||||||||||||||||||||
Have you finished this pattern?Tag your pictures with #dropspattern #mountainmorainevest or submit them to the #dropsfan gallery. Do you need help with this pattern?You'll find 18 tutorial videos, a Comments/Questions area and more by visiting the pattern on garnstudio.com. © 1982-2026 DROPS Design A/S. We reserve all rights. This document, including all its sub-sections, has copyrights. Read more about what you can do with our patterns at the bottom of each pattern on our site. |
||||||||||||||||||||||||||||


With over 40 years in knitting and crochet design, DROPS Design offers one of the most extensive collections of free patterns on the internet - translated to 17 languages. As of today we count 324 catalogues and 12267 patterns translated into English (UK/cm). 12267
We work hard to bring you the best knitting and crochet have to offer, inspiration and advice as well as great quality yarns at incredible prices! Would you like to use our patterns for other than personal use? You can read what you are allowed to do in the Copyright text at the bottom of all our patterns. Happy crafting!
Post a comment to pattern DROPS 210-4
We would love to hear what you have to say about this pattern!
If you want to leave a question, please make sure you select the correct category in the form below, to speed up the answering process. Required fields are marked *.