
Popular categories
Looking for a yarn?


Comments / Questions (63)
![]() Anne Andersen wrote:
Anne Andersen wrote:
Er diagrammet for str XL rettet , jeg får 11 retmasker mellem vrangmaskerne og det kan jeg ikke få til st passe
20.02.2023 - 12:43
![]() Anne Andersen wrote:
Anne Andersen wrote:
Jeg har nu opgivet at strikke denne model, da diagram 2 i str XL ikke virker. Og det er netop pind 4 der driller. Hvor mage retmasker skal der være mellem vrang maskerne ?? Jeg får det til 11 masker, men så bliver det forkert på resten af omgangen Er mønstret rettet ?? Mvh Anne
20.02.2023 - 12:41DROPS Design answered:
Hej Anne, ja det stemmer, du strikker 9 masker i stjernemasken og så har du 2 masker ret fra den anden side af diagrammet :)
23.02.2023 - 15:29
![]() Núria wrote:
Núria wrote:
Hola primeramente muchas gracias por los patrones gratuitos, tengo una duda he empezado el patrón Alberta Rose con hilo safran y no entiendo cuando pone seguir esquema A1 (4 puntos) y 27 en horizontal? Gracias de antemano, espero me ayuden. Saludos
01.10.2022 - 05:58DROPS Design answered:
Hola Núria, tienes que trabajar la primera fila del diagrama A.1, que se encuentra bajo las instrucciones del patrón. Puedes ver cómo leer los diagramas aquí: https://www.garnstudio.com/lesson.php?id=68&cid=23 El diagrama A.1 tiene 4 puntos en la primera fila, tienes que repetir estos 4 puntos 27 veces en la vuelta (es decir, repites la primera fila de A.1 27 veces en la vuelta).
02.10.2022 - 23:54
![]() Susan wrote:
Susan wrote:
Ich verstehe die Zunahmen nicht. Also im Diagramm mit dem Stern gekennzeichnet. Und auch nicht was mit hintere Mitte gemeint ist. Es ist ein wirklich sehr schöner Pulli aber bin wohl zu doof.
30.03.2022 - 13:49DROPS Design answered:
Liebe Susan, die hintere Mitte ist die Mitte am Rückenteil. Mit dem Stern (3. Symbol im Diagram) sollen Sie die selbe Maschen entweder 7 Mal (S, M, L) oder 9 Mal (XL, XXL, XXXL) stricken (so nehmen Sie 6 Maschen (S,M,L) oder 8 Maschen (XL, XXL, XXXL). Dieses Video zeigt für den Top, wie man solche Diagramme strickt, sicher kann es Ihnen helfen. Viel Spaß beim stricken!
30.03.2022 - 14:16
![]() Lisa wrote:
Lisa wrote:
Hallo, ich bin etwas verwirrt darüber, wo ich den Markierer der Halsbänder anbringen. Nach den ersten sechs Runden oder wenn ich A.1 fertig geschrieben habe?
25.01.2022 - 15:17DROPS Design answered:
Liebe Lisa, der Markierer setzen Sie nach Bündchen, am Ende der Halsblende (= vor der Passe), er soll hier bleiben so daß die Arbeit ab diese Markierer gemessen wird. Viel Spaß beim stricken!
25.01.2022 - 16:48
![]() Lisa wrote:
Lisa wrote:
Hallo, ich bin etwas verwirrt darüber, wo ich den Markierer der Halsbänder anbringen. Nach den ersten sechs Runden oder wenn ich A.1 fertig geschrieben habe?
25.01.2022 - 15:16
![]() Eva Sæther wrote:
Eva Sæther wrote:
Det var Drops 212-6 jeg sente spørsmål om
03.12.2021 - 10:23
![]() Eva Sæther wrote:
Eva Sæther wrote:
Jeg prøver å strikke str M. Det står at jeg skal legge opp 131 masker inkludert stolpene. Strikker deretter A2og A1 og øker slik det er oppsatt. Når jeg er ferdig mef A2 og A1 for str M skal jeg ha 247 masker. Jeg har 223 masker. Jeg har også bare 23 ganger i bredden. Hva blir riktig antall i bredden for str M? Mønstret. Er det riktig at + skal være vrang fra retten? Kan dere sende svar på mailto::eva.saether@ posten.no.
03.12.2021 - 10:20DROPS Design answered:
Hej Eva. Jag antar att det är modell 212-6 du stickar. Du ska sticka A.2 29 gånger i bredden. I A.2 ökar du 4 maskor per rapport totalt. 29 x 4= 116 m ökade totalt. 131+116=247 m. Mvh DROPS Design
03.12.2021 - 12:12
![]() Eugenia wrote:
Eugenia wrote:
Hello! Please, the first increases on the yoke are every 3 stiches or 4? Thank you!
13.07.2021 - 18:20DROPS Design answered:
Dear Eugenia, the first increases are done after every 4th stitch. Happy Stitching!
13.07.2021 - 21:09
![]() Susana wrote:
Susana wrote:
Buenas y muchas gracias por el patrón, yo tengo dudas de que talla elegir, suelo usar una 40-42 talla española, y tengo 100cm de contorno de pecho, ¿es talla M o L? Muchas gracias.
30.05.2021 - 10:42DROPS Design answered:
Hola Susana, está prenda es bastante ajustada, por lo que necesitarías una talla L o mejor XL, para que no quede demasiado justo. De todas formas, puedes consultas todas las medidas debajo del patrón, en el esquema de la prenda.
30.05.2021 - 20:25
|
||||||||||||||||||||||||||||
Alberta Rose#albertarosesweater |
||||||||||||||||||||||||||||
 |
 |
|||||||||||||||||||||||||||
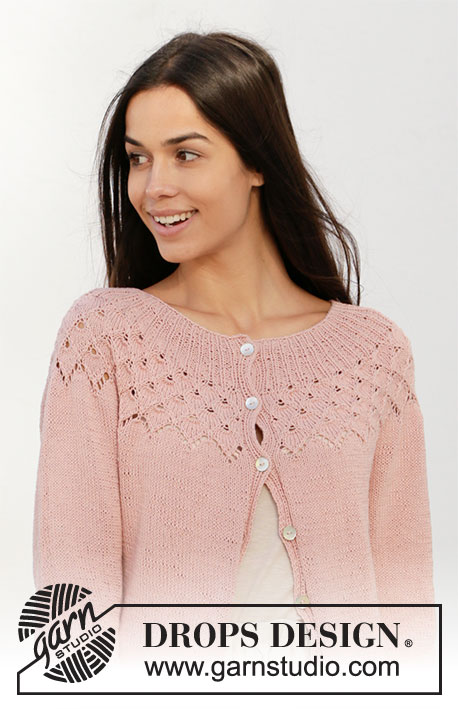
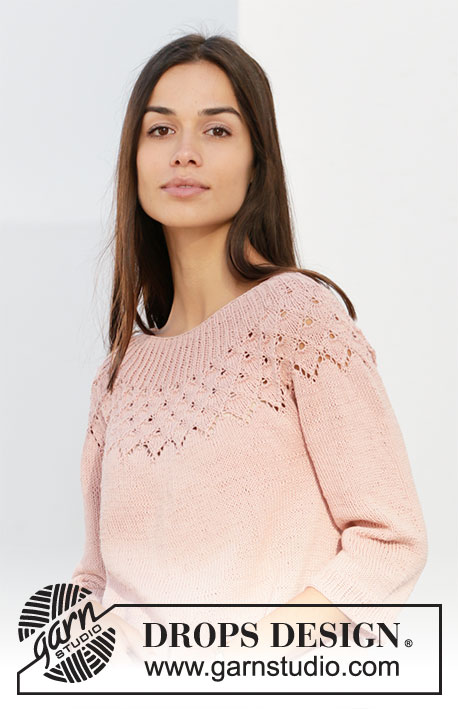
Knitted jumper with round yoke in DROPS Safran. The piece is worked top down with lace pattern, leaf pattern and ¾-length sleeves. Sizes S - XXXL.
DROPS 212-5 |
||||||||||||||||||||||||||||
|
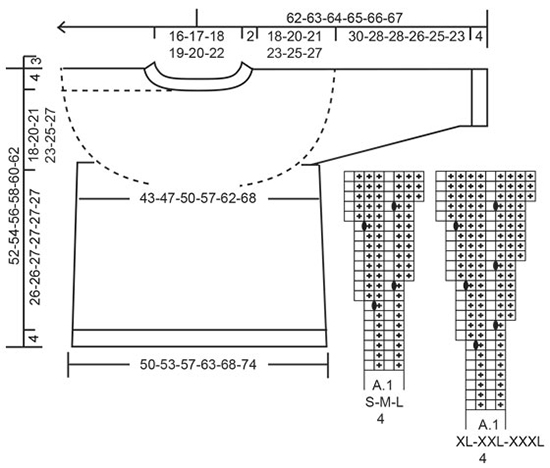
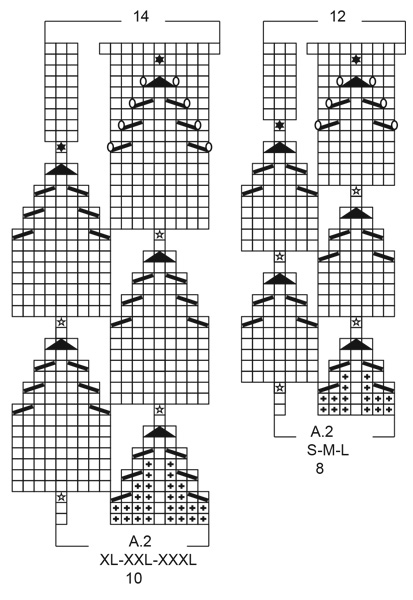
------------------------------------------------------- EXPLANATIONS FOR THE PATTERN: ------------------------------------------------------- PATTERN: See diagrams A.1 and A.2. Choose diagrams for your size. INCREASE TIP-1 (for sides of body): Work until there are 2 stitches left before the marker thread, make 1 yarn over, knit 4 (marker thread sits between these 4 stitches), make 1 yarn over. On the next round work the yarn overs twisted to avoid holes. Then work the new stitches in stocking stitch. INCREASE TIP-2 (evenly spaced): To work out how to increase evenly, count the total number of stitches on the needle (e.g. 244 stitches) and divide by the number of increases to be made (e.g. 62) = 3.93. In this example, increase by making 1 yarn over after approx. each 4th stitch. On the next round work the yarn overs twisted to avoid holes. DECREASE TIP (for sleeves): Decrease 1 stitch on each side of the marker thread as follows: Work until there are 3 stitches left before the marker thread, knit 2 together, knit 2 (marker thread sits between these 2 stitches), slip 1 stitch as if to knit, knit 1 and pass the slipped stitch over the knitted stitch. CASTING-OFF TIP: To avoid the cast-off edge being tight you can cast off with a larger size needle. If the edge is still tight, make 1 yarn over after approx. each 4th stitch at the same time as casting off and the yarn overs are cast off as normal stitches. ------------------------------------------------------- START THE PIECE HERE: ------------------------------------------------------- JUMPER – SHORT OVERVIEW OF THE PIECE: The neck and yoke are worked in the round with circular needle, from mid back and top down. The yoke is divided for body and sleeves and the body is continued in the round with circular needle. The sleeves are worked in the round with double pointed needles, top down. NECK: Cast on 108-116-124-124-128-140 stitches with circular needle size 2.5 mm and Safran. Knit 1 round. Work A.1 (= 4 stitches) in the round (= 27-29-31-31-32-35 times in width). When the first 6 rounds of the pattern are worked, change to circular needle size 3.5 mm. Insert 1 marker at the beginning of the round, mid back; the yoke will be measured from this marker! YOKE: When A.1 has been worked 1 time in height there are 216-232-248-310-320-350 stitches on the needle. The piece measures approx. 5-5-5-6-6-6 cm from the marker. Work A.2 (= 8-8-8-10-10-10 stitches) in the round (= 27-29-31-31-32-35 times in width). REMEMBER THE KNITTING TENSION! When A.2 has been worked 1 time in height there are 324-348-372-434-448-490 stitches on the needle. The piece measures approx. 16-16-16-21-21-21 cm from the marker. Continue with stocking stitch until the piece measures 18-20-21-23-25-27 cm from the marker. Now divide the piece for body and sleeves as follows: Knit 46-50-53-62-65-73 (= half back piece), place the next 70-74-80-93-94-98 stitches on a thread for the sleeve and cast on 8-8-10-8-12-10 stitches under the sleeve, knit 92-100-106-124-130-148 (= front piece), place the next 70-74-80-93-94-98 stitches on a thread for the sleeve and cast on 8-8-10-8-12-10 stitches under the sleeve and finish with knit 46-50-53-62-65-73 (= half back piece). BODY: = 200-216-232-264-284-314 stitches. Insert 1 marker thread in the middle of the 8-8-10-8-12-10 stitches cast on under each sleeve (= sides of body). There are 100-108-116-132-142-156 stitches on the back piece and 100-108-116-132-142-158 stitches on the front piece. Allow the threads to follow your work onwards; they will be used when increasing in the sides. Work stocking stitch in the round. When the piece measures 3 cm from the division increase 1 stitch on each side of both marker threads – read INCREASE TIP-1 (= 4 stitches increased). Increase like this every 2½ cm a total of 7 times = 228-244-260-292-312-342 stitches. Continue working until the piece measures 26-26-27-27-27-27 cm from the division. Knit 1 round and increase 60-62-64-65-66-66 stitches evenly spaced – read INCREASE TIP-2 = 288-306-324-357-378-408 stitches. Change to circular needle size 2.5 mm and work rib (= knit 1 / purl 2). Continue this rib for 4 cm. Cast off with knit – read CASTING-OFF TIP. SLEEVES: Place the 70-74-80-93-94-98 stitches from the thread on the one side of the piece onto double pointed needles size 3.5 mm and knit up 1 stitch in each of the 8-8-10-8-12-10 stitches cast on under the sleeve = 78-82-90-101-106-108 stitches. Insert 1 marker thread in the middle of these 8-8-10-8-12-10 new stitches under the sleeve. Allow the thread to follow your work onwards; it will be used when decreasing mid under sleeve. Work in the round in stocking stitch. When the piece measures 2 cm from the division decrease 1 stitch on each side of the marker thread – read DECREASE TIP (= 2 stitches decreased). Decrease like this every 2½-2-1½-1-1-1 cm a total of 9-10-13-17-18-18 times = 60-62-64-67-70-72 stitches. When the sleeve measures 30-28-28-26-25-23 cm from where the sleeve was divided from the body, increase 6-7-8-5-8-6 stitches evenly spaced = 66-69-72-72-78-78 stitches. Change to double pointed needles size 2.5 mm and work rib (= knit 1 / purl 2) over all stitches. Cast off with knit when the sleeve measures 34-32-32-30-29-27 cm from the division. Work the other sleeve in the same way. |
||||||||||||||||||||||||||||
Diagram explanations |
||||||||||||||||||||||||||||
|
||||||||||||||||||||||||||||
 |
||||||||||||||||||||||||||||
 |
||||||||||||||||||||||||||||
Have you finished this pattern?Tag your pictures with #dropspattern #albertarosesweater or submit them to the #dropsfan gallery. Do you need help with this pattern?You'll find 24 tutorial videos, a Comments/Questions area and more by visiting the pattern on garnstudio.com. © 1982-2026 DROPS Design A/S. We reserve all rights. This document, including all its sub-sections, has copyrights. Read more about what you can do with our patterns at the bottom of each pattern on our site. |
||||||||||||||||||||||||||||


With over 40 years in knitting and crochet design, DROPS Design offers one of the most extensive collections of free patterns on the internet - translated to 17 languages. As of today we count 325 catalogues and 12298 patterns translated into English (UK/cm). 12298
We work hard to bring you the best knitting and crochet have to offer, inspiration and advice as well as great quality yarns at incredible prices! Would you like to use our patterns for other than personal use? You can read what you are allowed to do in the Copyright text at the bottom of all our patterns. Happy crafting!
Post a comment to pattern DROPS 212-5
We would love to hear what you have to say about this pattern!
If you want to leave a question, please make sure you select the correct category in the form below, to speed up the answering process. Required fields are marked *.