
Popular categories
Looking for a yarn?


Comments / Questions (39)
![]() Catherine wrote:
Catherine wrote:
Je ne comprends pas comment avec 165 mailles on peut faire un point de riz ? Avec un nombre impair il y aura en fin de tour deux mailles du même sens ?
12.01.2026 - 19:55DROPS Design answered:
Bonjour Catherine, découvrez ici comment on tricote un point de riz en rond, sur un nombre impair de mailles. Bon tricot!
14.01.2026 - 09:22
![]() Karolin wrote:
Karolin wrote:
Hallo, Eine Frage zu dem Rumpfteil: Für das abteilen an den Markierungsfäden, wird alles gemessen oder ab dem Übergang vom Rippen- zum Perlmuster? Vielen Dank für eure Antworten, die immer sehr schnell kommen. LG
22.11.2025 - 09:57DROPS Design answered:
Liebe Karolin, es ist die Gesamtlänge ab dem Maschenanschlag gemeint. Viel Spaß beim Weiterstricken!
22.11.2025 - 10:42
![]() Catherine wrote:
Catherine wrote:
Pour les manches, après les côtes, Comment fais t’on pour augmenter 35 mailles sur un rang qui comporte 32 mailles ? Merci
10.10.2025 - 23:01DROPS Design answered:
Bonjour Catherine, en plus des jetés, vous pouvez tricoter des mailles alternativement dans le brin avant et le brin arrière pour obtenir les 35 augmentations. Bon tricot!
15.10.2025 - 07:36
![]() Wilma wrote:
Wilma wrote:
I don’t understand how to work the sizing of the pattern
31.08.2025 - 13:45DROPS Design answered:
Dear Wilma, the measurements of the garment can be found in the size chart at the bottom of the page. These are the final measurements of the garment in cm. If you want more information on how to understand this chart you can check this lesson. Happy knitting!
31.08.2025 - 18:20
![]() Conny wrote:
Conny wrote:
Ich bin noch Strickanfänger und habe folgende Frage: Kann man die Ärmel auch anstricken? Wenn ja, muss man die Maschen gleichmäßig aufnehmen? Vielen Dank für die tolle Anleitung!
01.08.2025 - 14:04DROPS Design answered:
Liebe Conny, damit die Armkugel richtig bleibt stricken Sie am besten die Ärmel wie erklärt, dh von unten nach oben, dann nähen Sie die Ärmel am Armloch. Viel Spaß beim Stricken!
01.08.2025 - 15:20
![]() Bitte wrote:
Bitte wrote:
Hei! Jeg driver og feller av på ermet (hvor jeg skal felle 1 maske per side). Skal jeg felles den første i raden og strikke raden ut, deretter snu og gjenta, eller skal jeg felle i begynnelsen og slutten av raden? Mvh. Bitte
26.06.2024 - 22:09DROPS Design answered:
Hej Bitte, du feller i begyndelsen af hver pind (ikke i slutten af pinden) :)
27.06.2024 - 07:27
![]() Marie M wrote:
Marie M wrote:
Bonjour Pouvez vous m’aider avec ma deuxième question : Bonjour, encore moi ☺️\\r\\nJ’arrive aux manches mais je ne comprends pas comment on fait pour continuer en aller retour quand on est en circulaire … j’ai beau chercher sur Google, je n’ai rien vu pour comprendre le passage de l’un à l’autre \\r\\nMerci de votre aide\\r\\nMarie 09.02.2024 - 12:38
17.02.2024 - 00:22DROPS Design answered:
Bonjour Marie M, à la hauteur indiquée, rabattez les premières mailles (2 à 7, cf taille) au début du tour, tricotez le tour jusqu'à la fin, tournez, rabattez les premières mailles (2 à 7, cf taille) au début du tour et terminez le rang sur l'envers; vous tricotez maintenant en rangs et plus en rond, rabattez 2 mailles au début des 2 rangs suivants, puis 1 maille au début de chaque rang de chaque côté jusqu'à ce que la manche mesure 4 à 12 cm depuis que l'on tricote en rangs, rabattez 3 mailles de chaque côté et rabattez les mailles suivantes au rang suivant sur l'endroit. Bon tricot!
19.02.2024 - 07:50
![]() Marie wrote:
Marie wrote:
Bonjour, Pouvez-vous m'éclaircir su ce point : pour les manches , je ne comprends pas l'utilisation des aiguilles à doubles pointes et de la petite aiguille circulaire qui n'est plus mentionnée par la suite dans les explications. Merci pour vos explications .
15.02.2024 - 12:17DROPS Design answered:
Bonjour Marie, on utilise l'aiguille circulaire quand il y a trop de mailles pour les aiguilles doubles pointes, changez simplement dès qu'un inconfort se fait sentir. Bon tricot!
15.02.2024 - 15:28
![]() Marie wrote:
Marie wrote:
Bonjour, encore moi ☺️ J’arrive aux manches mais je ne comprends pas comment on fait pour continuer en aller retour quand on est en circulaire … j’ai beau chercher sur Google, je n’ai rien vu pour comprendre le passage de l’un à l’autre Merci de votre aide Marie
09.02.2024 - 12:38
![]() Marie wrote:
Marie wrote:
Bonjour Je ne comprends pas les diminutions pour les emmanchures. Si elles sont à faire en début de rang, comment faire chaque côté à chaque fois? Car tous les deux rangs, je reviens à chaque fois sur le même côté non? Pouvez vous m’aider? Merci d’avance
22.01.2024 - 23:49DROPS Design answered:
Bonjour Marie, on doit rabattre pour l'arrondi de la manche en début de rang de chaque côté, autrement dit aussi bien sur l'endroit que sur l'envers, par ex vous rabattez d'abord 2-3-4-5-6-7 m au début des 2 rangs suivants (= 2-3-4-5-6-7 m de chaque côté), puis 2 m au début des 2 rangs suivants (2 m de chaque côté), puis 1 m au début de chaque rang de chaque côté (sur l'endroit et sur l'envers) jusqu'à ce que l'arrondi de la manche mesure 4 à 12 cm (cf taille), puis rabattez 3 m au début des 2 rangs suivants, et enfin rabattez les mailles restantes au rang (et non tour) suivant. Bon tricot!
23.01.2024 - 07:47
|
|
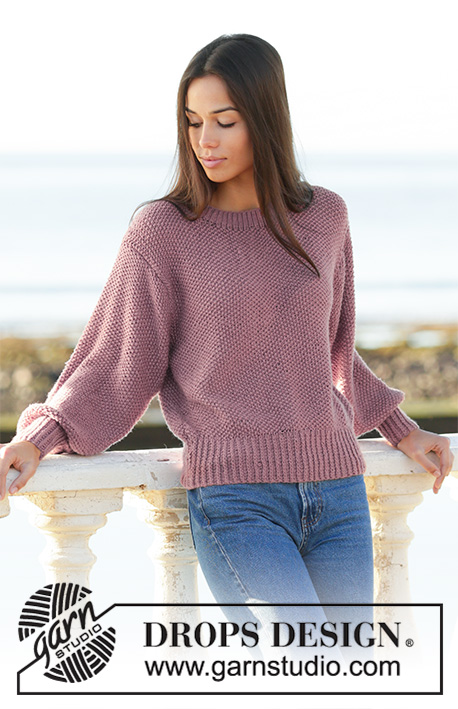
Summers End#summersendsweater |
|
 |
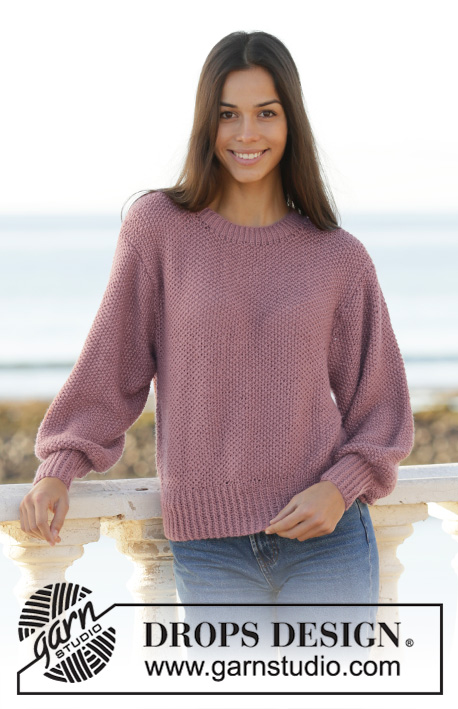 |
Knitted jumper with moss stitch, balloon sleeves and tight rib in DROPS Merino Extra Fine. Sizes S – XXXL.
DROPS 202-33 |
|
|
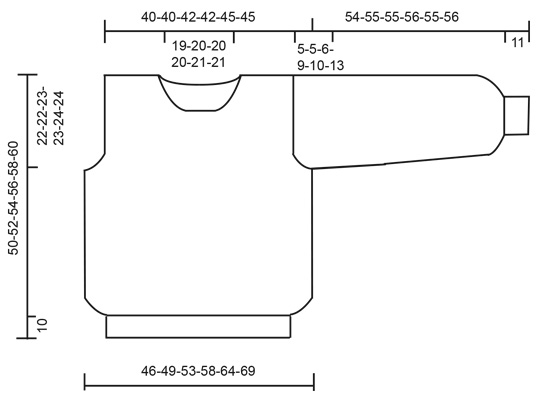
------------------------------------------------------- EXPLANATIONS FOR PATTERN: ------------------------------------------------------- RIB (worked in the round): Round 1: * Knit 1 twisted, purl 1 *, work from *-*. Round 2: Knit (not twisted) over the twisted knit and purl over purl. Repeat rounds 1 and 2 onwards. MOSS STITCH (worked in the round): Round 1: * Knit 1, purl 1 *, work from *-*. Round 2: Knit over purl and purl over knit. Repeat round 2 onwards. MOSS STITCH (worked back and forth): Row 1: * Knit 1 purl 1 *, work from *-*. Row 2: Knit over purl and purl over knit. Repeat row 2 onwards. INCREASE TIP-1: Increase 1 stitch between 2 stitches by making 1 yarn over; on the next round work this yarn over into the moss stitch – there will be a small hole at the increase. INCREASE TIP-2: Increase 2 stitches in 1 stitch as follows: Knit 1 stitch but do not slip this stitch from the needle, make 1 yarn over and work another stitch in the stitch, but in the back loop = 2 stitches increased.. CASTING-OFF TIP: To avoid the cast-off edge being tight, you can cast off with a ½ needle-size larger. ------------------------------------------------------- START THE PIECE HERE: ------------------------------------------------------- JUMPER: The jumper is worked in the round with circular needle, bottom up as far as the armholes. Then the front and back pieces are finished separately, back and forth on circular needle. The sleeves are worked in the round with double pointed needles/short circular needle. BODY: Cast on 150-160-170-190-210-230 stitches with circular needle size 4 mm. Knit 1 round, then work RIB – see description above. When the rib measures 10 cm, change to circular needle size 6 mm. Knit 1 round where you increase 6-5-10-7-7-5 stitches evenly spaced = 156-165-180-197-217-235 stitches on the round - read INCREASE TIP- 1. Then work MOSS STITCH – see description above - REMEMBER THE KNITTING TENSION! Work 78-82-90-98-108-118 stitches (= back piece) and insert a marker thread between 2 stitches (= side) work 78-83-90-99-109-117 stitches (= front piece) and insert a marker thread between 2 stitches (= side). When the piece measures 28-30-31-33-34-36 cm, divide the body at the markers and each piece is finished separately. BACK PIECE: = 78-82-90-98-108-118 stitches. Continue with moss stitch back and forth on the needle. Now cast off on each side for the armholes at the beginning of every 2nd row as follows: Cast off 2-3-4-5-7-9 stitches 1 time, 2 stitches 1-2-2-2-3-4 times, 1 stitch 1-0-1-2-3-4 times =68-68-72-76-76-76 stitches on row. When the piece measures 46-48-50-52-54-56 cm, cast off the middle 24-26-26-26-28-28 stitches for neck and each shoulder is finished separately. Then cast off on each side towards the neck every 2nd row as follows: 2 stitches 2 times. Cast off the remaining stitches when the piece measures 50-52-54-56-58-60 cm . FORSTYKKE: = 78-83-90-99-109-117 stitches. Work as back piece, but when the piece measures 44-46-47-49-51-53 cm cast off for the neck as follows: Cast off the middle 20-21-22-23-25-25 stitches and finish each shoulder separately. Then cast off on side towards neck every 2nd row as follows: 3 stitches 1 time, 2 stitches 1 time and 1 stitch 1 time. Cast off the remaining stitches when the piece measures 50-52-54-56-58-60 cm . SLEEVE: The sleeve is worked in the round with double pointed needles and short circular needle. Cast on 32-32-36-36-38-38 stitches with double pointed needles size 4 mm. Knit 1 round then work RIB – see description above – until the piece measures 11 cm. Change to double pointed needles size 6 mm and knit 1 round where you increase 35 stitches evenly spaced = 67-67-71-71-73-73 stitches on the round - read INCREASE TIP-1. Insert 1 marker thread at the beginning of the round = mid under sleeve. Then work moss stitch. AT THE SAME TIME increase 2 stitches mid under sleeve every 7-7-7-7-6-6 cm a total of 4 times = 75-75-79-79-81-81 stitches – read INCREASE TIP-2. When the piece measures 49-50-49-47-45-43 cm cast off for sleeve cap and the piece is finished back and forth. Cast off for sleeve cap every 2nd row on each side as follows: 2-3-4-5-6-7 stitches 1 time, 2 stitches 1 time. Then cast off 1 stitch on each side until the sleeve cap measures 4-4-5-8-9-12 cm. Cast off 3 stitches on each side 1 time. On the next round loosely cast off the remaining stitches. The sleeve measures approx. 54-55-55-56-55-56 cm. Work the other sleeve in the same way. ASSEMBLY: Sew shoulder seams. Sew in sleeves. Knit up approx. 110 stitches around the neck with double pointed needles size 4 mm and work rib (knit 1, purl 1) for 3 cm. Loosely cast off with knit over knit and purl over purl. |
|
 |
|
Have you finished this pattern?Tag your pictures with #dropspattern #summersendsweater or submit them to the #dropsfan gallery. Do you need help with this pattern?You'll find 28 tutorial videos, a Comments/Questions area and more by visiting the pattern on garnstudio.com. © 1982-2026 DROPS Design A/S. We reserve all rights. This document, including all its sub-sections, has copyrights. Read more about what you can do with our patterns at the bottom of each pattern on our site. |
|


With over 40 years in knitting and crochet design, DROPS Design offers one of the most extensive collections of free patterns on the internet - translated to 17 languages. As of today we count 324 catalogues and 12245 patterns translated into English (UK/cm). 12245
We work hard to bring you the best knitting and crochet have to offer, inspiration and advice as well as great quality yarns at incredible prices! Would you like to use our patterns for other than personal use? You can read what you are allowed to do in the Copyright text at the bottom of all our patterns. Happy crafting!
Post a comment to pattern DROPS 202-33
We would love to hear what you have to say about this pattern!
If you want to leave a question, please make sure you select the correct category in the form below, to speed up the answering process. Required fields are marked *.