
Popular categories
Looking for a yarn?


Comments / Questions (28)
![]() Karin Wiig wrote:
Karin Wiig wrote:
Kan en vrenge arbeidet etter bærestykke, slik at det bare strikkes rett?
12.05.2021 - 15:07DROPS Design answered:
Hej Karin, ja det kan du godt gøre :)
14.05.2021 - 08:53
![]() Ruta wrote:
Ruta wrote:
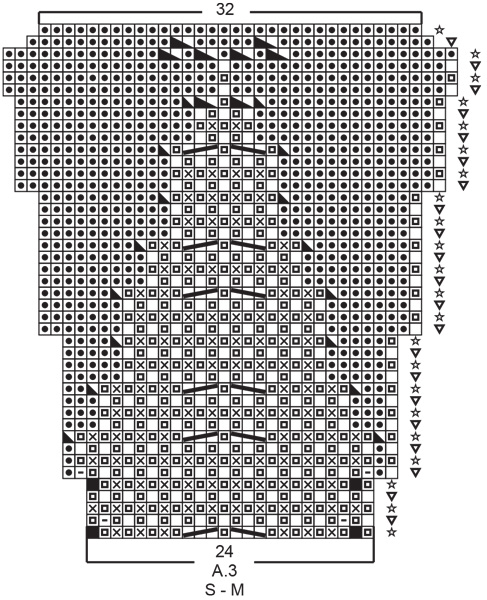
I think there is a mistake in A3 diagram for S-M size sweater. In 14th row counting from the bottom up and then every fourth row there is a x sign that means i need to purl yarn over and slipped stitch, yet on other size A3 diagrams on those rows you always have to knit a yarn over and slipped stitch. And i tried to study the photograph very closely and i can see that in between the feathers vertical lines are all knit stitches.
18.03.2021 - 11:30DROPS Design answered:
Dear Ruta, thanks for your feedback, diagram A.3 has been edited. Happy knitting!
22.04.2021 - 15:12
![]() Berit S Larsen wrote:
Berit S Larsen wrote:
Hei igjen og tusen takk for svar :-) Da venter jeg i spenning på ny video, og så får jeg også beklage, da var det like mye min skyld at jeg ikke fikk svar! Hilsen Berit
04.05.2020 - 17:00
![]() Berit S Larsen wrote:
Berit S Larsen wrote:
Jeg venter fremdeles på svar - se mitt spørsmål fra 8. mars (+ purring 23. mars). Altså snart ventet i 2 måneder!
30.04.2020 - 13:44DROPS Design answered:
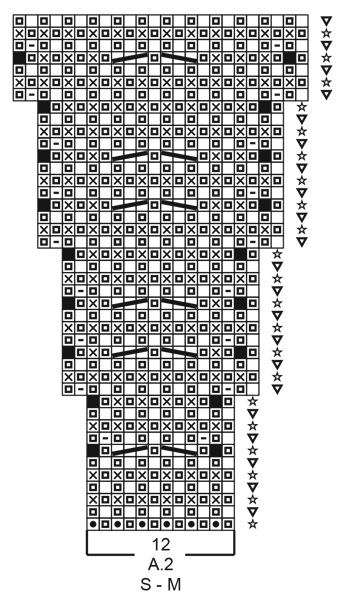
Hei Berit. Beklager at det har tatt så lang tid. Men du har kategorisert dine spørsmål (fra 8.mars og 23. mars) som kommentarer og ikke som spørsmål. Vi får derfor ikke et varsel at det er noe som skal svares på. Husk å hake av for spørsmål. Ang. ditt spørsmål fra 8. mars. Vi skal lage en video som beskriver diagramikonene i A.2 - 7.rad. mvh DROPS design
04.05.2020 - 13:48
![]() Berit S Larsen wrote:
Berit S Larsen wrote:
Hei igjen, håper på svar fra dere snart selv om vi er i Corona-tider. Takk.
23.03.2020 - 10:05
![]() Berit S Larsen wrote:
Berit S Larsen wrote:
Hei, har kjøpt garn til denne genseren, men har problemer med å skjønne fellingen (Rad nr. 7 på A.2, str. L der hvor første felling begynner). Har prøvd å se på videoer, men er ikke helt likt som denne oppskriften med å holde tråden foran og løfting fram og tilbake med masker. Får for store hull pga kastene jeg lager tror jeg. Er det noe sted jeg kan se en video som forklarer denne linjen? Tusen takk for svar.
08.03.2020 - 11:34
![]() Tone Bolme wrote:
Tone Bolme wrote:
Hei. Jeg kan ikke finne diagram A1 i mønsteret, det som beskriver hvordan halskanten skal strikkes. Er det en mangel i oppskriften? Mvh Tone
25.02.2020 - 16:52DROPS Design answered:
Hei Tone, A.1 er et lite diagram ved siden av skissen med målene, på bunnen av oppskriften. God fornøyelse!
26.02.2020 - 07:22
![]() Lydia LAURENT wrote:
Lydia LAURENT wrote:
Bonjour Où trouve-t'on le tuto du point côtes anglaises zigzag pour ce modèle 201.30 ? je vois bien le tuto côtes anglaises avec jeté mais pas zigzag, et les tutos youtube ne ressemblent pas aux points visibles sur le modèle? Merci par avance
29.08.2019 - 11:09DROPS Design answered:
Bonjour Mme Laurent, nous n'avons pas encore de vidéo pour les diagrammes, on les tricote en côtes anglaises en suivant bien pas à pas chaque rang des diagrammes et en se référant à la légende pour former le motif. Bon tricot!
29.08.2019 - 13:01
![]() Karen wrote:
Karen wrote:
Waarom krijg ik geen antwoord op mijn vraag van 2 juli 2019? Mijn vraag is wel afgedrukt op de site. M.vr.gr.
05.07.2019 - 22:18
![]() Karen wrote:
Karen wrote:
Streep 1 meet 5 cm vanaf het kortste punt. Vraag: wordt dat gemeten vanaf de opzet rand? Of vanaf nld 1 van patroon A.2? Streep 2 meet 9 cm vanaf het kortste punt. Vraag: wordt dat gemeten vanaf de opzetrand? Of vanaf de 1ste nld van patroon A.2? Of vanaf het begin van streep 2? M.vr.dank!
02.07.2019 - 19:06DROPS Design answered:
Dag Karen,
De 5 en 9 cm van de strepen worden gemeten vanaf de opzetnaald. Door het patroon komt er een golving in en je meet dus waar de streep op zijn kortst is.
08.07.2019 - 12:00
|
||||||||||||||||||||||||||||||||||||||||
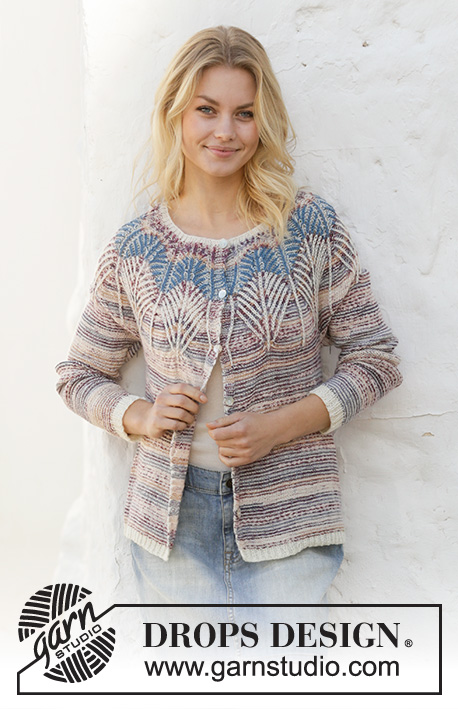
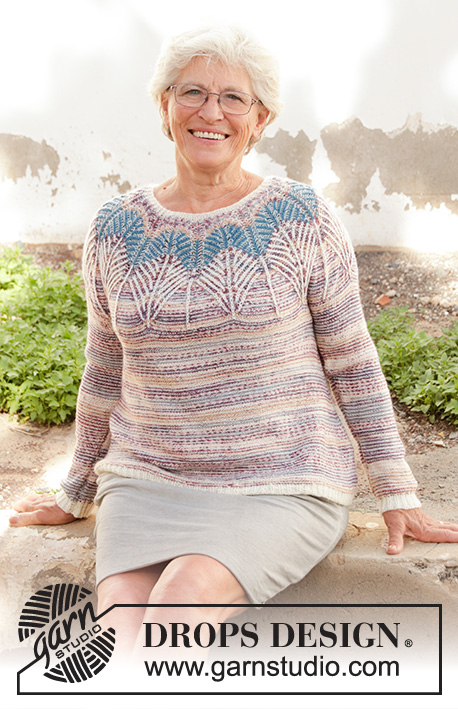
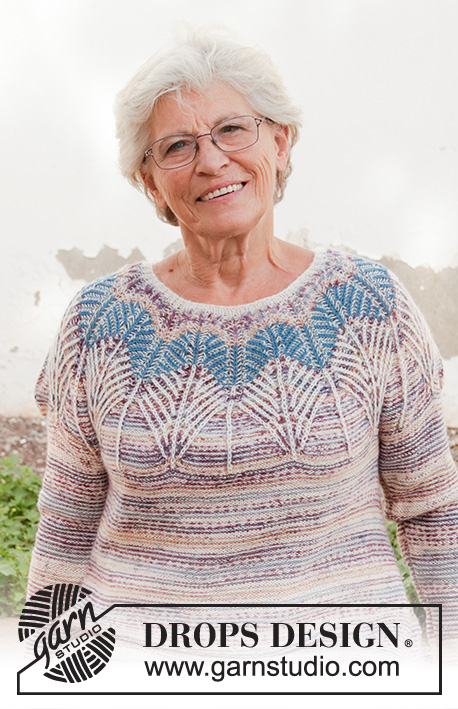
Egyptian Feathers#egyptianfeatherssweater |
||||||||||||||||||||||||||||||||||||||||
 |
 |
|||||||||||||||||||||||||||||||||||||||
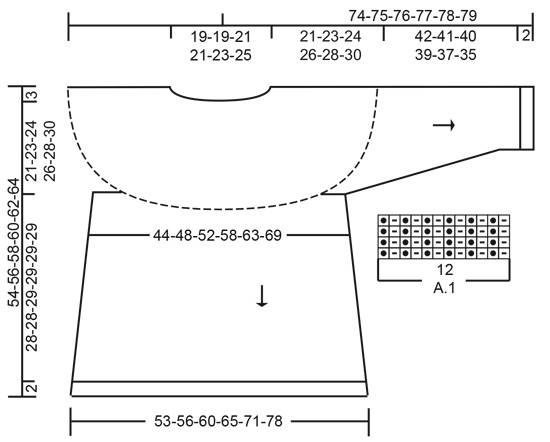
Knitted jumper with round yoke in DROPS Fabel. The piece is worked top down with 2-coloured English rib and zigzag stripes. Sizes S - XXXL.
DROPS 201-30 |
||||||||||||||||||||||||||||||||||||||||
|
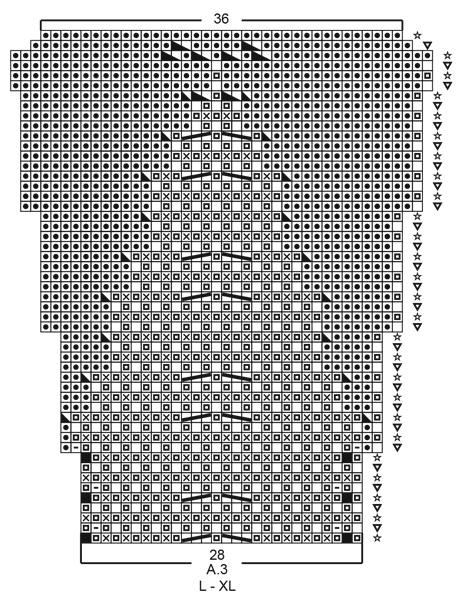
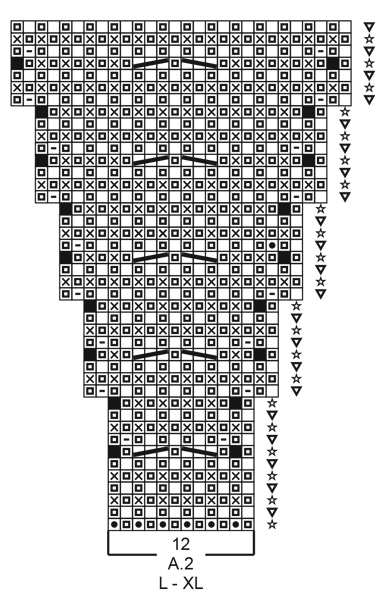
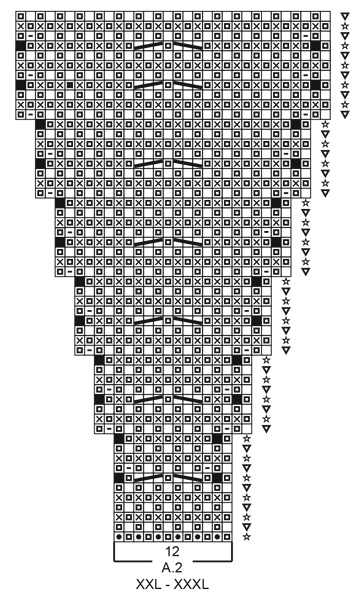
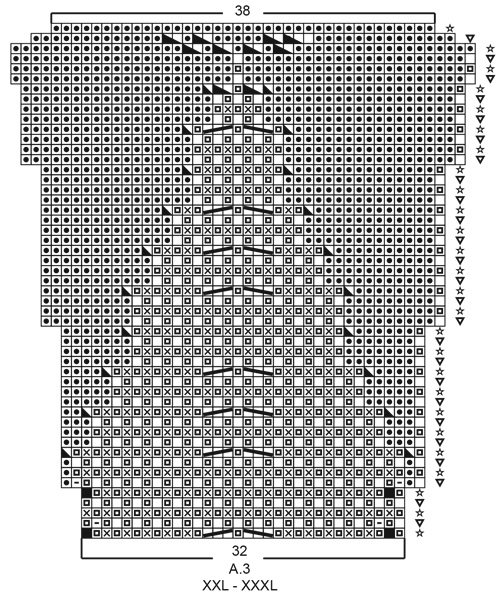
------------------------------------------------------- EXPLANATIONS FOR THE PATTERN: ------------------------------------------------------- PATTERN: See diagrams A.1 to A.3. Choose diagram for your size. First work A.1 (= rib on neck). When A.1 has been worked 1 time in height, work A.2 over A.1. When A.2 has been worked 1 time in height, work A.3 over A.2. STRIPES: To get the 2-coloured effect work stripes with, alternately, 1 round of colour-2 and 1 round of colour-1. Pattern A.2 starts with a round off-white as described in text. Each time you decrease or increase in A.2 and A.3, you work on a round with colour-2. Stripes are worked in English rib. STRIPE 1: Colour-1 = lavender, colour-2 = off white. Work until the piece measures 5 cm at the shortest point. STRIPE 2: Colour-1 = grey blue, colour-2 = off white. Work until the piece measures a total of 9 cm at the shortest point. STRIPE 3: Colour-1 = off white, colour-2 = lavender. Work until A.3 has been worked 1 time in height. The last row in the diagram is worked with lavender. Then continue the stripes, in reversed stocking stitch, as follows: ROUND 1: Work with off white. ROUND 2: Work with lavender. Repeat rounds 1 and 2. KNITTING TIP: All stitch counts when working English rib are without yarn overs, because the yarn overs belong to the knitted stitches and are therefore counted as 1 stitch (unless otherwise stated). DECREASE TIP (for mid under sleeves): Decrease 1 stitch on each side of the marker thread as follows: Work until there are 3 stitches left before the marker thread, purl 2 together, purl 2 (marker thread sits between these 2 stitches), purl 2 stitches together twisted (2 stitches decreased). INCREASE TIP-1 (evenly spaced): To work out how to increase evenly, count the total number of stitches on the needle (e.g. 252 stitches) and divide by the number of increases to be made (e.g. 18) = 14. In this example, increase by making 1 yarn over after each 14th stitch. On the next round work the yarn overs twisted to avoid holes. INCREASE TIP-2 (for sides of body): Work until there are 2 stitches left before marker thread, 1 yarn over, purl 4 (marker thread sits in middle of these 4 stitches), 1 yarn over (= 2 stitches increased). On the next round purl the yarn overs twisted to avoid holes. Then purl the new stitches onwards. ------------------------------------------------------- START THE PIECE HERE: ------------------------------------------------------- JUMPER - SHORT OVERVIEW OF THE PIECE: Neck and yoke are worked in the round with circular needle, top down. The yoke is worked in 2-coloured English rib with zigzag, then the piece is continued in stocking stitch with wrong side out and stripes, with 1 round of each colour. The yoke is divided for body and sleeves. The body is continued in the round with circular needle. The sleeves are worked in the round with short circular needle/double pointed needles, top down. NECK: Cast on 120-132-132-144-144-156 stitches with circular needle size 2.5 mm and off-white. Knit 1 round. Then work A.1 in the round (= 10-11-11-12-12-13 repeats of 12 stitches). When A.1 has been worked 1 time in height, work yoke as described below. YOKE: Change to circular needle size 3 mm. Work A.2 in the round (= 10-11-11-12-12-13 repeats of 12 stitches –first round worked with off-white). Read STRIPES and KNITTING TIP and REMEMBER THE KNITTING TENSION! When A.2 has been worked 1 time in height there are 240-264-308-336-384-416 stitches on the needle. The piece measures approx. 9-9-9-9-11-11 cm from the cast-on edge mid front. Now work A.3 over A.2. When A.3 has been worked 1 time in height there are 320-352-396-432-456-494 stitches on the needle. The piece measures approx. 17-17-19-19-21-21 cm from the cast-on edge mid front. Continue in the round with purl and stripes as before. When the piece measures 19-19-21-21-21-21 cm from the cast-on edge increase evenly spaced as follows: Increase 4-4-4-4-8-8 stitches every 2 cm a total of 1-2-1-1-2-2 times = 324-360-400-436-472-510 stitches – read INCREASE TIP-1. When the piece measures 21-23-24-26-28-30 cm from the cast-on edge mid front, divide the piece for body and sleeves as follows: Purl 49-53-58-65-72-78 stitches as before (= ½ back piece), place the next 64-74-84-88-92-98 stitches on 1 thread for sleeve, cast on 8 new stitches on the needle (= in side under sleeve), purl the next 98-106-116-130-144-157 stitches (= front piece), place the next 64-74-84-88-92-98 stitches on 1 thread for sleeve, cast on 8 new stitches on the needle (= in side under sleeve) and purl the remaining 49-53-58-65-72-79 stitches (= ½ back piece). Cut the strand. Body and sleeves are finished separately. THE PIECE IS NOW MEASURED FROM HERE! BODY: = 212-228-248-276-304-330 stitches. Insert 1 marker thread in each side of the body, in the middle of the 8 stitches cast on under each sleeve. Allow the marker threads to follow your work onwards; they will be used when increasing in the sides. Start the round at one of the marker threads and purl in the round as before with stripes. When the piece measures 2 cm from the division, increase 1 stitch on each side of both marker threads – read INCREASE TIP-2 (= 4 stitches increased). Increase like this every 2½-2½-2½-3-3-2½ cm a total of 10-10-10-9-9-11 times = 252-268-288-312-340-374 stitches. Continue working until the piece measures 28-28-29-29-29-29 cm from the division (or to desired length; there is 2 cm left to finished length). Knit 1 round where you increase 18-20-18-18-17-19 stitches evenly spaced = 270-288-306-330-357-393 stitches. Change to circular needle size 2.5 mm and work rib in the round with off-white (= knit 1/ purl 2) for 2 cm. Loosely cast off with knit over knit and purl over purl. The jumper measures approx. 54-56-58-60-62-64 cm from the shoulder down. SLEEVE: Place the 64-74-84-88-92-98 stitches from the thread on the 1 side of the piece on short circular needle/double pointed needles size 3 mm and knit up 1 stitch in each of the 8 stitches cast on under the sleeve = 72-82-92-96-100-106 stitches. Insert 1 marker thread in the middle of the 8 stitches cast on under the sleeve. Allow the marker threads to follow your work onwards; they will be used when decreasing under the sleeve. Start the round by the marker thread and purl in the round with stripes as before. When the piece measures 2 cm from the division decrease 2 stitches mid under sleeve – read DECREASE TIP. Decrease like this every 4-2½-2-1½-1½-1½ cm a total of 9-13-17-18-19-21 times = 54-56-58-60-62-64 stitches. Continue working until the piece measures 42-41-40-39-37-35 cm from the division (or to desired length; there is 2 cm left to finished length. NOTE: Shorter measurements in larger sizes due to wider neck and longer yoke). Knit 1 round where you increase 0-1-2-0-1-2 stitches evenly spaced = 54-57-60-60-63-66 stitches. Change to double pointed needles size 2.5 mm and work rib in the round with off-white (= knit 1/ purl 2) for 2 cm. Loosely cast off with knit over knit and purl over purl. The sleeve measures approx. 44-43-42-41-39-37 cm from the division. Work the other sleeve in the same way. |
||||||||||||||||||||||||||||||||||||||||
Diagram explanations |
||||||||||||||||||||||||||||||||||||||||
|
||||||||||||||||||||||||||||||||||||||||
 |
||||||||||||||||||||||||||||||||||||||||
 |
||||||||||||||||||||||||||||||||||||||||
 |
||||||||||||||||||||||||||||||||||||||||
 |
||||||||||||||||||||||||||||||||||||||||
 |
||||||||||||||||||||||||||||||||||||||||
 |
||||||||||||||||||||||||||||||||||||||||
 |
||||||||||||||||||||||||||||||||||||||||
Have you finished this pattern?Tag your pictures with #dropspattern #egyptianfeatherssweater or submit them to the #dropsfan gallery. Do you need help with this pattern?You'll find 22 tutorial videos, a Comments/Questions area and more by visiting the pattern on garnstudio.com. © 1982-2026 DROPS Design A/S. We reserve all rights. This document, including all its sub-sections, has copyrights. Read more about what you can do with our patterns at the bottom of each pattern on our site. |
||||||||||||||||||||||||||||||||||||||||


With over 40 years in knitting and crochet design, DROPS Design offers one of the most extensive collections of free patterns on the internet - translated to 17 languages. As of today we count 324 catalogues and 12245 patterns translated into English (UK/cm). 12245
We work hard to bring you the best knitting and crochet have to offer, inspiration and advice as well as great quality yarns at incredible prices! Would you like to use our patterns for other than personal use? You can read what you are allowed to do in the Copyright text at the bottom of all our patterns. Happy crafting!
Post a comment to pattern DROPS 201-30
We would love to hear what you have to say about this pattern!
If you want to leave a question, please make sure you select the correct category in the form below, to speed up the answering process. Required fields are marked *.