
Popular categories
Looking for a yarn?


Comments / Questions (34)
![]() Dea wrote:
Dea wrote:
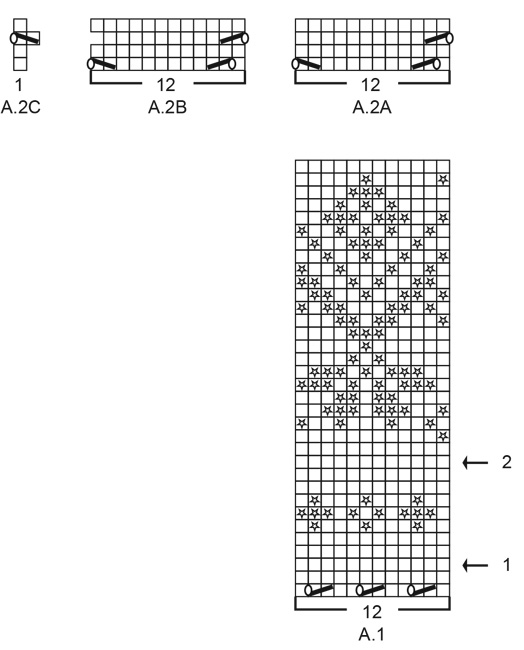
Buongiono il diagramma A2A non è corretto alla terza riga, secondo me manca qualcosa. Se seguissi come è disegnato non combacia il gettato e si sposta, fatelo ricontrollare.
02.05.2021 - 11:04DROPS Design answered:
Buonasera Dea, probabilmente manca una maglia, comunque abbiamo inoltrato la sua richiesta al settore design. Buon lavoro!
02.05.2021 - 20:30
![]() Natasja Van Den Bosch wrote:
Natasja Van Den Bosch wrote:
Hallo, ik ben bij A.2.a gekomen maar begrijp niet zo goed de 3e naald (het open vakje op het einde) ?
19.10.2020 - 09:14DROPS Design answered:
Dag Natasja,
Het is inderdaad vreemd dat lege vakje en ik zal het even navragen bij de ontwerpafdeling. Volgens mij kun je dit gewoon negeren en steeds de 12 steken in A.2a herhalen. Dus bij de derde naald brei je na de omslag en het samen breien nog 10 steken en dit herhaal je steeds in de breedte.
21.10.2020 - 11:23
![]() Adriana wrote:
Adriana wrote:
Hola! No entiendo el símbolo de la primera línea del esquema A1, me lo podrían explicar aquí por favor? Gracias!
03.09.2020 - 18:04DROPS Design answered:
Hola Adriana. La primera fila se trabaja como sigue: *1 derecho, trabajar 2 puntos juntos de derecho con lila claro, 1 hebra con lila claro, 2 derechos, trabajar 2 puntos juntos de derecho con lila claro, 1 hebra con lila claro, 2 derechos, trabajar 2 puntos juntos de derecho con lila claro, 1 hebra con lila claro, 1 derecho*, repetir de * a * toda la vuelta.
09.09.2020 - 20:08
![]() Yvonne Lasschuit-LeLoux wrote:
Yvonne Lasschuit-LeLoux wrote:
Ik ben aanbeland bij patroon A2a en moet na 2 cm vanaf de scheiding beginnen met dit patroon. Ik brei mt M. Nu is dit voor mij na 7 toeren na de scheiding terwijl op de foto het na 5 toeren is (met S waarschijnlijk). Dit is na 1 cm volgens de stekenverhouding. Volgens mij klopt het patroon dus niet. Maten S, M en L zouden na 2 cm moeten beginnen met A2a en XL, XXL en XXXL al na 1 cm. Dit zou toch andersom moeten zijn?
11.08.2020 - 23:04DROPS Design answered:
Dag Yvonne,
1 cm is ongeveer 5 naalden. Als A.1 klaar is op de pas brei je nog een stukje door tot het werk 21-23-25-27-29-31 cm meet vanaf de pas. Het kan zijn dat hier het verschil in zit waardoor je in de grotere maten 1 cm na de scheiding moet beginnen met A2a. Als je meer of minder ruimte wilt tussen A.1 en A.2a dan ben je natuurlijk vrij om meer naalden er tussen te breien.
17.08.2020 - 21:48
![]() Bente Beck Jensen wrote:
Bente Beck Jensen wrote:
Jeg er i gang med denne smukke bluse. Har netop taget af pinden, da jeg ikke synes at maske antal i starten er for småt i forhold til billedet af blusen. Har valgt XL og vil nu forsøge at slå 148 masker op i stedet for 105. Har i en kommentar til halsudskæringen. På forhånd tak. Bente
01.04.2020 - 10:17DROPS Design answered:
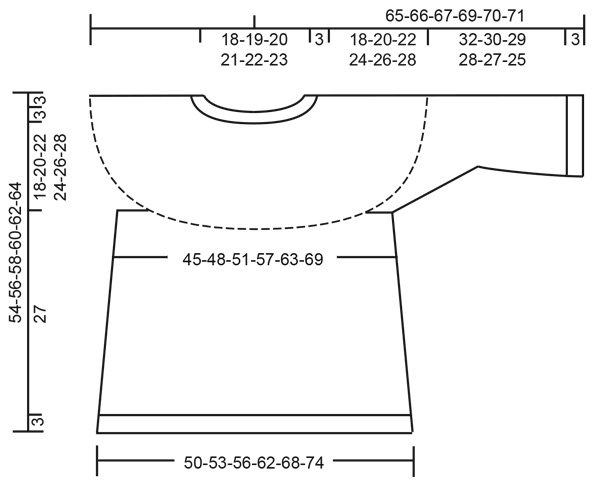
Hej Bente, Halskanten bør få målene som du ser nederst i måleskitsen (hvis du følger strikkefastheden) god fornøjelse!
16.04.2020 - 16:04
![]() Kamila wrote:
Kamila wrote:
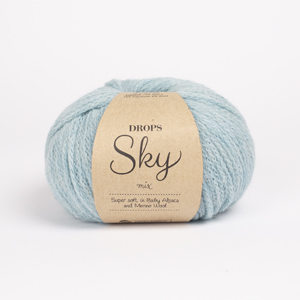
Hi, I would like to ask if it is possible to use Puna yarn instead of Sky and what accommodations do you suggest? Thank you very much for lovely patterns ♥️
11.01.2020 - 12:45DROPS Design answered:
Dear Kamila, since Puna and Sky belongs both to same yarn groupe B, you can use Puna instead, -just remember texture will be different read more here - just try our yarn converter to get the new yarn amount. Happy knitting!
13.01.2020 - 08:45
![]() Terese Gustafson wrote:
Terese Gustafson wrote:
Hej! Efter dom två ökningsvarven på oket så får jag inte diagrammet att stämma. Rapporten varv 13 börjar inte på samma ställe som på varv 8 pga ökningen. Maskantalet stämmer. Tack på förhand!
11.01.2020 - 09:45DROPS Design answered:
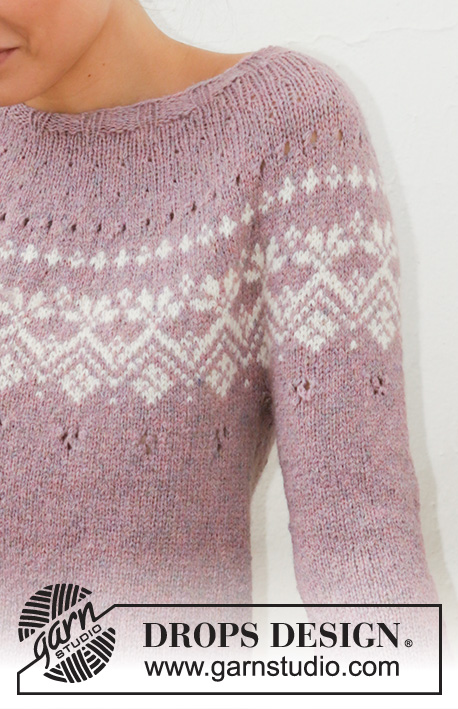
Hei Terese. Siden du øker ved pil 1 og 2 vil ikke diagrammet bli 100% slik arbeidet blir i forholde til diagrammet. Det er ikke feil og om du ser på bildet ser du hvordan det lille mønstret mellom de 2 øke pilene blir i forhold til det store diagrammet (etter 2. pil/økning). mvh DROPS design
10.02.2020 - 10:07
![]() Leila Soumani wrote:
Leila Soumani wrote:
Liebes Team, ich stricke dieses Modell 201/2 mit der angegeben Nadel in Größe S. 95 M für den Halsausschnitt ist viel zu wenig, sieht nicht so schön wie auf dem Foto aus. Gibt's dazu eine Korrekturanleitung? Ich freue mich auf Ihre Rückmeldung MfG, Leila Soumani
16.11.2019 - 07:24DROPS Design answered:
Liebe Soumani, Stimmt Ihre Maschenprobe? Nach Bündchen wird die Maschenanzahl zu 134 zugenommen, dann soll der Halsauschnitt wie bei der Maßskizze aussehen. Viel Spaß beim stricken!
18.11.2019 - 08:55
![]() Emma wrote:
Emma wrote:
Ik begrijp A2b niet. Dat moet dan 1 gaatje worden?
04.03.2019 - 21:57DROPS Design answered:
Dag Emma,
Ja klopt, dit is 1 steek, behalve op de derde naald, maar deze sluit aan op het patroon A.2a.
05.03.2019 - 17:54
![]() Emma wrote:
Emma wrote:
Aanvulling op mijn eerdere vraag. Als ik naar de afmeting van de hals kijk op de tekening in het patroon dan is deze gelijk aan wat ik nu op de pen heb staan. Klopt de foto wel met het patroon?
13.02.2019 - 09:33DROPS Design answered:
Dag Emma,
De afmetingen die in de tekening staan aangegeven zijn de juiste maten. We proberen een zo representatief mogelijke foto weer te geven, maar deze kan soms ietsje afwijken.
13.02.2019 - 10:32
|
|||||||||||||||||||
Rosewood#rosewoodsweater |
|||||||||||||||||||
 |
 |
||||||||||||||||||
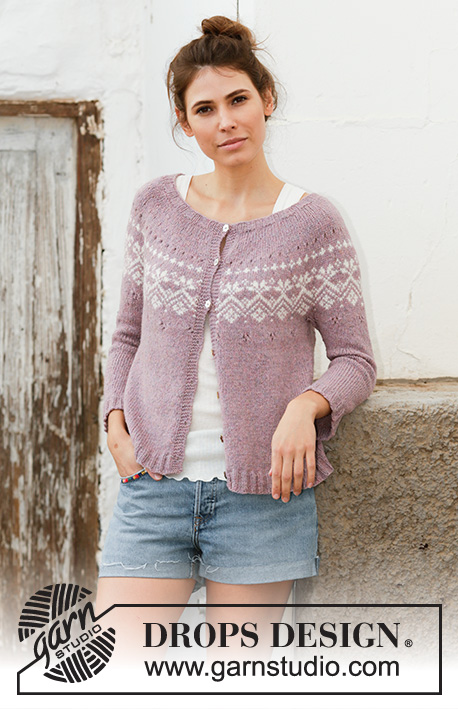
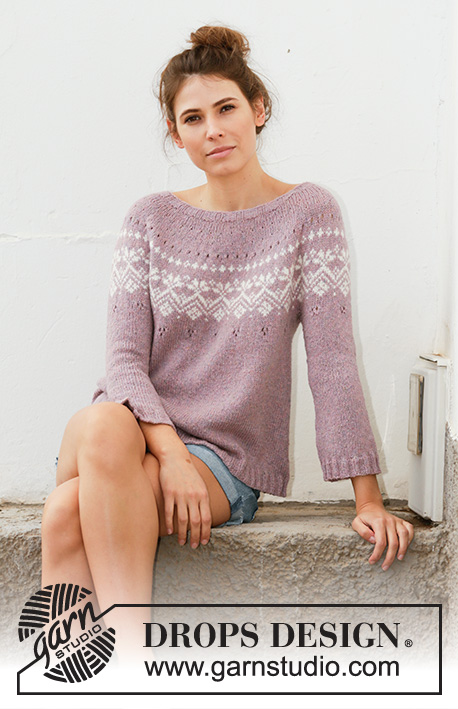
Knitted jumper in DROPS Sky. The piece is worked top down with round yoke, Nordic pattern, A-shape and ¾-length sleeves. Sizes S - XXXL.
DROPS 201-2 |
|||||||||||||||||||
|
------------------------------------------------------- EXPLANATIONS FOR THE PATTERN: ------------------------------------------------------- PATTERN: See diagrams A.1 and A.2. KNITTING TIP: To avoid the knitting tension becoming tighter when working pattern, it is important that the strands at the back are not tight. Go up a needle size when working pattern if this is a problem. INCREASE TIP-1 (evenly spaced): To work out how to increase evenly, count the total number of stitches on the needle (e.g. 95 stitches) and divide by the number of increases to be made (e.g. 39) = 2.4. In this example, increase by making 1 yarn over after alternately each 2nd and 3rd stitch. On the next round knit the yarn overs twisted to avoid holes. INCREASE TIP-2 (for sides of body): Work until there are 4 stitches left before the marker thread, make 1 yarn over, knit 8 (marker thread sits in middle of these 8 stitches), 1 yarn over (= 2 stitches increased at each marker thread and a total of 4 stitches increased on round). On the next round knit the yarn overs twisted to avoid holes. Then work the new stitches in stocking stitch. INCREASE TIP-3 (for mid under sleeves): Work until there is 1 stitch left before the marker thread, make 1 yarn over, knit 2 (marker thread sits in middle of these 2 stitches), 1 yarn over (= 2 stitches increased). On the next round knit the yarn overs twisted to avoid holes. Then work the new stitches in stocking stitch. DECREASE TIP (for mid under sleeves): Work until there are 3 stitches left before the marker thread, knit 2 together, knit 2 (marker thread sits in middle of these 2 stitches), slip 1 stitch as if to knit, knit 1 and pass the slipped stitch over the knitted stitch (= 2 stitches decreased). ------------------------------------------------------- START THE PIECE HERE: ------------------------------------------------------- JUMPER - SHORT OVERVIEW OF THE PIECE: Neck and yoke are worked in the round with circular needle, top down. The yoke is divided for body and sleeves. The body is continued in the round with circular needle, top down. The sleeves are continued in the round with short circular needle/double pointed needles, top down. NECK: Cast on 95-100-100-105-110-115 stitches with short circular needle size 3.5 mm and light lilac. Knit 1 round. Then work rib in the round (= knit 2 / purl 3) for 3 cm. When the rib is finished, knit 1 round where you increase 39-40-42-43-44-47 stitches evenly spaced – read INCREASE TIP-1 = 134-140-142-148-154-162 stitches. Then work the yoke as described below. YOKE: Change to circular needle size 4.5 mm. Work stocking stitch in the round with light lilac. AT THE SAME TIME increase evenly as described below. REMEMBER THE KNITTING TENSION! When the piece measures 5-5-5-5-5-6 cm from the cast-on edge, increase 44-46-50-50-52-52 stitches evenly spaced = 178-186-192-198-206-214 stitches. When the piece measures 7-7-7-7-7-9 cm from the cast-on edge, increase 38-42-48-40-42-44 stitches evenly = 216-228-240-238-248-258 stitches. The increases are finished in sizes S, M and L. XL, XXL and XXXL: When the piece measures 9-10-12 cm from the cast-on edge, increase 38-40-42 stitches evenly = 276-288-300 stitches. ALL SIZES: = 216-228-240-276-288-300 stitches. Continue working without further increases until the piece measures 8-9-10-11-13-15 cm from the cast-on edge. Now start pattern on the yoke – read KNITTING TIP and work A.1 in the round (= 18-19-20-23-24-25 repeats of 12 stitches). Continue this pattern. AT THE SAME TIME on each round marked with an arrow in A.1 increase as follows. Round with arrow-1 in A.1 increase 24-36-36-36-48-48 stitches evenly spaced = 240-264-276-312-336-348 stitches (there is now room for 20-22-23-26-28-29 repeats of 12 stitches). Round with arrow-2 in A.1 increase 24-24-36-36-36-48 stitches evenly spaced = 264-288-312-348-372-396 stitches (there is now room for 22-24-26-29-31-33 repeats of 12 stitches). When A.1 has been completed continue with stocking stitch and light lilac until the piece measures 21-23-25-27-29-31 cm from the cast-on edge. The next round is worked as follows: Work 41-44-46-52-57-62 stitches in stocking stitch (= ½ back piece), place the next 50-56-64-70-72-74 stitches on 1 thread for sleeve, cast on 8-8-10-10-12-14 new stitches on needle (= in side under sleeve), work 82-88-92-104-114-124 stitches in stocking stitch (= front piece), place the next 50-56-64-70-72-74 stitches on 1 thread for sleeve, cast on 8-8-10-10-12-14 new stitches on needle (= in side under sleeve) and work the remaining 41-44-46-52-57-62 stitches in stocking stitch (= ½ back piece). Body and sleeves are finished separately. THE PIECE IS NOW MEASURED FROM HERE! BODY: = 180-192-204-228-252-276 stitches. Insert 1 marker thread in each side of the body in the middle of the 8-8-10-10-12-14 stitches cast on under each sleeve. Allow the marker threads to follow your work onwards; they will be used when increasing in the sides. Start the round by one of the marker threads and work stocking stitch in the round with light lilac. When the piece measures 2-2-2-1-1-1 cm from the division, work A.2A in the round (= 15-16-17-19-21-23 repeats of 12 stitches). When A.2A has been completed, continue with stocking stitch in the round. When the piece measures 5 cm from the division, increase 1 stitch on each side of both marker threads – read INCREASE TIP-2. Increase like this every 5 cm a total of 5 times on each side = 200-212-224-248-272-296 stitches. Then continue working until the piece measures 27 cm from the division in all sizes (or to desired length; there is 3 cm left to finished length). Knit 1 round where you increase 50-53-56-62-68-74 stitches evenly spaced = 250-265-280-310-340-370 stitches. Change to circular needle size 3.5 mm. Work rib in the round (= knit 2 / purl 3) for 3 cm. Loosely cast off with knit over knit and purl over purl. The jumper measures approx. 54-56-58-60-62-64 cm from the shoulder down. SLEEVE: Place the 50-56-64-70-72-74 stitches from the thread on the one side of the piece on short circular needle/double pointed needles size 4.5 mm and knit up 1 stitch in each of the 8-8-10-10-12-14 stitches cast on under the sleeve = 58-64-74-80-84-88 stitches. Insert 1 marker thread in the middle of these 8-8-10-10-12-14 stitches. Allow the marker thread to follow your work onwards; it will be used when decreasing under the sleeve. Start the round at the marker thread and work stocking stitch in the round with light lilac. When the piece measures 2-2-2-1-1-1 cm from the division, work the next round as follows: 4-1-0-3-5-1 stitches in stocking stitch, work A.2A over the next neste 36-48-60-60-60-72 stitches (= 3-4-5-5-5-6 repeats of 12 stitches), work A.2B (= 12 stitches), work A.2C (= 1 stitch) and finish with 5-2-1-4-6-2 stitches in stocking stitch. Continue this pattern. When A.2 has been completed continue with stocking stitch. AT THE SAME TIME when the piece measures 3-3-3-2-2-2 cm from the division, decrease 2 stitches mid under sleeve – read DECREASE TIP. Decrease like this every 3-2-1-1-1-1 cm a total of 4-6-10-11-11-11 times = 50-52-54-58-62-66 stitches. When the sleeve measures 15-15-15-14-14-14 cm from the division, increase 2 stitches mid under sleeve – read INCREASE TIP-3. Increase like this every 3-3-2½-2½-2½-2 cm a total of 5 times in all sizes = 60-62-64-68-72-76 stitches. Continue working until the sleeve measures 32-30-29-28-27-25 cm from the division (shorter measurements in larger sizes due to wider neck and longer yoke). Knit 1 round where you increase 15-13-16-17-18-19 stitches evenly spaced = 75-75-80-85-90-95 stitches. Change to double pointed needles size 3.5 mm. Work rib in the round (= knit 2 / purl 3) for 3 cm. Loosely cast off with knit over knit and purl over purl. The sleeve measures approx. 35-33-32-31-30-28 cm from the division. Work the other sleeve in the same way. |
|||||||||||||||||||
Diagram explanations |
|||||||||||||||||||
|
|||||||||||||||||||
 |
|||||||||||||||||||
 |
|||||||||||||||||||
Have you finished this pattern?Tag your pictures with #dropspattern #rosewoodsweater or submit them to the #dropsfan gallery. Do you need help with this pattern?You'll find 25 tutorial videos, a Comments/Questions area and more by visiting the pattern on garnstudio.com. © 1982-2026 DROPS Design A/S. We reserve all rights. This document, including all its sub-sections, has copyrights. Read more about what you can do with our patterns at the bottom of each pattern on our site. |
|||||||||||||||||||


With over 40 years in knitting and crochet design, DROPS Design offers one of the most extensive collections of free patterns on the internet - translated to 17 languages. As of today we count 324 catalogues and 12245 patterns translated into English (UK/cm). 12245
We work hard to bring you the best knitting and crochet have to offer, inspiration and advice as well as great quality yarns at incredible prices! Would you like to use our patterns for other than personal use? You can read what you are allowed to do in the Copyright text at the bottom of all our patterns. Happy crafting!
Post a comment to pattern DROPS 201-2
We would love to hear what you have to say about this pattern!
If you want to leave a question, please make sure you select the correct category in the form below, to speed up the answering process. Required fields are marked *.